2-10
2.3.4 Power Management System
Battery
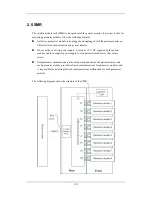
The patient monitor uses two chargeable lithium-ion batteries (11.1 V, 4500 mAh). The
battery compartment is located at the bottom of the patient monitor. The battery power is
supplied to the mother board via the battery interface board, and then to the power module.
NOTE
z
AC mains must be used when the CIS is connected with the patient monitor.
Battery Interface Board
The Battery interface board connects the batteries to the DC input terminal of the power
module via the mother board, implementing charging and discharging of the batteries and the
power board.
Power Module
The power module is located at the back of the patient monitor. The main part of the power
module is the power board, which contains charging & power management board, voltage
drop DC transforming board and voltage rise and drop DC transforming board.
The power module converts the input power into DC power supplies and then distributes
them to each component of the patient monitor. The input power comes from either the
batteries or an AC source. The patient monitor will run power from the AC source whenever
an AC source is available. If the AC source becomes unavailable, the patient monitor will
automatically switch to the battery power. This does not affect the monitor’s operating status.
The power module protects itself and the patient monitor by switching off AC input or DC
output in case of overcurrent, short circuit and overvoltage. The power module provides 3
DC outputs:
Outputs
Description
+
3.3 V
Power supply of the LCD, mother board, CPU board, DVI interface
board and integral module rack.
+
5.0 V
Power supply of the DVI interface board, recorder, CF storage card
board and USB_Hub board.
+
12 V
Power supply of the recorder, LCD inverter, integral module rack,
parameter modules, USB_Hub board and the CIS
Содержание BeneView T5
Страница 1: ...DPM 6 Patient Monitor Service Manual ...
Страница 2: ......
Страница 4: ...II FOR YOUR NOTES ...
Страница 12: ...6 FOR YOUR NOTES ...
Страница 16: ...1 4 FOR YOUR NOTES ...
Страница 32: ...2 16 FOR YOUR NOTES ...
Страница 68: ...3 36 FOR YOUR NOTES ...
Страница 80: ...4 12 FOR YOUR NOTES ...
Страница 118: ...5 38 4 Remove the module infrared communication backboard and disconnect all the cables from it ...
Страница 124: ...5 44 5 Unscrew the two M3 8 screws on the parameter board Then pull off the parameter board rightward as shown below ...
Страница 126: ...5 46 FOR YOUR NOTES ...
Страница 133: ...6 7 6 3 3 12 1 Screen Assembly with anti glare screen Exploded View ...
Страница 163: ...6 37 6 6 7 BIS Module Exploded View ...
Страница 180: ...6 54 FOR YOUR NOTES ...
Страница 204: ...A 14 FOR YOUR NOTES ...
Страница 205: ......


