© 2014 MIMAKI ENGINEERING CO.,LTD.
7.1.3
P.1
1
2
3
4
5
6
7
8
R.1.0
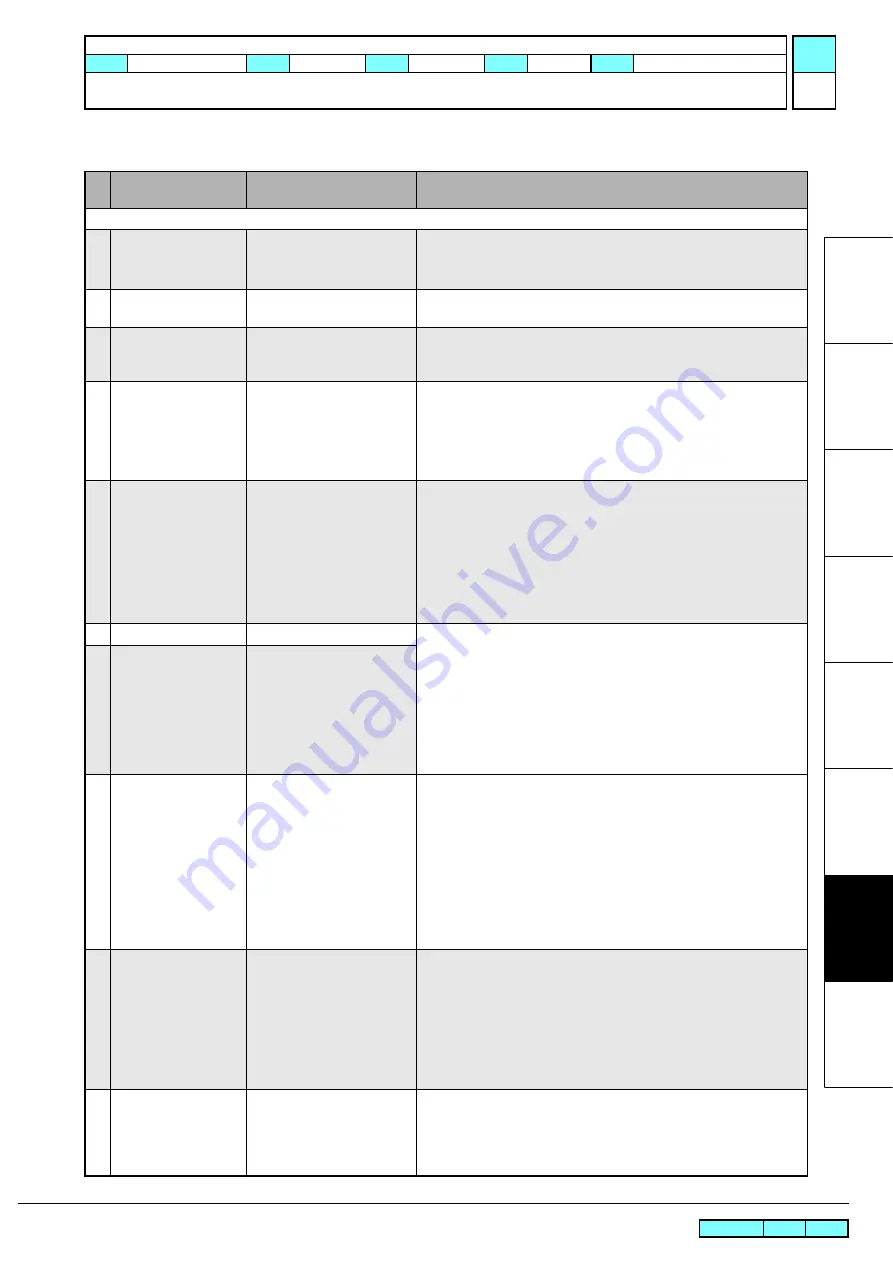
7.1.3 List of Warning Messages
List of Warning Messages (1/3)
No
.
Message
Cause
Corrective Measures
List of Ink Error (Checking by guidance)
1
WRONG INK IC
IC chip of Ink Cartridge
unreadable properly
1. Check the attached status of the chip.
2. Perform [#TEST][CHECK INK IC].
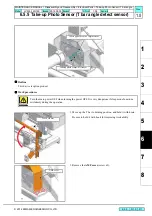
3. Replace the ID Contact PCB Assy. with a new one.
(
See 6.4.14)
2
INK TYPE
Type of inserted Ink Cartridge
is different.
1. Check the type of the ink cartridge.
3
INK COLOR
The color of Ink Cartridge
inserted is different from the
color to be set.
1. Check the color of the ink cartridge.
4
WRONG CARTRIDGE
An error occurred in the IC
chip information of the ink
cartridge.
The chip was used too much (exceeding the specified times).
1. Check whether the chip was also replaced when the pack was
replaced.
2. Check the W ink nozzle clogging and resolve it.
3. Replace the chip.
5
NO CARTRDG
No cartridge (Cartridge is not
installed)
(When the message is still displayed even after a Ink Cartridge is
charged;)
1. Execute and confirm [#TEST][SENSOR][CartridgeSensor](The
number meets the cartridge No.).
2. Check the peripheral and the assembly of the Presence Sensor.
3. Check the connection of the Presence Sensor and the End Sensor
4. .Replace the Cartridge with a new one
5. Replace the MAIN PCB with a new one.
(
See 3.3.1)
6
INK END
Ink end (No ink left)
(When the message is still displayed even after a new Ink Cartridge or an
empty Ink Cartridge is charged;)
1. Execute and confirm [#TEST][SENSOR][CartridgeSensor](The
number meets the cartridge No.)
.
2. Check the peripheral and the assembly of the End Sensor.
3. Check the connection of the Presence Sensor and the Near End
Sensor.
4. Replace the Cartridge with a new one
5. Replace the MAIN PCB with a new one.
(
See 3.3.1)
7
INK NEAR END
Ink near end (A small amount
of ink left)
8
EXPIRATION
Some ink cartridges are
expired.
1. Be careful that the expiration date is coming soon. You can use up to
the two month later
.
(If this message appears when a correct cartridge is set)
2. Check the clock time of the machine.
3. Check the assembly of the ID Contact PCB and the shape of the
contact plate, and execute the cleaning.
4. Check the connection of the ID Contact PCB.
5. Replace the Cartridge with a new one.
6. Replace the ID Contact PCB Assy. with a new one.
7. Replace the CART IO PCB with a new one.
9
EXPIRATION(1MONTH)
Some ink cartridges are
expired.
(One month has passed after
the expiration date.)
1. Be careful that the expiration date is coming soon. You can use up to
the next month. The red LED blinks.
(
If this message appears when a correct cartridge is set)
2. Check the assembly of the ID Contact PCB and the shape of the
contact plate, and execute the cleaning.
3. Check the connection of the ID Contact PCB.
4. Replace the Cartridge with a new one.
5. Replace the ID Contact PCB Assy. with a new one.
(
See 6.4.14)
10
EXPIRATION(2MONTH)
Some ink cartridges are
expired.
(Two months have passed
after the expiration date.)
Replace the cartridge with the warning.
MAINTENANCE MANUAL > Troubleshooting > Details on Errors and Malfunctions > List of Warning Messages
Model
JV300-130/160
Issued 2014.05.30 Revised
F/W ver
1.10
Remark
1.0
Rev.


