


396
Matrix NAVAN CNX200 System Manual
•
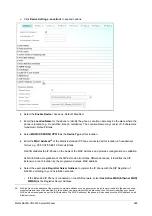
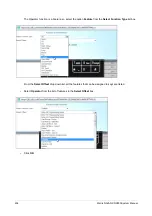
To take a second example, if you want to assign
Remote DND
to the key currently assigned
CO 1
key,
click the key. A dialog box will open.
•
In the
Select
Function Type
list box, select the option
SA Command
, as Remote DND is a System
Administrator (SA) Command.
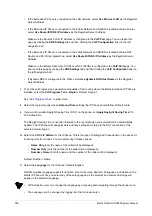
•
In the
Select Offset
box, select the option
Set DND for remote station
.
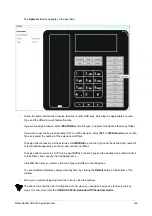
•
Click
OK
. The box closes. Remote DND feature will appear in abbreviated form as
R-DND
on the key
label.
Follow the same instructions to assign features to other DSS keys. Selecting the appropriate Function Type
and the Offset for each feature/ function.
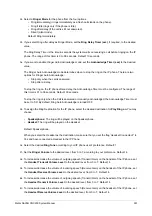
If you want to assign a feature, select
FEATURE
as the
Select Function Type
, and select the desired feature
in the
Select Offset
.
If you want to use the key to call a SIP extension, select
SIP Extension
as Function Type and select the
number of the extension as the Offset.
To assign direct access to a mobile trunk, select
MOBILE
as Function Type and the desired port number
1
or
2
as Offset
(depending on the availability of system variant).
To assign direct access to a SIP Trunk, select
SIP Trunk
as Function Type and the desired trunk number from
1
to
8
as Offset depending on availability. Also, specify the Call Appearance.
•
Click
OK
, each time you select a Function Type and Offset in the dialog box.
•
You can reinstate default key assignment any time, by clicking the
Default
button at the bottom of the
window.
•
When you complete assigning functions to keys, close the window.
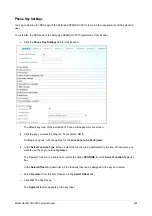
If you have completed the configuration of Extended SPARSH VP310 at
Location-1
, follow similar steps as
described above to configure other Extended SPARSH VP310 at the remaining two locations, if required.
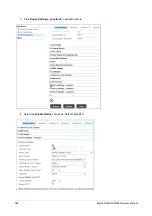
1.
Click
Device Settings - Location2
to expand options and configure similarly as described for the
Extended SPARSH VP310 present at Location-1.
2.
Click
Device Settings - Location3
to expand options and configure similarly as described for the
Extended SPARSH VP310 present at Location-1.
Содержание NAVAN CNX200
Страница 1: ...NAVAN CNX200 System Manual ...
Страница 2: ......
Страница 3: ...NAVAN CNX200 Office in a Box Solution for Small Businesses System Manual ...
Страница 26: ...16 Matrix NAVAN CNX200 System Manual NAVAN CNX226 3G NAVAN CNX226 2G2 ...
Страница 27: ...Matrix NAVAN CNX200 System Manual 17 NAVAN CNX208 3G2 NAVAN CNX244 3G2 ...
Страница 28: ...18 Matrix NAVAN CNX200 System Manual Application of NAVAN ...
Страница 118: ...108 Matrix NAVAN CNX200 System Manual To exit the SA mode click Logout on the top of the page ...
Страница 122: ...112 Matrix NAVAN CNX200 System Manual ...
Страница 128: ...118 Matrix NAVAN CNX200 System Manual ...
Страница 146: ...136 Matrix NAVAN CNX200 System Manual You can also view the DHCP Status by clicking the Status tab See DHCP ...
Страница 158: ...148 Matrix NAVAN CNX200 System Manual ...
Страница 268: ...258 Matrix NAVAN CNX200 System Manual ...
Страница 278: ...268 Matrix NAVAN CNX200 System Manual ...
Страница 296: ...286 Matrix NAVAN CNX200 System Manual ...
Страница 306: ...296 Matrix NAVAN CNX200 System Manual ...
Страница 323: ...Matrix NAVAN CNX200 System Manual 313 Default CPTG Type applied to each Region supported by NAVAN ...
Страница 397: ...Matrix NAVAN CNX200 System Manual 387 ...
Страница 419: ...Matrix NAVAN CNX200 System Manual 409 1 Click Device Settings Location1 to expand options ...
Страница 436: ...426 Matrix NAVAN CNX200 System Manual ...
Страница 530: ...520 Matrix NAVAN CNX200 System Manual ...
Страница 570: ...560 Matrix NAVAN CNX200 System Manual ...
Страница 712: ...702 Matrix NAVAN CNX200 System Manual Page Zones For information on how to create and assign Page Zones see Paging ...
Страница 848: ...838 Matrix NAVAN CNX200 System Manual ...
Страница 852: ...842 Matrix NAVAN CNX200 System Manual ...
Страница 864: ...854 Matrix NAVAN CNX200 System Manual To generate the detailed test report click the Generate Test Report button ...
Страница 900: ...890 Matrix NAVAN CNX200 System Manual Pick up the handset Dial 1070 Replace handset ...
Страница 903: ...Matrix NAVAN CNX200 System Manual 893 For SLT Users When dialed extension is busy Dial 4 on busy tone ...
Страница 912: ...902 Matrix NAVAN CNX200 System Manual Exit System Administrator mode ...
Страница 930: ...920 Matrix NAVAN CNX200 System Manual Replace handset ...
Страница 994: ...984 Matrix NAVAN CNX200 System Manual You may log out of Jeeves ...
Страница 1072: ...1062 Matrix NAVAN CNX200 System Manual To Retrieve Message Wait Pick up the handset Dial 1077 ...
Страница 1086: ...1076 Matrix NAVAN CNX200 System Manual To resume outgoing speech Press Flash Key Dial 1052 ...
Страница 1114: ...1104 Matrix NAVAN CNX200 System Manual For SLT Users When dialed extension is busy Dial 5 on Busy Tone ...
Страница 1155: ...Matrix NAVAN CNX200 System Manual 1145 Dial New User Password You get confirmation tone Replace handset Extended IP Phone ...
Страница 1216: ...1206 Matrix NAVAN CNX200 System Manual ...
Страница 1308: ...1298 Matrix NAVAN CNX200 System Manual The End IP Address ...
Страница 1310: ...1300 Matrix NAVAN CNX200 System Manual ...
Страница 1356: ...1346 Matrix NAVAN CNX200 System Manual NAVAN Features tested on IP Phones of different Brands ...
Страница 1357: ...Matrix NAVAN CNX200 System Manual 1347 ...
Страница 1366: ...1356 Matrix NAVAN CNX200 System Manual ...
Страница 1374: ...1364 Matrix NAVAN CNX200 System Manual ...


