background image

284

Matrix NAVAN CNX200 System Manual

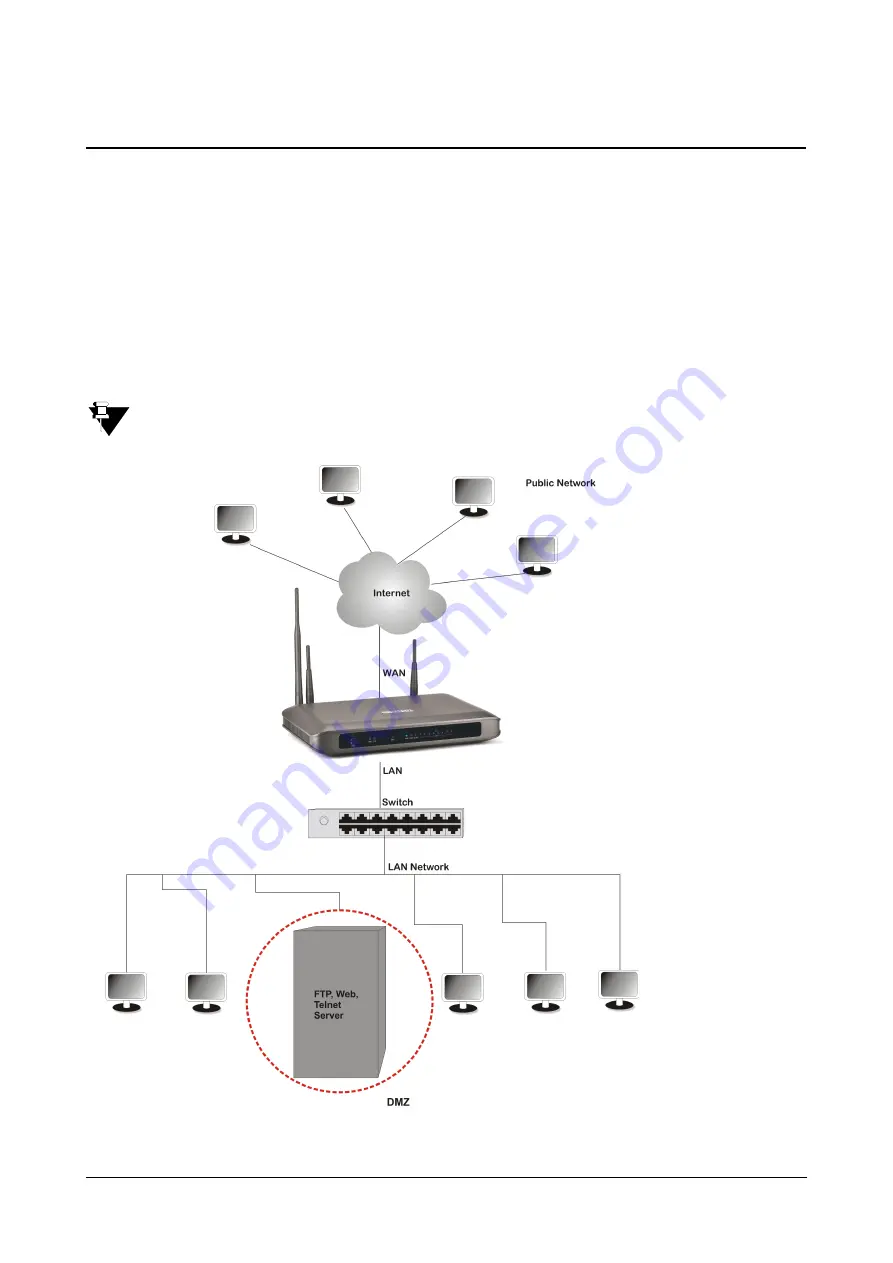
Demilitarized Zone (DMZ)

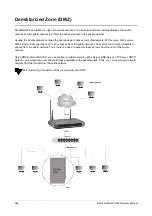
Demilitarized Zone (DMZ) is a type of network security. It is a small sub-network residing between the private 
network and the public network to protect the devices located in the private network. 

Usually, the private network contains the host devices, mostly servers (Mail servers, FTP servers, VoIP servers, 
Web servers) that generally need to be accessed from the public network. These servers are most vulnerable to 
attacks from the public network. Thus, there is a need to separate these servers from the rest of the private 
network. 

Using DMZ feature of NAVAN, you can configure multiple servers—Web Server, DNS Server, FTP Server, SMTP 
Relays—on a single computer and make these available to the general public. Thus, you can secure your private 
network from the threats from the public network.

Port Forwarding, if enabled, will be given priority over DMZ. 

Содержание NAVAN CNX200

Страница 1: ...NAVAN CNX200 System Manual ...

Страница 2: ......

Страница 3: ...NAVAN CNX200 Office in a Box Solution for Small Businesses System Manual ...

Страница 4: ...hile every precaution has been taken in the preparation of this system manual Matrix ComSec assumes no responsibility for errors or omissions Neither is any liability assumed for damages resulting from the use of the information contained herein Neither Matrix ComSec nor its affiliates shall be liable to the purchaser of this product or third parties for damages losses costs or expenses incurred b...

Страница 5: ...28 Wireless LAN WLAN Connectivity 31 Connecting Single Line Telephones 32 Connecting SIP Extensions 33 Extended IP Phone Mobile Client Operation 66 Installing the Voice Mail System 96 Starting Up NAVAN 97 Configuration Modes 99 Configuration Tools 100 System Configuration using the Web based GUI 101 System Configuration using Telephone 109 Configuring NAVAN 113 Using the Wizard 114 Using Selective...

Страница 6: ...y Table 317 Configuring Extensions 321 Extensions and Feature Codes 321 SLT Extensions 324 SIP Extensions 347 Configuring Matrix SPARSH VP248 Extended IP Phone as SIP Extension 374 Configuring Matrix SPARSH VP310 Extended IP Phone as SIP Extension 388 Configuring Matrix SPARSH VP330 Extended IP Phone as SIP Extension 397 Configuring Matrix SPARSH Mobile Soft Phone Clients as SIP Extension 407 Conf...

Страница 7: ...93 Page Zones 702 PIN Dialing 703 Station Message Detail Recording SMDR 707 Station Message Detail Recording Storage 708 Station Message Detail Recording Online 713 Station Message Detail Recording Report 720 Station Message Detail Recording Posting 737 Station Message Detail Recording Backup 754 SMPP Server 757 System Parameters 761 System Timers and Counts 769 Time Table 775 VoIP Port 778 Digest...

Страница 8: ...Features 961 Class of Service CoS 963 Conference Dial In 967 Conference 3 Party 974 Conference Multiparty 977 Conflict Dialing 982 Conversation Recording 985 Customer Name 988 Day Night Mode 989 Dial By Name 992 Dialed Number Directory 995 Distinctive Rings 997 Do Not Disturb DND 1001 DSS Call Pick Up 1007 Dynamic Lock 1009 Emergency Conference 1016 Emergency Dialing 1020 Emergency Detection and R...

Страница 9: ... Reservation 1138 User Absent Present 1142 User Password 1144 Video Call 1146 Voice Help 1148 Voice Message Applications 1149 Walk In Class of Service 1165 Voice Mail Features 1171 Alarms and Reminders 1171 Broadcast Message 1177 Call Transfer Types 1178 Dial by Extension Number 1180 Dial By Name 1181 Email Based Notification 1183 Voice Mail Notification via Call 1185 Forwarding Messages 1188 Acce...

Страница 10: ...il Memory Status 1281 CO Status 1286 CTI Status 1287 Mobile Status 1288 VoIP Status 1291 SIP Trunk Status 1292 SMPP Server Status 1293 SIP Extension Status 1294 DHCP 1295 Wireless LAN 1296 VPN Connections 1297 Multi VLAN 1299 Appendix 1301 Technical Specifications 1301 Voice Mail System Prompts 1308 SA Commands 1317 Features at a Glance 1321 Default Area Code Table for the Region USA 1328 Allowed ...

Страница 11: ...and support the NAVAN System Engineers are persons who customize the system configuration to meet the requirements of the organization users It is assumed that they are experienced in installing similar products are familiar with telecom wiring technology how it works and the various technical terms and functions associated with it The SE must have undergone training in the configuring NAVAN No on...

Страница 12: ... step by step instructions for installing connecting and powering the system Configuring NAVAN contains description of the different tools and options available to configure NAVAN Configuring Matrix NAVAN for the Data Applications it provides detailed description on how to configure the LAN WAN Wireless LAN Virtual Private Network Firewall and Security parameters Configuring Matrix NAVAN for the V...

Страница 13: ... step by step format as follows Each step its outcome and indication notification wherever they occur have been described Notices The following symbols have been used for notices to draw your attention to important items Important to indicate something that requires your special attention or to remind you of something you might need to do when you are using the system Caution to indicate an action...

Страница 14: ...to another extension of the NAVAN Internal numbers same as extension numbers Mobile Extension A mobile landline phone used as a remote extension of NAVAN You can access all the features of an extension of NAVAN from the mobile landline phone Port the physical interfaces on the modules for trunk lines and extension lines Service Provider the providers of telecom network lines Internet POTS PSTN GSM...

Страница 15: ...astructure so that they can lower operational costs and enhance collaboration with customers and suppliers Key Features VoIP Telephony Get the power of business class telephony features similar to large business systems such as mobility teleworking voice mail auto attendant shared lines remote extensions and web based management and lot more Data Networking Consolidate wired and wireless data netw...

Страница 16: ...ming anywhere in the office GSM 3G Connectivity Benefit from the omni present GSM 3G mobile networks to make cellular voice VoIP calls send SMS and surf high speed 3G Internet over mobile phones laptops and PDAs Virtual Private Networking Extend secure access to business applications and information with central offices remote workers and partners Standards based SSL IPSec PPTP L2TP VPN tunneling ...

Страница 17: ... Caller ID Presentation DTMF FSK Programmable Dialing method Pulse Tone with programmable Pulse Ratio DTMF On Off period Programmable Speech Tx Gain Programmable Speech Rx Gain Programmable Disconnect Tone Sensing Programmable Flash Timer Programmable Loop Current The Mobile Interface The Mobile Interface enables the NAVAN to be connected to GSM UMTS network operators worldwide NAVAN s Mobile Inte...

Страница 18: ...oIP Interface are 8 SIP Trunks for Proxy as well as Peer to Peer non Proxy calls Up to 24 SIP Extensions Standard IP Phones and Matrix Extended IP Phones Supports 12 VoIP channels that can provide 6 concurrent VoIP calls Selectable Network Assignment Connection Type Static IP DHCP PPPoE Selectable DNS Automatic and Static Dynamic DNS for client STUN TCP and UDP NAT Keep Alive Symmetric RTP Selecti...

Страница 19: ...the time of the day Different voice greetings for different time zones Special greetings for holidays Call transfer types Transfer to Mailbox Transfer immediately Transfer when extension rings Transfer when extension answers Transfer when extension permits Dial by extension Dial by name Personalized greetings for each mailbox Individual mailbox size Call forward to Voice Mail Message forwarding Di...

Страница 20: ... uninterrupted Internet Connectivity You can connect NAVAN to the Public or Private network depending on your installation scenario Data Interface NAVAN supports the data interface that offers the following features Virtual Private Networks for communication between multiple offices making communication cheaper but secure Multiple VPNs can be created using different protocols Port Forwarding Trigg...

Страница 21: ...figurations In built 8 SIP Extensions To connect 16 more extensions you need to purchase two IP8 licenses The SMS Gateway feature of NAVAN requires an additional license NAVAN CNX244 Interfaces 4 CO Trunks 4 SLT Ports 8 SIP Trunks 8 SIP Extensions 8 LAN Switch Ports Voice Mail System requires a license ...

Страница 22: ...ual NAVAN CNX226 2G Interfaces 2 CO Trunks 6 SLT Ports 8 SIP Trunks 8 SIP Extensions 8 LAN Switch Ports 2G GSM Module Voice Mail System requires a license NAVAN CNX226 3G Interfaces 2 CO Trunks 6 SLT Ports 8 SIP Trunks 8 SIP Extensions ...

Страница 23: ...LAN Switch Ports 3G GSM Module Voice Mail System requires a license NAVAN CNX226 2G2 Interfaces 2 CO Trunks 6 SLT Ports 8 SIP Trunks 8 SIP Extensions 8 LAN Switch Ports Two 2G GSM Modules Voice Mail System requires a license NAVAN CNX208 3G2 ...

Страница 24: ...ail System requires a license NAVAN CNX244 3G2 Interfaces 4 SLT Ports 4 CO Trunks 8 SIP Trunks 8 SIP Extensions 8 LAN Switch Ports 2 3G GSM Modules Voice Mail System requires a license The 2G variants of NAVAN will support Voice calls and SMS only The 3G variants of NAVAN will support Voice calls SMS and will provide Internet access ...

Страница 25: ...Matrix NAVAN CNX200 System Manual 15 Hardware Overview Illustrated below are design of the enclosure and the position of connectors on each variant of NAVAN NAVAN CNX244 NAVAN CNX226 2G ...

Страница 26: ...16 Matrix NAVAN CNX200 System Manual NAVAN CNX226 3G NAVAN CNX226 2G2 ...

Страница 27: ...Matrix NAVAN CNX200 System Manual 17 NAVAN CNX208 3G2 NAVAN CNX244 3G2 ...

Страница 28: ...18 Matrix NAVAN CNX200 System Manual Application of NAVAN ...

Страница 29: ...push button phone Feature phone or Cordless phone A fax machine as required to connect to SLT port For the FXO ports arrange for one or more active Analog two wire trunk lines as required For the Mobile ports a SIM card to test mobile network connectivity if GSM UMTS module is present SIP Account information to be configured in the system to test SIP calls Any standard SIP Phone or Matrix Extended...

Страница 30: ...ork coverage available For more details refer Protecting Yourself and NAVAN Cables Select standard good quality telephone cables with 0 5 mm conductor diameter for the internal as well as over head cabling Use twisted pair wires to reduce interference Ethernet cables with RJ45 connectors Use separate cable conduits for electrical and telephone cables The length of the cables must not be too long T...

Страница 31: ...e clamp Assembly Optional GSM Antenna Cable with RJ45 connector on one end 2 meters length for WAN Power Adaptor 24VDC 2Amp AC Power Code for AC DC Adaptor Indian Country specific for export Two Wall mount Screws Wood Screw 7 30 CSK Slotted Head Two Screw Grips for Wall mount Screw Wood Screw 7 30 Warranty Card Set Wall mounting template Quick Start Printed Copy CD NAVAN CNX200 System Manual NAVAN...

Страница 32: ...e ground where they may be trampled upon or get damaged by entangling with feet or pressure from other heavy objects Power Supply This product should be operated with proper supply voltage The Adaptor 24VDC 2 Amp provided with NAVAN works with input voltage ranging between 100 240VAC Protect the system from heavy voltages from the mains NAVAN has trunk and extension interfaces So there are chances...

Страница 33: ...ay touch dangerous voltage points or short out parts which may result in fire or electric shock Do not overload wall outlets and extension cords as this can result in the risk of fire or electric shock This product is equipped with a plug having a third ground pin which fits only into a grounding type outlet This is a safety feature If you are unable to insert the plug into the outlet ask an elect...

Страница 34: ...its a distinct change in performance Disposal This product must be disposed according to the national laws and regulations prevailing in the country where it is installed Warning for RF Safety The product complies with RF exposure guidelines as per standard FCC 47 CFR part 2 We recommend the following precautions Make sure that the RF Antenna is installed at least 20cm away from other electronic a...

Страница 35: ...res of networks across the world The number of FXO Ports supported by the configurations of NAVAN are Use standard good quality twisted wire pair telephone cables with RJ11 plugs to connect the FXO ports of NAVAN to the Trunk Lines from your exchange NAVAN CNX244 4 FXO Ports NAVAN CNX226 2G 2 FXO Ports NAVAN CNX226 3G 2 FXO Ports NAVAN CNX226 2G2 2 FXO Ports NAVAN CNX208 3G2 Not Supported NAVAN CN...

Страница 36: ...PIN on the SIM Get the SIM Card from the GSM service provider of your choice ready Protect the SIM card from unauthorized use with a Personal Identification Number PIN on the SIM in consultation with the customer owner of the SIM SIM PIN Protection To enable SIM PIN protection get a mobile handset Insert the SIM into the mobile handset from the mobile handset enable PIN Protection change the SIM P...

Страница 37: ...h the protruded portion of the SIM backwards again repeat the same steps to insert the other SIM card Connect the antenna to the antenna connector The UMTS Mobile Ports of NAVAN also provide Wireless WAN Interface If you want to use wireless WAN over the Mobile port you must have a 3G module installed in the system and Internet services activated on the SIM Switch On power supply if you have finis...

Страница 38: ...and regulations when installing and using this product Before you connect the system to WAN we recommend that you first connect a computer to the Ethernet LAN Port of NAVAN configure the parameters and then connect to WAN You can connect NAVAN to WAN either over Ethernet WAN Port or over Mobile Ports Wireless WAN or USB Dongle While several installation scenarios are possible only three most commo...

Страница 39: ... into the Ethernet WAN Port of NAVAN and the other end into the LAN Switch Hub Wireless WAN NAVAN provided WWAN connectivity through the 3G GSM or the USB Dongle For WWAN connectivity using the GSM make sure that You have installed a 3G variant of NAVAN a SIM is present in the Mobile port Internet Services are activated on the SIM ...

Страница 40: ...30 Matrix NAVAN CNX200 System Manual For WWAN connectivity using the USB Dongle make sure that You have connected a USB Dongle Internet Services are activated ...

Страница 41: ...vity NAVAN may function as a Wireless LAN Access Point AP for the local network providing wireless clients with Internet and LAN access The wireless setup requires configurations in NAVAN as well as the wireless clients For more details see Configuring Wireless LAN ...

Страница 42: ...nstruments You may also connect a Fax machine if required Use SLTs equipped with a Flash key as several of the features and facilities of the NAVAN require you to press Flash If any of the SLTs you have selected does not have a Flash key tap the Hook switch of the phone to dial Flash 2 Use standard twisted wire pair the cables of good quality with RJ11 plugs to connect the analog single line telep...

Страница 43: ...t SPARSH VP310 with NAVAN see Connecting SPARSH VP310 as Extended SIP Extension SPARSH VP3306 is a proprietary Extended IP Phone with graphical touch screen user interface This feature rich SIP based phone support most features and functions of the proprietary digital key phones of NAVAN except the following features Trunk Call Waiting Hot Desking To connect SPARSH VP330 with NAVAN see Connecting ...

Страница 44: ... the Extended IP Phone on the public network as SIP Extension you must configure the Registrar Server Address the Registrar Server Port the SIP ID Authentication ID and Password in the SIP device If NAVAN is connected to a Private Network Behind the NAT Connect Extended IP Phone or any Open SIP phone to the LAN Switch You may also register any SIP device Extended IP Phones Mobile Soft phone client...

Страница 45: ...ireless WAN connectivity through 3G module or a USB Dongle Connect Extended IP Phone or any Open SIP Phone to the LAN Switch You may also register any SIP device Extended IP Phones Mobile Soft phone clients or Open SIP phones on the public network as SIP Extension ...

Страница 46: ...the Extended IP Phone then select DHCP Option 224 Data Type as String and program the Server Address and SPARSH Port in the given format IP_Address Port in the 3rd party DHCP server Server Address can be either LAN or WAN IP Address Domain Name of NAVAN depending on the network installation scenario Assign an extension number to the Extended IP Phone on the Extensions and Feature Codes page under ...

Страница 47: ...ews fitting into the Keyhole slots Reverse the handset wall mount tab to make sure the handset remains intact when you mount the phone Push the handset wall mount tab upwards to remove it from the slot Rotate it 180 degrees clockwise and push it downwards into the slot When you mount the phone on a desk You can attach the Foot Stand in two ways as illustrated below Foot Stand attached at 30 Angle ...

Страница 48: ...dset to the Phone body Plug the long straightened end of the phone cord into the handset jack at the bottom of the phone marked with the handset symbol Plug the other short straight end of the phone cord into the jack at the bottom of the handset 4 If you want to use a Headset not supplied with your phone you may plug any standard stereo headset with 2 5mm single connector into the headset jack wi...

Страница 49: ...ed with this phone to connect the PC Port of the phone with LAN Port of the computer 7 Plug the connector of the Power Adaptor in to the power jack at the back of the phone7 Use only the adaptor provided with the phone to prevent any damages that may arise from the use of other adaptors If you want to use Power over Ethernet PoE ensure that your LAN supports PoE Supply power through an 802 3af con...

Страница 50: ...equence All keys with LED including the Speaker key and the Ringer LED will glow The LCD display will light up and the following message will appear on it as the phone boots As soon as the Loading message appears on the phone display press key Select the firmware Extended SIP Move the cursor by pressing the Down navigation key V Welcome to Matrix Booting Welcome to Matrix Loading Select the firmwa...

Страница 51: ...ll prompt you to change Network settings Press Enter key to select No or wait for three seconds If you want to change the Network Settings press the Enter key Detailed instructions for changing the Network Settings of the phone are provided at the end of this topic See Network Settings at the end of this topic Select the firmware Standard S IP Extended S IP Welcome to Matrix L oading V05R01_ExtSIP...

Страница 52: ...les from NAVAN As the phone downloads the configuration files the file names will appear one by one On successful download of all configuration files the phone attempts to register with NAVAN On successful registration the phone will display the current day date and time the extension number and name assigned to the Extended IP Phone SPARSH VP248 DHCP discovery T r y i n g f o r C o n f i g f i le...

Страница 53: ...erscore that appears under the first letter of the first option in the menu To make a selection in the menu you must move the cursor in the desired direction using the Up Down Forward and Back key When the cursor is at the desired position press Enter key to make a selection Accessing Network Settings You can access the Network Settings of the Extended IP Phone in any of the following stages 1 Dur...

Страница 54: ...own Up key to reach the desired network parameter and press Enter key to select and change the settings You can configure all network parameters described below except the MAC Address 1 2 3 4 5 6 7 8 9 0 abc def ghi jkl mno pqrs tuv wxyz Voice Mail Call Back Cancel Forward DND Names Mute Conference Transfer Hold Release Redial CA04 CA03 CA02 CA01 1 2 3 4 5 6 7 8 9 0 abc def ghi jkl mno pqrs tuv wx...

Страница 55: ...er the Subnet Mask to be applied on the phone by pressing the digit keys To enter the dot period in the IP Address press the digit key 1 twice Gateway Address If you select Static as Connection Type enter the Gateway Address here This is the IP Address of the LAN Port of the Router DNS Server If you select Static as Connection Type select the DNS Server option Static and configure the DNS Address ...

Страница 56: ... you worrying for related parameters configuration While registering the Extended IP Phone with NAVAN if you use any 3rd party DHCP server in your LAN other than NAVAN for assigning IP Address to the Extended IP Phone then select DHCP Option 224 Data Type as String and program the Server Address and SPARSH Port in the given format IP_Address Port in the 3rd party DHCP server Server Address can be ...

Страница 57: ...alid range 0 7 Default 6 Select PC VLAN CoS to add VLAN header to all packets entering the PC Port and leaving the LAN port of the phone Default Disabled To configure PC VLAN COS select Enable Select VLAN ID and enter the same ID as you have assigned to the VLAN in which the computers are connected Valid range 0 4094 Default 1 Select CoS and define the Layer 2 CoS priority bits Valid range 0 7 Def...

Страница 58: ...r on Network Status and press the Enter key The Network Status submenu appears Use the Down Up key to view the status of the various network parameters The status of the following parameters appear on your display as you scroll MAC This is the MAC Address of the phone IP The current IP Address assigned to the phone MASK The current Subnet mask assigned to the phone GW The current Gateway IP Addres...

Страница 59: ...on While registering the Extended IP Phone with NAVAN if you use any 3rd party DHCP server in your LAN other than NAVAN for assigning IP Address to the Extended IP Phone then select DHCP Option 224 Data Type as String and program the Server Address and SPARSH Port in the given format IP_Address Port in the 3rd party DHCP server Server Address can be either LAN or WAN IP Address Domain Name of NAVA...

Страница 60: ...nt the phone with the screws fitting into the Keyhole Slot Reverse the handset wall mount tab to make sure the handset remains intact when you mount the phone Push the handset wall mount tab upwards to remove it from the slot Rotate it 180 degrees clockwise and push it downwards into the slot When you mount the phone on a desk you can attach the Foot Stand in two ways as illustrated in the followi...

Страница 61: ...o the Phone body Plug the long straightened end of the Spring Cord into the handset jack on the left side panel of the phone marked with the handset symbol Plug the other short straight end of the Spring Cord into the jack at the bottom of the handset If you want to use a Headset not supplied with your phone you may plug a headset with a 3 5 mm single connector into the headset jack headset jack w...

Страница 62: ... the Power Adapter in to the power jack at the back of the phone10 Use only the adapter provided with the phone to prevent any damages that may arise from the use of other adapters If you want to use Power over Ethernet PoE ensure that your LAN supports PoE Supply power through an 802 3af connection on the LAN Port of the phone Do not connect the Adapter NAVAN does not support PoE on its LAN Ports...

Страница 63: ...t loading the Extended IP Phone Firmware It will display current firmware being loaded After loading the firmware the phone will prompt you to change Network settings Wait for a few seconds If you want to change the Network Settings press the Enter key Detailed instructions for changing the Network Settings of the phone are provided at the end of this topic See Network Settings at the end of this ...

Страница 64: ...by one On successful download of all configuration files the phone attempts to register with NAVAN On successful registration the phone will display the current day date and time the extension number and name assigned to the Extended IP Phone Network Settings You can change the network settings of the Extended IP Phone Press the Down key when the phone is in idle state To move the cursor and scrol...

Страница 65: ...n the phone prompts you to change the network settings after loading the firmware You must press the Enter Key to select Yes and access network settings When the phone is making Network discovery downloading configuration files attempting registration You must press the Down key to access network settings When the phone is in idle state You must press the Down key to access the Network Settings Co...

Страница 66: ...e digit keys To enter the dot period in the IP Address press the digit key 1 twice Gateway Address If you select Static as Connection Type enter the Gateway Address here This is the IP Address of the LAN Port of the Router DNS Server If you select Static as Connection Type select the DNS Server option Static and configure the DNS Address If you select DHCP or PPPoE as Connection Type and your Inte...

Страница 67: ...you worrying for related parameters configuration While registering the Extended IP Phone with NAVAN if you use any 3rd party DHCP server in your LAN other than NAVAN for assigning IP Address to the Extended IP Phone then select DHCP Option 224 Data Type as String and program the Server Address and SPARSH Port in the given format IP_Address Port in the 3rd party DHCP server Server Address can be e...

Страница 68: ... Select PC VLAN CoS to add VLAN header to all packets entering the PC Port and leaving the LAN port of the phone Default Disabled To configure PC VLAN COS select Enable Select VLAN ID and enter the same ID as you have assigned to the VLAN in which the computers are connected Valid range 0 4094 Default 1 Select CoS and define the Layer 2 CoS priority bits Valid range 0 7 Default 0 PCAP To capture p...

Страница 69: ...key to access the Network Settings Again press the Down key to select Network Status and press the Enter key The Network Status submenu appears Use the Down Up key to view the status of the various network parameters The status of the following parameters appear on your display as you scroll MAC This is the MAC Address of the phone IP The current IP Address assigned to the phone MASK The current S...

Страница 70: ...any 3rd party DHCP server in your LAN other than NAVAN for assigning IP Address to the Extended IP Phone then select DHCP Option 224 Data Type as String and program the Server Address and SPARSH Port in the given format IP_Address Port in the 3rd party DHCP server Server Address can be either LAN or WAN IP Address Domain Name of NAVAN depending on the network installation scenario Assign an extens...

Страница 71: ... with the screws fitting into the Keyhole slots Reverse the handset wall mount tab to make sure the handset remains intact when you mount the phone Push the handset wall mount tab upwards to remove it from the slot Rotate it 180 degrees clockwise and push it downwards into the slot When you mount the phone on a desk you can attach the Foot Stand in two ways at 35 Angle or at 50 Angle ...

Страница 72: ...ith your phone you may plug a headset with a 3 5 mm single connector into the headset jack headset jack with the symbol on the left side panel of the phone OR You may plug a headset with an RJ9 connector into the headset port on the side panel of the phone marked with the symbol Connect the LAN Port of SPARSH VP330 to the IP Network A DSL Modem Router or LAN Switch using the Ethernet Cable OR Conn...

Страница 73: ...n 802 3af connection on the LAN Port of the phone Do not connect the Adapter Plug the Power Adapter into a power outlet Switch ON power supply When you power the phone the boot process will be initiated in the following sequence All keys with LED including the Speaker key and the Ringer LED will glow The LCD display will light up and the following message will appear on it as the phone boots The L...

Страница 74: ...Fi for connectivity press Settings Refer to the SPARSH VP330 User Guide To change the Network Settings of the phone and configure the network parameters To use WiFi for connectivity and configure its parameters On getting the IP Address and Server Address the phone initiates Auto Configuration to download the configuration files from NAVAN The Configuring the phone message appears on the phone ...

Страница 75: ...NAVAN The Registering the phone message appears on the phone display On successful registration the Home screen appears The phone will register successfully only if the SIP Extension parameters in NAVAN have been correctly configured as per your installation scenario For more details please refer the SPARSH VP330 User Guide ...

Страница 76: ...ch VoIP Voice over Internet Protocol phone providing voice communication over IP network It looks and works like any normal phone having all the traditional phone features such as redial speed dial call transfer call hold call forward conference and so forth It allows you to make and receive calls using the handset the headset if connected and the speaker The models of SPARSH VP248 are SPARSH VP24...

Страница 77: ...listed below Abbreviated Dialing Auto Answer Call Chaining Call Cost Display Call Duration Display Call Mute Dialed Number Directory Directory Dialing by Name Dynamic Lock Forced Answer Keypad Lock Message Paging Off Hook Alert Room Monitor User Status Presence SPARSH VP248 does not support the following features Trunk Call Waiting Hot Desking ...

Страница 78: ...x 24 characters 1 2 3 4 5 6 7 8 9 0 abc def ghi jkl mno pqrs tuv wxyz CLIR Hotline SIP2 SIP1 CA4 CA3 CA2 CA1 Menu Sat 01 05 30 1 2 3 8 10 6 5 7 9 11 12 4 Voice Mail Call Back Cancel Forward DND Names Mute Conference Transfer Hold Release Redial Dial Pad Speaker key with LED Volume decrease key Handset Programmable feature keys 4P4C Spring Cord 7 8 9 10 11 12 Date and Time Ringer LED Touch sense fe...

Страница 79: ... 24 characters LCD display full duplex cap sense feature keys Touch Keys No No Touch screen operation No No LCD with backlight Yes Yes Headset Interface Yes Yes Ringer Lamp LED Yes Yes Speaker Phone Full duplex Full duplex Feature Model SPARSH VP248S SPARSH VP248P ...

Страница 80: ...one Settings option of the SPARSH VP248 Phone Menu Ringer LED The Ringer LED indicates incoming internal and external calls The LED Cadence will match with the Ring Cadence of the incoming internal external call The Ringer LED changes color according to the type of call as described in the table below Type of Call Cadence Internal Call Short very slow 750ms ON 2250ms OFF External Call Double 400ms...

Страница 81: ...the table given below These keys are programmable However as you cannot change the labels avoid programming these keys Refer the Phone Key Settings under Configuring Matrix Extended Phone Settings using Jeeves topic for instructions on programming these keys Direct Station Selection DSS Keys These are 16 programmable keys that can be assigned to Stations and Trunks and important or frequently acce...

Страница 82: ...he state of other Extensions Trunks For example if the LED of the DSS key assigned to Extension 201 is glowing Red continuously it means Extension 201 is busy with another Extension or Trunk Violet indicates the state of the trunk you are in speech with For example when you are in speech on an outgoing call on Trunk 1 the LED of the DSS Key assigned to Trunk 1 will be continuously ON When you put ...

Страница 83: ...haracters and The dial pad is used for dialing numbers of extensions external parties and for dialing the programming and feature access codes Speaker Key The speaker key sets the phone in Speaker mode for hands free operation The Speaker key is programmable you can program any other feature function on this key Speaker Key LED The Speaker Key on SPARSH VP248 is equipped with a single color LED wh...

Страница 84: ...ments of each user group these key maps can be customized to match the exact requirement of individual users For instructions on customizing the Key Maps see Phone Key Settings under Configuring Matrix Extended Phone Settings using Jeeves Matrix Extended IP Phone SPARSH VP248 Key Template default By using Key Templates you can prepare and assign common key maps to all or as many Extended IP Phones...

Страница 85: ...l Directory Call Forward To set and cancel Call Forward Busy Call Forward No Reply Call Forward Unconditional and Follow Me Dynamic Lock To change the Toll Control level of the phone User Status To set User Present or User Absent Keypad Lock To lock the keypad of the phone when the keypad is locked the features Call Log Contact Call Forward Dynamic Lock User Status DND Call Cost Display Hotline Al...

Страница 86: ...et Call Waiting Tone is played and the LCD displays the Caller ID of the station trunk Call Waiting Tone is played and the LCD displays the Caller ID of the station trunk Call Waiting Tone is played and the LCD displays the Caller ID of the station trunk Second call indication when the first call is on the Speaker Second call indication when the first call is on the Handset Second call indication ...

Страница 87: ...n tight integration with NAVAN IP PBX systems for speed of operations and better workforce collaboration Key Features 2 Line LCD with Backlit Fixed Function Keys With LED Voice Mail Mute Do Not Disturb Forward Logs Speaker Fixed Function Keys Without LED Hold Conference Contacts Transfer Superior Voice Quality with HD Audio Full Duplex Speaker Phone PC and LAN Ethernet Ports Power over Ethernet IE...

Страница 88: ...H VP310 if it is the Operator phone SPARSH VP310 Front View LCD Display The LCD display of SPARSH VP310 is backlit The LCD backlight can be turned on and off as well as adjusted for contrast and brightness from the Phone Settings of the SPARSH VP310 Phone Menu Ringer LED 1 Ringer LED 2 LCD Screen 3 Navigation Keys 4 Fixed Function Keys 5 DSS Direct Station Selection Keys 6 Digit Keys Dial Pad Keys...

Страница 89: ...vigating the Menu is the Forward key used to move the cursor is the Back key used to move the cursor return from the Sub menu to the Main Menu is the Cancel key used to exit a menu Feature Keys There are 9 Feature keys assigned to important or frequently accessed features of NAVAN Type of Call Cadence Internal Call Short very slow 750ms ON 2250ms OFF External Call Double 400ms ON 200ms OFF 400ms O...

Страница 90: ...s and Trunks The LED of DSS keys assigned to Extensions Trunks glow in three colors to indicate status of the call event on the Extensions Trunks and on the Extended IP Phone Thus the status of the Extended IP Phone user s own Extension as well as that of the other Extensions i e Extended IP Phones SLTs and the status of Trunk lines are indicated by the LED of the DSS keys assigned to those Extens...

Страница 91: ... assigned to that key requires LED For example Call Pick Up this feature does not require an LED So when a DSS key is assigned to this feature the LED of the key remains inactive when Call Pick Up is accessed A feature like Auto Redial requires an LED to show that it has been set or canceled So the LED of the DSS key to which the Auto Redial feature has been assigned will glow Red when Auto Redial...

Страница 92: ...ch while talking and to decrease the Ringer volume when the phone is ringing Headset Connectivity The SPARSH VP310 provides two Headset interfaces a 3 5mm Audio Jack and an RJ9 connector on the left side panel of the phone body So you can use any stereo headset of standard make with a 3 5 mm single connector or a stereo headset with an RJ9 connector You can also program any of the DSS keys to func...

Страница 93: ... Call Logs To view call history of internal and external Missed Answered and Dialed calls You can also edit numbers in the call logs and store them in the Personal Directory Call Forward To set and cancel Call Forward Busy Call Forward No Reply Call Forward Unconditional and Follow Me Dynamic Lock To change the Toll Control level of the phone User Status To set User Present or User Absent Keypad L...

Страница 94: ...under SIP Extensions See SIP Extensions for instructions The tables below describes the second call indications for each Ringer Mode Ringer Mode Ring if Idle Alarm To set cancel Personalized and Automated Alarms Change User Password To change User Password required for using certain features like Call Follow Me Dynamic Lock DISA Walk In Class of Service User Absent Present Hot Desk and for customi...

Страница 95: ...ent Dedicated one touch feature keys and intuitive user interface provides quick access to full range of PBX call management features including Call Hold Call Park Call Transfer Conference and Voicemail Access to Corporate Directory Easy integration with the enterprise s Corporate Directory Global Directory which allows you to easily locate and dial corporate contacts at one click Second call indi...

Страница 96: ... Station Selection keys 1 Ringer LED Improved Audio High Definition HD Audio output that delivers crystal clear voice and life like conversations over HD handset and hands free speaker High Speed Ethernet connectivity Dual switched 10 100 Base T auto sensing Ethernet LAN connectivity allows unconstrained bandwidth from the network to the phone LAN port is used to connect the phone to a Switch or a...

Страница 97: ...N CNX200 System Manual 87 Front View 1 Ringer LED 2 LCD Screen 3 Fixed Function Keys 4 DSS Direct Station Selection Keys 5 Digit Keys Dial pad Keys 6 Volume Up Key Key 7 Speaker Key 8 Volume Down Key Key 9 Handset ...

Страница 98: ...88 Matrix NAVAN CNX200 System Manual Bottom View Left Side View 1 USB Port for Wi Fi Adapter 2 PC Port 3 LAN Port 4 Power Port 1 RJ11 Headset Port 2 Headset Port 3 Handset Port ...

Страница 99: ... its function Default features assigned to these keys are as follows It is not possible to re label these feature keys hence it is recommended that you do not change the default features assigned to these keys DSS Key Feature icon Assigned Feature LED 13 Voicemail Single Color Blue 14 Mute Single Color Blue 15 Headset Single Color Blue 16 Hold No 17 Conference No 18 Transfer No ...

Страница 100: ...h Ringer Mode Ringer Mode Ring if Idle Ringer Mode Ring Immediately Ringer Mode Ring After Delay Ringer Mode Silent The LCD will display the Caller ID of the station trunk Second call indication when the first call is on the Speaker Second call indication when the first call is on the Handset Second call indication when the first call is on the Headset NA NA NA Second call indication when the firs...

Страница 101: ...lling to any location An innovative and easy to understand user interface delivers all productivity features at fingertips that enhance speed of communication and collaboration with office users and customers Make sure the phone in which you install Matrix SPARSH MS runs on Android V2 2 or later if you are using Android devices In case you are using iPhones make sure your iPhone runs on iOS4 3 or ...

Страница 102: ... on the native Android iPhone designs One touch access to call feature options during VoIP Voice over IP calls including Adding a New Call Mute Hold Transfer and Speakerphone Also provides DTMF support to enter numbers using an auto attendant Cost Effective Calling If you are using the enterprise Wi Fi network to register Matrix SPARSH MS with the NAVAN calls made from the application will be almo...

Страница 103: ...fice users and customers Make sure the phone tablet in which you install Matrix SPARSH M2S runs on Android V2 2 or later if you are using Android devices In case you are using iPhones make sure your iPhone runs on iOS7 Key Features PBX Extension Matrix SPARSH M2S becomes a mobile extension of the NAVAN As an increased number of business professionals are using the collaborative tools found in smar...

Страница 104: ...tering the number of that extension and without putting the call on hold Similarly you can also transfer a call from the fixed extension to your application Better Voice Quality Using customized codec settings enhanced voice output is available If you are aware of the bandwidth and the network criteria of your location you can select the proper codec from the application to get high quality voice ...

Страница 105: ...n how to configure SPARSH M2S in NAVAN see Configuring Matrix Extended Phone Settings using Jeeves Operating SPARSH M2S When using the application in Android smartphones or devices refer to Matrix SPARSH M2S Android Application User Guide for Mobile Tablet for instructions on operating the features of NAVAN In case of using the application in iPhones refer Matrix SPARSH M2S iPhone Application User...

Страница 106: ...gth for each Mailbox is set to 15 seconds Matrix provides a 4GB Pen Drive storage for VMS The Pen Drive supports 72 hours of recording This Pen Drive is factory fitted within NAVAN Activating the VMS For NAVAN make sure the VMS module has firmware version revision as V6R7 V6R8 or later You must purchase the license from Matrix and then activate it To do this Connect a computer to the Ethernet WAN ...

Страница 107: ...rmal Condition Random Blinking Preparing Startup 10s ON Starting System Continuous On for 55s OFF Starting Applications Continuous Off for 25s Slow Blinking Health is Normal 1s On and 1s Off SYS System Status Firmware Upgrading ON System is upgrading firmware Continuous On approximately 600s Fast Blinking Recovering corrupted firmware 250ms On and 250ms Off for 3min Fast Blinking Refer Notea below...

Страница 108: ...w Blinking Dongle connected and trying for Internet connection but not connected yet 1s On and 1s Off ON Internet connection established but no data transfer Continuous Fast Blinking Data transfer is going on 100ms On and 100ms Off OFF Dongle is not connected a Note If the SYS System Status LED is fast blinking for more than 3 minutes contact MATRIX Technical Support LED Status Meaning Cadence ...

Страница 109: ...nfiguration features and facilities of the NAVAN can be changed as per end user requirements Only the System Engineer the person who installs configures and maintains the system must be allowed access to this mode Access to the SE mode is protected by means of a password referred throughout this document as the SE Password System Administrator Mode At the System Administrator level the settings of...

Страница 110: ...ured using the following tools A web based graphic user interface GUI called Jeeves A telephone specific parameters only Each of these is explained in detail later in this chapter NAVAN can be configured both on site and from a remote location without its functioning being affected ...

Страница 111: ...how to change the Admin password If you forget the Admin password you can restore the default Admin password See Restoring Default Admin Password for instructions on restoring the default Admin password You are advised to record the Admin password at a safe place where it can be accessed by you to avoid the inconvenience of restoring the default Admin password Configuring NAVAN from SE Mode To be ...

Страница 112: ...an simultaneously login into SE Mode and configure the system However it is recommended that multiple login be avoided when using the Quick Installation Wizard and the use of the Wizard be restricted to a single person only Configuring NAVAN from SA Mode To be able to configure NAVAN from SA Mode you must login into the Jeeves using SA Password SA Password The access to SA mode may be protected by...

Страница 113: ...ure the IP Address of the computer and the Ethernet LAN Port of NAVAN do not conflict and both are in the same Subnet The default IP Address of the Ethernet LAN Port of NAVAN is 192 168 2 56 The default Subnet Mask of the Ethernet LAN Port of NAVAN is 255 255 255 0 Change the Subnet of the computer if necessary Make sure a web browser either Internet Explorer 9 and later or Mozilla Firefox 14 and ...

Страница 114: ...ings of your computer s screen to the resolution of 1024 x 768 pixels for full view of the pages From the Login as box select the login mode you want to enter Admin System Engineer or System Administrator Enter the Admin SE or SA Password for the Login mode you selected Click Login button ...

Страница 115: ...assword has been changed use the new password Click the Login button On successful login the home page of the Admin mode will appear on your screen Click on the graphical icons of the respective parameter you wish to configure Change the settings to the desired values and click Submit to save To exit the Admin configuration mode click Logout on the top of the page ...

Страница 116: ...the screen are the main links to configuring the Data and Voice Application parameters After you click the main tab its sub links appear on the left navigation bar For example to configure the Network Parameters click the LAN WAN tab The LAN WAN parameters sub links appear on the left navigation bar Click the link of the desired parameter The page of the respective parameter opens Change the setti...

Страница 117: ...ord has been changed use the new password Click the Login button On successful login the tabs appear on top of the screen which are the main links to configure the Voice parameters After you click the main tab its sub links appear on the left navigation bar From the SA mode you can Click the link of the desired Feature to open the page Configure the feature and click Submit button to save changes ...

Страница 118: ...108 Matrix NAVAN CNX200 System Manual To exit the SA mode click Logout on the top of the page ...

Страница 119: ...the system using a Telephone Off site i e from a Remote location using the Direct Inward System Access DISA feature of the NAVAN You can access the System Administrator mode from the remote location System Administrator Mode At the System Administrator level you can set cancel features settings for extensions capture and print various system activity logs and reports The Operator or Receptionist w...

Страница 120: ...he number of persons who can simultaneously enter and operate from the SA mode using a telephone Entering SA Mode using a Telephone You may use an Extended IP Phone or an SLT extension of the NAVAN to enter the SA Mode To enter SA mode from an extension phone Dial 1 92 SA Password17 You get a confirmation Tone of the NAVAN to indicate successful entry into the SA mode Dial SA Command strings 1072 ...

Страница 121: ...r Where SA Mode Timer 000 to 255 minutes You can also exit the SA mode before the SA Mode Timer expires by dialing this command If the SA Mode Timer is set to 000 minutes you can exit the SA mode only by dialing the command 1 92 The SA Mode Timer can also be configured from the SA pages of Jeeves ...

Страница 122: ...112 Matrix NAVAN CNX200 System Manual ...

Страница 123: ...eb based GUI The Login page will open 2 Log in as System Engineer 3 Enter the SE password On successful login you reach the Home page There are two ways to do the system configuration using Jeeves Using the Wizard A special configuration Wizard will lead you logically step by step through the configuration of the various parameters Or ...

Страница 124: ...e Back button you will be prompted to save changes made on the current page The More button and the Less button on the page allow you to expand and collapse respectively the parameters on the page The Expand button expands a link on the page to display all parameters under the link The Collapse button collapses a link hides all the parameter under a link on the page The Settings icon allows you to...

Страница 125: ...er More link displays all additional parameters on the page Logout enables you to exit Jeeves Set the desired values on this page and click Submit button to save You may use the Wizard or selectively configure the desired parameter pages whichever works best for you When configuring the system for the first time you may use the Wizard When you want to make changes after the configuration has been ...

Страница 126: ...stem administrator about the system generated notification messages NAVAN displays a Notification icon on Jeeves in System Engineer login mode This icon is displayed only when there is any pending notification s The Notification icon shows the number of pending notifications ...

Страница 127: ... as shown below Once you read the notification s you may cancel the notification message s by clicking the red cross button beside the selected message The steps described above are for System Engineer Mode To log in as Admin to configure NAVAN refer the Powerpoint presentation CD provided with the manual ...

Страница 128: ...118 Matrix NAVAN CNX200 System Manual ...

Страница 129: ...our installation Active WAN provides you with the options to change the default WAN connectivity auto fallback option to another Internet connection if your active Internet link is down and to switch back to the main Internet connection when the Internet link is up According to the type of WAN connectivity Ethernet or WWAN configure the WAN parameters using Jeeves WAN connectivity using Ethernet W...

Страница 130: ...s selected as the Connection Type Default Ethernet WAN IP Address 192 168 1 1 Static Select this connection type if your ISP provides you with a Static IP Address Configure the following parameters IP Address Enter the IP Address as provided by your Service Provider to be assigned to the WAN Port Subnet Mask Enter the Subnet Mask as provided by your Service Provider to be assigned to the WAN port ...

Страница 131: ...matically by your Service Provider select the Get DNS Automatically check box If you do not want your Service Provider to automatically assign the DNS Server configure the Primary DNS and Secondary DNS Address in the respective boxes PPPoE User ID Enter the PPPoE User ID provided by your Service Provider PPPoE Password Enter the PPPoE User Password provided by your Service Provider PPPoE Service N...

Страница 132: ...n either configure these parameters manually or using APN Settings 2 Under GSM UMTS Channel 1 configure the following parameters manually Access Point Enter the Access Point provided by your Service Provider Number To Dial Enter the Number To Dial provided by your Service Provider User Name Enter the User Name provided by your Service Provider Password Enter the Password provided by your Service P...

Страница 133: ... configure the parameters for GSM UMTS Channel 2 to use WWAN Internet connection as provided to you by your Service Provider 5 To get Internet connectivity using the USB Dongle configure the following parameters Select GSM or CDMA as the Service Type depending on your service providers network You can configure the parameters either manually or automatically using APN Settings Follow instructions ...

Страница 134: ...ly switches back to it To configure the Active WAN parameters 1 Click the Active WAN link to expand and configure the following parameters 2 Select the Fallback to another priority when connection is unavailable check box if you want the system to use an alternative WAN connection as per the configured priorities when the current active type of WAN connection is unavailable 3 Select the desired ty...

Страница 135: ...a server where the system should keep on sending the NAT Keep Alive messages even when Fallback is disabled that is when the Fallback to another priority when connection is unavailable check box is cleared If Fallback is disabled then you can even keep this field blank Also enter the time duration within Interval sec after which the system should send the next NAT Keep Alive message to the configu...

Страница 136: ...networks which utilise the WAN Port settings to function need to be updated regularly with the new IP Address Dynamic DNS resolves this by mapping a domain name to the WAN Port IP Address which the system can update in the Dynamic DNS Once the IP Address of the system is updated in the Dynamic DNS any user on the IP network can reach the system using the host name domain of the system NAVAN suppor...

Страница 137: ...characters except and double quote are allowed Enter the User Name you created on DDNS Server Enter the Password you created for the User ID on DDNS Server If you select the option Customized then proceed as follows In Server Address enter the domain IP address of the DDNS Server Maximum 63 ASCII characters allowed In Service API enter the GET Request URI string This string is sent to the Server A...

Страница 138: ...g 200 Successful Update and IP not changed Maximum 32 ASCII characters are allowed 5 If you want the system to check its IP Address in the DDNS Server at a regular interval of 10 minutes and update only when the changes have been made select the Check Periodically check box 6 If you want the system to update its IP address at a particular instant of time select the Forcefully Update check box Ente...

Страница 139: ...enable MAC Cloning and configure the following 1 The Unique MAC Address displays the current MAC Address of the Ethernet WAN Port of the system 2 If cloning of the MAC Address is required select Clone MAC Address check box 3 Enter the Clone MAC Address 4 Click Submit to save the settings Viewing the Network Status To view the WAN Port Status Click the LAN WAN tab On the left navigation bar click t...

Страница 140: ...130 Matrix NAVAN CNX200 System Manual Click the Network link You can also view the WAN Port Status by clicking the Status tab See Network Status ...

Страница 141: ...e of LAN port is to connect desktop computers laptops or IP Phones for Voice and Data applications Configuring General Settings 1 Log into Jeeves as System Engineer 2 Click the LAN WAN tab 3 On the left navigation bar click the LAN link 4 Click General Settings to expand 5 Enter the current LAN IP Address Default 192 168 2 56 ...

Страница 142: ...6 10 Enter the Primary DNS Address to be assigned to the DHCP client 11 Enter the Secondary DNS Address to be assigned to the DHCP client 12 Enter the Lease time Minutes for which IP Address is allocated to the DHCP client The Lease Time ranges from 1 to 9999 minutes Default 480 minutes DHCP client should renew its lease within the Lease Timer If the client does not renew its lease before the expi...

Страница 143: ...Enter the IP Address Data 6 Click Submit to save the changes Close the window to return to the main page 7 The entry appears in the DHCP Options table 8 To edit an entry click Edit 9 To delete an entry select check box of the respective entry entries and click Delete IP Address Reservation If you want to assign fixed IP Address to certain DHCP clients you must configure the following parameter 1 C...

Страница 144: ...ose IP Address is to be reserved 5 Enter the corresponding IP Address that you want to reserve for the host 6 Click Submit to save the details Close the window to return to the main page 7 The entry appears in the IP Address Reservation table 8 To edit an entry click Edit 9 To delete an entry select check box of the respective entry entries and click Delete Viewing Status To view the LAN Port Stat...

Страница 145: ...stem Manual 135 You can also view the LAN Port Status by clicking the Status tab See Network Status Similarly to view the DHCP Status Click the LAN WAN tab On the left navigation bar click the Status link Click the DHCP link ...

Страница 146: ...136 Matrix NAVAN CNX200 System Manual You can also view the DHCP Status by clicking the Status tab See DHCP ...

Страница 147: ...e respective Port Link Status appears green or else it will appear grey 5 Speed Status displays the speed of the port 6 Select the required Administrative Status for each LAN port If you select Down no Local Area connections will be possible for the device connected to that LAN Port If you select Up it will be possible to have Local Area Connections with the device connected to that LAN Port The A...

Страница 148: ... LAN port from the other or else disable it You can enable the Flow Control on the selected LAN port only if the Link Speed is set as 10 100mbps and the Duplex Mode is Full Default Disable 10 Click Submit to save the settings 21 Duplex Mode is a mode of transmission of data packets between the port and the remote Ethernet port the sender and the receiver Half Duplex mode allows only one data trans...

Страница 149: ...e switch may route the VoIP traffic to Gateway1 say having IP as 192 168 10 1 while it may route the MPLS connection specific traffic to Gateway2 say having IP as 192 168 11 1 The VLAN switch can also do the reverse process in which it aggregates the traffic from the different gateways that is Gateway1 and Gateway2 into a single Ethernet link connected to your NAVAN s WAN port In such a condition ...

Страница 150: ...normally routed through the default Gateway Address of the Ethernet WAN port You should also configure the Static Routing Table22 once VLAN Interfaces have been programmed Here you must select the appropriate VLAN Interface It enables to tag packets destined for specific destination address to Index Name VLAN ID VoIP VLAN Connection Type DNS Address 1 VoIP VLAN 10 Selected As instructed by Service...

Страница 151: ...the Assign VLAN Tag on Default WAN check box It may be required when the destination address of packets does not match to the network of any Multi VLAN interface and the service provider s configuration requires tagging of packets sent through the default Ethernet WAN 6 Configure the VLAN ID23 when you have selected the Assign VLAN Tag on Default WAN check box 7 Click Submit to save the settings I...

Страница 152: ...nations This may be provided by your service provider Two VLAN IDs can not be the same 5 If you want to run all VoIP services on this selected VLAN Sub Interface select the VoIP VLAN check box If selected the respective interface IP will be used in all SIP messages You can specify only one interface as VoIP VLAN 6 Select the Connection Type as specified by your service provider for the selected Su...

Страница 153: ...ly check box or configure the Primary DNS Address and Secondary DNS Address manually as instructed by your service provider 7 Click Submit to save the settings 8 To add other Sub Interfaces follow the similar steps as described above Viewing Status To view the Multi VLAN Status Click the LAN WAN tab On the left navigation bar click the Status link Click the Multi VLAN link You can also view the Mu...

Страница 154: ... that of the WAN port of NAVAN the system compares the Destination IP Address with that configured in the Static Routing table If the Destination IP Address matches with that configured in the table the system will start communicating sending the packets to the corresponding configured Gateway Address If it does not match the system will use the default Gateway Address configured on the WAN Port p...

Страница 155: ...is Destination Address through its default Gateway Address However if you have enabled Multi VLAN on the Ethernet WAN port of NAVAN you should specify the VLAN Sub Interface to be applied to the packets according to their Destination Addresses For example a packet having the Destination Address of 115 118 161 163 can be routed through VLAN1 whereas a packet having the Destination Address of 116 72...

Страница 156: ...ination network Select the VLAN Interface from the list box If you have already configured VLAN Interfaces and select one from the list box here you will not require to configure the Gateway Address again However if you select VLAN Interface as the Default WAN you must configure the corresponding Gateway Address as mentioned below In Gateway Address enter the IP Address of the router gateway which...

Страница 157: ...te select the respective check box and click the Edit button to do the required modifications 7 To delete any static route from the list select the respective check box and click the Delete button The Static Routing Table allows you to configure maximum 10 entries ...

Страница 158: ...148 Matrix NAVAN CNX200 System Manual ...

Страница 159: ...Settings Connect Wi Fi using WPS Assign IP Address to the Wi Fi Clients Provide Selective Wi Fi Access Configure the QoS Settings only if required as the system will function with the default settings Configure the Advance Settings only if required as the system will function with the default settings Check the Wi Fi Connectivity Status Selecting a suitable location for NAVAN Decide the location o...

Страница 160: ...150 Matrix NAVAN CNX200 System Manual Configuring the Wi Fi parameters Log into Jeeves as System Engineer Click the Wireless LAN tab On the left navigation bar click the Wi Fi Settings link ...

Страница 161: ... name Network SSID will be displayed to them The Clients can then get connected with NAVAN s Wi Fi network In the Network SSID enter the network name that should be displayed on the client device while it attempts to connect with it By default it is MATRIX NAVAN It can be a maximum of 32 ASCII characters Clear the SSID Broadcast check box to disable the broadcasting of your SSID name to other devi...

Страница 162: ...utomatically choose a channel having the least interference Click Submit to save settings Security Settings To secure your wireless network from unauthorized access configure the Security Settings Click Security Settings to expand To configure the Security Settings for Network SSID Select the Security Mode you want The security modes supported by NAVAN are WEP WPA WPA2 and None Wired Equivalence P...

Страница 163: ...on Enter the Passphrase This passphrase will be used to encrypt and decrypt data packets The range of passphrase is from 8 to 63 ASCII characters Enter the time in Key Renewal Timer sec After the expiry of this timer the system will renew the key Click Submit to save To configure the Guest SSID follow the same steps as in Network SSID Connecting Wi Fi using WPS You can secure a wireless network us...

Страница 164: ...splays Enabled when the client s is connected successfully Assigning IP Addresses to Wi Fi Clients After authentication you must assign IP Addresses to all your Wi Fi clients connected with your network NAVAN has a built in DHCP Server which has a pool of IP Addresses available for the wired as well as the wireless clients NAVAN allows configuring the starting LAN IP Address and the number of DHCP...

Страница 165: ...rement In MAC Address list of Wireless Stations For Allow configure the MAC Addresses of the devices you want to allow Wi Fi connectivity under the Allowed MAC Address column For Denied configure the MAC Addresses of the devices you want to deny Wi Fi connectivity under the Denied MAC Address column You can assign a Name to the MAC Address of each device for easy identification Click Submit Simila...

Страница 166: ...ations If you select Custom you can modify the QoS related parameters of AP and Wi Fi stations If you select Custom you must do the following For Station configure the CWMin CWMax AIFSN and TXOP parameters for the various data types Background Best Effort Video and Voice The packets will be processed as per the priority you set Similarly for Access Point AP configure the CWMin CWMax AIFSN and TXOP...

Страница 167: ...ta packet after this value the packet will be fragmented into multiple packets Default 2346 bytes Select the CTS Protection Mode check box to prevent collisions between the packets while the data transmission to your AP occurs in heavy traffic If you have enabled CTS Protection Mode set the RTS Threshold value to control the inconsistent data flow Default 2346 bytes Click Submit button to save you...

Страница 168: ...ing Wi Fi connectivity with the Clients To verify the Wi Fi connectivity of all the Clients from any wireless device try to access another device in your LAN network only for trusted clients connected using the Network SSID or browse the Internet ...

Страница 169: ...r two networks or remote offices users located at different remote sites on the network to share or access data securely appearing as if they are in the same network A Virtual Private Network virtually connects its remote sites users and transfers the data that are tunneled through WAN using encryption and security protocols resulting into the transfer of data privately on the public network The m...

Страница 170: ...a company s private network and remote users through a third party service provider Site to Site VPN Site to site VPN connection is a connection between two networks which usually is done between two routers connecting multiple sites offices securely over a public network Internet but appearing as a local connection Site to Site VPN extends the company s network and its resources to branch offices...

Страница 171: ...s are explained later in this chapter NAVAN s VPN provides your business with the following benefits Provides the flexibility to the remote offices or individual users employees to access your organization s network through public network Internet Extended geographical connections without usage of any leased lines Maximum security of data exchange including the authentication of the packets receiv...

Страница 172: ...l used by the Client for creating a VPN tunnel supported by the Client which wants to get connected with you NAVAN supports 10 VPN Connections as a Server and 10 VPN Connections as a Client for PPTP and SSL protocol NAVAN supports 20 VPN Connections for IPSec and L2TP over IPSec These can be either Servers or Clients 2 For these Clients create Users and configure a unique User Name and Password fo...

Страница 173: ... the security protocol which you will use for creating a VPN tunnel connection and inform to your Server 2 Enable the Client mode of the system for the corresponding protocol 3 Get the User Name and Password from your Server which you will use during VPN connection 4 Get the type of authentication or encryption used for security negotiation from your Server and configure accordingly 5 Get the type...

Страница 174: ... Client See Creating a PPTP VPN Client for details L2TP over IPSec VPN Client See Creating a L2TP over IPSec Client for details Open VPN SSL Client See Creating an Open VPN SSL Client for details IPSec VPN Client See Creating an IPSec VPN Client for details Creating a PPTP VPN Client In Windows XP PPTP VPN connections are created using the New Connection Wizard To set up a PPTP VPN connection foll...

Страница 175: ...xt to begin the configuration a new VPN connection 4 On the Network Connection Type page of the Windows XP New Connection wizard select the Connect to the network at my workplace option from the list as shown below and click Next 5 Select the Virtual Private Network connection option as shown below and click Next ...

Страница 176: ...166 Matrix NAVAN CNX200 System Manual 6 In the Company Name enter a descriptive name for the connection This name will be displayed in Network Connections Click Next ...

Страница 177: ...ct to and click Next Company network administrators will provide this information 8 If you want the created connection to be for your use only and saved in your user account then select My use only If you want that anybody who logs in to this computer can use this connection then select Anyone s use Click Next ...

Страница 178: ...t to this connection to my desktop check box Click Finish to complete the setup 10 When you click Finish a Connect dialog appears First click Properties button to view its properties 11 In PPTP Connection Properties window click Networking tab In Type of VPN select the type of protocol and click OK ...

Страница 179: ...Matrix NAVAN CNX200 System Manual 169 12 In the Internet Protocol TCP IP properties select Obtain an IP address automatically and Obtain DNS server automatically ...

Страница 180: ...ced Security Settings window In the Data encryption drop down list select the type of encryption required Also select the respective type of authentication protocol in Allow these protocols as provided by your NAVAN Select PAP protocol if No encryption is required type of data encryption is selected Select CHAP protocol if Optional encryption type is selected ...

Страница 181: ...d Click OK 15 Enter your username and password provided by your Server and click Connect to try your connection If you want to save your credentials select the Save This User Name and Password check box Select Me Only if you want to restrict the use of this VPN connection to the current user only Select Anyone who uses this computer to enable any user of this computer to use the connection ...

Страница 182: ...on to view the L2TPIPSecConnection Properties window Go to Security tab select the Advanced custom settings and click Settings button 2 In the Data encryption drop down list select the type of encryption required Also select the respective type of authentication protocol in Allow these protocols as provided by your Server Select PAP protocol if No encryption is required type of data encryption is ...

Страница 183: ... 173 You must select Microsoft CHAP Version 2 protocol along with CHAP if Require encryption or Maximum Strength encryption type of data encryption is selected Click OK 3 Click IPSec Settings button This opens the IPSec Settings window ...

Страница 184: ...l 4 Select the Use pre shared key for authentication check box to enable the Key field In Key enter the pre shared authentication key for IPSec provided by your Server 5 Click Networking tab and in Type of VPN field select L2TP IPSec VPN ...

Страница 185: ...8 Specify valid username and password provided by your Server NAVAN and click Connect to try your connection If you want to save your credentials select the Save This User Name and Password check box Select Me Only if you want to restrict the use of this VPN connection to the current user only Select Anyone who uses this computer to enable any user of this computer to use the connection ...

Страница 186: ...you start with the configuration To create an Open VPN SSL Client on any remote device any Operating System 1 The VPN Client who wants to get connected to NAVAN must first install a SSL tool available in market namely Open VPN GUI The tool is available on the website openvpn net ...

Страница 187: ... 3 Click the config folder to view the configuration files By default sample config files will be available Create a new config file with an extension of ovpn Select the config file which you just created and either double click to open it or right click and click Open For example here openvpn client ovpn is the sample file ...

Страница 188: ...Matrix NAVAN CNX200 System Manual 4 The openvpn client ovpn config file appears as below As instructed in the below config file configure all the required parameters as provided to you by your Server NAVAN ...

Страница 189: ...The virtual interface used Tun Your Remote Server s IP Address CA Certificate or Chain Name of the Certificate Private Key of the Certificate Your s Client s Port Number Type of Transport Protocol used Idle Timeout Timer Dead Peer Detection ...

Страница 190: ...ed Username and Password for authentication then only create a new txt file for the same 6 Open the userpass txt file which you just created Write the Username in the first line and Password in the second as provided to you by your Server in this txt file and save it This is fetched automatically ...

Страница 191: ...ions Click Edit Config right click option if you want to edit the Config file 8 Click the Connect option to connect with your Server Thus an Open SSL Client is created successfully Creating an IPSec VPN Client To set up an IPSec VPN Connection on any remote device with Windows XP as the operating system you must follow the below procedure First if any default IPSec Policy is not created on your co...

Страница 192: ...182 Matrix NAVAN CNX200 System Manual 1 On Windows XP go to the Control Panel click Administrative Tools select Local Security Policy this opens the Local Security Settings window OR ...

Страница 193: ...em Manual 183 1 Click Start select Run and type secpol msc in the field Click OK This opens the Local Security Settings window 2 Right click on IP Security Policies on Local Computer and click Create IP Security Policy option ...

Страница 194: ...184 Matrix NAVAN CNX200 System Manual 3 This opens IP Security Policy Wizard window Click Next 4 In Name type a name for the IP Security Policy Click Next ...

Страница 195: ...CNX200 System Manual 185 5 Select the Activate the default response rule check box and click Next 6 Click Next 7 Select Edit properties check box and click Finish This completes the configuration of the IPSec Policy ...

Страница 196: ...rovided to you by your Server NAVAN Follow the below steps to configure a Rule of the selected IPSec Policy 1 Select the available IPSec Policy and right click on it Select the Properties right click option 2 This opens the Properties window Clear the Dynamic check box if it is selected and click Add to add a new rule ...

Страница 197: ...anual 187 3 A Security Rule Wizard window opens up Click Next 4 Select The tunnel endpoint is specified by this IP address option and enter the IP Address of the remote device Server with which you want to get connected Click Next ...

Страница 198: ...rement to which this rule is to be applied Click Next 6 Select the Authentication Method as provided to you by your Server If Pre shared key is used as authentication then select Use this string to protect the key exchange preshared key option and enter the key in the box Click Next ...

Страница 199: ... NAVAN CNX200 System Manual 189 7 Select the IP Filter List as provided by your Server to which this security rule will get applied Click Next 8 Select Permit as the filter action for this rule and click Next ...

Страница 200: ...figuration of properties of the new security rule 10 The newly created IPSec rule gets listed in the Client Properties window as shown below Now select the rule and click Edit to configure all the rule parameters as provided to you by your Server for the selected IPSec Policy ...

Страница 201: ...AN CNX200 System Manual 191 11 In the IP Filter List tab of the Edit Rule Properties window select the IP Filter list if not selected as provided by your Server whose network traffic will be affected by the rule ...

Страница 202: ...for the IP Filter of your IP traffic Click Edit The IP Filter List window opens 13 Click Edit The Filter Properties window opens In the Source Address drop down list select A specific IP Subnet and specify your IP Address and Subnet Mask in the respective boxes Similarly in Destination Address select the required option as provided by your Server ...

Страница 203: ...ct Any as protocol type Click OK to save the Filter properties for the selected IP Filter 15 Go to the Filter Action tab and select the Filter Action from the list 16 Go to the Connection Type tab and select the network connection type as per your setup and requirement ...

Страница 204: ...00 System Manual 17 Go to the Tunnel Setting tab and select The tunnel endpoint is specified by this IP address option if not selected and enter the IP Address of the Server as provided with which you want to get connected ...

Страница 205: ...entication then browse the certificate 19 Click the Close button of the Edit Rule Properties window and return to the Client Properties window This completes the configurations of the rule of the selected IPSec Policy 20 Click Close button of the Client Properties window 21 Select the IPSec Policy and right click to view the right click options Select Assign option to assign this IPSec Policy and ...

Страница 206: ...tails IPSec VPN Client See Creating an IPSec VPN Client for details Create a PPTP VPN Client To set up a VPN connection in Windows 7 follow this procedure 1 Open the Windows Control Panel then select the Network and Sharing Centre item in Control Panel A list of existing dial up and LAN connections will appear 2 Click Set up a new connection or network option as shown below ...

Страница 207: ...ion option appears which asks you to select the type of connection you want to do Select Connect to a workplace option in this window and click Next 4 Select the type of connection to connect to the workplace Select Use my Internet Connection VPN to connect using VPN Connection ...

Страница 208: ...ect to which is actually the Server Address provided by your network administrator In Destination name enter the desired name of the destination which you want to be displayed as icon of this new VPN connection 6 In Username and Password enter your Username and Password provided to you by your Server Click Create ...

Страница 209: ...takes not more than a minute 8 Select the icon of the PPTP VPN Connection which you just created and right click to view its right click options Click Properties option to view the Properties window 9 Go to the Security tab In Type of VPN drop down list select Point to Point Tunneling Protocol PPTP ...

Страница 210: ...otocol in Allow these protocols as provided by your Server Select PAP protocol if No encryption is required type of data encryption is selected Select CHAP protocol if Optional encryption type is selected You must select Microsoft CHAP Version 2 protocol along with CHAP if Require encryption or Maximum Strength encryption type of data encryption is selected Click OK ...

Страница 211: ...e verified and then finally you will be registered on the Server 13 Click Connect Thus a new PPTP VPN Client connection is successfully created Creating an IPSec VPN Client To set up an IPSec VPN connection on any remote device with Windows 7 as its Operating System follow the below procedure 1 On the Start menu click Control Panel menu Select Administrative Tools and select Local Security Policy ...

Страница 212: ...k Run and type secpol msc and press Enter key This will lead you directly to the Local Security Settings window 2 Right click on IP Security Policies on Local Computer and select Create IP Security Policy option to create a new IP Security Policy on your computer ...

Страница 213: ...Matrix NAVAN CNX200 System Manual 203 3 This opens the IP Security Policy Wizard window Click Next 4 In Name type a name for this IP Security Policy ...

Страница 214: ...e the default response rule earlier versions of Windows only check box 6 Select Use this string to protect the key exchange preshared key as the initial authentication method and enter the preshared key provided to you by your Serer NAVAN in the box Click Next ...

Страница 215: ... the Wizard This completes the creation of IP Security Policy 8 On the IPSec Client Policy Properties window under Rules tab clear the Dynamic check box and click Add to create a new Rule for this IP Security Policy 9 On the Security Rule Wizard window click Next ...

Страница 216: ... Select the The tunnel endpoint are specified by the following IP addresses option and enter the IP Address of your Server with which you want to get connected Click Next 11 Select the Network Type to which this Security Rule will be applied ...

Страница 217: ...ystem Manual 207 12 Click Add to add a new IP filter for the type of traffic to which this security rule will be applied 13 In Name type a name for IP Filter List Click Add to add a filter to this newly added IP Filter List ...

Страница 218: ...208 Matrix NAVAN CNX200 System Manual 14 On IP Filter Wizard window click Next to start creating a new Filter 15 In the Description box if required enter the description for the IP Filter ...

Страница 219: ...ss of the IP Traffic Select A specific IP Address or Subnet option if a IP traffic is located behind you and enter the source IP Address or subnet mask in the IP Address or Subnet field Click Next 17 In Destination Address drop down list select the option as per the IP Traffic of your destination Click Next ...

Страница 220: ...AVAN CNX200 System Manual 18 In Select a protocol type list select the type of IP Protocol to be used Select Any and click Next 19 Click Finish to complete the IP Filter Wizard Now IP Filter is created successfully ...

Страница 221: ...em Manual 211 20 The IP Filter gets added in the list for the newly created IP Filter List Click OK 21 This adds the newly created IP Filter List to the IP Filter List list box Select All IP Traffic filter list and click Next ...

Страница 222: ...200 System Manual 22 For each IP Filter List you must create a Filter Action Click Add to create a Filter Action for All IP Traffic filter list 23 On Filter Action Wizard window click Next to start creating Filter Actions ...

Страница 223: ...trix NAVAN CNX200 System Manual 213 24 In Name and Description fields type a name and a brief description for this Filter Action Click Next 25 Select Permit as the behavior of the filter action Click Next ...

Страница 224: ...0 System Manual 26 On the Filter Action Wizard click Finish to complete creating the IP Security Filter Action 27 In the Filter Action box the newly created filter action gets added Select Permit filter action and click Next ...

Страница 225: ...rties of your new rule of the selected IP Security Policy 29 On IPSec Client Policy Properties window the newly created IPSec Security Rule including the IP Filter List All IP Traffic as well as its Filter Action Permit gets added for your IPSec Client Policy Select the check box to apply this security rule for communication ...

Страница 226: ...00 System Manual 30 Now click Edit if you want to edit the rule properties for this IPSec Policy This opens the Edit Rule Properties window Make sure that the rule properties are specified as provided to you by your Server ...

Страница 227: ...e the rule properties and go to the Local Security Settings window The newly created IPSec Policy gets added to the list Right click the policy and select Assign option to assign this IPSec Policy on your computer 32 Thus IPSec Client is created successfully ...

Страница 228: ... the IPSec process The interested traffic on the Client side initiates and sends the request to start the IPSec process The NAVAN Server acknowledges the request and starts the IKE process as per the configured IPSec security policy IKE phase one After initiation of the IKE process the Security Associations occurs for the security purpose Security Associations between the Server and the Client tak...

Страница 229: ...uring an IPSec Policy If L2TP over IPSec or IPSec is used as the security protocol by your Client or Server you need to create and assign an IPSec Policy for negotiation and communication between the Server and the Client In each policy you can define different rules you wish to apply during the negotiation NAVAN allows you to create five such IPSec Policies Log into Jeeves as System Engineer Clic...

Страница 230: ...h the remote IPSec Client if the security negotiation fails Default 3 tries Select Authentication Mode to negotiate the IKE security and key exchange between the Server and the IPSec Client You can select either Main Aggressive or Both When you select Both as the Authentication Mode the System will initiate the Tunnel using the Main Mode If it fails to initiate the Tunnel using Main Mode the Syste...

Страница 231: ...MD5 SHA1 SHA256 SHA384 or SHA512 Select the required DH Diffie Hellman Group to establish the secret keying material for IKE and IPSec to be consistent with current security requirements You can select either 1 DH768 or 2 DH1024 or 5 DH1536 The larger the DH groups the more the processing time and increase security Enter the Key Life This is the time span for which a key will be valid After the ex...

Страница 232: ...n IPSec Server Remote Access signifies that the system will work as IPSec Server and creates the Tunnel on request from the Client Log into Jeeves as System Engineer Click the VPN tab On the left navigation bar click the IPSec link Click the Remote Access Mode tab and configure the following Server parameters Each VPN client must be assigned an IP Address In Assign IP Address define the range of I...

Страница 233: ... Site Initiate having only one LAN device Client Site to Site Initiate having LAN Network Configuring a Tunnel as a Server Remote Access Determine the Tunnel Number you want to configure as a Server and click the desired Tunnel Number tab Click General Settings to expand and configure the following Server parameters Select the Enable check box Assign a Name to the Tunnel Select the Mode as Remote ...

Страница 234: ...sing a key password during initial negotiation which is agreed upon by both the Server and Client in advance select Pre Shared Key If you select this option you must configure the parameters Pre shared Key and Confirm Pre shared Key In Pre shared Key enter the pre shared key you want to use to authenticate your Client In Confirm Pre shared Key re enter the key for confirmation If you want to authe...

Страница 235: ...s Local ID of its Client If you select IP Address as the Local ID and Remote ID option make sure the IP Address is a Public IP Address WAN IP Address Make sure the Local ID and Remote ID configured in IPSec and L2TP over IPSec are not same Make sure the type you select for the Local ID and Remote ID are same that is if you select an IP Address as the type in Local ID make sure the type selected in...

Страница 236: ...for Response Timer Default ON Configure the time in Check Peer After Every sec NAVAN Server will send the DPD message to check the availability of the peer IPSec Client every time after expiry of this time Default 30 seconds Configure the Wait For Response Timer sec When DPD message is sent to the peer IPSec Client to check its availability NAVAN Server will wait for its response till the expiry o...

Страница 237: ...cy 1 is selected Select the Encapsulation Mode you want to be use in order to encapsulate the packets travelling during the connection Select Tunnel if you want to use IPSec for security as well as for connectivity between the Server and the Client Select Transport if you want to use IPSec for security only If you select Tunnel you must configure the parameters Allowed Local LAN IP Address Remote ...

Страница 238: ...cation you select will be used along with IPSec Policy to authenticate your IPSec Client during initial negotiation If you want to authenticate your Client using a key password during initial negotiation which is agreed upon by both the Server and Client in advance select Pre Shared Key If you select this option you must configure the parameters Pre shared Key and Confirm Pre shared Key In Pre sha...

Страница 239: ...Remote ID of a Server should match with the ID configured as Local ID of its Client If you select IP Address as the Local ID and Remote ID option make sure the IP Address is a Public IP Address WAN IP Address Make sure the type you select for the Local ID and Remote ID are same that is if you select an IP Address as the type in Local ID make sure the type selected in Remote ID is also an IP Addres...

Страница 240: ...onse of the DPD message is not received from the remote Client till the expiry of Wait for Response Timer Default ON Configure the time in Check Peer After Every sec NAVAN Server will send the DPD message to check the availability of the peer IPSec Client every time after expiry of this time Default 30 seconds Configure the Wait For Response Timer sec When DPD message is sent to the peer IPSec Cli...

Страница 241: ...e Policy details click the Settings icon Select the Encapsulation Mode you want to be use in order to encapsulate the packets travelling during the connection Select Tunnel if you want to use IPSec for security as well as for connectivity between the Server and the Client Select Transport if you want to use IPSec for security only If you select Tunnel you must configure the parameters Allowed Loca...

Страница 242: ...tication you select will be used along with IPSec Policy to authenticate your IPSec Server during initial negotiation If you want to authenticate your Client using a key password during initial negotiation which is agreed upon by both Server and Client in advance select Pre Shared Key If you select this option you must configure the parameters Pre shared Key and Confirm Pre shared Key In Pre share...

Страница 243: ...0 203 2 an E mail for example customer care matrixcomsec com The Remote ID of a Client should match with the ID configured as Local ID of its Server The Remote ID is configured for each Tunnel Make sure it is unique for each tunnel Make sure the type you select for the Local ID and Remote ID are same that is if you select an IP Address as the type in Local ID make sure the type selected in Remote ...

Страница 244: ...Sec connection with the remote Server when response of the DPD message is not received from the remote IPSec Server till the expiry of Wait for Response Timer Default ON Configure the time in Check Peer After Every sec NAVAN Client will send the DPD message to check the availability of the peer IPSec Server every time after expiry of this time Default 30 seconds Configure the Wait For Response Tim...

Страница 245: ...a PPP frame an IP datagram is wrapped with an L2TP header and a UDP header IPSec Encapsulation is the second layer in which the resulting L2TP message is then wrapped with an IPSec Encapsulating Security Payload ESP header and trailer an IPSec Authentication trailer that provides message integrity and authentication and a final IP header Encryption The L2TP message is encrypted with Data Encryptio...

Страница 246: ...assigned to the L2TP over IPSec Client to resolve the Domain Name query of internal network hosts Default Blank If WINS Server is available in your internal network enter IP Address of WINS Server in WINS Server The configured IP Address will be assigned to the L2TP over IPSec Client to resolve NETBIOS name TCP IP Query from connected L2TP over IPSec Client of the internal network hosts Default Bl...

Страница 247: ...ur L2TP over IPSec Client By default Policy 1 is selected For detailed instructions see Creating an IPSec Policy Select the type of Remote LAN Network the client belongs to You can select Single IP IP Subnet or None Road Warrior If you want to allow access to only one device from the entire remote network of the client select Single IP Address Configure the IP Address you want to allow access to I...

Страница 248: ...ey re enter the key for confirmation If you want to authenticate your L2TP over IPSec Client using a digitally signed certificate in IPSec Policy select Certificate If you select this option select the relevant System Certificate For detailed information see Certificate Management If you select Certificate as the Authentication Type you do not have to configure the Local ID and Remote ID These wil...

Страница 249: ...l ID and Remote ID configured in IPSec and L2TP over IPSec are not same The options for Local ID and Remote ID will depend on the type of Authentication Mode selected under IPSec Policy For detailed information see Creating an IPSec Policy Make sure the type you select for the Local ID and Remote ID are same that is if you select an IP Address as the type in Local ID make sure the type selected in...

Страница 250: ... expiry of this time Default 30 seconds Configure the Wait For Response Timer sec When DPD message is sent to the peer L2TP over IPSec Client to check its availability NAVAN Server will wait for its response till the expiry of this timer If no response is received till the expiry of this timer the system will disconnect the tunnel Default 10 seconds Click Submit to save the settings Configuring NA...

Страница 251: ...an select None Single IP or IP Subnet If you want to allow access to only one device from the entire remote network of the Server select Single IP Address Configure the IP Address you want to allow access to If you want to allow access to the entire remote network of the Server select IP Subnet Configure the IP Address Network and the Subnet Mask If the Server is a single user and there is no remo...

Страница 252: ...t matrixcomsec com The Local ID of a Client should match with the ID configured as Remote ID of its Server Select the type of Remote ID identity of your remote L2TP over IPSec Server which is expected to be received by your L2TP over IPSec Client during IPSec negotiation You can select the identity of your Client either as a DNS IP Address E mail a DNS domain name for example myserver com an IP Ad...

Страница 253: ...connection with the remote Server when response of the DPD message is not received from the remote L2TP over IPSec Server till the expiry of Wait for Response Timer Default ON Configure the time in Check Peer After Every sec NAVAN Client will send the DPD message to check the availability of the peer L2TP over IPSec Server every time after expiry of this time Default 30 seconds Configure the Wait ...

Страница 254: ...r has a Open VPN Client that is capable of using the particular SSL VPN The traffic between the SSL VPN Client and the SSL VPN Server is encrypted with the SSL protocol Configuring SSL VPN Connection SSL protocol can be configured as both Server as well as Client type of connection mode for VPN tunneling Configure the parameters as per your installation scenario Configuring NAVAN as an SSL Server ...

Страница 255: ...from which you want the server to start assigning the IP Addresses to its clients Default 172 16 18 1 to 171 16 18 254 Make sure the LAN Network and the IP Addresses assigned to the SSL Clients are in different Subnets If the Domain Name Server is available in your internal network configure the Primary DNS Address The configured IP Address will be assigned to the SSL Client to resolve the Domain ...

Страница 256: ...entication parameters for each client click Add A new window opens Assign a User Name to the client Assign a Password to the client Select the type of Remote LAN Network the client belongs to You can select Single IP IP Subnet or None Road Warrior If you want to allow access to only one device from the entire remote network of the client select Single IP Address Configure the IP Address you want t...

Страница 257: ...e Certificate Management To configure the authentication parameters for each client click Add A new window opens Enter the Common Name of the System Certificate of the SSL Client Select the type of Remote LAN Network the client belongs to You can select Single IP IP Subnet or None Road Warrior If you want to allow access to only one device from the entire remote network of the client select Single...

Страница 258: ...end the requests NAVAN supports 10 PPTP Tunnels Default 1 Select the Enable Client check box Default Disabled Select the type of transport Protocol using which the Client receives sends the packets to from the SSL Server You can either select UDP or TCP Make sure the SSL Server is configured with the same protocol Enter the Server Address Port that is the remote SSL Server s Address and Port as pr...

Страница 259: ...ou can Authenticate the client based on User Name Common Name If you select the User Name enter the User Name and Password as configured in the Server If you selected Common Name the Server will consider the Common Name in the System Certificate of the Client for authentication For detailed information see Certificate Management Click Submit to save the settings ...

Страница 260: ...blishes an invisible tunnel which carries the encrypted PPP data packets between the VPN client and VPN server Configuring VPN using PPTP PPTP protocol can be configured as both Server and Client type of connection mode for VPN tunneling Configure the parameters as per your installation scenario Configuring NAVAN as a PPTP Server Server Mode signifies that system works as PPTP Server and creates t...

Страница 261: ...ed to the PPTP Client to resolve NETBIOS name TCP IP Query from connected PPTP Client of the internal network hosts Default Blank Select the type of User Authentication Protocol you want to use to authenticate your PPTP Client You can use PAP Plain Authentication Protocol or CHAP Challenge Handshake Authentication Protocol Default CHAP Make sure you configure the PPTP Client with the same Authenti...

Страница 262: ... network of the client select IP Subnet Configure the IP Address Network and the Subnet Mask If the client is a single user and there is no remote network select None Road Warrior Click Submit to save the settings The window closes and you return to the main page The entries you added appear in the PPTP Member table You can add up to 10 VPN Clients To edit an entry click Edit To delete an entry se...

Страница 263: ...uthentication Protocol Default CHAP Select the type of MPPE Encryption as provided by the PPTP Server You can use 40 128 bits or 128 bits or None 128 bits is more secure than 40 bits Select None if encryption of the data is not required by the Server Default 40 128 bits Select the type of Remote LAN Network the Server belongs to You can select Single IP or IP Subnet If you want to allow access to ...

Страница 264: ...N to destination of remote LAN IP Address configured for this tunnel In Disconnect After Idle Timeout configure the time duration minutes for which the system should maintain the tunnel connection binding with the PPTP Server The system disconnects the tunnel of this PPTP Client if the packets are not sent or received from this tunnel before this timer expires Default 300 mins On Submit The system...

Страница 265: ...ts as well as DNS queries from other sources In such a case you can split the DNS Proxy You can configure the DNS Proxy of NAVAN so that the DNS queries from the internal LAN hosts VPN Clients are resolved locally while the others can be handled by the DNS Server of the ISPs Let us understand how the DNS queries are resolved with the help of an example As shown above a VPN connection is created be...

Страница 266: ...olve this DNS query to a particular IP Address in its own network and the DNS query will be redirected to the desired Domain Name Now the system receives another DNS query www xyz com from the internal host The Domain Name received in this query does not match with that configured in the table DNS Proxy is not configured in the system for www xyz com thus this DNS query is redirected to the ISP DN...

Страница 267: ...able preference will always be given to the Hostname during DNS Server resolution So it is recommended to configure Domain Names in DNS Proxy table different from the Hostname to fully utilize the DNS Proxy service of NAVAN For more details about Hostname refer Maintenance Server IP Address Enter the IP Address of the DNS Server of the VPN Client which will resolve the DNS query This IP Address mu...

Страница 268: ...258 Matrix NAVAN CNX200 System Manual ...

Страница 269: ... the packets and minimizes congestion in the network making packet processing more efficient The data packets can be filtered according to different QoS policies Source MAC Address Policy Source IP Address Policy Destination IP Address Policy Application Based Policy DSCP24 Based Policy Packet transfer before applying QoS Policy 24 DSCP means Differentiated Services Code Point It is a value which ...

Страница 270: ...QoS Policy for the packets on the basis of MAC Address Log into Jeeves as System Engineer Click the QoS tab On the left navigation bar click the Source MAC Based Policy link The Source MAC Address based QoS Policy page opens You must add a rule for the required MAC Addresses on which you want to apply the QoS policy To do so S1 S2 S4 S3 S3 S3 S3 S1 S3 S2 S3 S4 S3 S3 Switch LAN Stream2 S2 Stream1 S...

Страница 271: ...rocessed as per the priority you select Select Apply DSCP Tag check box if it is used by your ISP while processing the packets If you enable Apply DSCP Tag select a DSCP Value value you want to assign to that packet The value ranges from 0 to 63 Default 1 Similarly you can add rules for other MAC Addresses Click Submit to save this QoS Policy You return to the main page The rules you created appea...

Страница 272: ... which is for information only Enter the Source IP Address on which this QoS Policy is to be applied Assign a Priority level to the data packets from this IP Address You can select the required priority from High Medium Normal or Low based on the type of data or importance of the data which is to be transmitted The packets gets processed as per the priority you select Select Apply DSCP Tag check b...

Страница 273: ...o edit a rule click the Edit icon To delete a rule select the check box of the respective rule and click Delete Destination IP Address based Policy To create a QoS Policy for the packets on the basis of Destination IP Address On the left navigation bar under QoS click the Destination IP Based Policy link The Destination IP Address based QoS policy page opens You must add a rule for the required IP...

Страница 274: ...s processed as per the priority you select Select Apply DSCP Tag check box if it is used by your ISP while processing the packets If you enable Apply DSCP Tag select a DSCP Value value you want to assign to that packet The value ranges from 0 to 63 Default 1 Similarly you can add rules for other IP Addresses Click Submit to save this QoS Policy You return to the main page The rules you created app...

Страница 275: ...Configure the following parameters Enter the Application Name It is unique name for this QoS Policy which is for information only Select the type of Transport protocol on which this QoS Policy is to be applied Select Any if you want to apply this QoS Policy on both the types of transport protocol Select TCP if you want to apply this QoS Policy on TCP protocol Select UDP if you want to apply this Q...

Страница 276: ...Value value you want to assign to that packet The value ranges from 0 to 63 Default 1 Similarly you can add rules Click Submit to save this QoS Policy You return to the main page The rules you created appear in the Application based QoS Policy table You can add up to 10 rules To edit a rule click the Edit icon To delete a rule select the check box of the respective rule and click Delete DSCP based...

Страница 277: ...e click the Edit icon To delete a rule select the check box of the respective rule and click Delete After you have created the rules for the desired type of policy you must configure the Upstream Bandwidth and Priority Wise Bandwidth Percentage of currently used Internet Connectivity Ethernet WAN or WWAN The Upstream Bandwidth will be provided by your ISP This is the speed of the outgoing packets ...

Страница 278: ...268 Matrix NAVAN CNX200 System Manual ...

Страница 279: ...erence example steal MAC steal IP Channel Hogging Disassociation Attacks Flooding Packets ARP Poising RST Packets Window Size Changes UDP Flooding ICMP Flooding Ping of dead BROADCAST Flooding Masquerade Attacks Land Attack Smurf Attack TCP hijacking Packet sniffing NAVAN provides you with different types of security which help you to secure your network against the common attacks such as Stateful...

Страница 280: ...l of Service DOS is a type of attack that makes a service unusable usually by overloading the server or network which causes your computer to crash or to become busy processing data and you are unable to use it This can be done by consuming the host resources and bandwidth or forcing more computation An Intrusion Detection System IDS is a software that automates the intrusion detection process An ...

Страница 281: ...Enabling this you can prevent the following types of attacks Smurf Attack TCP Reset Attack DOS Attack BRUTE FORCE Attack SYNFLOOD Restrict Port Scan To secure your network select the check box of the respective type of security Click Submit to save ...

Страница 282: ...s blocked by Keywords 3 Blocked Destination IP Address 4 Blocked Destination Ports Similarly you can also frame policies to allow users access to the Internet on the basis of 1 Allowed Destination IP Address 2 Allowed Destination Ports To apply these policies you can filter out the LAN users on the basis of 1 MAC Address 2 IP Address Creating an Access Policy To create an Access Policy do the foll...

Страница 283: ...ss window opens Configure the MAC Addresses of the desired users to apply this policy You can configure up to 10 MAC Addresses If you select IP Address List click the Settings icon The List of IP Address window opens Configure the IP Addresses of desired users to apply this policy You can configure upto 10 IP Addresses If you select IP Address Range click the Settings icon The Range of IP Address ...

Страница 284: ... restricted Do not configure the Hostname programmed in the Administrative Settings page of Jeeves under the Maintenance tab in this list Otherwise access to NAVAN using the programmed Hostname will be blocked For more details on accessing NAVAN using the Hostname refer Maintenance To deny access to certain websites on the basis of Keywords click Website blocking on Keyword to expand and add the k...

Страница 285: ...ou want to allow the LAN users to access To allow access to certain Applications by Port click Allow Application by Port to expand and configure the following parameters for the application s you want to allow the LAN users to access In Name enter a unique name for the application This is just for your reference In Transport select the type of protocol used during packet transport If you want the ...

Страница 286: ...lete Similarly you can create other policies You can create upto 25 policies Select the Block Packet if no match found in any policy check box and click Submit if you want to block the LAN packets that do not match with any of the policies If no match is found in any policy for the packets and you want to route these LAN packets to the WAN port clear the Block Packet if no match found in any polic...

Страница 287: ...s the remote computers on the public network to get connected with specific computers in the private network In this way the data or services of your computer in the private network such as FTP server Web server File server or Gaming applications can be shared with the devices located in the public network Port Forwarding helps in distributing the network traffic received on the WAN port between s...

Страница 288: ...ves of will not open To access the Web Jeeves you must configure the Server Port of NAVAN to a port other than 80 Port Forwarding has higher priority than Port Triggering Configuring Port Forwarding Log into Jeeves as System Engineer Click the Firewall Security tab On the left navigation bar click the Port Forwarding link To add a new Port Forwarding Rule click Add A new window opens Configure the...

Страница 289: ...gle If you want to forward packets received on a range of ports select Range Configure the Start Port and End Port If you have selected the Port Type as Single configure the Internal IP Address and Port enter the IP address and port of the destination device within the private network The system will forward the packets received on the source port to this IP address If you have selected the Port T...

Страница 290: ...t occupies a particular port Port Triggering does not forward any traffic to an internal host until that internal host has initiated some form of traffic for an external destination When that occurs the Port Triggering mechanism automatically allows traffic to be forwarded to the internal host that initiated the trigger condition Port Triggering is more secure than Port Forwarding because the inco...

Страница 291: ...the packets are forwarded from any public IP Address to the destination port LAN If a single external IP Address is configured the packets will be forwarded from the defined external IP Address 8 8 8 8 to the internal host running the Gaming Application that is to the defined source LAN IP Address and Port from which the triggering was activated The triggering port will be a different port Port 60...

Страница 292: ...elect Single configure only one destination port on the internal host If you select Range configure a range of destination ports on the internal host in Start Port and End Port Under Port Forwarding configure the following parameters Select the Protocol used for packet transport which the system must match to forward the packets as per the configured rule You can select If you want the system to f...

Страница 293: ...can select Single or Range If you select Single you need to configure the destination port of the internal host If you select Range you need to configure a range of destination ports of the internal host in Start Port and End Port The allowed range is 1 to 65535 The Port Forwarding rule will remain active for 10 minutes If there is no in or out packet flow during this time the rule will be deactiv...

Страница 294: ...oIP servers Web servers that generally need to be accessed from the public network These servers are most vulnerable to attacks from the public network Thus there is a need to separate these servers from the rest of the private network Using DMZ feature of NAVAN you can configure multiple servers Web Server DNS Server FTP Server SMTP Relays on a single computer and make these available to the gene...

Страница 295: ...into Jeeves as System Engineer Click the Firewall Security tab On the left navigation bar click the DMZ link Select the Enable check box In Internal IP Address enter the IP Address of the internal host connected behind your NAVAN where the packets are to be forwarded Click Submit to save ...

Страница 296: ...286 Matrix NAVAN CNX200 System Manual ...

Страница 297: ... CAs issue an SSL Certificate to the organizations websites after verifying their credentials Generally one SSL Certificate is issued for a particular server website domain and it is valid for a certain period of time Self Signed Certificate A self signed certificate is created by the Clients themselves or by the Servers and then given to their clients It means that you yourself become the Certifi...

Страница 298: ...lity Name enter the name of your city In Organization Name enter the name of your organization where NAVAN is installed In Organizational Unit Name enter the name of the unit or section or domain of your organization where your NAVAN is installed In Common Name enter your Server s NAVAN s host name or IP Address This Common Name serves as the distinguishing factor In Email Address enter the your h...

Страница 299: ...d appears in the Root CA Certificate table Valid formats are cer crt and pem To delete a CA Certificate select the check box of the respective Root CA Certificate and click Delete The following alert message will be displayed SIP over TLS might not function properly if the CA certificate you are attempting to delete is being used by the system Are you sure you want to delete To delete click Yes el...

Страница 300: ...em Certificate for your clients These System Certificates can then be given to the respective Clients or the Clients can prepare their own System Certificates For this you need to send them the CA Certificate created by you or generate a Certificate Signing Request CSR if you want the Certificate to be signed by a third party If the Clients prepare their own Certificates you need to send your CA C...

Страница 301: ...as the distinguishing factor In Subject Alternate Name enter the name of the multiple domain separated by comma if the same certificate is to be issued for multiple domain of the organization In Email Address enter the your host s e mail address In Validity Upto select the date till which this certificate will be valid Click Calendar to open the calendar NAVAN s Self Signed Certificate s validity ...

Страница 302: ...o delete To delete click Yes else click Cancel To download the System Certificate click Download A sample Self Signed Certificate is given below In the above Self Signed Certificate Issuer represents the details of the CA issuing the Certificate Here the Organization itself is the CA issuer hence the O and CN of both Issuer and Subject is same Validity represents the valid period of this certifica...

Страница 303: ... name of your state or province In Locality Name enter the name of your city In Organization Name enter the name of your organization where the NAVAN is installed In Organizational Unit Name enter the name of the unit or section or domain of your organization where your NAVAN is installed In Common Name enter your Server s NAVAN s host name or IP Address This Common Name serves as the distinguishi...

Страница 304: ...process of obtaining a certificate from any trusted third party CA After you have generated the certificate you must contact any authorized third party that issues SSL Certificates to companies or web owners such as Thawte VeriSign etc and enroll the Certificate Signing Request CSR with them These third parties Certificate Authorities CA have their charges to sign and validate the certificate for ...

Страница 305: ...tion at which the key is saved and click Upload The System Certificate you uploaded appears in the System Certificates table Valid formats for certificate are cer crt and pem Valid formats for keys are pem and key Base64 encoded ASCII file The number of uploaded certificates out of the possible 60 is displayed above the table To delete a System Certified select the check box of the respective Cert...

Страница 306: ...296 Matrix NAVAN CNX200 System Manual ...

Страница 307: ...es all the telephony features which a small business needs including some of the key features including LCR Auto Attendant CLI Based Routing Call Budgeting RCOC Call Conferences Once you install NAVAN you must configure the following region specific parameters Selecting the Region 1 Log into Jeeves as System Engineer 2 Click the Regional Settings tab 3 On the left navigation bar click the Region l...

Страница 308: ...isplayed in this language By default English language is selected You can change the default language as per the selected Region 6 Click Submit to save At the time of installation when you select the Region according to the geographical location of the site where the system is installed NAVAN sets the country specific values for the following parameters automatically Call Progress Tones Daylight S...

Страница 309: ...RTC values at regular intervals to correct this drift To change the desired parameters 1 Click the Regional Settings tab 2 On the left navigation bar click the Date and Time link 3 On this page click Date Time to expand 4 Select the desired Date Format to display the Date as DD MM YYYY Date Month Year or MM DD YYYY Month Date Year 5 Click the Set Date Time button to edit or set the Current Date an...

Страница 310: ...ly To do this 1 Click the Regional Settings tab 2 On the left navigation bar click the Date and Time link 3 On this page click Daylight Saving Time DST to expand 4 Select the required DST Type for the selected Region either as Disable Manual or Scheduled If DST is not to be observed in the selected Region by default the system displays the DST as Disable for that Region If you want to schedule a D...

Страница 311: ...t Date Month Wise type configure the below settings in the DST table Specify the date of the month when the DST Starts and Ends In the Month column select the name of the month when DST begins and ends January December In the Date column select the date on which DST begins and ends 1 31 In the Time column select the time when DST will begin to change and end The time mode is 24 hours with options ...

Страница 312: ...s can be programmed manually from the Jeeves as described in Setting the Real Time Clock RTC Other than that NAVAN can also synchronize its time with a configured SNTP Simple Network Time Protocol server or the GSM network To configure the Time Synchronization option to be used by NAVAN 1 Click the Regional Settings tab 2 On the left navigation bar click the Date and Time link 3 On this page click...

Страница 313: ...will be displayed 5 Program the SNTP Server Address in the relevant field This address is mandatory when Time Synchronization option is selected as SNTP 6 Select the Time Zone from the list box according to the geographical location of the site where NAVAN is installed By default Time Zone is selected automatically as per your region after you select the Region however if required you can change t...

Страница 314: ...P Server Mobile network click the Sync Date Time Now button provided below In this way you can manually update NAVAN s RTC any time as per your requirement If DST is applicable and Date and Time change is received from the SNTP server Mobile network then system will synchronize the DST as per the new Date Time ...

Страница 315: ...rward Dialinga is done Toooooooooooo Played for 7 seconds After which Error Tone starts Dial Tone Timer Ring Back Tone Played when the internal number you have dialed is free Turroo Turrroo Played for 45 seconds Ring Back Tone Timer Busy Tone Engaged Tone High pitch beeps with equal ON and OFF periods played when the dialed extension is busy Busy tone continues for 7 seconds This Busy Tone Timer i...

Страница 316: ...ne Call Waiting Tone as per ITU Two ticks followed by a longer OFF time of approx 3 seconds played to a busy extension when there is a new incoming Trunk call Beep Beep Beep Beep Played for the duration of the Transfer On Busy Timer Transfer On Busy Timer Confirmation Tone Acceptance Tone as per ITU Continuous fast beeps played to confirm successful use of features Beep Beep Beep Played for 7 seco...

Страница 317: ...ange the CTPG type set by the system To do this Log into Jeeves as System Engineer Click the Regional Settings tab On the left navigation bar click the Call Progress Tone link Select the desired Region from the drop down list as the Call Progress Tone Type Select the desired Dial Tone Type as Type 1 or Type 2 from the combo box Click Submit to save changes To change CPT related Timers Click the PB...

Страница 318: ...40 0 4on 0 2off 0 4on 2 0off 440 0 75on 0 75off 2 Region2 400 Continuous 400 Continuous 400 0 6on 0 2off 0 2on 2 0off 400 0 5on 0 5off 3 Region3 350 440 Continuous 350 440 Continuous 440 480 2 0on 4 0off 480 620 0 5on 0 5off 4 Argentina 425 Continuous 425 Continuous 425 1 0on 4 0 off 425 0 3on 0 2off 5 Australia 425 25 Continuous 425 25 Continuous 400 25 4on 2off 4on 2 0off 425 0 375on 0 375off 6 ...

Страница 319: ...ealand 400 Continuous 400 Continuous 400 450 0 4on 0 2off 0 4on 2 0off 400 0 5on 0 5off 25 Philippines 425 Continuous 425 Continuous 425 480 1 0on 4 0off 480 620 0 5on 0 5off 26 Poland 425 Continuous 425 Continuous 425 1 0on 4 0off 425 0 5on 0 5off 27 Portugal 425 Continuous 425 Continuous 425 1 0on 5 0off 425 0 5on 0 5off 28 Russia 425 Continuous 425 Continuous 425 0 8on 3 2off 425 0 4on 0 4off 2...

Страница 320: ... 0off 480 620 0 5on 0 5off 8 China 450 0 7on 0 7off 450 0 1on 0 1off 450 0 1on 0 9off 450 0 4 on 4 0off 450 0 2on 0 2off 0 2on 0 6off 9 Egypt 450 0 5on 0 5off 425 50 0 1on 0 1off 425 50 0 1on 0 9off 425 50 0 1on 0 1off 0 1on 2 7off 450 0 5on 0 5off 10 France 440 0 25on 0 25off 440 0 1on 0 1off 440 0 1on 0 9off 440 0 3on 10 0off 440 0 1on 2 9off 11 Germany 425 0 24on 0 24off 425 0 1on 0 1off 425 0 ...

Страница 321: ...on 0 9off 400 0 2on 3 0off 0 2on 5 0off 425 0 1on 2 9off 25 Philippines 480 620 0 25on 0 25off 425 0 1on 0 1off 425 0 1on 0 9off 440 0 3on 10 0off 440 0 1on 2 9off 26 Poland 425 0 5on 0 5off 425 0 1on 0 1off 425 0 1on 0 9off 425 0 15on 0 15off 0 15on 4 0off 425 0 1on 2 9off 27 Portugal 450 0 33on 1 0off 425 1 0on 0 2off 425 0 1on 0 9off 425 0 2on 0 2off 0 2on 5 0off 425 0 2on 1 4off 28 Russia 425 ...

Страница 322: ...50 0 1on 2 9off 35 UAE 400 0 4on 0 35off 0 225on 0 525off 350 440 0 1on 0 1off 350 440 0 1on 0 9off 350 440 0 1on 0 1off 0 1on 2 7off 350 440 0 1on 2 9off 36 UK 400 0 4on 0 35off 0 225on 0 525off 350 440 0 1on 0 1off 350 440 0 1on 0 9off 350 440 0 1on 0 1off 0 1on 2 7off 400 0 2on 4 8off 37 USA 480 620 0 25on 0 25off 350 440 0 1on 0 1off 350 440 0 1on 0 9off 440 0 3on 10 0off 480 620 0 5on 0 5off ...

Страница 323: ...Matrix NAVAN CNX200 System Manual 313 Default CPTG Type applied to each Region supported by NAVAN ...

Страница 324: ...or each default Emergency Number For example 112 is the default Emergency Number for the mobile network So you may select the Mobile Trunk for dialing this number You may add additional Emergency Numbers to the existing default numbers in the edit boxes and select the Outgoing Trunks for these numbers Disclaimer Matrix is not responsible for incorrect configuration of Emergency Numbers To add an E...

Страница 325: ...rrow buttons on the right display box To delete trunks from those you have selected use Delete key on your keyboard Select Rotation if you have selected more than one trunk Default Disabled When you enable Rotation each new outgoing call is routed through the subsequent trunk in the group 26 ensuring equal distribution of outgoing call traffic on all trunks When Rotation is OFF calls are routed th...

Страница 326: ...ation has no relevance if only one trunk is selected Click OK to save the selected trunks All the trunks you selected appear in through field in the sequence you selected separated by comma Click Submit to save the values entered on this page ...

Страница 327: ... can play customized greeting messages to callers For each holiday you can play a different message For example A company ABC Ltd has the following requirements December 23 to December 31 all the employees will be on a holiday The callers must be greeted with a holiday message January 1 to January 4 few employees will be attending the office In this case you must define the following in the Holida...

Страница 328: ...ensions according to the Day Working Hours When Day Night Mode is As per Time Table the system routes the call as per the Trunk Landing Group and Auto Attendant defined for the current time zone customized Holiday message if configured is played to the caller in place of the Welcome message for the current time zone extensions work according to the Class of Service Toll Control and Trunks assigned...

Страница 329: ...nk Valid Range is from 01 to 31 Start and End Month is Blank Valid Range is from January to December Start and End Time is 00 00 for Hours Minutes Valid Range is from 00 00 to 23 59 You can assign a Name to each time period you have defined as Holiday For example Christmas Independence Day Thanksgiving Default Blank As the Day Night Mode select the time zone for the period you have defined as Holi...

Страница 330: ... you need to do the following configuration Ensure that Voice Mail Auto Attendant is selected as the Auto Attendant in the Select Trunks for Outgoing Calls For detailed information see SLT Extensions and SIP Extensions Make sure you disable the parameter Directly Route to Root Node in the VMS Auto Attendant Profile you assign to the Trunks and Extensions For more details see Voice Mail Auto Attend...

Страница 331: ...t extension numbers to the following extension port types 21 26 to SLT port numbers 01 to 06 respectively By default the Extension Numbers of all SIP extensions are blank The default Feature Access Codes that appear on this page are country dependant To configure 1 Log into Jeeves as System Engineer 28 Feature access codes are short digit codes used to invoke a feature or function See Access Codes...

Страница 332: ...e extension number may be 6 digits The digits 0 to 9 and are allowed 0 can not be used as first digit and and can be used only as the first digits When you change the extension numbers make sure that they do not clash with any other Feature Access Codes in the dialing phase codes starting with 1 9 etc To know more refer the Access Codes and Conflict Dialing topics Each time there is a conflict of ...

Страница 333: ...Number will be considered as the SIP ID 7 If you have finished assigning numbers and names click the Submit button To assign the extension numbers all over again click the Clear Extn No button on this page To default all parameters click the Default button on this page To reach any specific station s configuration page click on that station port appearing under the Port column 8 Reassign Feature A...

Страница 334: ...ntial parameter links on the page Expand Click to expand a link to display all parameters under the link Collapse Click to collapse a link Hides all parameters under the link Copy Click to copy the parameters under a specific link of a page to the same link under another extension page Settings Click to configure the settings of a parameter further More link Click to view all additional parameters...

Страница 335: ...k 2 Enter the Email ID of the extension user The Email ID can be a maximum of 64 characters Default Blank 3 Click Submit These parameters are used by the SMS Server application To know more about this feature see SMS Server Class of Service 1 Click Class of Service to expand options Define the Class of Service for the SLT extension for Day time and Night Break time 2 To allow a feature select the ...

Страница 336: ...k the Settings icon The Settings icon does not appear when you select No Calls and All Calls option The Toll Control Allowed Denied Numbers page will open in a new window Configure the Allowed and Denied Numbers Click Submit Close the window after you have configured the list See Toll Control to know more about this feature Toll Control for Dynamic Lock Dynamic Lock allows extension users to chang...

Страница 337: ... and All Calls option Click the Settings icon The Toll Control Allowed Denied Numbers page will open in a new window Configure the Allowed and Denied Numbers for Local Regional National International and Limited Calls Click Submit Close the window after you have configured the list Select Trunks for Outgoing Calls Outgoing calls to external numbers are made by dialing Trunk Access Codes TAC TAC fo...

Страница 338: ...Up and Down arrow buttons on the right display box To remove delete any trunks from the list press the Delete key of your keyboard You may select the Rotation option if you have selected more than one trunk When you enable Rotation each new outgoing call is routed through the subsequent trunk in the group30 This ensures equal distribution of outgoing call traffic on all trunks If you clear Rotatio...

Страница 339: ...cted trunks offer different tariffs according to the time of the day as well as area distance phone number Service Provider Based Choose this option if the same service providers of the selected trunks offer different rates for calls made to numbers within their own network and for calls made to numbers of another Service Provider s network If you do not want to apply LCR select OFF Configure LCR ...

Страница 340: ...ailbox 4 Allow Mailbox Management Select Yes for Allow Mailbox Management to allow the user the right to change the settings of the mailbox It provides the right to change the settings of the mailbox that is redirect the messages or delete old messages 5 Define the Mailbox Size minutes for the extension You may change the mailbox size to any desired value from 00001 to 60 000 minutes Default 5 min...

Страница 341: ... extension user after playing the message Always If you select this option the VMS will play message details to the extension user after playing each message On Demand If you select this option the VMS will play message details to the extension user only when the user requests it On completion of each message the VMS will prompt the extension user to press a digit for date and time stamp When the ...

Страница 342: ...off and the stuttered dial tone will stop Stuttered Dial Tone LED Lamp Polarity Reversal When the extension user goes OFF Hook the extension user will hear a stuttered dial tone and if the SLT has a Message Wait lamp the lamp will blink continuously due to provision of Polarity Reversal When the extension user retrieves all the waiting messages the LED will be turned off and the stuttered dial ton...

Страница 343: ...o the extension user as an attachment select Send with Attachment If you want to mail the notification only to the extension user select Send without Attachment Default Do Not Send See Email Based Notification for more details 16 Type the E mail Address of the extension user to which the Voice Mail notification is to be sent The e mail ID may consist of up to 64 characters Default blank See Email ...

Страница 344: ... Flash is the breaking of Loop Current for a specific time period NAVAN considers that an extension has dialed flash if it detects breaking of the loop current for the duration of the Flash Timer The Flash timer is programmable The range of this timer is from 70 minimum to 900 maximum milliseconds By default Flash Timer is set to 101 600 milliseconds You can program the Flash Timer according to th...

Страница 345: ...ntral Office and the telephone instrument connected to the SLT port Select the Loop Length as Upto 5 Km or Above 5 Km according to your installation scenario 9 Set the value of the OFF Hook Current minimum according to the current drawn by the SLT instrument connected to the SLT port NAVAN supports OFF Hook detection for all types and brands of SLT instruments by providing for configurable values ...

Страница 346: ...ignal Call Disconnection The range of this timer is 68 to 952 milliseconds Default 476 msec 14 Gain Setting Configure the Transmit and Receive Gain Settings as described below 34 Dialing Flash either with the Flash Key or by pressing the Hook switch causes the phone to go in ON Hook state briefly for 600 800 milliseconds Thus ON Hook state is simulated briefly The SLT may draw a higher current whe...

Страница 347: ...ure the Gain Setting that you want the system to apply on the SLT when the FXS Port is connected to any other FXS Port of the system during an incoming or outgoing call Valid Range for Tx Gain 6dB to 12dB and Rx Gain 6dB to 12dB Default 0 dB SLT CO Tx Gain and Rx Gain Configure the Gain setting that you want the system to apply on the SLT when the FXS Port is connected to CO Port of the system dur...

Страница 348: ...xtension Transfer immediately When the caller dials the extension number the VMS Auto Attendant will transfer the call on the extension without checking whether it is busy or free Transfer when extension rings When the caller dials the extension number the VMS Auto Attendant will wait for the extension to start ringing and then transfer the call If the extension is busy the VMS Auto Attendant will...

Страница 349: ...rom this extension Received by this extension the system will store only incoming calls from other extensions Never the system will not store internal calls 3 To store details of incoming calls from external numbers select Store Incoming Calls Default selected 4 To store details of outgoing calls made by the extension user to external numbers select Store Outgoing Calls Default selected Call Budge...

Страница 350: ...he desired option Display Number of Transferring Extension when call is transferred by this extension Display Number of Party kept on Hold when call is transferred by this extension Walk In Walk Out This parameter is related to the feature Walk In Class of Service NAVAN offers two types of Walk In i One Call per Walk In where the extension user is automatically logged out after a call ii Walk In u...

Страница 351: ...all it to the programmed destination phone number as Call Forward No Reply By default the Timer is set to 30 seconds Refer the feature description for Call Forward to know more 3 Select the type of calls to be forwarded If Call is forwarded to an external number You may select from the following options Forward only Internal calls Forward only Trunk calls Forward all calls internal as well as trun...

Страница 352: ...Received without CLI check box if you want incoming calls without CLI to be taped Default Disabled Program the numbers of the Incoming Calls that must be taped in Tape Incoming Calls received from following numbers table You may type as many as 99 numbers Program the external numbers that you want the system to tape in the Tape Outgoing Calls made to following numbers table You may type as many as...

Страница 353: ...n enter as many as 99 numbers In the Do Not Apply CDC for calls matching with numbers column enter the numbers which you want to be exempted from CDC Click Submit and close the window Priority 1 Select a Priority from 1 to 9 for the SLT extension Default 5 Each extension of the NAVAN is assigned a Priority Level starting from 1 2 3 to 9 with 1 being lowest Priority and 9 being highest Priority Whe...

Страница 354: ...arm call Music on Hold The extension user is played music on hold on answering the alarm call Voice Mail The extension user is greeted by the VMS on answering the alarm call Route to Operator The alarm call is routed to the Operator extension so that the Operator can serve the alarm request to the extension user Default Voice Message Help Desk Configure this parameter if you want to define the ext...

Страница 355: ...nother SLT extension How to copy Parameter Values to another SLT extension 1 Click the Copy button on the page of the SLT extension you wish to copy The Copy dialog box opens The dialog box displays the number and name of the extension to be copied in the Copy from field The dialog box also lists the numbers and names of the extensions to which you can copy the values under Copy To field ...

Страница 356: ...AVAN CNX200 System Manual 2 Select the check boxes of the extension numbers to which you want to Copy To 3 Click OK The parameter values of the extension you Copy From will be applied on the extensions you Copy To ...

Страница 357: ...ed by Matrix as well as any other Open Standard SIP phone39 Configure these parameters regardless of the SIP extension type that is Extended or Open SIP extension you want to register with NAVAN For details see Configuring SIP Extension General Parameters To register the proprietary Extended IP Phone SPARSH VP248 with NAVAN configure specific settings relevant to SPARSH VP248 Extended SIP as descr...

Страница 358: ...ure relevant settings as described in Configuring Open SIP Phones as SIP Extensions Configuring SIP Extension General Parameters All the parameters displayed within the SIP Extensions page in Jeeves are considered as the SIP Extension General Parameters except the following three Device Settings Location1 Device Settings Location2 Device Settings Location3 To configure the SIP Extension General Pa...

Страница 359: ...tton To copy the same SIP extension parameter values to another SIP extension s use the Copy button The default numbers and names of the SIP extensions appear on the tabs on this page When you default the system Clicking Maintenance tab Default the System link the configured IDs of all the SIP Extensions are cleared Follow the instructions provided below to configure the general parameters of SIP ...

Страница 360: ...s per your requirement later on User Details 1 Enter the Mobile Number of the extension user The Number can be a maximum of 16 digits Default Blank 2 Enter the Email ID of the extension user The Email ID can be a maximum of 64 characters Default Blank 3 Click Submit These parameters are used by the SMS Server application To know more about this feature see SMS Server Class of Service 1 Click Class...

Страница 361: ...ngs icon This icon does not appear when you select No Calls and All Calls option The Toll Control Allowed Denied Numbers page will open in a new window Configure the Allowed and Denied Numbers Click Submit Close the window after you have configured the list See Toll Control to know more about this feature Toll Control for Dynamic Lock Dynamic Lock allows extension users to change the Toll Control ...

Страница 362: ...ndow Configure the Allowed and Denied Numbers for Local Regional National International and Limited Calls Click Submit Close the window after you have configured the list Select Trunks for Outgoing Calls Outgoing calls to external numbers are made by dialing Trunk Access Codes TAC TAC for users worldwide are 0 5 Default 0 and 5 TAC for users in USA are 9 5 For each TAC you need to select the Outgo...

Страница 363: ...he sequence you selected separated by commas For example BSNL CO 1 BSNL CO 3 Reliance CO 4 and Pulver SIP1 3 To apply Least Cost Routing on the Trunks allowed for 0 dialing select the desired LCR method from the combo box Number Based Choose this option if the service providers of the trunks you selected offer different tariffs according to area or distance or phone numbers dialed Time Based Choos...

Страница 364: ...lt access to the mailbox is password protected Your User Password is required to access the mailbox Whenever the mailbox owner accesses the mailbox the VMS will ask for the user password If you want to remove password protection clear this check box Since a Mailbox can be accessed using the default User Password 1111 extension users who are assigned a mailbox are recommended to change their User P...

Страница 365: ... make sure that General Mailbox is enabled in the Class of Service of the SIP extension Refer Class of Service CoS for instructions Overwrite Old messages If you select this option the VMS will overwrite the old messages to record the new message in the mailbox The VMS starts overwriting the oldest message first Default Deliver New Message in General Mailbox 8 To play message details such as Date ...

Страница 366: ...the extension user goes OFF Hook See Message Wait feature for more details Default No Notification 12 To notify the arrival of a new voice message in the mailbox of the extension user via call select the required option in the Voice Mail Notification via Call list If you want the notifications to be sent as soon as a new message arrives in the mailbox of the extension user select Immediate If you ...

Страница 367: ...he E mail Address of the extension user to which the Voice Mail notification is to be sent The e mail ID may consist of up to 64 characters Default blank See Email Based Notification for more details 17 Select the Department Group from the Assign the Mailbox of the Department Group combo box whose mailbox you want to assign to the extension Default None You can assign the Mailbox of a Department G...

Страница 368: ...w the SIP extension user to choose whether or not to show its Presence Status to other SIP Extensions Default Disabled If you allow PUBLISH subscription for a SIP Extension you must also enable Authentication of PUBLISH 9 Keep the Authenticate PUBLISH check box selected if you enabled Allow Publish Default Enabled 10 Select the Allow Presence Subscription check box to enable Presence Subscription ...

Страница 369: ...l be accepted 13 To suppress Silence packets and allow only Voice packets through select the check box Silence Suppression Default Disabled NAVAN supports Silence Suppression for all Vocoders except GSM FR Silence Suppression must be disabled if you have selected Pass Through as the Fax Type 14 Select the appropriate DTMF Option from the three DTMF types supported by NAVAN RTP RFC 2833 or SIP Info...

Страница 370: ...Gain and Rx Gain Configure the Gain Setting that you want the system to apply on the SIP Extension when it is connected to the SIP Trunk or any other SIP Extension of the system during an incoming or outgoing call Valid Range for Tx Gain 31dB to 31dB and Rx Gain 31dB to 31dB Default 0dB SIP Mobile Tx Gain and Rx Gain Configure the Gain Setting that you want the system to apply on the SIP Extension...

Страница 371: ...milliseconds 20 If you are using Fax over IP FoIP 50 select the protocol as Fax Type You may select T 38 UDPTL T 38 RTP Pass through Default T 38 UDPTL Pass Through and T 38 will work only if the peer devices also support the same option If you select Pass through as Fax type you must disable Silence Suppression If the fax sent using T 38 is rejected NAVAN will use Pass Through for sending the Fax...

Страница 372: ... parameter If this parameter is low then fax is transferred faster EQM is directly proportional to this parameter If this parameter is high you will receive good quality fax You may increase the Fax Image Level from 1 to 3 if the quality of fax does not improve with Fax Max Rate and Fax Packet Period Level 0 means no redundancy Set Data Redundancy Level to None 1 2 3 4 5 6 or 7 Default 3 This is a...

Страница 373: ...ofile determines the welcome message to be played to mailbox owner extension user when they reach the home node It also determines whether or not the user should be taken to the root node directly Make sure you also configure the Voice Mail Auto Attendant Profiles when you assign them to extensions To configure click the link Voice Mail Auto Attendant Profile See Voice Mail Auto Attendant Profile ...

Страница 374: ...r chooses not to talk the VMS transfers the call to the mailbox of the extension user if assigned and asks the caller to leave a message Default Transfer when extension answers for Day and Night Break 5 Select Announce Name if you want the VMS Auto Attendant to announce the extension user s name to the caller when transferring the call to the extension Default Disabled When you enable Announce Nam...

Страница 375: ...ct the Apply Call Budget check box 3 Define the calling permission for the extension when it has used up the call budget allotted to it Select the desired option for Calls allowed when Call Budget is consumed No Calls Local Calls Regional Calls National Calls All Calls Default No Calls Click the Settings icon to view the Toll Control Allowed Denied Numbers page This icon does not appear when you s...

Страница 376: ...y on completion of call if you want to assign One Call per Walk In to the extension Or Walk Out on user request if you want to assign Walk In until SIP user manually logs out of the extension Call Forward 1 Click Call Forward to expand 2 Set the Call Forward No Reply Timer sec to the desired value if required The range of this timer is 001 255 Default 030 seconds Call Forward No Reply Timer signif...

Страница 377: ...ce allows the extension user to put two calls on hold make attend a third call and toggle between three calls The more the number of Call Appearances assigned to an extension the more the number of calls the extension user can handle simultaneously The NAVAN supports a maximum of 8 Call Appearances on SIP extensions SIP extensions for Executives are usually assigned 2 Call Appearances while the Op...

Страница 378: ...ernal calls made and received by the extension to be taped Default Disabled Select the Tape Incoming Calls Received without CLI check box if you want incoming calls without CLI to be taped Default Disabled Program the numbers of the Incoming Calls that must be taped in Tape Incoming Calls received from following numbers table You may type as many as 99 numbers Program the external numbers that you...

Страница 379: ...ted on the expiry of the CDC Timer Default Disabled In the Apply CDC for calls matching with numbers column type the numbers on which you want to apply CDC You can enter as many as 99 numbers In the Do Not Apply CDC for calls matching with numbers column enter the numbers which you want to be exempted from CDC Click Submit and close the window Priority 1 Select a Priority from 1 to 9 for the SIP e...

Страница 380: ...oice Message The extension user is played a message recorded in the Voice Module on answering the alarm call Music on Hold The extension user is played music on hold on answering the alarm call Voice Mail The extension user is greeted by the VMS on answering the alarm call Route to Operator The alarm call is routed to the Operator extension so that the Operator can serve the alarm request to the e...

Страница 381: ...w the same steps as described above to configure this extension OR 3 Use the Copy button within SIP Extn 1 page to apply the same SIP extension settings you have already configured on this extension that is SIP Extn 2 4 Click the Copy button on the page of the SIP extension you wish to copy ...

Страница 382: ...he extensions to which you can copy the values under Copy to field 5 Select the check box of the extension number to which you want to Copy To 6 Click OK The parameter values of the extension you Copy From will be applied on the extensions you Copy To Viewing SIP Extension Status To view SIP Extension Status Log into Jeeves as System Engineer Click the Extensions tab On the left navigation bar cli...

Страница 383: ...atrix NAVAN CNX200 System Manual 373 Click SIP Extensions After viewing this page you may log out of Jeeves You can also view the SIP Extensions Status by clicking the Status tab See SIP Extension Status ...

Страница 384: ...hen configure the specific settings relevant to Extended SPARSH VP248 as described below in Configuring Matrix Extended Phone Settings using Jeeves Configuring Matrix Extended Phone Settings using Jeeves You can register up to three Matrix Extended SIP Phones Mobile Soft phone applications Open SIP Phones at three different locations as a single SIP Extension that is all having the same SIP ID You...

Страница 385: ...Matrix NAVAN CNX200 System Manual 375 1 Click Device Settings Location1 to expand options 2 Select the Enable Device check box Default Disabled ...

Страница 386: ...TUN s IP Address as the Registrar Server Address Make sure the Router s Public IP Address is configured in the VoIP Port page You can reach this page by clicking the PBX Settings tab and then clicking the VoIP Configuration link on the left navigation bar If the Extended IP Phone is connected in the Public Network and NAVAN is located behind a NAT Router and STUN is programmed select Use Router ST...

Страница 387: ...ge by accessing and navigating through the phone menu The Language can be changed by logging into the SA Jeeves also 12 Select a Ringer Mode for the phone from the four options Ring immediately it rings immediately as a fresh calls lands on the phone Ring if idle rings only if the phone is idle Ring after delay if the call is still not answered Silent silent mode Default Ring Immediately 13 If you...

Страница 388: ...e headset of the IP phone set the Headset Receive Volume Level to the desired level from 0 to 7 Default 4 22 To change the Transmit Gain of the Speakerphone MIC Volume set Speaker Transmit Volume Level to the desired level from 0 to 7 Default 4 23 To change the Receive Gain of the Speakerphone MIC Volume set Speaker Receive Volume Level to the desired level from 0 to 7 Default 4 24 To use a Headse...

Страница 389: ...at the phone waits for a response from the called party after sending INVITE message This timer starts after sending INVITE message to the called party and stops on receipt of the provisional response or the final response or when the user disconnects the call On expiry of the timer the phone terminates the call process and gives an error tone to the user The range of the SIP INVITE TIMER is 10 18...

Страница 390: ...electing the respective check box SIP System Hardware Call Menu User Interface The phone supports multiple debug levels You may select any or all of these debug levels The Syslog Client will send only the debug messages for the selected level to the remote server on the IP network For example if the debug log of Call s is required you can select this option and disable all others 36 Click Submit t...

Страница 391: ...c parameters in the VoIP Port page are changed For details see VoIP Port Phone Key Settings You can customise the DSS keys of the Extended SPARSH VP248 to match the requirements of the extension user To customize the DSS keys of the Extended SPARSH VP248 registered at this location 1 Click the Phone Key Settings link for this location The default key map of the Extended IP Phone appears on your sc...

Страница 392: ...y you want to configure For example CO 2 A dialog box opens with the options for the Functions to be Performed 3 In the Select Function Type list box select the function to be performed by the key For example you want to use the key to call the Operator ...

Страница 393: ...a Feature so select the option FEATURE from the Select Function Type list box In the Select Offset drop down list all the features that can be assigned to the keys are listed Select Operator from the list of features in the Select Offset box Click OK The box closes ...

Страница 394: ...d example if you want to assign Remote DND to the key currently assigned CO 1 key click the key A dialog box opens In the Select Function Type list box select the option SA Command as Remote DND is a System Administrator SA Command In the Select Offset box select the option Set DND for remote station ...

Страница 395: ...call a SIP extension select SIP Extension as Function Type and select the number of the extension as the Offset To assign direct access to a mobile trunk select MOBILE as Function Type and the desired port number 1 or 2 as Offset depending on the availability of system variant To assign direct access to a SIP Trunk select SIP Trunk as Function Type and the desired trunk number from 1 to 8 as Offse...

Страница 396: ...ar steps as described above to configure other Extended SPARSH VP248s at the remaining two locations if required 1 Click Device Settings Location2 to expand options and configure similarly as described for the Extended SPARSH VP248 present at Location 1 2 Click Device Settings Location3 to expand options and configure similarly as described for the Extended SPARSH VP248 present at Location 1 ...

Страница 397: ...Matrix NAVAN CNX200 System Manual 387 ...

Страница 398: ...e the specific settings relevant to Extended SPARSH VP310 as described below in Configuring Matrix Extended Phone Settings using Jeeves Configuring Matrix Extended Phone Settings using Jeeves You can register up to three Matrix Extended SIP Phones Mobile Soft phone applications Open SIP Phones at three different locations as a single SIP Extension that is all having the same SIP ID You can registe...

Страница 399: ...figuration on validation As NAVAN allows registration of the SIP Extension from three different locations it identifies the SIP Extension at each location by the programmed unique MAC address 6 Select the appropriate Registrar Server Address to register the IP phone with the SIP Registrar of NAVAN according to your installation scenario If the Extended IP Phone is connected on the WAN network sele...

Страница 400: ...alled select the Call Progress Tone Region Default Region 1 See Call Progress Tones to know more 8 Select the region country whose Date and Time settings the IP Phone should follow Default India 9 If you want to enable Daylight Saving Time DST on the phone set Apply Daylight Saving Time to Yes Default No The Daylight Saving Time convention followed in the country region you selected will be automa...

Страница 401: ...set to 00 By default Ring Auto Acknowledge is turned OFF 15 To assign the Ring Destination for the IP phone select the desired destination for Play Ring on You may choose Speakerphone The ring will be played on the Speakerphone Headset The ring will be played on the Headset Default Speakerphone When you select the Headset as the destination make sure that you set the flag Headset Connected to Yes ...

Страница 402: ...f Time sec to the desired value if required from 000 to 999 seconds Default 10 seconds 28 Adjust the Backlight brightness of the phone s LCD display by setting the LCD Backlight Level to the desired value from 1 to 4 Default 3 29 Set the LCD Contrast Level to a level from 1 to 4 that is comfortable to you Default 3 Transport Mode and SRTP 30 Select Transport Mode and enable SRTP Select the protoco...

Страница 403: ... is 10 180 seconds Default 30 seconds SIP Provisional Timer sec This is the time in seconds that the phone waits for final response after receiving the provisional response from the called party This timer starts on the receipt of the provisional response from the called party and stops on receipt of the final response from the called party or when the user disconnects the call On expiry of the ti...

Страница 404: ...ion and disable all others 38 Click Submit to save settings When you change any of the parameters listed below for the SIP Extensions the IP phone at Location 1 2 or 3 as applicable will restart automatically if registered SIP ID Extension Number Enable SIP Extension Authentication ID Authentication Password Enable Device Device Type MAC Address Registrar Server Address Key Map in the Key Template...

Страница 405: ...y you want to configure For example CO 2 A dialog box opens with the options for the Functions to be Performed 3 In the Select Function Type list box select the function to be performed by the key For example you want to use the key to call the Operator The Operator function is a Feature so select the option FEATURE from the Select Function Type list box In the Select Offset drop down list all the...

Страница 406: ...o assign direct access to a mobile trunk select MOBILE as Function Type and the desired port number 1 or 2 as Offset depending on the availability of system variant To assign direct access to a SIP Trunk select SIP Trunk as Function Type and the desired trunk number from 1 to 8 as Offset depending on availability Also specify the Call Appearance Click OK each time you select a Function Type and Of...

Страница 407: ...nfiguring SIP Extension General Parameters Then configure the specific settings relevant to Extended SPARSH VP330 as described below in Configuring Matrix Extended Phone Settings using Jeeves Configuring Matrix Extended Phone Settings using Jeeves You can register up to three Matrix Extended SIP Phones Mobile Soft phone applications Open SIP Phones at three different locations as a single SIP Exte...

Страница 408: ...398 Matrix NAVAN CNX200 System Manual 1 Click Device Settings Location1 to expand options 2 Select the Enable Device check box Default Disabled ...

Страница 409: ...egistrar Server Address Make sure the Router s Public IP Address is configured in the VoIP Port page You can reach this page by clicking the PBX Settings tab and then clicking the VoIP Configuration link on the left navigation bar If the Extended IP Phone is connected in the Public Network and NAVAN is located behind a NAT Router and STUN is programmed select Use Router STUN s IP Address as the Re...

Страница 410: ...select the Transport Mode as TCP or TLS When security of SIP messages is of primary concern you should select TLS If you select TCP make sure that Enable SIP Over TCP check box is selected in VoIP Port page located under PBX Settings tab For details see VoIP Port If you select TLS make sure that Enable SIP Over TLS check box is selected in VoIP Port page located under PBX Settings tab For details ...

Страница 411: ...party This timer starts on the receipt of the provisional response from the called party and stops on receipt of the final response from the called party or when the user disconnects the call On expiry of the timer the IP phone terminates the call process and gives error tone to the user The range of SIP Provisional Timer is 10 180 seconds Default 60 seconds General Request Timer sec This is the t...

Страница 412: ...n 1 2 3 will restart automatically if The SE Password of NAVAN is changed You restart the System Set the System to Default The system Network parameters specific to LAN and WAN Ports are changed Specific parameters in the VoIP Port page are changed For details see VoIP Port Phone Key Settings To personalize the key map of the Extended SPARSH VP330 click the Phone Key Settings link ...

Страница 413: ... a new window on your screen Click the key you want to configure For example SLT 1 The Functions to be Performed by the key opens in a new window In the Select Function Type list select the function to be performed by the key For example you want to use the key to call the Operator ...

Страница 414: ...tion is a Feature so select the option Feature from the Select Function Type list box From the Select Offset drop down list all the features that can be assigned to keys are listed Select Operator from the list of features in the Select Offset box Click OK ...

Страница 415: ...access to a mobile trunk select MOBILE as Function Type and the desired port number 1 or 2 if available depending on the product variant as Offset To assign direct access to a SIP Trunk select SIP as Function Type and the desired trunk number from 1 to 8 as Offset Also specify the Call Appearance Click OK each time you select a Function Type and Offset in the dialog box You can reinstate default k...

Страница 416: ...onfigure other Extended SPARSH VP330s at the remaining two locations if required 1 Click Device Settings Location2 to expand options and configure similarly as described for the Extended SPARSH VP330 present at Location 1 2 Click Device Settings Location3 to expand options and configure similarly as described for the Extended SPARSH VP330 present at Location 1 ...

Страница 417: ...e iPhones and delivers full array of Matrix NAVAN features to the users on the go Through tight integration with the enterprise mobility features of the NAVAN Matrix SPARSH MS provides advanced call capabilities including Conferencing Corporate Directory Access Global Directory Call Logs and Conversation Recording with one touch access Other than these you can take the advantage of using premium f...

Страница 418: ...r the productivity features at fingertips that enhance speed of communication and provide collaboration among office users and customers To be able to register and use these applications you must configure the following parameters Configure the SIP Extension General Parameters at first60 For details see Configuring SIP Extension General Parameters within SIP Extensions Then configure the specific ...

Страница 419: ...Matrix NAVAN CNX200 System Manual 409 1 Click Device Settings Location1 to expand options ...

Страница 420: ...are using an iPhone enter the Device ID here The Device ID can be obtained from the iPhone application s Settings option61 Default blank NAVAN validates Matrix SPARSH Mobile Soft phone clients on the basis of this unique identifier that is based on the MAC Address IMEI Number ESN Number or the Device ID and provides configuration on validation As NAVAN allows registration of SIP Extensions from th...

Страница 421: ... NAVAN is located behind a Router or NAVAN is located behind a NAT Router and STUN is programmed select Use Router STUN s IP Address as External Registrar Server Address Make sure you configure either the Router s Public IP Address or Simple Traversal of UDP over NAT STUN in the VoIP Port page under the PBX Settings tab If Dynamic DNS is configured in the Network Parameters select Use Dynamic DNS ...

Страница 422: ...Enable NAT Keep Alive check box to send Keep Alive messages periodically to refresh the binding in the NAT router Default Disabled Define as Interval sec the time period from 001 to 9999 seconds after which the phone should send Keep Alive message Default 120 seconds The time period you define should be less than the binding timer of the router Timers Set the following Timers to the desired value ...

Страница 423: ... Location 1 follow the same steps as described above to register other Soft phone Clients if any at Location 2 and Location 3 When you change any of the parameters listed below in the SIP Extension at Location 1 2 3 the phone will go in Auto Configuration mode automatically if registered SIP ID Extension Number Extension Name Enable SIP Extension Authentication ID Authentication Password Enable De...

Страница 424: ...Open SIP Phone parameters When the Open SIP Phone starts it then gets configured automatically Here NAVAN acts as the Auto Provisioning Server by providing the configuration file to the Open SIP Phones Auto Provisioning enables mass deployment of Open SIP Phones and provides a plug and play solution for them To configure Open SIP Phones using this method see Configuring Open SIP Phones using Auto ...

Страница 425: ...one has multiple SIP accounts it is recommended to keep the first SIP account in default settings After Auto Provisioning the old configuration if present for this account will be deleted automatically and it will get registered with the NAVAN Configuring Panasonic Open SIP Phones You are recommended to complete the following steps before connecting Panasonic UTG200B Decide the physical location o...

Страница 426: ... the specific Open SIP Phone manufacturer s documentation for more details Parameter Description Action to be Taken Applicable Open SIP Phone Variant Enable Device Select the Enable Device check box Panasonic UTG200B Location Name Configure the Location Name to identify the phone The Location Name can be a maximum of 18 characters Default Blank Panasonic UTG200B Device Type Select Device Type as P...

Страница 427: ...is non editable Currently it is set as English Panasonic UTG200B User Password Configure the User Password of the Panasonic phone It can be a minimum of 6 characters to a maximum of 16 characters Default userpass Panasonic UTG200B Admin Password Configure the Admin Password of the Panasonic phone It can be a minimum of 6 characters to a maximum of 16 characters Default adminpass Panasonic UTG200B ...

Страница 428: ...iguring the DHCP Server of NAVAN see Configuring the Ethernet LAN Port If you are using a third party DHCP Server see Using any third party DHCP Server in your LAN Configure the SIP Extension General Parameters in NAVAN Jeeves For details see Configuring SIP Extension General Parameters in SIP Extensions 65 65 Some of the parameters may not be applicable depending on the Open SIP Phone you have co...

Страница 429: ...pen SIP Phone configure following parameters at any suitable location within Device Settings Location1 or 2 or 3 in the Jeeves and Submit the page66 66 Depending on the selected Grandstream Open SIP Phone variant the applicable parameters within option Device Settings Location1 2 3 may vary ...

Страница 430: ... GXP2200 3 Grandstream GXP21xx 116x 14xx 4 Grandstream GXP3140 3175 Language Select the desired phone language from the list 1 Grandstream GXP110x 2 Grandstream GXP2200 3 Grandstream GXP21xx 116x 14xx 4 Grandstream GXP3140 3175 User Password Configure the User Password of the Grandstream phone It can be a minimum of 1 character to a maximum of 30 characters Default 123 1 Grandstream GXP110x 2 Gran...

Страница 431: ... configure the DHCP Server Select OPTIONS as 66 Configure the Data option in the format http LAN Port IP Address of NAVAN Web Server HTTP Port of NAVAN For example if default LAN settings of NAVAN have not been changed then Data can be configured as http 192 168 2 56 80 For more information about configuring the DHCP Server of NAVAN see Configuring the Ethernet LAN Port If you are using a third pa...

Страница 432: ...e details Parameter Description Action to be Taken Applicable Open SIP Phone Variant Enable Device Select the Enable Device check box 1 Yealink SIP T19P SIP T21P T22P T26P T28P T4X 2 Yealink SIP T20P 3 Yealink SIP T3XG Location Name Configure the Location Name to identify the phone The Location Name can be a maximum of 18 characters Default Blank 1 Yealink SIP T19P SIP T21P T22P T26P T28P T4X 2 Ye...

Страница 433: ...e should be displayed 1 Yealink SIP T19P SIP T21P T22P T26P T28P T4X 2 Yealink SIP T20P 3 Yealink SIP T3XG User Password Configure the User Password of the Yealink phone It can be maximum of 32 characters long Default user 1 Yealink SIP T19P SIP T21P T22P T26P T28P T4X 2 Yealink SIP T20P 3 Yealink SIP T3XG Admin Password Configure the Admin Password of the Yealink phone It can be a maximum of up t...

Страница 434: ...d 1 Yealink SIP T19P SIP T21P T22P T26P T28P T4X 2 Yealink SIP T20P 3 Yealink SIP T3XG DST Start Day of Week Last in Month Select the DST Start Day of Week Last in Month 1 Yealink SIP T19P SIP T21P T22P T26P T28P T4X 2 Yealink SIP T20P 3 Yealink SIP T3XG Start Hour of Day Select the DST Start Hour of the Day 1 Yealink SIP T19P SIP T21P T22P T26P T28P T4X 2 Yealink SIP T20P 3 Yealink SIP T3XG DST S...

Страница 435: ...and reboot the Open SIP Phone Make sure that DHCP is selected as the Connection Type in the Open SIP Phone The Open SIP Phone will automatically fetch the configuration file s from NAVAN and will get registered Time Display Format Select the Time Display Format for the Open SIP Phone 1 Yealink SIP T19P SIP T21P T22P T26P T28P T4X 2 Yealink SIP T20P 3 Yealink SIP T3XG ...

Страница 436: ...426 Matrix NAVAN CNX200 System Manual ...

Страница 437: ...200 System Manual 427 CHAPTER 14 Configuring Trunks SIP Trunks NAVAN supports 8 SIP Trunks To configure 1 Log into Jeeves as System Engineer 2 Click the Trunks tab 3 On the left navigation bar click the SIP Trunks link ...

Страница 438: ...meter further More link Click to view all additional parameters on the page To configure another SIP trunk click the Trunk number name tab To save settings click Submit To assign default values to all the parameters of the trunk click the Default button To copy the same SIP trunk parameter values to the other SIP trunks use the Copy button If you assigned names to the SIP trunks on the Trunks page...

Страница 439: ... parties will use to call this SIP Trunk The SIP ID may be a number or text consisting of a maximum of 40 characters If you have defined the trunk mode as Proxy enter the User ID provided by your ITSP For example if SIP URI provided by the ITSP is 12345 abc com enter 12345 in this field If you have defined the trunk mode as Peer to Peer you can leave this ID blank 5 Check SIP ID during incoming ca...

Страница 440: ...runk to Treat Incoming Peer to Peer call as Trunk or Station If you select Trunk then parameters configured in Incoming Call Routing option will be applied If you select Station the incoming call on the trunk will be routed to the Extension Number received in the To field in the INVITE message If a Trunk Access Code and External Number are received in the To field of the INVITE message the call wi...

Страница 441: ...Define the Registration Retry Time This Timer stands for the period between retries for registration with the Registrar Server If the registration attempt fails NAVAN sends the registration request on the expiry of this Timer again The system continues to send the registration request till it gets registered with the Registrar Server The valid range of this timer is from 00001 65535 Default 10 sec...

Страница 442: ...eld A new window opens Select the extensions you want to assign as landing destination The landing destination may be an SLT SIP Extension Virtual Extension or Voice Mail Auto Attendant Profile If you select landing destination as Voice Mail Auto Attendant make sure you have configured the selected profile See Voice Mail Auto Attendant Profile for details Set the Ring Timer for the extensions This...

Страница 443: ...f this timer NAVAN will route the call to the auto attendant Select the destination for an unanswered call in the field If not answered route to You may select the Built In Auto Attendant or the Voice Mail Auto Attendant Default Built In Auto Attendant 7 If you select Built in Auto Attendant as the landing destination for calls during the day the Voice Modules 02 to 13 will be played as Built In A...

Страница 444: ...DISA option PIN Authentication Multiple calls Select this option if you want to enable DISA with PIN Authentication and allow multiple calls during the DISA login session CLI Authentication Multiple calls Select this option if you want to enable DISA login with CLI Authentication and allow multiple calls to be made during the DISA login session CLI Authentication One call Select this option if you...

Страница 445: ...lt Disabled If you do not want greeting message to be played select Disabled When you select a Greeting Message you must record a Voice Module with the desired Greeting Message and assign the Voice Module to Trunk Auto Answer Greeting application You can record 4 different Greetings Messages for Trunk Auto Answer and assign a different Greeting message for the Day Break and Night See the topic Voi...

Страница 446: ... with the desired Bye Message and assign the Voice Module to Trunk Auto Answer Bye Message application You can record 4 different Bye Messages for Trunk Auto Answer and assign a different Bye message for the Day Break and Night See Voice Message Applications under Voice Mail IVR tab for instructions on recording and assigning voice modules for Bye messages 12 Follow the same instructions as descri...

Страница 447: ...tion The Automatic Number Translation feature of NAVAN modifies dialed numbers or part thereof to match the specific route numbering plan understood by the destination network PSTN GSM VoIP by adding or stripping country and area codes For example you can configure Automatic Number Translation such that when an extension user dials a local landline number the NAVAN prefixes the number with the app...

Страница 448: ...system dials out this number 6 Click Submit to save your entries 7 Close the window For more details see the description for Automatic Number Translation SMDR Storage The Station Message Detail Recording SMDR feature of NAVAN enables you to record the details of Internal Incoming IC and Outgoing OG calls made from to all its trunks and extensions To obtain SMDR as a report you must enable SMDR Sto...

Страница 449: ... Cost Calculation to expand 1 Select a Call Cost Calculation Pulse Rate option from 1 to 4 Each Call Cost Calculation Pulse Rate option contains a Pulse Rate Type which you must configure Some service providers offer discounted rates for special days In which case you can configure the rates for normal days in the Normal Pulse Rate Table and the rates for special days in the Discounted Pulse Rate ...

Страница 450: ...all Budget on Trunk to know more 2 To enable call budget on the trunk set Use Call Budget to Yes Default No 3 Define the call budget in terms of number of calls in the field Restrict outgoing calls if total number of calls exceeds Default 9999 4 Define the call budget in terms of amount in the field Restrict outgoing calls if total cost of calls exceeds Default 999999 local currency 5 Define the c...

Страница 451: ...t a Call Back Profile 1 to 4 for the trunk port from the combo box Make sure you also configure the Call Back profile you select here To configure the profile click the Settings icon A new window opens Configure the Profile Number See Call Back on Trunk Ports for instructions Click Submit to save your profile Close the window Call Taping To use Call Taping feature on the trunk 1 Click Call Taping ...

Страница 452: ...ial This parameter is applicable for the Multi Stage Dialing feature 1 Click DTMF Out Dial to expand 2 Set the time for which the DTMF digit should remain ON while being dialed out by the NAVAN as DTMF ON Time The range of this timer is from 051 to 255 milliseconds Default 102 msec 3 Set the time for which NAVAN should wait before dialing the successive DTMF digits as Inter Digit Pause Time The ra...

Страница 453: ... of the extension making the outgoing call through the SIP trunk as CLI The DDI number assigned to the calling extension will be sent instead of its extension number If the calling extension has disabled the parameter Send DDI as CLI then its Pilot number configured in the DDI Routing on this SIP Trunk will be sent as CLI If calling extension has enabled CLIR no CLI will be sent by this SIP Trunk ...

Страница 454: ...d P Asserted Identity P Preferred Identity for Outgoing calls 1 Click P Asserted Identity P Preferred Identity for Outgoing calls to expand 2 Configure the following P Asserted Identity P Preferred Identity for Outgoing calls parameters as provided to you by your Service Provider Select Add P Asserted Identity P Preferred Identity check box if supported by your Service Provider Select P Preferred ...

Страница 455: ...rted by your Service Provider Select P Preferred Identity or P Asserted Identity as the Preference By default Handle Privacy Header is enabled If the system receives Privacy Header as Privacy ID anonymous will be displayed as the CLI to the called extension Privacy None the CLI received from the Service Provider will be displayed to the called extension If No Privacy header is received the CLI rec...

Страница 456: ...c as a Preferred Vocoder select G 723 Bit Rate as Bit Rate 5 3 Kbps or 6 3 Kbps Default 6 3kpbs When G 723 is negotiated the selected Bit Rate will be applied only when sending the RTP packets When receiving RTP packets from the remote end both Bit Rates of G 723 will be accepted 4 Select the check box Silence Suppression to suppress the Silence packets and to allow only the Voice packets through ...

Страница 457: ...e for Tx Gain 31dB to 31dB and Rx Gain 31dB to 31dB Default 0dB 4 SIP Call Progress Tones Tx Gain and Rx Gain Configure the Gain Setting that you want the system to apply on the SIP Trunk while playing Call Progress Tones Valid Range for Tx Gain 31dB to 31dB and Rx Gain 31dB to 31dB Default 0dB 5 SIP SLT Tx Gain and Rx Gain Configure the Gain Setting that you want the system to apply on the SIP Tr...

Страница 458: ...the SRTP Media Type You may select AVP or SAVP Default AVP Forced Select Forced if you want NAVAN to use only SRTP SAVP for transporting the speech packets If the remote user does not support SRTP NAVAN will reject incoming calls from and drop outgoing calls made to such users By default SRTP Mode is Disabled Echo Cancellation NAVAN supports Echo Cancellation for SIP to CO trunk calls and SIP to D...

Страница 459: ...actor determines the rate of adaptation of the Dynamic Jitter Buffer to the jitter in the network 2 Set the Optimization Factor only if you select Dynamic Jitter Buffer to the desired value from 01 to 13 Default 10 In networks with higher jitter a higher value should be configured as Optimization Factor The actual size of the Dynamic Jitter Buffer will be determined by the DSP on the basis of the ...

Страница 460: ...er speed As EQM is inversely proportional to fax Max Rate if you receive poor quality fax the Max Rate should be reduced 3 Set the Packet Period msec to the desired value Default 40msec The packet period sets the sampling rate of TDM signal If you cannot improve fax quality by lowering Fax Max Rate you may reduce the Fax Packet Period When you reduce the Fax Packet Period the fax image will be sen...

Страница 461: ...fax NAVAN will accept the fax with any Codec Pass Through Fax Rx Gain SIP to Digital Trunk Call Configure this parameter if you selected Pass Through73 as Fax Type and the fax is to be received on a digital trunk 1 Select the dB level for Data Gain dB from 31 to 31 dB Default 11 dB 2 Select the dB Level for Bypass Gain dB from 31 to 31 dB Default 9 dB Pass Through FAX Rx Gain SIP to SLT Call Confi...

Страница 462: ...c IP Address if NAVAN is located behind a NAT Router any type If you select this option keep the Outbound Proxy disabled 2 In the No of Simultaneous Calls list select the number of simultaneous calls you want to allow on this SIP Trunk Default 12 The number of simultaneous SIP calls depends on the number of simultaneous calls allowed by the ITSP with whom you have subscribed this SIP Trunk The NAV...

Страница 463: ...again If you want to enable the Digest Authentication feature on the SIP trunk Select the Digest Authentication check box Default disabled Configure the Digest Authentication Table To do this Click the PBX Settings tab On the left navigation bar click the VoIP Configuration link Click Digest Authentication Table The Digest Authentication Table page opens Enter the User ID to be authenticated along...

Страница 464: ... IP Address of the Target Server on which further SIP messages are to be sent SRV Record Select this option if you want NAVAN to send the SRV query to the DNS Server to fetch the Destination Port The system will also make a DNS A query to fetch the IP Address of the Target Server on which further SIP messages are to be sent NAPTR SRV Record Select this option if you want NAVAN to send queries to t...

Страница 465: ...r as CLI check box By default Display Called Party Number as CLI option is disabled This parameter is useful when a single SIP Trunk having DDI Numbers and Operator are shared by more than one organization To enable the Operator to handle calls more efficiently you must enable Display Called Party Number as CLI and configure the names and corresponding numbers of the organizations sharing the SIP ...

Страница 466: ...The system includes the incoming call request information as well as the new call information in the INVITE Re INVITE requests generated on the target Default Disabled If you have selected Generate new Call as the Call Redirection Type select the desired option in CLI while Diversion Redirection You may select Self or Received Default Self If you select Self the system will send SIP Trunks s Ident...

Страница 467: ... the Class of Service for Day time and Night Break time 2 To allow a feature select the check box of the feature 3 To deny a feature clear the check box Toll Control If you set the SIP Trunk mode as Peer to Peer and selected Treat Incoming Peer to Peer Call as Station configure Toll Control 1 Click Toll Control to expand options Set the desired Toll Control for the Day and Night Break 2 Select the...

Страница 468: ...alls to expand 2 Double click the Trunks allowed for dialing field A multiple selection box opens To select a trunk from the left box place your cursor on the desired trunk and click the Select button You may change the sequence of the trunks you selected if required using the Up and Down arrow buttons on the right display box To remove delete the selected trunks press the Delete key on your keybo...

Страница 469: ...of Call Taping to be applied from the options OFF Apply as per profile 1 Apply as per profile 2 Apply as per profile 3 Apply as per profile 4 If you do not want to apply Call Taping select OFF Default OFF 3 You can configure the Call Taping Profile number you selected for the extension To do this Click the Settings icon The page opens in a new window displaying the parameters of the profile you se...

Страница 470: ...want to apply Call Duration Control select OFF Default OFF 3 You can configure the Call Duration Control Profile number you selected for the extension To do this Click the Settings icon The page opens in a new window The page displays the parameters of the profile you selected for the extension This icon does not appear when Call Duration Control is OFF In the new window Enable Apply CDC to Intern...

Страница 471: ...rking day Click Submit Close the window See Time Table to know more Forced Account Code Configure this parameter if you want to apply the Forced Account Code feature on the SIP trunk See Account Codes to know more about this feature 1 Select the Do not allow Outgoing Calls without Account Code check box to enable Forced Account code on the trunk Default Disabled When you enable this flag the syste...

Страница 472: ...he Copy button on the page of the SIP trunk you wish to copy The Copy dialog box opens The dialog box displays the number and name of the trunk to be copied in the Copy from field The dialog box also lists the numbers and names of the trunks to which you can copy the values under the Copy to field ...

Страница 473: ...u Copy From will be applied on the trunks you Copy To Viewing SIP Trunk Status To view SIP Trunk Status Log into Jeeves as System Engineer Click the Trunks tab On the left navigation bar click the Status link Click SIP Trunks After viewing this page you may log out of Jeeves You can also view the SIP Trunk Status by clicking the Status tab See SIP Trunk Status ...

Страница 474: ...e a link Hides all parameters under the link Copy Click to copy the parameters under a specific link of a page to the same link under another trunk page Settings Click to configure the settings of a parameter further More link Click to view all additional parameters on the page To configure another CO trunk click the CO number name tab To save settings click Submit To assign default values to all ...

Страница 475: ... the CO line Selecting the format supported by your service provider from the below options You may consult the service provider this trunk line None Any ETSI DTMF format Any FSK V 23 format Any FSK Bellcore format 1st Ring ETSI DTMF 2nd Ring Polarity Reversal ETSI DTMF 1st Ring 1st Ring FSK 2nd Ring DT AS FSK 1st Ring RP AS FSK 1st Ring Polarity Reversal DT AS FSK 1st Ring Any DTMF Format without...

Страница 476: ...ncoming Call Routing to expand options 2 Select the landing destination for Route Calls during Day to You may select Operator Extensions Department Group Built in Auto Attendant Voice Mail Auto Attendant if available 3 If you select Extension s as the landing destination ...

Страница 477: ...ted more than one extension Default Disabled If you select Voice Mail Auto Attendant Profile as landing destination the parameters Ring Timer and Continuous Ring will not be applicable Click OK All the extensions you selected will appear in the Extension s field in the sequence you selected separated by commas 4 If you select a Department Group as the landing destination 74 When Continuous Ring is...

Страница 478: ...d route to You may select the Built In Auto Attendant or the Voice Mail Auto Attendant Default Built In Auto Attendant 6 If you select Built in Auto Attendant as the landing destination for calls during the day the Voice Modules 02 to 13 will be played as Built In Auto Attendant Greeting Messages and Built In Auto Attendant Guidance Messages If you want to play a different message make sure you re...

Страница 479: ...ring the DISA login session CLI Authentication One call Select this option if you want to enable DISA session with CLI Authentication and allow only a single call to be made during the DISA login session If you select Multiple Calls or One Call as CLI Authentication you must configure the DISA CLI Authentication Table under PBX Settings tab See Direct Inward System Access DISA 10 You can select Tr...

Страница 480: ...nswer Greeting application You can record 4 different Greetings Messages for Trunk Auto Answer and assign a different Greeting message for the Day Break and Night See the topic Voice Message Applications under Voice Mail IVR tab for instructions on recording and assigning voice modules to greeting messages Select the Ring Back Tone Message you want the system to play to callers from the following ...

Страница 481: ...signing voice modules for Bye messages 11 Follow the same instructions as described above to configure Incoming Call Routing for Route Calls during Break to and Route Calls during Night to Voice Mail Auto Attendant If you have selected Voice Mail Auto Attendant as the destination for Routing calls during day or during night or during break 1 Click Voice Mail Auto Attendant to expand 2 Select the d...

Страница 482: ...he trunk Default OFF 3 Configure the ANT table number you selected if not configured 4 Click the Settings icon A new window opens 5 Click the Table Number you selected for this trunk The selected table appears on your screen The table has three columns Dialed Number Strings Strip Digits Add Prefix The number strings are stored against an Index number from 1 to 32 You can to enter as many as 32 num...

Страница 483: ...re details of outgoing calls made from this trunk select the check box Store Outgoing Calls Default selected 4 Click Submit DSS Key Interface This parameter determines what the system should do to the current call when a SIP Extension user presses the DSS key of another trunk port during speech with an external party 1 Click DSS Key Interface to expand options 2 Select the radio button of the desi...

Страница 484: ...se Rate Option 2 Define the Call Cost Calculation Schedule for the Pulse Rate option you selected The Pulse Rates offered by service providers may vary according to the time of the day In such cases you must divide the day into Time Zones from 1 to 4 as required to match the time of the pulse rates offered by your service provider Specify the Start Time and the End time in 24 hours HH MM format fo...

Страница 485: ...total call duration exceeds field Default 999999 minutes 6 To have the system reset the Number of Calls Amount Minutes automatically on a particular date select the desired date from the Reset Call Budget on combo box as 1st to 31st of the every month The consumed Call Budget Amount Minutes Number of Calls can be reset from SE and SA Mode referred to as Manual Reset Refer the feature description C...

Страница 486: ...g to know more Call Duration Control CDC To use the Call Duration Control CDC feature on trunk 1 Click Call Duration Control to expand options 2 Select the Apply CDC for Incoming Calls check box to control the call duration for incoming calls on this trunk Default Enabled Clear this check box if you do not want to apply CDC for incoming calls on this trunk 3 Select the Apply CDC for Outgoing Calls...

Страница 487: ...appropriate Pulse Dial Ratio from the following options according to the type of Pulse Dialing Ration supported by your CO Network 10PPS 1 2 10PPS 2 3 10PPS 1 1 20PPS 1 2 20PPS 2 3 20PPS 1 1 Default 10 PPS 1 2 5 Select AC Termination Impedance The AC Termination Impedance of the CO port must match with the AC Termination Impedance supported by the PSTN network By default the AC Termination Impedan...

Страница 488: ...O System Tx Gain and Rx Gain Configure the Gain Settings that you want the system to apply on the CO port with respect to the system for example Call Conference These will not be applicable for any other port type Valid Range for Tx gain 10dB to 15dB and Rx Gain 10dB to 15dB Default 0 6dB for Tx Gain and 0 3dB for Rx Gain CO Voice Mail Tx Gain and Rx Gain Configure the Gain Setting that you want t...

Страница 489: ...wer Supervision signal as provided by your CO Network If the type of Answer Supervision signal selected in the system does not match with that of the CO network the call will not be stored in the Station Message Detail Record SMDR buffer For example if the CO network does not support Answer Supervision but you have selected Polarity Reversal or 12 16KHz as Answer Supervision Type the call will be ...

Страница 490: ...and Polarity Reversal as Disconnect Supervision signal for the CO ports in the system In this case when a call is made through the CO port the call will be considered as matured after the Pseudo Answer Supervision Timer Now when the called party answers the call the CO generates Polarity Reversal as answer supervision signal on the CO port But as Polarity Reversal is also selected as the Disconnec...

Страница 491: ...ec It is the width of DTMF digit to be dialed out by the CO port Set the ON time to the desired value Default 102 milliseconds DTMF OFF Time msec When the CO port dials out the DTMF digits on the CO it waits for the DTMF OFF Time while dialing the DTMF digits on the CO Set this option to the desired value Default 102 milliseconds The level of each DTMF digit is fixed at 6 0 dB but you may configur...

Страница 492: ...to dial out the numbers from the CO port The range of this timer is from 0500 to 2500 milliseconds By default the timer is set to 1000 milliseconds Ring Cadence OFF Time Configure this timer to set OFF time for Ring cadence During an incoming call on the CO port if the CO gives ring with a long Ring OFF period the system will consider that the ring has been stopped and it will stop ringing the SLT...

Страница 493: ... TIP RING voltage in NAVAN Adjust the values of the Tip Ring Voltage to match your country requirements from the following options 3 1 3 2 3 35 3 5 Default 3 5 20 Set the Ringer Impedance as High or Synthesized for the CO port according to your country specific requirement High signifies 20Mohm Ringer Impedance This is the default Ringer Impedance provided on the line side by the DAA module of the...

Страница 494: ...Default 11 dB 24 Select the dB Level for Pass Through Fax Bypass Gain on SIP Trunk Default 9 dB You can also set the Rx and Tx Gains for SIP to Digital Trunks and Extensions and SIP to SLT To increase Rx and Tx Gain for SIP to SLT extensions go to SLT parameters page To increase Rx and Tx Gain for Digital Trunks Extensions go to SIP Trunks parameters page 25 Click Submit to save your CO port setti...

Страница 495: ...nk Default Disabled When you enable this flag the system will prompt extension users to dial the Account Code whenever they grab this trunk to dial out a number The system will allow extension users to dial out numbers only after they have dialed the Account Code or Name Account Codes feature must also be enabled in the Class of Service of extension users who are to be allowed this feature Now tha...

Страница 496: ...extension numbers to which you want to Copy To 3 Click OK The parameter values of the trunk you Copy From will be applied on the trunks you Copy To To view the CO Trunk Status Click the Trunks tab On the left navigation bar click the Status link Click the CO link The status of CO Trunk 1 appears on your screen To view the status of the other CO trunk click the respective tab For example click CO 2...

Страница 497: ...display all parameters under the link Collapse Click to collapse a link Hides all parameters under the link Copy Click to copy the parameters under a specific link of a page to the same link under another trunk page Settings Click to configure the settings of a parameter further More link Click to view all additional parameters on the page To configure another mobile trunk click the Trunk number n...

Страница 498: ...e port you must go back to the Trunks page Follow the instructions provided below to configure the Mobile Ports SIM PIN 1 Click SIM PIN to expand 2 You may change the SIM PIN for the SIM Card inserted in the mobile port Recall that you have changed the SIM PIN of the SIM Card to the default value 1234 using a Handset before installing it in the system Now you may change it to the desired SIM PIN O...

Страница 499: ...stinations for incoming calls during the day night and the break Ignore Incoming calls81 Reject Incoming calls 3 To allow incoming calls without CLI to land on the trunk select the Accept Calls without CLI check box 4 Select the landing destination for Route Calls during Day to You may select Operator Extensions Department Group Built in Auto Attendant Voice Mail Auto Attendant if available 81 In ...

Страница 500: ...Rotation83 if you have selected more than one extension Default Disabled If you select Voice Mail Auto Attendant Profile as landing destination the parameters Ring Timer and Continuous Ring will not be applicable Click OK All the extensions you selected will appear in the Extension s field in the sequence you selected separated by commas 6 If you select a Department Group as the landing destinatio...

Страница 501: ... route to You may select the Built In Auto Attendant or the Voice Mail Auto Attendant Default Built In Auto Attendant 8 If you select Built in Auto Attendant as the landing destination for calls during the day the Voice Modules 02 to 13 will be played as Built In Auto Attendant Greeting Messages and Built In Auto Attendant Guidance Messages If you want to play a different message make sure you rec...

Страница 502: ...uring the DISA login session CLI Authentication One call Select this option if you want to enable DISA session with CLI Authentication and allow only a single call to be made during the DISA login session If you select Multiple Calls or One Call as CLI Authentication you must configure the DISA CLI Authentication Table under PBX Settings tab See Direct Inward System Access DISA 12 You can select T...

Страница 503: ...nswer Greeting application You can record 4 different Greetings Messages for Trunk Auto Answer and assign a different Greeting message for the Day Break and Night See the topic Voice Message Applications under Voice Mail IVR tab for instructions on recording and assigning voice modules to greeting messages Select the Ring Back Tone Message you want the system to play to callers from the following ...

Страница 504: ...e modules for Bye messages 13 Follow the same instructions as described above to configure Incoming Call Routing for Route Calls during Break to and Route Calls during Night to Return Call to Original Caller 1 To apply the RCOC Return Call to Original Caller feature on the mobile trunk first click RCOC Return Call to Original Caller to expand 2 Select the check box Set RCOC for Calling Extension w...

Страница 505: ...omatic Number Translation85 feature on the mobile trunk Click Automatic Number Translation ANT to expand Select the desired ANT Table number table 1 to 8 which you want to apply on the trunk Default OFF Configure the ANT table number you selected if not configured Click the Settings icon The ANT page opens in a new window The Settings icon does not appear when ANT is OFF Click the Table Number you...

Страница 506: ...or more details see the description for Automatic Number Translation SMDR Storage 1 To record details and generate reports of Internal Incoming and Outgoing calls made from to the mobile trunk enable SMDR Storage See Station Message Detail Recording SMDR and Station Message Detail Recording Storage to know more Click SMDR Storage to expand Select the Store Incoming Calls check box to store details...

Страница 507: ...egistration Retry Timer86 On the expiry of this timer the system will retry registration for the Count i e number of times configured and with each re try attempt the count will be decremented by one Select the Frequency Band supported by the service provider network whose SIM card is installed in the mobile port Frequency Band selection not required if the Mobile module has SIMCOM 3G module When ...

Страница 508: ...ation Retry Timer If no match is found the Mobile port SIM will not get registered with any of the available network operators and no calls can be made or received on this port When you change the Network Selection Mode to Manual and the Network Operator Code manually the change you made will not come into effect until you have restarted the system DSS Key Interface This parameter determines what ...

Страница 509: ...rates for special days in the Discounted Pulse Rate Table See Call Cost Calculation CCC Configure the Pulse Rate Type according to the billing pattern of the service provider of this trunk Trunks following the same billing pattern should be assigned the same Pulse Rate Option 2 Define the Call Cost Calculation Schedule for the Pulse Rate option you selected The Pulse Rates offered by service provi...

Страница 510: ... the call budget in terms of amount in the field Restrict outgoing calls if total cost of the calls exceeds Default 999999 local currency Define the call budget in terms of duration in the field Restrict outgoing calls if total call duration exceeds Default 999999 minutes To have the system reset the Number of Calls Amount Minutes automatically on a particular date select the desired date from the...

Страница 511: ...select here To configure the profile click the Settings icon The Settings icon does not appear when Call Back is OFF A new window opens Configure the Profile Number See Call Back on Trunk Ports for instructions Click Submit to save your profile Close the window Call Taping To use Call Taping feature on the trunk 1 Click Call Taping to expand option 2 Select the check box to enable Call Taping on t...

Страница 512: ...Settings to expand Configure the following Transmit and Receive Gain Settings Mobile System Tx Gain and Rx Gain Configure the Gain Settings that you want the system to apply on the Mobile port with respect to the system for example Call Conference These will not be applicable for any other port type Valid Range for Tx Gain and Rx Gain is Very Low Low Medium High Very High Default Medium Mobile Voi...

Страница 513: ...m Mobile SIP Tx Gain and Rx Gain Configure the Gain Setting that you want the system to apply on the Mobile Port when the Mobile Port is connected to any SIP Trunk or SIP Extension of the system during an incoming or outgoing call Valid Range for Tx Gain and Rx Gain is Very Low Low Medium High Very High Default Medium Mobile Mobile Tx Gain and Rx Gain Configure the Gain Setting that you want the s...

Страница 514: ...t 2 after 9 seconds i e after a delay of individual P i e 3 3 3 9 The range of this time is from 1 to 9 The Pause Time is used in the Multi Stage Dialing feature DTMF Detection 1 Click DTMF Detection to expand Select the DTMF detection minimum threshold value You can select the required minimum value from the drop down list which can be 0dB 3dB 6dB 9dB 12dB 15dB 18dB 21dB 24dB 27dB and 30dB Defaul...

Страница 515: ...this port daily enter the maximum number of SMS that can be sent using this Mobile Port daily Default 20000 Valid Range 1 to 20000 More Features Click More link to expand 1 Select a Priority level from 1 to 9 for the trunk Default 9 Each trunk of the NAVAN can be assigned a Priority Level starting from 1 2 3 to 9 with 1 being lowest Priority and 9 being highest Priority Whenever there are incoming...

Страница 516: ...ure must also be enabled in the Class of Service of extension users who are to be allowed this feature See Account Codes to know more about this feature Now that you have finished configuring the Mobile trunk You may configure the next Mobile trunk if available 1 Click the tab of the next Mobile trunk number 2 Follow the same steps as described above to configure this trunk 3 Use the Copy button t...

Страница 517: ... values of the trunk you Copy From will be applied on the trunks you Copy To To view the Mobile Trunk Status Click the Trunks tab On the left navigation bar click the Status link Click the Mobile link The status of Mobile Trunk 1 appears on your screen ...

Страница 518: ...nserted in the Mobile port Each SIM is internationally identified by its ICC ID ICC IDs are stored in the SIM Card and are also printed on the SIM card body IMSI International Mobile Subscriber Identity IMSI is a unique number stored in the SIM card Registered with Network Operator This shows the type of network with which the Mobile port is registered whether GSM GSM Compact 3G or UMTS Network Op...

Страница 519: ... is used for calculating Answer Seizure Ratio ASR for the port It is displayed in the MM SS format Dialed Calls This is the total number of outgoing calls90 made from the Mobile port This data is used for calculating Answer Seizure Ratio ASR for the port Successful Calls This is the total number of matured outgoing calls made from the Mobile port This data is used for calculating Answer Seizure Ra...

Страница 520: ...ually reset ASR and ACD when the total number of calls reaches 999 When you reset ASR and ACD the number of call matured and the number of calls dialled is reset to 0 ASR and ACD can be reset anytime even when the total number of calls is less than 999 When ACD is reset only the Total Call Duration maintained for the ACD calculation will be reset The Total Call Duration of the Call Budget i e the ...

Страница 521: ... Number which is transmitted by BTS in BCCH Broadcast Control Channel When NAVAN is switched on the Mobile Port gets registered with the network on a particular BTS which has the highest signal strength However the signal strength is not consistent It keeps fluctuating resulting in call drop or poor voice quality Therefore to avoid this NAVAN enables you to lock the Mobile Port to a particular cel...

Страница 522: ...e Port is disabled GSM Initialization Displayed when GSM module is in initialization state i e before SIM detection SIM Absent Displayed when SIM Card is not detected by the system SIM PIN wrong Displayed when wrong SIM PIN is issued SIM PUK required Displayed when SIM PUK is required Registering Displayed when the Mobile Port is in registration process with the Network Idle Displayed when the Mob...

Страница 523: ...tify a given network from within a specific country LAC Location Area Code In this field LAC Location Area Code is displayed LAC uniquely identifies a location area within a GSM PLMN Public Land Mobile Network The maximum length of LAC is 16 bits ranging from 0 to 65535 LAC is displayed in hexadecimal characters for SIMCOM 2G For SIMCOM 3G engine LAC is displayed in decimal digits which ranges fro...

Страница 524: ...ample Consider the following example when using this feature Problem NAVAN is installed in roaming area where more than one network is available network A and network B Mobile Network Selection is set to Manual mode network A is selected as the first priority and network B is selected as the second priority The Mobile Port gets registered with network A After registration the user locks the Mobile...

Страница 525: ...tuation user should set Manual BCCH locking mode to No to register Mobile Port with the suitable network automatically Later the user can set the Manual BCCH locking mode to Yes and lock the Mobile Port to the desired cell after assessing the cell information ...

Страница 526: ...d by the Network Operators to their subscribers for Recharging Service Different Network Operators have different numbers for Recharging Service For example the Recharging Service Number of Vodafone is 140 To check your SIM balance from the Jeeves Log into Jeeves as System Engineer Click the Trunks tab On the left navigation bar click the SIM Balance Recharge link If there are multiple Mobile port...

Страница 527: ...e any digits from 0 to 9 and the characters and PIN Enter the PIN number which is printed on the Recharge Voucher Coupon Your Recharge PIN number may consist of a maximum of 20 digits The valid digits for Balance Inquiry number are any digits from 0 to 9 and the characters and Make sure you enter the digits and characters of the Recharge PIN number exactly as given on the Recharge Voucher Coupon C...

Страница 528: ... Recharge Request for both the SIM cards present in the system During Balance Inquiry Recharge Request the status of the Mobile port will be busy It will become idle only after the USSD response is received from the Mobile network The NAVAN will clear the USSD Reply after system restart So each time you open the SIM Balance and Recharge page after system restart the USSD Reply box will be blank ...

Страница 529: ...runk type CO MOBILE SIP and the port number For example the name of the Two wire Trunk connected to port number 1 is displayed as CO 1 To configure Log into Jeeves as System Engineer Click the Trunks tab On the left navigation bar click the Trunks link 1 You may assign names to each trunk port type for easy identification The name can be derived from the name of the Service Provider The name may c...

Страница 530: ...520 Matrix NAVAN CNX200 System Manual ...

Страница 531: ... recorded welcome messages of the VMS or record in WAV format the custom welcome messages that meet your requirements configure Graphs and Nodes configure Multi level Auto Attendant Profile select VMS Auto Attendant for routing incoming calls during day time break time and night time for the desired trunk ports configure Voice Mail Auto Attendant parameters for the trunk ports If you want to use c...

Страница 532: ...ou can change the default settings of certain VMS features and functions like function codes for nodes in a graph access code for General mailbox call transfer message options etc On the left navigation bar click the General Parameters link To change option values refer the description mentioned below General Settings ...

Страница 533: ... is selected Home Node Code for Graph By default 0 is defined as the function code for Home Node in a graph Dialing 0 takes the caller to the home position in a graph If required you may assign a different function code for Home Node in this field See Graphs and Nodes topic to know more Code to Stop Message Recording The VMS requires callers extension users to signal end of message recording by di...

Страница 534: ...age is played the VMS offers different options to the caller like go to Operator dial the name of the extension user go to Home Position disconnect the call leave a message The VMS instructs the caller extension user to dial different digits function codes for each option offered in the Home Position For each of the Home Node options listed below you may change the default function codes to match ...

Страница 535: ... by the system The VMS offers the following options that can be set by you for the digits dialed by the caller Leave Message Dial another Extension Dial another Extension using Dial by Name Transfer Call to Operator Transfer Call to Mobile Alternate Number Transfer Call to Assistance Go to Home Position Disconnect Call If you select either the options Transfer Call to Mobile Alternate Number or Tr...

Страница 536: ...ttended Message This message is played to the caller when the called party does not answer the transferred call Called Party Busy Message This message is played to the caller when the called party is found to be busy Called Party Not Available Message This message is played to the caller when the called party is not available Leave Message If you clear this check box the VMS will not offer the cal...

Страница 537: ...his is the time for which the system plays the Dial tone to the extension user Digit to Digit Wait Timer for External Caller Configure the Digit to Digit Wait Timer for External Caller This is the time for which the system waits for the external caller to dial the next digit On the expiry of this timer the system considers it as the end of number dialing Digit to Digit Wait Timer for Internal Call...

Страница 538: ...rnoon Evening By default the caller extension user is played the messages Good Morning Good Afternoon Good Evening according to the time of the day You can set the start time for the System Greetings Refer Greeting Message Time in System Parameters for instructions You can also record custom message as System Greetings Refer the topic Recording Voice Messages Welcome Message It is played to the ca...

Страница 539: ...ime and Night Time if you want to customize System Greetings or Welcome Messages or any Graph Nodes messages and record the messages Upload the new voice message files using the embedded FTP server of the VMS module Refer Recording Voice Messages topic whether you want the VMS to take the external callers and extension users directly to the Root Node without playing the System Greetings or Welcome...

Страница 540: ...eter is disabled in both the time zones When Directly Route to Root Node is disabled for a time zone the VMS will play System and Welcome Greetings to callers and extension users Home Node option for Caller on No Digit Dialed The VMS plays the voice messages to instruct callers to navigate through the Graph The VMS waits for the caller extension user to dial a digit for a certain time period If th...

Страница 541: ...instructions For Department groups see the feature description for Department Call for instructions Assigning Voice Mail Auto Attendant Profiles to Trunks A Voice Mail Auto Attendant Profile must be assigned to trunks CO Mobile SIP if you want to use the VMS as Auto Attendant on the trunk For this you must do the following first select Voice Mail Auto Attendant as the destination for Routing Incom...

Страница 542: ... Routing Select Voice Mail Auto Attendant as destination for incoming calls during the Day Break and Night as desired Configure the Voice Mail Auto Attendant parameter Select the auto attendant profile number as Voice Mail Auto Attendant Profile number See also Auto Attendant ...

Страница 543: ...ou also gave a name to the distribution list for example sales marketing customer care etc Draw a two column table on a piece of paper for each Distribution List On one column write the number of the member in serial order from for example 01 up to 24 You may write the numbers corresponding to the number of members you wish to include in this list Now in the next column for each member number writ...

Страница 544: ... System Engineer Click the Voice Mail IVR tab On the left navigation bar click the Distribution Lists link Now refer to the Distribution lists you created on paper and enter the same information in the appropriate fields on this page Click Submit to save changes You may log out of Jeeves ...

Страница 545: ...messages to prompt callers at every step so as to enable them to reach the desired destination Let us take the example of the 6 node graph illustrated above to understand graphs and nodes In this 6 node graph the caller reaches the Root Node by dialing the digit 0 The Root Node is the entry point of the graph At the Root Node the VMS offers the caller different options like leaving a message acces...

Страница 546: ...ns The digits 0 to 9 and can be programmed for selecting the options The caller dials the digit for the desired option to traverse from one node to another If the caller does not dial any digit you can configure a node of your choice to redirect the caller Information Node The Information node is a point in the graph at which the VMS delivers information to the caller When the caller reaches the I...

Страница 547: ... registering complaints feedback etc Customers can place orders have their complaint registered leave special request messages A different voice prompt can be recorded and played to the caller for each Message node The Message node can be reached only from a Menu node Graph may be terminated at the message node Dial By Name Node This node is a point in the graph from where the VMS allows the calle...

Страница 548: ...he caller traverses through the graph at each node the VMS plays the prompt attached to it For example at menu node VMS plays the prompt related to menu options At information node the VMS plays the information prompt At transfer node the VMS plays the transfer prompt and then transfers the call to the designated destination You can program the prompt of your choice at each node Root Node Message ...

Страница 549: ...broking insurance mutual fund advisory The company wants to reinforce its brand promise Your Interest First It wants to use Voice Mail to enhance customer experience and project its image as a company that puts the clients best interest first The company wants to use Voice Mail to respond to existing and potential clients 24x7 provide information about the Company service offerings new retirement ...

Страница 550: ...ation bar click the Graph link Representative for Complaints TN Representative for Stock booking TN Welcom Message MN Existing Customer MN New Customer MN Stock Market IN Mutual Funds IN Insurance IN Representative IN Information on Services Provided IN Information on Shares TN Representative for Mutual Funds TN Information on Mutual Funds TN Representative for Insurance TN Information on Insuranc...

Страница 551: ...endant will become editable If you want to give some information to the caller extension user select Information as Node Type The respective fields of both Extension Number and Destination Node for the Digits columns will become un editable At the same time the Destination Node for No digit dialed Message play over Information node field will become editable If you want to give the caller extensio...

Страница 552: ... respective fields of Destination Node for the Digits the Destination Node for No digit dialed Message play over Information node and the Extension Number columns will become un editable If you want to give the caller the option to leave a message for any extension user select Leave Message as Node Type The respective fields of Destination Node for the Digits the Destination Node for No digit dial...

Страница 553: ... for No digit dialed Message play over Information node field you can configure a node of your choice to redirect the caller if the caller does not dial any digit You may also configure the option Count for No digit dialed Message play over Information node The VMS will redirect the caller to the Node configured in the Destination Node for No digit dialed Message play over Information node field f...

Страница 554: ...ce Mail Settings parameter of the extension configure the Memory Usage Notification to SE and SE Email ID options in the VMS General Parameters configure the SMTP Settings To configure SMTP Settings Log into Jeeves as System Engineer Click the Voice Mail IVR tab On the left navigation bar click the SMTP Settings link Configure the SMTP parameters as described below Outgoing Mail Configuration SMTP...

Страница 555: ...it for a response from the SMTP server You may change the Connection Timeout Interval timer if required The range of Connection Timeout Interval timer is 01 to 99 seconds Default 60 seconds Reconnection Interval This is the time duration for which the VMS will wait before attempting to reconnect with the SMTP server You may change the Reconnection Interval timer if required Range of Reconnection I...

Страница 556: ...ailed When connection to SMTP has been established successfully but there is no acknowledgement for the test mail sent Test Mail Sent Successfully When acknowledgement for the test mail sent to SMTP server received successfully Test Status Message Description ...

Страница 557: ...es To configure General Mailbox parameters do the following Log into Jeeves as System Engineer Click the Voice Mail IVR tab On the left navigation bar click the General Mailbox Settings link 1 Enter the Access Code of the General Mailbox Maximum 6 digits are allowed The valid digits are 0 9 Default 1176 2 Enter the Name of the General Mailbox Maximum 18 characters are allowed Default General 3 Def...

Страница 558: ...e the VMS will prompt the extension user to press a digit for date and time stamp When the mailbox owner presses the digit the VMS will play the message details Default On Demand 7 If you want VMS to ask for a password to access the General Mailbox select the Ask Password to Access Mailbox check box 8 If you have selected the Ask Password to Access Mailbox check box enter the Mailbox Password Fixe...

Страница 559: ...r extension users may be found under the topic Mailbox Settings Recording Station Names using a Telephone Lift the receiver of any SLT extension or Extended IP Phone connected to the NAVAN Enter SA mode 1072 310 Extension Access Code Where Extension Access Code is the extension number assigned to the SLT SIP extension Department Group on which you have enabled Announce Name The VMS will prompt you...

Страница 560: ...essages are played in place of the Welcome messages and help the callers navigate through the VMS graph and its nodes A different message can be played for each holiday Holiday Messages are played to callers when the VMS Auto Attendant feature is enabled on trunks and the Holiday Table is configured Graph Node Messages These are voice guidance messages that are played to help the caller take some ...

Страница 561: ...the VmsCard configuration or recording custom messages that better suits your purpose All VMS default voice messages are in English only If you want you may record voice messages in your local language No special programming is required for using the default voice messages However if you want to use custom messages you must first record the message Greetings Welcome Messages Holiday Messages Graph...

Страница 562: ...n the VMS configuration files make sure that the audio files are recorded in wav file format with the attributes listed below Bit Rate 128 kbps Audio Sample Size 16 bit Channels 1 mono Audio Sample Rate 8 KHz Audio Format PCM The audio file of the custom message you have recorded must have the same unique file name as the existing default audio file Voice Messages can be recorded and played back f...

Страница 563: ...me Prompts Response 01 SysGrt01 wav Good Morning 02 SysGrt02 wav Good Afternoon 03 SysGrt03 wav Good Evening 04 05 06 07 08 09 10 11 12 Number Filename Prompts Response 01 Welmsg01 wav Welcome Please dial the extension number Or to dial by name press 7 To leave message press 6 To go to operator press 9 For more options press 0 To disconnect press 02 Welmsg02 wav We are closed for Lunch To leave me...

Страница 564: ...9 wav Welcome We are closed at this moment To leave message press 6 For assistance press 0 To disconnect press pound 10 Welmsg10 wav Hotel Welcome Please dial the room number To leave message for the guest press 6 To go to operator press 0 To disconnect press 11 Welmsg11 wav Welcome We are closed for Lunch Please press 0 for assistance or press pound to disconnect 12 Welmsg12 wav Welcome We are cl...

Страница 565: ...ne Index Where Extension is the number of the extension Time zone Index is 1 for Working Hours 2 for Break Hours 3 for Non Working Hours The VMS will prompt you to start recording your messages after the beep and press hash pound sign to indicate end of message Follow VMS prompt to record your message To check Mailbox Greeting you recorded for a time zone for an extension s mailbox dial 1072 309 E...

Страница 566: ...13 Prompt Number The VMS will playback the message you recorded If you have finished recording exit SA mode Uploading Custom Voice Messages As mentioned earlier when you record voice messages from an external source make sure that The audio file is recorded in the prescribed format wav and attributes The audio file of the custom message you have recorded has the same unique file name as the existi...

Страница 567: ...on your keyboard 4 The Log on as window of the FTP server opens 5 In the Password field enter the SE password default 1234 and click the Log On button 6 On successful login the FTP window will open You will see the different Configuration folders in this window All the System folders will be displayed Click the USB folder and then click the VmsCard folder ...

Страница 568: ... messages click System_Greetings folder to upload prompts responses open System_Prompts_Responses folder The existing audio files with their unique names and wav extension appear Go to the location CD Pen Drive or Local disk where you have stored the custom voice messages Copy the custom message file e g click to copy Thankyou wav Return to the FTP window Click the desired folder The Thank you mes...

Страница 569: ...pted if you want to replace the existing file Click OK The progress of file transfer will appear on your screen Follow the same procedure to copy other audio files Close the FTP window after the files are transferred For instructions on uploading voice messages using FireFTP see Voice Message Applications ...

Страница 570: ...560 Matrix NAVAN CNX200 System Manual ...

Страница 571: ... personal directory accommodates 25 numbers Each number may be up to 16 digits long A personal directory has Index numbers from 01 to 25 against which the frequently dialed telephone numbers are stored along with their corresponding names and Trunk Access Code TAC As many as 50 different personal directories numbered from 01 to 50 can be created and assigned to SLT and Extended IP phone extensions...

Страница 572: ... simply dialing 8 default feature access code for Abbreviated Dialing followed by 102 Memory Location code at which the desired number 02652630566 is stored The NAVAN will dial out the number using any of the trunks selected for Routing Global Directory s numbers Extensions can use Global Abbreviated Dialing only if this feature is included in the Class of Service CoS allowed to them Further an ex...

Страница 573: ... Directory Programming both must be allowed in their CoS by the System Engineer Preparing Numbers Lists for Personal and Global Directories In consultation with the Extension Users the System Engineer may Determine the number of personal directories that need to be configured Make a list of numbers frequently dialed by the extension Ask the extension users the numbers they would like to be include...

Страница 574: ...than one extension Uploading Personal and Global Directory Contacts If you have personal and global directory contacts database in an excel sheet you can convert the same into a CSV file and upload it through Jeeves For Personal directory contacts the format of the CSV file must be as follows For example 21 9867985489 Sean Gilbert Sean hotmail com 1 0 Where 21 is the Index Number at which you want...

Страница 575: ... is the Email ID optional 1 is the Group Index number optional see SMS Email Group 000 is the Alternate Number Group optional To upload Global Contacts CSV file using Jeeves see Upload Global Directory CSV file Update Personal Directories via Email You can update the Personal Directory contacts via Email if you have enabled the SMS Server Application You can Add View Edit and Delete contact s via ...

Страница 576: ...be a maximum of 64 characters You can assign the contact to a Group Select the desired Group Type from the list The system clubs together contacts assigned to the same Group Default None For details see SMS Email Group Click Submit to save the entries To configure another Directory click the corresponding personal directory number tab Follow the same steps as described above to configure each Pers...

Страница 577: ...ssigned to the SLT extension from the list box For example to assign Personal Directory 02 to SLT 21 select 02 Click Submit to save changes To assign Personal Directory to another SLT click the tab of the desired SLT and follow the same steps as described above to assign the Personal Directory Similar to an SLT Extension you can assign Personal Directory to a SIP extension as follows Click the Ext...

Страница 578: ...d Personal Directory Contacts to expand In Personal Directory Number select the number of the personal directory in which you want to upload the contacts from the CSV file Select the Clear all other indices of the selected Personal Directory which are not specified in the csv file being uploaded check box to overwrite the existing contacts in the Personal directory with the contacts of CSV file De...

Страница 579: ...er select the number of the personal directory from which you want to download the contacts For example select the Personal Directory 01 Click the Download button You will get a prompt asking you to open the Personal_Directory_01 csv file or save the file to a location Save the file on the local disk To open the Personal_Directory_01 csv file from the location on the local disk follow the steps gi...

Страница 580: ...570 Matrix NAVAN CNX200 System Manual Open the Data tab and select From Text button in the Get External Data Select your CSV file from the location on the local disk to import ...

Страница 581: ...rix NAVAN CNX200 System Manual 571 In Original data type section select Delimited radio button and click Next In Delimiters select the Comma check box column dividers will appear in preview and click Next ...

Страница 582: ...AVAN allows you to Add View Edit and Delete contact s via Email When the SMS Server receives an Email for configuring the Personal Directory the system searches for the Email ID in the system users lists If a match is not found the system sends a reply mail to the sender with the Subject SMS Server Personal Directory Configuration and the message in the body Not a valid user If a match is found th...

Страница 583: ...r Subject James Smith 919898985400 The name and number of the contact you wish to add Here The To field contains the Email ID of the SMS Server The Subject contains the details of the contacts The name of the contact is James Smith The number of the contact is 919898985400 The contact is added at the first free index in the Personal Directory and a confirmation mail is sent to the sender with the ...

Страница 584: ... contain the details of all For example if the query is made for the name James that is Subject James If the system finds two entries James D and James S then reply email contains both entries James D 9426712345 James S 9426921345 Similarly if you want the details of all the names groups beginning with J then return mail will contain all names starting with character J and each name will be displa...

Страница 585: ...erver received a delete request for a contact and the same is not configured in the Personal Directory then a reply mail is sent to the sender with the Subject SMS Server Error Cause and the message in the body X not found in Personal Directory Where X is the actual name Modify Edit a Contact You cannot edit any contact in the Personal Directory via Email To modify any contact details you must fir...

Страница 586: ... select the Group for the contact Enter the Email ID of the contact you wish to store The Email ID can be a maximum of 64 characters You can assign the contact to a Group Select the desired Group Type from the list The system clubs together contacts assigned to the same Group Default None For details see SMS Email Group To configure more numbers click the next tabs 200 299 300 399 400 499 500 599 ...

Страница 587: ...m the right display box by pressing the Ctrl key from your keyboard Click the OK button If you want to apply the Least Cost Routing logic on the trunks select the desired LCR type from the list box Time based Number based Time Number based Service Provider based See Least Cost Routing LCR to know more Click Submit to save your entries in the Global Directory Applying Global Directory to Extensions...

Страница 588: ... the Global Directory which are not specified in the csv file being uploaded check box to overwrite the existing contacts in the Global directory with the contacts of CSV file Default Disabled Click the Browse button to Select the csv file to be uploaded from the location on the local disk Click the Upload button All the contacts of the CSV file will be uploaded in the Global Directory To view cli...

Страница 589: ...Opening Global_Directory csv file or to save the file to a location Save the file on the local disk To Open the Global_Directory csv file from the location on the local disk make sure you follow the steps given below DO NOT OPEN THE CSV FILE DIRECTLY WITH EXCEL Open a New worksheet in Excel Open the Data tab and select From text button within the Get External Data ...

Страница 590: ...580 Matrix NAVAN CNX200 System Manual Select your CSV file from the location on the local disk to import In Original data type section select Delimited radio button and click Next ...

Страница 591: ...Matrix NAVAN CNX200 System Manual 581 In Delimiters select the Comma check box column dividers will appear in preview and click Next ...

Страница 592: ...ion users can configure their own Personal Directories using their extension phones The personal directory may be configured using the Matrix Extended IP Phones You may also configure the Personal Directory using an SLT but you will not be able to enter Names of contacts in the Directory For Extended IP Phone Users Press DSS Key assigned to Personal Directory if programmed OR Dial 1071 Enter Perso...

Страница 593: ... an extension user configures Global Directory Part 1 the system will automatically assign the number and name to a free Memory Location The system will use the trunks selected by the System Engineer to dial out the number added by the extension user To configure Global Directory Part 1 from the Matrix Extended IP Phone follow these steps Press Enter key to enter the Phone Menu Scroll to Contacts ...

Страница 594: ... as you did for editing the name After you have finished editing the name press Enter key You will get the confirmation tone and the confirmatory message Stored at Index xxx Deleting a contact To delete a contact Scroll to Contacts in the phone menu and press Enter key Select Delete and press the Enter key You get the prompt Enter Name to select and press Enter Key to delete Enter the initial lett...

Страница 595: ...S Key assigned Abbreviated Dialing function if programmed OR Dial 8 users world wide OR Dial 6 users in USA You get the message Give Index Enter Global Directory Index number 100 to 999 The desired number will be dialed out For SLT Users Pick up the handset Dial 8 users world wide OR Dial 6 users in USA Dial Global Directory Index number 100 to 999 The desired number will be dialed out ...

Страница 596: ... as filter This way the organization can know the details of calls made to and on behalf of each client To illustrate this with an example An advertising media agency makes nearly 100 calls every day to and on behalf of its clients that include Midas Business Solutions Jet Set Holidays Bacchus Vineyard among several others Now the agency can assign a three digit account code to Midas Business Solu...

Страница 597: ...e enabled on the extensions and trunks from which calls using Account Codes are to be made When Forced Account Code is enabled on an extension and the extension user dials out a number or the Trunk Access Code to grab a trunk the system will play an error tone If the extension is an Extended IP Phone the system will flash a message on the phone s display that Account Code is required to make the o...

Страница 598: ...igit number between 001 and 999 Write the Account Names i e names of the clients on the second column against their respective Account Codes The names must not exceed 12 characters All ASCII characters except and double quote are allowed For example You need not follow a cardinal numbering sequence when assigning Account Codes You may assign any code to any client For instance you can assign code ...

Страница 599: ...k Submit to save your entries To enable Account Code on extensions Click the Extensions tab On the left navigation bar click the link of the relevant extension type SLT Extensions or SIP Extensions to which you want to allow this feature Click the extension number tab to which you want to allow this feature Click Class of Service to expand Select the Account Code check box in the Class of Service ...

Страница 600: ...Select the Do not allow outgoing calls without Account Code check box to enable this feature on the extension Click Submit To enable Forced Account Code on trunks Click the Trunks tab On the left navigation bar click the link of the trunk type CO or Mobile or SIP to which you want to allow this feature On the respective trunk page click the More link ...

Страница 601: ... codes i e number and names can be dialed out before making the call during the call when grabbing a trunk if Forced Account Code option is enabled Print and hand out copies of the Account Code List to everyone in the organization for reference while making calls Dialing Account Code by Number To enter the Account Code Number before making the call Press the DSS Key assigned to Account Code by Num...

Страница 602: ...F hook Now follow the same steps in the sequence mentioned above For SLT Users Go OFF hook Dial Account Code first Dial Trunk Access Code followed by the number of the client If you dial the Trunk Access Code to grab a trunk without dialing the Account Code you will get an error tone Go ON hook and then go OFF hook Now follow the steps in the sequence mentioned above Dialing Account Code by Name D...

Страница 603: ... Enter key Speech will be resumed with the called party Dialed the wrong account code or name If you have dialed the wrong account code or name while in the middle of a call you can correct it by dialing flash again and following the steps described above The system will override the previously dialed account code or name Printing Call Reports of Clients You can print the call details of your clie...

Страница 604: ... e you must select whether the number which must be called back should be the same CLI number as on the received call or an alternative number The CLI of those callers whom the system should call back as well must be configured in a List Also if you want the call back to be made to an alternative number the alternative number must also be configured in a list You must select the trunks through whi...

Страница 605: ... assigned the system will check if Least Cost Routing is enabled on these trunks and accordingly place the call back call When A answers the call the system checks the type of Call Back Mode enabled in the Call Back Profile assigned to mobile port 1 the port on which the call back request was made Four scenarios are possible 1 Auto Attendant is enabled as Call Back Mode on mobile port 1 A gets dia...

Страница 606: ...d as per the normal incoming call management logic For call back requests made from a group of trunks when any of these trunks is in the restricted category call back request will not be served by NAVAN See Logical Partition topic for more details How to configure For this feature to function you must configure the Call Back Profiles and assign them to each Trunk port type CO Mobile SIP on which y...

Страница 607: ... it is set to 10 seconds Select the number which the system must Call Back To You may select Call Back on same number from which missed call is received If you select this option you must configure the numbers eligible for call back in the Program the numbers for which call back is to be provided list provided below on this page Or Call back on alternate number if programmed If you select this opt...

Страница 608: ...unk port on which missed call is received to use the same trunk port to make the call back To make the call back using a group of trunk ports select Call Back from trunks and double click this field to select the trunks A multiple selection box opens On the left the trunks appear with their names as configured in Trunks and port numbers in a sequence starting with CO trunks followed by Mobile trun...

Страница 609: ...per the DISA call logic allowing the remote party to enter DISA mode with CLI Authentication Multiple calls as authentication method and level of access CLI Authentication Single Call Answer Signaling The system will process the call as per DISA call logic allowing the remote party to enter DISA mode with CLI Authentication Single call as authentication method and level of access Refer the feature...

Страница 610: ...he modified CLI or the Alternate number should be entered in the same row as the corresponding received CLI number For example for the received CLI number string entered in row 2 enter the corresponding modified CLI Alternate number string in row 2 When the CLI received matches with the number string entered in row 2 of the alternate number list the call back will be made using the modified Altern...

Страница 611: ... feature You can create as many as 8 CPU Groups and assign the extensions to these groups To create a CPU group 1 Log into Jeeves as System Engineer 2 Click the PBX Features tab 3 On the left navigation bar click the Call Pickup Group link 4 For the desired Call Pickup Group Number double click the corresponding Extensions row field A multiple selection box opens The extensions appear on the left ...

Страница 612: ...ltiple extensions You can also delete extensions from the ones you have selected using the Delete key of your keyboard 6 Click OK All the extension numbers you selected will appear in the field Extensions for the CPU Group number The extension numbers appear in the sequence you selected separated by commas 7 To create another CPU group execute similar steps as described above 8 Click Submit to sav...

Страница 613: ...ending on the amount of call traffic to be managed there may be more than one Operator extension Also different Operator extensions may be assigned according to the time of the day For instance during the day working hours call may be landed on the extension of the Receptionists Front Desk Personnel During the night non working hours calls may be landed on the extension of the Security Personnel T...

Страница 614: ...oup you have created will continue to ring even as the system hunts for other extensions in the group to land the call If the call still remains unanswered the system will return the call to the first extension once again This flag has no relevance if there is only one Operator extension 8 Select the Rotation check box if you have selected more than one extension as Operator When you enable Rotati...

Страница 615: ...enied to the Operator extension 100 The type of calls to be allowed denied to the Operator extension during the day break and night local calls regional calls national calls international calls limited calls 101 The trunks through which outgoing calls are to be routed during the day break and night 102 Each extension of the NAVAN is assigned a Priority Level starting from 1 2 3 4 to 9 With 1 being...

Страница 616: ...iple SMPP Clients Software Applications used for sending receiving messages with NAVAN NAVAN functions as an SMPP Server These Clients can send receive messages using the Mobile port s of NAVAN SMS Server With the SMS Server license you can Send receive SMSes to from individuals or groups using the Mobile Port of NAVAN Forward SMS received on Mobile Port as Emails to users through the Email Client...

Страница 617: ...re installing the Voice Mail System or want to connect more than 8 SIP Extensions you would require a valid License Key which you must activate in the system Instructions for Matrix Channel Partners Your license voucher may be a paper or a PDF password protected file You may activate your License Online For this keep the following items ready The License Voucher containing the 16 digit PIN A valid...

Страница 618: ...is page You may view the features and functions that are currently available to you under Service Profile Keep your Current License Key and the License Voucher ready Copy the License PIN from the Voucher Open a new window on your browser Enter http www matrixcomsec com MatrixLicense in the address bar of the new window ...

Страница 619: ...rix NAVAN CNX200 System Manual 609 The Login to Access page opens Enter your User Name and Password provided by Matrix and click the Login button The Home page will open Click the License Activation button ...

Страница 620: ...License Activation page will open As Product Family select the option Convergence In the Current License Key field type the current product license key you noted or paste the copied product license key from the License Management page of Jeeves ...

Страница 621: ...Matrix NAVAN CNX200 System Manual 611 Click View button The page will show the current License Profile on NAVAN Click the Next button to continue The License Activation page opens ...

Страница 622: ... NAVAN CNX200 System Manual In the License PIN field on this page enter or paste the copied License PIN from the Voucher Click Details The details appear in the fields Product Family Product Name Product Variant ...

Страница 623: ...ofile will appear on this page Click the Activate button and wait for a few seconds as the activation is initiated On successful activation the confirmation message will appear on your screen along with the activation date and time You will also be sent a confirmation mail to your e mail ID registered with Matrix ...

Страница 624: ...ew License Key in the Enter License Key field The system will automatically distribute the complete License key sequentially in its respective boxes Click Submit button The Service Profile on this page will be updated according to the license When you activate the IP8 License it will appear on your Service Profile Similarly you can activate other features requiring valid licenses To log off click ...

Страница 625: ... on this page You may view the features and functions that are currently available to you under Service Profile Send your Current License Key and the License PIN on the Voucher to the Matrix License Support Centre You will receive a new License Key Open Jeeves again Log in as System Engineer Click the License Management link under PBX Settings tab Paste the copied New License Key you obtained from...

Страница 626: ...d the equipment is designed to restrict flow of call traffic from these networks For example the Telecom Regulatory Authority of India TRAI allows termination of lines of the PSTN and VoIP Networks in the same equipment only if these lines are logically partitioned Termination of lines from both of these networks in the same equipment without a logical partition constitutes an offence in India NAV...

Страница 627: ...lude restricted trunks in a 3 party or multi party conference An Error Tone will be played when s he attempts it Dial In Conference Participation in a Dial In Conference from trunks with restricted call permission is not allowed External Call Forward In the case of Built In Auto Attendant DISA or when transferring a trunk call to an extension if the extension has set call forward to an external nu...

Страница 628: ...iate country area code when it routes the call through the GSM UMTS network How it works Automatic Number Translation makes use of the Automatic Number Translation ANT Table The ANT Table consists of three columns Dialed Number String This column contains the numbers you expect the users to dial Strip Digit This column contains the number of digit s to be stripped off by the system from the Dialed...

Страница 629: ... and add 0 For example when a user dials the number 919925801882 the system will dial out 09925801882 Automatic Number Translation also forms the basis of Multi Stage Dialing How to configure To use Automatic Number Translation feature Decide on which trunks you want to assign the Automatic Number Translation ANT feature Decide the number of ANT tables you need You can program 8 different tables w...

Страница 630: ...e number of digits you want the system to strip off from the Dialed Number before the dialing out this number The valid range is from 00 to 16 Default 0 In the Add Prefix column enter the number you want the system to add as prefix to the Dialed Number before the system dials out this number The Prefix can be a maximum of 40 characters Default Blank Click Submit to save your entries To enable Auto...

Страница 631: ...list box Select OFF if you want to disable ANT on this trunk Default OFF You can also configure the ANT Table number you select for this trunk from this page by clicking the Settings icon This will open the ANT Table Number you selected for this trunk Click Submit to save settings You may log out of Jeeves ...

Страница 632: ... on Trunk Port CO Mobile SIP used for making the outgoing call Number dialed whether local long distance or international Time and day when the call was made whether day time break time night time or on a Special Day Duration of the call For this feature to work you must get the tariff details from the Service Providers and configure the same determine the outgoing trunk for the calls according to...

Страница 633: ...n or equal to one unit Cost of Call Cost of First Unit Service Charge as applied If the duration of the call is more than one unit Cost of Call Cost of First Unit Number of Additional units x Cost for Additional units Service Charge as applied The system applies the rates as configured in the Normal Pulse Rate Table for all the days except when it detects a day configured in the Discounted Pulse R...

Страница 634: ...is programmed in Pulse Rate Option 1 for the matching entry at Index 001 Index Area Code Name Ignore Digit Count Pulse Rate Type for Pulse Rate Option 1 Pulse Rate Type for Pulse Rate Option 2 Pulse Rate Type for Pulse Rate Option 3 Pulse Rate Type for Pulse Rate Option 4 001 26 Local 03 06 09 10 002 09 Mobile 05 03 07 08 Pulse Rate Type Time Zone T1 Time Zone T2 Time Zone T3 Time Zone T4 First Un...

Страница 635: ... of the First unit and the Additional units must be configured in the Discounted Pulse Rate Table according to the Time Zones How to configure To be able to use Call Cost Calculation you must do the following Define the Unit and Service Charge on the basis of which call cost is to be calculated Assign Call Cost Calculation Pulse Rate Option and the Call Cost Calculation Schedule on the trunks on w...

Страница 636: ...if a call worth 10 units was made the service charge will be applied on each of the 10 units instead of the one time service charge as in the case of Fixed service charge If you select this option you must define the amount to be added as service charge on each unit in the Specify Service Charge field Percentage of call cost A percentage of the cost of the call is added as a service charge for tha...

Страница 637: ...ervice providers offer different call rates for different types of calls for example local national international You can configure different Pulse Rate Types for different types of calls Thus each Pulse Rate Type can have different rates for the First and the Additional unit The Pulse Rates offered by service providers may vary according to the time of the day In such cases you will need to confi...

Страница 638: ... configure the Discounted Pulse Rate table On the left navigation bar click the Discounted Pulse Rate link Configure the Discounted Pulse Rate Type with rates for the First Unit and the Additional Unit as required Click Submit to save changes ...

Страница 639: ...nted Pulse Rate options on this page Click Submit to save Configuring Area Code Table The pulse rate of a call depends on the destination number dialed Generally pulse rate varies according to the type of the call Local National International NAVAN enables you to configure Pulse Rates according to Area codes To configure Pulse Rates for Area Codes ...

Страница 640: ...gnore Digit Count This parameter is relevant only for Service Provider Based Least Cost Routing Different service providers offer different pulse rates for the same type of calls To take care of this NAVAN allows you to assign different Pulse Rate Options for each area code For each area code configure the Pulse Rate to be followed for the desired Pulse Rate Options in the Pulse Rate Type for Puls...

Страница 641: ...ll Cost Display for an extension Enter SA mode Dial command 1072 181 Extension Flag Where Extension is the Number of the Extended IP Phone Flag is 0 for Disable 1 for Enable By default Call Cost Display is enabled Exit SA mode How to use For Extended IP Phone Users Press the DSS Key assigned to Call Cost Display feature OR Dial 1075 Scroll with the up down navigation keys to view the cost of the l...

Страница 642: ...r calls matching with numbers list and the Do Not Apply CDC for calls matching with numbers list in the CDC profile To check whether CDC is applicable on the Trunk The system checks if Apply CDC for Outgoing Calls check box is selected in the trunk The following results are possible The Apply CDC for Outgoing Calls made from Trunks flag is enabled and a match is found for the number in the Apply C...

Страница 643: ...call This Timer is fixed At the end of the Goodbye Timer the call is disconnected if the Disconnect Call after CDC Timer flag is enabled If this flag is disabled the call will not be disconnected Instead the CDC Warn Timer will be loaded again The user can know how long s he has been talking A is played Warning Beeps B cannot hear the beeps This continues until either party disconnects External In...

Страница 644: ...se this feature on extensions Configure Call Duration Control Profiles You may configure up to 4 different Profiles Assign a CDC Profile to the extensions on which you want to apply this feature Enable CDC for incoming and outgoing calls received on made from the Trunks on which you want to apply this feature To configure Call Duration Control Profiles First decide the types of calls Outgoing Inco...

Страница 645: ... change the CDC Timer to the desired duration The range of the timer is 0001 to 9999 seconds Default 160 seconds To have calls disconnected on the expiry of the CDC Timer enable Disconnect Call after CDC Timer Default Disabled In the Apply CDC for calls matching with numbers column enter the numbers on which CDC should be applied You may refer to the list you prepared In the Do Not Apply CDC for c...

Страница 646: ...the extensions For instructions see SLT Extensions SIP Extensions Enable CDC on the desired trunks For instructions see Call Duration Control present under SIP Trunks CO Trunks and Mobile Trunks available in the Trunks tab for instructions Log out of Jeeves if required ...

Страница 647: ...he system displays the duration of the current call on the LCD display of the phone The current call may be incoming or outgoing internal or external call How it works The Extended IP Phone user goes OFF Hook Dials an external number The remote party answers the call The dialed external number with duration 5 digits in the format of MM SS is displayed on the LCD of the phone when the call is answe...

Страница 648: ...e trunk used for making receiving external calls Incoming calls without Calling Line Identification CLI can also be taped To be able to record internal calls Tape Internal Calls option must be enabled in the assigned Call Taping Profile to the extension Use this feature in accordance with the local privacy laws Matrix ComSec is not responsible for any abuse of this feature by users How it works A ...

Страница 649: ...ping Profile assigned to the extension If the flag is enabled then the system checks if the flag for Call Taping on the trunk on which the call is received is enabled If the flag is enabled then all calls without CLI are taped A calls B The system checks if the Tape Internal Calls is enabled in the Call Taping Profile assigned to A If the flag is enabled the system records the speech between A and...

Страница 650: ...g into Jeeves as System Engineer Click the PBX Settings tab On the left navigation bar click the Call Taping link Call Taping Profile 1 appears on this page In the Tape Incoming Calls received from following numbers column enter the phone numbers of external callers whose speech you want to tape In the Tape Outgoing Calls made to following numbers column enter the phone numbers of external parties...

Страница 651: ...m the Extension Number SLT or SIP whose mailbox you want to use for Call Taping For example if you want to select the mailbox of the phone assigned to SLT Extension 201 then enter 201 in this field To enable Call Taping on Trunks Enable Call Taping check box in the desired trunk page See Call Taping under SIP Trunks CO Trunks and Mobile Trunks available under the Trunks tab for instructions If req...

Страница 652: ...Extension Users Press Voice Mail Key OR Dial 390 default Voice Mail Access Code Dial 0 to go to Home Position default Access Code Dial 8 default Access Code Dial the number of the extension to which the common mailbox has been assigned Enter the password for the common mailbox105 Follow Voice Mail Prompts to listen to new messages Follow the prompts to listen to old messages Replace handset after ...

Страница 653: ...ks the numbers stored in the CLI Based Routing table D s number is found in the CLI Based Routing Table The system checks the destination number stored against D s CLI A s number is found as the destination extension The system lands the call on A Match from first digit of CLI If you select Match from first digit of CLI the call will be routed as follows D calls on a trunk of NAVAN The system firs...

Страница 654: ... system Enter the telephone numbers and names of the calling parties and the corresponding landing destinations that is the Port Type and Port Number The Port Type may be SLT SIP Extension or a Virtual Extension or a Voice Mail Auto Attendant Profile The Name field is for identifying the entry When placing a call on the destination extensions both the number and the Name are presented in the CLI D...

Страница 655: ...Index numbered from 001 to 400 There are 100 entries on each page To go to the next 100 Index click the numbered tabs at the top of the CLI table 101 200 201 300 301 400 Refer to the table you created on paper and configure the following parameters In the Calling Party s Number field enter the number of the calling party not exceeding 16 digits You can also enter in the number string In the Callin...

Страница 656: ... CNX200 System Manual Enable CLI Based Routing To enable CLI Based Routing on CO Trunk see CO Trunks To enable CLI Based Routing on Mobile Trunk see Mobile Trunks To enable CLI Based Routing on SIP Trunk see SIP Trunks ...

Страница 657: ...s networked with PBX A at Location B To create a CUG over Analog Trunks the CO port of NAVAN is connected to the SLT FXS port of PBX A the CO port FXO of PBX A is connected to the SLT port of NAVAN To create a CUG over IP Network both NAVAN and PBX A may be connected directly to the Public network in Peer to Peer mode The Extension Numbers of NAVAN and PBX A must be unique Closed User Group CUG mu...

Страница 658: ...d system will check this parameter By default this flag is enabled The system will apply toll control to all the outgoing calls Disable this flag if you do not want to apply toll control to the CUG numbers dialed by you The CUG Table you configure on NAVAN would look like this At Location B you may do a suitable configuration of the PBX If the PBX at Location B were NAVAN the CUG Table you configu...

Страница 659: ...as 0 if you do not want any digits to be stripped off from the beginning of the dialed number string To strip off some digits from the beginning of the dialed number string specify corresponding value between 1 to 9 Default 0 Clear the Self Route check box to route the dialed call to the other PBX If you select this check box then NAVAN will route the call to any of its own extensions provided it ...

Страница 660: ...ou may enable Rotation if you have selected more than one trunk When you enable Rotation each new outgoing call is routed through the subsequent trunk in the group107 This ensures equal distribution of outgoing call traffic on all trunks When Rotation is disabled calls are routed through the first trunk in the group If this trunk is busy the call is routed to the next trunk in the group Rotation h...

Страница 661: ...CUG numbers dialed by you See Toll Control for more details If the CUG is connected over IP network you must also configure the SIP Trunk as Peer to Peer trunk and configure the Peer to Peer Table See Peer to Peer Calling for instructions Click Submit button to save your entries You may log out of Jeeves ...

Страница 662: ...ll the Department The system checks E s Class of Service for the Department Call feature The feature is enabled Then the system checks if Rotation is enabled for the extensions in the Department If the Rotation check box is selected the system lands the call on the extension which is set to ring first Extension A configured as the first landing destination rings for the duration of the Ring Timer ...

Страница 663: ...n of the Department group Voice Mail If your system has the Voice mail module a Department Group can be assigned a common mailbox for Voice mail called the Department Group Mailbox You can assign Department Group Mailbox to selected extensions or to all extensions in the Department To take the example of Extensions A B C D with the Department Access Code 391 further Extensions A B C and D are all ...

Страница 664: ...Groups NAVAN does not support Call Forward to an external destination number You can set Call Forward for Department Group from the SA Mode only NAVAN supports the following Call Forward options for Department Groups Call Forward Unconditionally calls are forwarded to the destination number without checking the status or waiting for a response from the Department Group Call Forward if Busy calls a...

Страница 665: ... will continue to hunt for a free extension If all extensions in the group are busy the call will be forwarded to the destination number Call Forward unconditional busy or busy No reply set by any member extension will not work If Call Forward No Reply is set the system will start the Call Forward No Reply Timer Department Group and place the call as per the Rotation set for the Department Group I...

Страница 666: ...t group more than 32 extensions in a single department group Decide in what sequence the extensions in each group should ring that is which extensions should ring first second third and so forth Decide the access code you want to assign to each department group You may also assign a name to the department group Your table may look like this The access codes for the department groups and extensions...

Страница 667: ...ystem Engineer Click the PBX Settings tab On the left navigation bar click the Department Group link Assign an Access Code to the department group against the Department Group Number if required By default the Access Codes assigned to Department groups are from 391 to 395 If you decide not to use the default access codes make sure that the access code you assign to each department group is unique ...

Страница 668: ... hunts for other extensions in the routing group to land the call If the call still remains unanswered the system will return the call to the first extension once again This flag is of no relevance if you have selected only one member extension in the department group Select the Rotation check box if you want to enable rotation of calls in the department group having multiple member extensions Whe...

Страница 669: ...te call traffic 8 Select the Continuous Ring check box for member 01 201 and set the Ring Timer to 20 seconds 9 Set the Ring Timer of member 02 202 to 10 seconds Clear Continuous Ring check box 10 Retain the Ring Timer of member 03 301 as default 15 seconds Clear Continuous Ring check box 11 Set the Ring Timer of member 04 302 to 20 seconds Clear Continuous Ring check box 12 Click OK the window cl...

Страница 670: ... number109 and the extension number dialed by the caller110 to the extension user You may select one of the following options Never The VMS will not play message details to the mailbox owner after playing the message Always The VMS will play message details to the mailbox owner after playing each message On Demand The VMS will play message details to the mailbox owner only when the mailbox owner r...

Страница 671: ...rring the call answered by the VMS Auto Attendant to the extension You may select any of the following methods of call transfer for the Day working hours and the Night Break non working hours Transfer to Mailbox When the caller dials the extension number the VMS Auto Attendant will check if the extension number has a mailbox assigned and transfer the call to the mailbox of the extension Transfer i...

Страница 672: ...he callee of the new message and allows the callee to access it Refer the feature description Voice Mail Notification via Call for more details Voice Mail Notification via Email The message notification will be sent to the email address of the extension user To use this feature configure the following parameters Notification If you want the Voice Mail notification to be mailed to the extension use...

Страница 673: ...nding extension type From the combo box Assign the Mailbox of the Department Group select the access code of the Department Group whose group mailbox you want to allow access to by the extension 3 Click Submit to save changes Setting Call Forward for Department Group You can set Call Forward for Department Group from SA Mode only To set Call Forward Log into Jeeves as System Administrator Click th...

Страница 674: ...extension number where the call is to be forwarded Click the Apply Call Forward button The color of the text indicating that Call Forward is set will change to red To cancel Call Forward Click the Cancel Call Forward button The color of the text indicating that Call Forward is not set will change to black Setting Call Forward No Reply Timer for Department Group If you have enabled Call Forward Dep...

Страница 675: ...s between 1 to 255 seconds Click Submit to save your timer setting How to use Making a Department Call Making a department call is the same as calling another extension For Extended IP Phone Users Press DSS Key assigned to the desired Department Group OR Dial the desired Department Group Number default 391 395 You get Ring Back Tone as the call lands on an extension within the department group Tal...

Страница 676: ...according to the type of Message Wait Indication set on your extension phone When the LED Lamp of the Message Wait Key glows OR When your phone plays Message Wait Ring111 Lift the handset Dial 390 Follow voice prompts Press 2 for Department Group mailbox Press 1 to listen to new messages Replace handset after listening to messages Or you may follow voice prompts If you hear Stuttered Dial Tone Voi...

Страница 677: ...rmation tone and message on your phone s LCD Go Idle For SLT Users Lift handset Dial 1179 users worldwide Users in the Philippines dial 1108 Dial the Access Code of the Department Group whose calls are to be forwarded Dial Call Forward Type 1 for Forward Unconditionally 2 for Forward when Busy 3 for Forward when No Reply 4 for Forward when Busy No Reply Dial 0 to Cancel Call Forward Dial Destinati...

Страница 678: ... numbers allotted by the Service Provider Each extension user can be assigned a separate DDI number To use this feature make sure you have Configured the Pilot Numbers for each SIP Trunk Assigned DDI Numbers to desired extension users Let us understand this with the help of an example SIP Trunk1 is connected to the NAVAN The Pilot Number 2630555 is assigned by the service provider along with 50 DD...

Страница 679: ... be displayed In DDI Number for SIP Trunk field for each SIP Trunk enter the DDI Numbers provided by the ITSP of that trunk You can assign these DDI numbers to SLT SIP or Virtual extension users as well as Department Groups For example in SIP Trunk 1 field enter the DDI numbers among the DDI numbers provided by the ITSP with whom you have registered the SIP Trunk 1 Each number can be assigned to t...

Страница 680: ...you want to disable Keep Send DDI Number as CLI enabled to allow the system to send the DDI number as CLI when outgoing calls are made by the extension user who is assigned this number If you clear the check box the system will send the Pilot number of the respective SIP Trunk as CLI for outgoing calls made from this extension Click Pilot Numbers to expand Enter the DDI Pilot Number provided by th...

Страница 681: ...ok or Off hook They are allowed to make as many trunk calls and internal calls as long as they are logged into the DISA mode To end the DISA login session callers must dial the Termination code or disconnect from the remote end Callers can access an extension to use DISA PIN Authentication Multiple Calls only if the extension has DISA feature enabled in its Class of Service DISA with CLI Authentic...

Страница 682: ... this feature to work you must enable the desired DISA variant on the desired trunks CO Mobile SIP A call lands on a DISA enabled trunk The system checks if a DISA variant is enabled on the trunk for the current time i e Day or Break or Night If a DISA variant is enabled on the trunk the system processes the call according to the DISA variant enabled on the trunk If DISA with PIN Authentication Mu...

Страница 683: ...he call At the end of the call the caller dials the On hook code 0 to go On hook To make another call the caller dials Off hook code 1 and dials the desired number Thus the caller dials the On hook and Off hook codes to make as many trunk and internal calls as desired If the caller dials an external number using a CO trunk the system starts the DISA Inactivity Timer configurable default 2 minutes ...

Страница 684: ...ks DISA calls in the SMDR report are marked as O in the remarks column See Station Message Detail Recording Report If DISA is disabled NAVAN will route the call by Built In Auto Attendant logic if Built In Auto Attendant is enabled If DISA and Built In Auto Attendant both are disabled the incoming call will be routed as per the Incoming Call Route logic To know more see Auto Attendant How to confi...

Страница 685: ...an configure as many as 900 numbers in this table by clicking the tabs of the index on the top of the table Refer to the list of remote user numbers and the corresponding NAVAN extension numbers you made In the Calling Party s Number column enter the number of the remote users whom you want to allow access to DISA using CLI Authentication The system will match the CLI of the callers with the numbe...

Страница 686: ...se flash use pause or dial characters including A B C D from your remote device to use the features and facilities of NAVAN in DISA Login mode However NAVAN will not be able to understand the conventional way of dialing flash key or going on hook with momentary make break of loop current Therefore NAVAN supports specific codes which it can interpret if these are received during DISA session When y...

Страница 687: ...mote end If DISA CLI Authentication Multiple Calls is enabled You will get system dial tone at the end of music Built In Auto Attendant Voice Message Dial the special digits 1 to go Off hook 0 to go On hook and make your calls like any local extension To terminate DISA session dial 9 or disconnect the call from your remote end If DISA CLI Authentication One Call is enabled You will get Trunk dial ...

Страница 688: ...the trunk 2 Number based LCR This type of LCR may be used when you have trunk lines of more than one service provider and each offers different tariffs according to the area or distance or phone numbers dialed For instance Service Provider 1 provides lower calling rates for calls made from City A to City B than Service Provider 2 and Service Provider 3 3 Time and Number based LCR This type of LCR ...

Страница 689: ...Cost Factor table The Cost Factor table displays all the Port Type Number of the system and the Trunk Names In Cost Factor column of the table assign a cost factor to each trunk type For instance assign Cost Factor 01 to CO1 and Cost Factor 02 to CO2 Similarly assign Cost Factor 03 to Mobile Trunk 1 Cost factor 04 to Mobile Trunk 2 Cost Factor 05 to SIP trunk 1 Configuring Time based LCR You can c...

Страница 690: ...the Time Zone in 24 Hours Minutes format Enter the Cost factor you assigned to CO1 i e 01 as Preference 1 2 3 and 4 When calls are made during this time period they will be routed through CO1 only If you have finished defining Time Zones and the preferred trunks for the time zones configure the Time based LCR using Jeeves Log into Jeeves as System Engineer Click the PBX Settings tab On the left na...

Страница 691: ...truncated phone number or an area code For each number string you enter select the Trunk with the lowest cost as your first preference i e Preference 1 Select the trunk of your second third and fourth preference in order of increasing cost When the trunk you selected as first preference is busy the system will route the call through the next trunk you have set that is free Refer to the table you p...

Страница 692: ...as your preference If you have finished entering the number strings and selecting the preferred trunks for the numbers configure the Number based LCR using Jeeves Configuring Number based LCR using Jeeves Log into Jeeves as System Engineer Click the PBX Settings tab On the left navigation bar click the Least Cost Routing LCR link Index Number Cost Factor Preference 1 Preference 2 Preference 3 Pref...

Страница 693: ...offer lower tariff You can define up to 8 time zones For each Time Zone you define specify the Number strings on which lower tariff is applied during that Time Zone For each Number string you enter for a particular time zone assign Cost Factor Select the trunk with the lowest cost as your first preference Select trunks of your second third and fourth preference in order of increasing cost Refer to...

Страница 694: ...ng the number strings and selecting the preferred trunks for the number strings configure the Number and Time based LCR using Jeeves or a Telephone Configuring Time Number based LCR using Jeeves Log into Jeeves as System Engineer Click the PBX Settings tab On the left navigation bar click the Least Cost Routing LCR link Time Zone1 Time Zone2 Time Zone3 Time Zone 8 HH MM HH MM HH MM Start Time 08 0...

Страница 695: ...never a number is dialed out the system ignores the area code and starts checking the numbers in the Service Provider based LCR table and routes the call according to the lowest cost trunk configured for that number For this you must configure the two parameters Area Code and Ignore Digit Count in the Area Code Table On a sheet of paper make a table for Service Provider based LCR Index No Number A...

Страница 696: ...the area code For example the area code for the number starting with 3 is 080 which consists of 3 digits So the Ignore Digit Count for the number area code 080 will be 3 For each number string and area code that you enter assign the Trunk of the service provider who offers the lowest tariff to that number area code Refer the table you prepared for assigning Cost Factor to trunks If you have finish...

Страница 697: ...s and the corresponding Ignore Digit Counts from the sheet you prepared for Service Provider based LCR You may also enter the respective name for each area code if desired Click Submit at the bottom of the page to save your changes Now click the Least Cost Routing LCR link on the left navigation bar The LCR options will appear below this link ...

Страница 698: ...age to save your settings Configuring LCR Type on Trunks After assigning Cost Factor to Trunks and configuring the LCR Type Time based Number based Time and Number based Service Provider based you must now apply the desired LCR Type on the Outgoing Trunks selected for the extension types SLT SIP Under Extensions tab click the link relevant to the extension type SLT Extensions SIP Extensions Select...

Страница 699: ...nks you selected for Dialing the Trunk Access Codes select the desired LCR Type from the combo box Time based Number based Time Number based Service Provider based Cost Factor Since you have already configured the LCR Type you do not need to configure the LCR settings further on this page Click Submit to save your settings ...

Страница 700: ...DSS key on which a Macro is assigned is pressed the corresponding access code is executed The system sets call forward to the external number automatically NAVAN also supports Macros for SLT which have special keys When any of these keys is pressed a special number string which you can program is dialed For example an SLT instrument has 5 special purpose keys When these keys are pressed the string...

Страница 701: ...xtended IP Phone you must select Macro as Function Type As Offset you must select the Macro Index number 1 25 at which the number string is stored In this example it would be Macro Index 1 For detailed instructions on assigning a keyboard macro to a DSS key see Phone Key Settings under Configuring Matrix SPARSH VP248 Extended IP Phone as SIP Extension and Configuring Matrix SPARSH VP330 Extended I...

Страница 702: ...ed enter the string 163 the default feature access code for Voice guided Alarms in the Number String field and enter the string 53 in the corresponding Access Code field The Access Code that you assign here in Macros must not conflict with any other Access Codes in the Dial Phase See Access Codes Click Submit to save Log out of Jeeves ...

Страница 703: ...ege type you must configure the list of National numbers International Calls Dialing of international numbers is allowed in addition to local area long distance and internal numbers You can also restrict calls to certain countries To apply this Call Privilege type you must configure the list of International Numbers All Calls Dialing of all types of numbers local regional national international is...

Страница 704: ...d on Time Zones By default Call Privilege No Calls is selected for this level Toll Control Call Budget Consumed is applied only if the Call Budget feature is enabled on the extension NAVAN offers you the flexibility to redefine the Call Privilege for each of the above Toll Control Levels according to the requirements of the extension users How it works When a call is made NAVAN checks the Toll Con...

Страница 705: ...ch extension port type SLT SIP For Toll Control to work you need to configure the lists of Local Numbers Regional Numbers National Numbers International Numbers and Limited Calls according to the type of Call Privilege you want to assign to the extensions To do this Make a two column tables each for Local Regional National International and Limited Call numbers on paper or using a computer On one ...

Страница 706: ...ber lists Configure these lists on the Toll Control Allowed Denied Numbers page of Jeeves Then assign Toll Control to individual extension users as described in Assign Toll Control to extension users Toll Control Allowed Denied Numbers Log into Jeeves as System Engineer Click the PBX Settings tab Sr No Allowed Numbers Denied Numbers 1 2 999 Sr No Allowed Numbers Denied Numbers 1 2 999 ...

Страница 707: ...ou may enter only the first digit of the number string or a part of the string or the complete number string Each number string you enter must not exceed 16 characters In the column Denied Numbers enter the number strings which you want to restrict from being dialed out Click Submit Enter as many local numbers as you want by clicking the Index number links 001 250 251 500 500 750 751 999 Click Sub...

Страница 708: ...ternational tab Enter the Allowed Numbers and Denied Numbers in their respective columns Click Submit Enter as many International numbers as you want by clicking the Index number links 001 250 251 500 500 750 751 999 Click Submit to save Limited Calls The Call Privilege Type Limited Calls allows the dialing of specific telephone numbers which may be local regional national or international numbers...

Страница 709: ...you may do so now Login as System Engineer Click the Extensions tab On the left navigation bar click the link of the extension type it may be SLT Extensions SIP Extensions The page of the selected extension type opens For example if you selected SLT Extensions the SLT Extensions page opens To select an extension number on the page select the Extension Number tab Click Toll Control to expand Click ...

Страница 710: ...umbers page will be automatically assigned If you have not configured number lists already you may do so now Click the Settings icon The number list of the call privilege type you selected opens in a window For instance if you selected National Calls as Calls allowed during Day when you click the settings icon the list for National numbers will open In the Allowed Numbers column enter the long dis...

Страница 711: ...to save the entries Close the window In the Calls allowed during Night Break box select the call privilege type for the Night Break time To configure the number list for the selected call privilege type click the corresponding Settings icon The number list of the call privilege type you selected opens in a window Follow the same steps as described above to configure this table Follow the same step...

Страница 712: ...702 Matrix NAVAN CNX200 System Manual Page Zones For information on how to create and assign Page Zones see Paging ...

Страница 713: ...A can directly dial an international number from any extension that has PIN Dialing enabled in its CoS NAVAN will prompt A to dial his her PIN either by playing feature tone or a voice message Voice message will be played if recorded See Voice Message Applications for more details As soon as s he dials a valid PIN NAVAN will dial out the number and connect A to the called party This method of call...

Страница 714: ...e left navigation bar click PIN Configuration Select the desired Toll Control level Each Toll Control level includes the Allowed and Denied numbers as configured by the SE See Toll Control for more details Configure the PIN at a desired index The PIN must be of 4 digits Valid digits are 0 to 9 Each PIN must be unique You cannot assign same PIN to two different index within the same Toll Control le...

Страница 715: ...e Make sure you have configured the LCR table for the selected LCR type See Least Cost Routing LCR for more details How to use For Extended IP Phone Users To use PIN Dialing from any extension Go OFF Hook Press DSS Key assigned to the PIN Dialing OR Dial 2 Dial the PIN You will hear the trunk dial tone Dial the desired number OR Go OFF Hook Dial TAC Dial the desired number You get Feature tone Voi...

Страница 716: ...ls in the SMDR Storage option of the desired extension From SA mode enable Print Calls made using PIN and set the PIN range in Calls made using PIN under Calls filter under SMDR Management tab s OG Call Report link From SE mode configure the Destination IP Address Port for SMDR Outgoing Call Report Refer Station Message Detail Recording Report for detailed instructions on printing reports using fi...

Страница 717: ...Calls Outgoing Calls and Internal calls using filters See Station Message Detail Recording Storage SMDR Report These parameters enable you to obtain offline Report of the records of Incoming Outgoing and Internal calls See Station Message Detail Recording Report SMDR Online These parameters enable you to obtain Online report of Incoming Outgoing and Internal calls With Online SMDR you can obtain d...

Страница 718: ...First Out FIFO logic The buffer can be cleared at any time from the System Administrator mode The SMDR buffer data is maintained even during power failures However it is advisable to take frequent printouts of the calls to avoid accidental loss of the data See Station Message Detail Recording Backup How to configure To enable storage of SMDR of Outgoing Incoming and Internal Calls you must enable ...

Страница 719: ...d you have the option of charging the call amount either to the extension that originally made the call i e the Originating Extension or to the extension that was last in speech on the call i e the Terminating Extension In the When Call Splitting is OFF charge calls to field select the desired extension you want to charge the call to as Originating Extension or Terminating Extension As the SMDR Ou...

Страница 720: ...In Auto Attendant check box If you want all calls that remained unanswered to be stored select the Store Unanswered Calls check box If you want all calls received using Auto Attendant that remained unanswered to be stored select the Store Unanswered calls from Built In Auto Attendant check box If you want calls made using DISA select the Store DISA Calls check box Click Submit to save Incoming Cal...

Страница 721: ...o button To delete calls made by a particular extension or a range of extensions select the Delete OG Calls made by Extensions button In the first edit box enter the number of the first extension in the range In the second box enter the number of the last extension in the range If you want to delete the records of a particular extension enter the same extension number in both fields To delete the ...

Страница 722: ... 1072 133 Reverse SA Password To delete calls made by a particular extension or range of extensions Dial 1072 131 Extension Number Extension Number To delete calls made by on a particular date or a between a certain time period 1072 132 DD MM YYYY DD MM YYYY The format of the date depends on the Date Format of the system Exit SA mode ...

Страница 723: ...ll is received Extension number which answered the call Date and time when the call was received Hold speech ring duration of the call in seconds Each Outgoing call is stored with the following fields Extension who made the call Trunk line port used for the call Number dialed Date and time when the call matured Duration of the call in seconds Call Units Call Maturity Type Call Type Normal DISA ECF...

Страница 724: ...he Destination Port In the Destination IP Address Port field enter the IP Address and the port of the remote Syslog Server For SMDR Incoming Call Online Select the Destination Port In the Destination IP Address Port field enter the IP Address and the port of the remote Syslog Server For SMDR Internal Call Online Select the Destination Port In the Destination IP Address Port field enter the IP Addr...

Страница 725: ...rial numbers are generated from 000 to 999 When serial number 999 is reached the numbers roll over to 000 Serial Number starts from 1 and not 0 When this field rolls over it increments the increment counter Increment Counter It increments when the serial number counter rolls over The Increment counter starts from A ending at Z and then rolls over back to A Property Code This is the property code i...

Страница 726: ... and Seconds i e whether the single digit hour is to be printed as space X or 0 X For example hour 1 is to be displayed as 1 or 01 In case leading zeroes are not required Date Month and Year sub fields are right aligned and the spaces are filled with character space Answer Duration The time after which the call was answered Program the duration unit and the duration fill flag Hold Duration The tim...

Страница 727: ...ed which means the serial number counter will not be automatically reset Click Submit to save settings You may log out of Jeeves How to use You can start and stop SMDR Online report from the System Administrator mode using Jeeves or dialing SA Commands from an extension phone To start stop Online report using Jeeves Log into Jeeves as System Administrator Click the SMDR Management tab ...

Страница 728: ... Extended IP Phone To start stop Online report for Outgoing Calls Dial 1072 101 1 to start Dial 1072 101 0 to stop To start stop Online report for Incoming Calls Dial 1072 151 1 to start Dial 1072 151 0 to stop To start stop Online report for Internal Calls Dial 1072 136 1 to start Dial 1072 136 0 to stop Exit SA mode You may print the Online report captured on the Syslog Server after suitable mod...

Страница 729: ...nual 719 The Internal calls Online report will look like this IN 309 305 16 02 2012 16 49 20 3 IN 305 309 16 02 2012 16 49 30 2 The Outgoing calls Online report will look like this 6 305 06001 123523 16 02 2012 16 33 04 12 1 1 10 D ...

Страница 730: ...s for printing SMDR Reports NAVAN supports Syslog116 Client for SMDR The Syslog Client enables the system to send call records in syslog format to the remote Syslog Server You can view the call records on the remote server and print NAVAN supports SMDR only on TCP How to configure To be able to generate SMDR Report you must do the following Enable SMDR Storage in the SMDR buffer See Station Messag...

Страница 731: ...dress Port field enter the IP Address and the port of the remote Syslog Server For SMDR Internal Call Report Select the Destination Port Default None In the Destination IP Address Port field enter the IP Address and the port of the remote Syslog Server Click Submit to save settings How to use You can print SMDR Report whenever you want or schedule printing of the report from the System Administrat...

Страница 732: ...eport link on the left navigation bar Setting Print Filters Set the following filters as desired You can print records of outgoing calls originating and outgoing calls terminating on specific Extension numbers and trunks CO Mobile SIP You can also print outgoing calls made using Account Code Calls for Department Billing Groups and PIN ...

Страница 733: ...xceed certain duration to be printed set the filter Calls with duration more than sec to the desired duration All outgoing calls with duration greater than this value will be printed If you want outgoing calls exceeding certain metering units to be printed set the filter Calls with units more than units to the desired value All outgoing calls that have metering units greater than this value will b...

Страница 734: ... the report on the local printer Click the View button A detailed report is displayed on the screen Click Print to print the report To print the report on the Destination Port Click the Send to Destination Port button To stop printing click Abort button ...

Страница 735: ...ile SIP To print calls received only on extensions that have not been assigned Access Codes select the Print Calls received on Extensions having blank Access Code check box Make sure in Calls received on Extensions you have assigned 0 in the From and To fields Click Calls to expand You can print incoming calls of different Call Types Normal calls calls received on Built In Auto Attendant calls tha...

Страница 736: ... calls received on a certain date or between a certain time period set the filter Calls received between To print calls made on a particular date select the same Date Month and Year in both fields To print incoming calls received at a particular time set the Hours and Minutes in 24 hour format calI in the filter Calls received between 00 00 and 23 59 To print incoming calls that remained unanswere...

Страница 737: ...ed Report Generation as required Click Submit to save Manual Report Generation You can print the SMDR Report of incoming calls any time you want You can print the report on a local printer or the Destination Port of NAVAN as configured from the SE mode To view print the report on the local printer Click the View button A detailed report is displayed on the screen Click Print to print the report ...

Страница 738: ...nt Internal call Report with filters click Internal Call Report link Setting Print Filters To print calls made by a particular extension or a range of extensions set the filter Calls made by Extensions by entering the extension numbers in the From and To fields If you want to print calls made by a particular extension only enter the same extension number in both From and To fields ...

Страница 739: ...o print calls with speech duration greater than a certain duration set the filter Calls with speech duration more than seconds Scheduled Report Generation To generate SMDR Report of internal calls on a particular day day of the week or day of the month set Scheduled Report Generation as required Click Submit to save Manual Report Generation You can print the SMDR Report of internal calls any time ...

Страница 740: ...tion of the format To generate SMDR Report from an extension phone Enter SA mode from an SLT Extended IP phone Manual Report Generation Enter SA mode from an SLT Extended IP phone To start stop Report for Outgoing Calls Dial 1072 121 1 to start Dial 1072 121 0 to stop To start stop Report for Incoming Calls Dial 1072 171 1 to start Dial 1072 171 0 to stop To start stop Report for Internal Calls Di...

Страница 741: ...e Weekly Scheduled Report Dial 1072 142 3 to enable Monthly Scheduled Report Dial 1072 142 0 to disable Scheduled Report Exit SA mode Print Filter Settings Outgoing Calls To set Print Filters for Outgoing Calls Enter SA mode from an SLT Extended IP phone Dial the Commands listed in the table for the desired filter Filter Commands Value Calls originated on Extensions 1072 102 Extension No Extension...

Страница 742: ...4 Units Units 0000 9999 Time for Scheduled report Daily 1072 123 HH MM HH 00 23 MM 00 59 Time for Scheduled report Weekly 1072 124 Day HH MM Day 1 7 HH 00 23 MM 00 59 Time for Scheduled report Monthly 1072 125 Date HH MM Date 01 31 HH 00 23 MM 00 59 Set filters to Default 1072 120 NA Filter Commands Values Calls received on Extensions 1072 160 Extension No Extension No Extension No 201 206 for SLT...

Страница 743: ... DD MM YYYY DD 01 31 MM 01 12 YYYY 0000 9999 Calls received between Time 1072 168 HH MM HH MM HH 00 23 MM 00 59 Calls remain unanswered for duration more than 1072 158 Seconds Seconds 000 999 Calls kept on hold with duration more than 1072 159 Seconds Seconds 000 999 Calls with speech duration more than 1072 157 Seconds Seconds 000 999 Time for Scheduled report Daily 1072 173 HH MM HH 00 23 MM 00 ...

Страница 744: ...Answered I DISA T Tranfer G Gateway D Built In Auto Attendant DU Built In Auto Attendant UnAnswered NAVAN V1R8 Page 1 The offline report for Internal Calls would look like this SMDR INTERNAL CALLS REPORT AS ON 02 02 2012 Thu AT 09 16 Filter Command Values Print Calls made by Extensions 1072 137 Extension No Extension Number No Call Type Extension No 201 206 for SLTs for SIP extensions it is as per...

Страница 745: ... 10 46 04 1 22 203 302 13 01 2012 10 59 38 5 23 203 302 13 01 2012 11 17 08 18 24 203 302 13 01 2012 11 18 16 2 25 302 203 13 01 2012 11 21 05 4 26 302 301 13 01 2012 11 27 38 20 27 201 303 13 01 2012 11 29 31 29 28 201 303 13 01 2012 11 30 26 17 29 201 301 13 01 2012 11 30 34 9 30 3931 303 13 01 2012 11 48 23 1 31 3931 302 13 01 2012 11 52 04 2 33 302 3931 13 01 2012 11 54 31 13 34 3931 303 13 01...

Страница 746: ...17 01 2012 12 22 11 18 1 1 10 D TOTAL CALLS 4 TOTAL DUR 62 TOTAL UNITS 4 TOTAL AMOUNT 4 40 TRK 03 CO 25 MOB 26 SIP STN 01 SLT 02 DKP Not applicable for NAVAN 34 SP 36 VS R CALL TYPE O DISA A Auto Redial E External Forwarded T Transfer G Gateway MATURITY C CPD R Reversal D Delay I Connect NAVAN V1R8 Page 1 ...

Страница 747: ... Micros B Comm One Call Inn Bell HOBIC XIOX RSI and others Each of these are described below Each posting protocol has its own handshaking protocol and call record format You may configure any one of these depending upon the protocol supported by the CAS you have interfaced with NAVAN It is also possible to customize the posting protocol to match the settings required by the CAS you have interface...

Страница 748: ...econds NAK Retransmit STX Call Record ETX BCC and wait for Data Transfer Retry Timer sec on Negative Response default 3 seconds NAK NAVAN to CAS CAS to NAVAN STX Call Record ETX BCC and wait for Response to Data Timeout sec default 3 sec NAK CAS responds but cannot accept at this time Retransmit STX Call Record ETX BCC and wait for Data Transfer Retry Timer sec on Negative Response default 3 secon...

Страница 749: ...ds the call details without waiting for any response from the CAS Each record is sent with the End of Packet Character Customized If you select this protocol as the SMDR OG Posting Protocol NAVAN provides you the flexibility to set the values for the OG Handshaking Protocol and the OG Online Call Record Format as per your requirement Call Detail Record Formats The Call Detail Record formats for va...

Страница 750: ...e Programmed String Extension Number 06 05 Fixed Right Yes 032 Trunk Number 12 05 Matrix Format Left Yes 032 Date 37 10 DD MM YYYY Right Yes 032 MM DD Time 48 08 HH MM SS Right Yes 032 HH MM Duration 057 005 Seconds Right Yes 032 Duration is in Minutes Units 063 004 Fixed Right Yes 032 Amount 068 007 Currency with Decimal Point Right Yes 032 Format is DDD CC Currency 000 001 Fixed Right Space 032 ...

Страница 751: ...resent Account Code 00 04 Fixed Right Yes 032 Remarks 76 02 Fixed Left Space NA Reset Serial Number to 001 Do not Reset Staring Character Increment Counter A Reset Increment Counter Do not Reset Prefix String Required No Property Code AAA Currency Symbol Enter Decimal Value 003 000 000 000 000 000 000 000 Parameter Start Column Number Field Length Format Alignment Filler Char Required Filler Char ...

Страница 752: ...t Yes 032 As per the Programmed String Extension Number 06 05 Fixed Right Yes 032 Trunk Number 12 05 Matrix Format Left Yes 032 Date 37 10 DD MM YYYY Right Yes 032 MM DD Time 48 08 HH MM SS Right Yes 032 HH MM Duration 057 005 Seconds Right Yes 032 Duration is in Minutes Units 063 004 Fixed Right Yes 032 Amount 068 007 Currency with Decimal Point Right Yes 032 Format is DDD CC Currency 000 001 Fix...

Страница 753: ... will be sent Location 000 005 Fixed Right NA NA Called Number 18 19 Continuo us Left Space NA Area code Exchange code and Subscriber Number separated by dash Space is sent in place of Area Code and first dash if area code is not present Account Code 00 04 Fixed Right Yes 032 Remarks 76 02 Fixed Left Space NA Reset Serial Number to 001 Do not Reset Staring Character Increment Counter A Reset Incre...

Страница 754: ...n software is running The CAS Software not supplied by Matrix The NAVAN Now connect the Ethernet WAN port of NAVAN to the computer on which CAS server application is running or to one of the Ethernet ports of the LAN Switch if the CAS server is in the same LAN How to configure Configuring the SMDR Posting feature involves the following steps Enabling storage of SMDR for Outgoing OG Calls By defaul...

Страница 755: ... IP Address Port field enter the IP Address and port of the PC on which the CAS server application software is running i e where NAVAN should post SMDR In the Listening Port for Posting field enter the Port number at which NAVAN must listen for SMDR Posting Default 6000 To start SMDR posting select Process as Start Click Submit button to save settings Refining Handshake Parameters You may need to ...

Страница 756: ... the sender should sent the ENQ again in case the response is not received for the last message sent ENQ Retry Count on Negative Response to ENQ The number of times the sender should send ENQ before dropping the process in case of a negative response received for the last message sent ENQ Retry Timer on Negative Response to ENQ The time after which the sender should send the ENQ again Response to ...

Страница 757: ...eceiver to acknowledge the receipt of the Link Control Character Message Data No Acknowledgement NAK Character This parameter signifies the ASCII character Single Character used by the receiver to dis acknowledge the receipt of the Link Control Character Message Data Start of Packet Character A string of four ASCII characters used by the receiver to indicate Start of Packet Each ASCII character is...

Страница 758: ... the type of posting protocol you have selected and the requirement of the CAS being used by the organization Serial Number This is the serial number generated for each call record Serial numbers are generated from 000 to 999 When serial number 999 is reached the numbers roll over to 000 Serial Number starts from 1 and not 0 When this field rolls over it increments the increment counter Increment ...

Страница 759: ...nd Year i e whether the single digit date is to be printed as space X or 0 X For example date 1 is to be displayed as 1 or 01 Where leading zeroes are not required the date month and year sub fields are right aligned and the spaces are filled with character space The Date field is not linked to the global flag of Date Format The global Flag of Date format is used while using features or in configu...

Страница 760: ...efixes to Amount field Hence to comply with various CDR formats it is recommended that the column position of Currency Symbol and Amount field should be programmed properly You can change the Currency Symbol used in the OG SMDR Format Call Type Indicator This indicates the type of call made i e whether local national or international Define the Call Types in the Call Type Indicator Your must progr...

Страница 761: ...the field size of area code exchange code are not standard but vary from two digits to four digits e g the Area code for Mumbai is of 2 digits whereas that of Vadodara is 3 digits In the Closed numbering system the Area Code Exchange Code and the Subscriber number are of fixed length In such case including in the called party number is not difficult Hence is put in the called party number The call...

Страница 762: ...default No Compulsory Reset is selected which means the serial number counter will not be automatically reset Prefix String Required This flag is to be programmed if the prefix string 0ac1 is to be sent when interfacing with OG SMDR Posting Protocol Property Code Enter the property code required by the CAS Currency Symbol Enter Decimal Value Enter currency symbol to be used Call Type Indicator In ...

Страница 763: ...s of maximum 4 digits The Text String is a string of 4 alphanumeric characters Your entries may look like these You may enter as many Call Types as supported by the Posting Protocol you have selected Click Submit to save entries Number Index Dialed Number String Call Type Indicator Text String Meaning 01 0 LD Long Distance 02 95 IC Inter Circle 03 197 INFO Information 04 00 INTL International 36 2...

Страница 764: ...Out logic While the SMDR buffer data is maintained even during power failures accidental data loss is not an uncommon occurrence SMDR data may be lost when the Buffer is full the files are accidentally deleted or corrupted the system is being upgraded the default settings are restored Therefore it is advisable to back up SMDR records to restore accidentally deleted lost or corrupted files Back up ...

Страница 765: ...x NAVAN CNX200 System Manual 755 Click Go or press Enter key on your keyboard The Log on as window of the FTP server opens In the Password field enter the SE password default 1234 and click the Log On button ...

Страница 766: ... into Jeeves as System Engineer Click the PBX Settings tab On the left navigation bar click the SMDR link Click the Backup SMDR Data link Follow the same steps as described for accessing the FTP server see the topic Voice Message Applications Copy the smdr folder on the FTP to another location on your computer While uploading SMDR files on to NAVAN first remove the current files in the system Copy...

Страница 767: ...e port through which the messages are to be sent received in the SMPP Clients you must configure the SMPP Client parameters in NAVAN This is how the NAVAN SMS Gateway works On successful registration of the SMPP Client with NAVAN a binding is established between the SMPP Client and NAVAN The SMPP Client can bind itself with NAVAN as a Receiver Transmitter or Transceiver As a Transmitter the SMPP C...

Страница 768: ... The SMPP Server Parameters page opens Under Parameters configure the following SMPP Server By default the SMPP Server is disabled To use the SMS Gateway feature select Enable SMPP Server Port Enter the SMPP Server s listening port The valid range is 1025 to 65535 Default SMPP Server Port is 2775 Enquiry Link Timeout seconds The SMPP Client sends the Enquiry Link Requests to the SMPP Server at reg...

Страница 769: ...me SMPP Client System ID and Password to multiple SMPP Clients Configure the same SMPP Client System ID and Password in the SMPP Client This ID is sent to the Server in the connection request made by the Client Mobile Port Select the Mobile Port using which the SMS is to be sent from to the SMPP Client The NAVAN supports a maximum of 2 Mobile ports119 Make sure you do not assign the same Mobile Po...

Страница 770: ...ollowing Binding Type This field displays the type of SMPP Client Binding that is Transmitter Receiver or Transceiver Address This field displays the SMPP Client s IP Address and Port Status Description Not Connected When the SMPP Server does not receive any request from the SMPP Client Connected When the SMPP Server receives a request from the SMPP Client and it accepts it A connection is establi...

Страница 771: ...ilt In Auto Attendant call disconnect options Presence and DND messages Each of these is described briefly here How to Configure To configure System Parameters Log into Jeeves as System Engineer Click the PBX Settings tab On the left navigation bar click the System Parameters link Click the desired parameter link to configure Click Submit to save settings You may log out of Jeeves System Parameter...

Страница 772: ... in the Missed Call log by enabling this parameter See Call Logs Store Internal Calls in Dialed Call Log You may instruct the system to store internal calls in the Dialed Call log by enabling this parameter See Call Logs Store Internal Calls in Answered Call Log You may instruct the system to store internal calls in the Answered Call log by enabling this parameter See Call Logs The Extended IP Pho...

Страница 773: ...ich is to be replaced in the CLI in the Replace from CLI with the number string field In this field enter the number string with which you want to replace received as prefix of calling party number If you keep the number string field blank NAVAN will remove sign from the CLI of calling party and present the remaining digits on the CLI of the Called Party For example The number string 919327237228 ...

Страница 774: ...stem plays Beeps to the extensions calling party and extension before it starts taping the call in the common mailbox or recording the conversation in the extension s mailbox When this flag is disabled no indication will be given to the opposite party when the call is being taped conversation is being recorded Default Enabled Play Feature Tone in place of Dial Tone when Call Forward is Set You can...

Страница 775: ...AVAN one of these languages will be applied as appropriate for the region you selected For instance if you selected India English will be applied If you selected Spain Spanish will be applied If you selected a country where none of these languages are the local language English will be applied The language set by the system on Region selection will be applied on the pages of the GUI for every logi...

Страница 776: ...ith numbers from 00000 to 99999 For example 0 can be set as prefix for dialing national numbers Area Code required to make local calls Depending on the dialing pattern of your local public telephone network you may choose No Area Code not required if your public telephone network does not require the dialing of Area Code for local numbers Yes Area Code is required if your public telephone network ...

Страница 777: ... trunks the Voice Mail System answers the call and plays the greeting message To know more about this feature see Auto Attendant You can set the desired Start Time for Morning Afternoon and Evening greetings In Start Morning Greeting at set the start time for the Morning Greeting Message Similarly in Start Afternoon Greeting at and Start Evening Greeting at set the start time for the Afternoon and...

Страница 778: ...erator and Users to set Once Only Alarms only Default Disabled Configurable Alarm Category Personalized Automated When this feature is enabled the system gives the Operator and extension user the choice of setting Personalized or Automated Alarm calls after they have configured the Alarm Type Clear the check box if you do not want to give a choice If this flag is disabled the users can set only Au...

Страница 779: ... seconds Auto Redial Normal Count The number of auto redial attempts the system will make when Auto Redial Normal is set 0 to 255 5 attempts Auto Redial Priority Timer sec The time interval between auto redial attempts when Auto Redial Priority is set 0 to 255 10 seconds Auto Redial Priority Count The number of auto redial attempts the system will make when an extension having the feature Auto Red...

Страница 780: ...before answering a Built In Auto Attendant call 0 to 255 5 seconds Built In Auto Attendant Music Timer sec The time for which the system plays music after answering the Built In Auto Attendant call 0 to 255 5seconds Built In Auto Attendant Beeps Timer sec The time for which the system plays beeps to the caller to prompt the caller to dial the desired extension number 0 to 255 10 seconds Built In A...

Страница 781: ...on extension will ring 1 to 255 30 seconds Interrupt Request Timer sec The time for which the extension on which the Interrupt Request is made will get the beeps 1 to 255 45 seconds Barge In Timer sec The time after which the extension that has activated Barge In gets connected to the extension which is barged in 1 to 255 10 seconds Trunk Reservation Timer min The time for which a trunk remains re...

Страница 782: ... when Ring is selected as the Message Wait Indication Type for the extension 1 to 255 30 minutes Conflict Dialing Timer sec The time for which the system waits for the extension user to dial the next digit to resolve conflicting access codes dialed by the extension user 1 to 255 2 seconds Extension Inter Digit Wait Timer sec The time for which the system waits for the extension user to dial the ne...

Страница 783: ... in the RCOC Table The timer is activated whenever a record is stored in the RCOC table At the end of this timer the system deletes this record from the table 1 to 999 999 minutes Release Conference if Idle for more than min This is the time for which the system will wait for participants of a Dial In Conference to withdraw or release themselves from the conference one by one On the expiry of this...

Страница 784: ...age opens The Timers and Counts on this page are arranged by the name of the feature or function these are related to Change the value of the Timer or Count by entering the desired duration or count in the respective fields Click Submit to save settings You may log out ...

Страница 785: ... working hours Night Time Non working hours The default Time Zones defined for each day are Day Time Working hours 09 00 to 18 00 Break hours 00 00 to 00 00 Night Time Non working hours 18 00 to 09 00 Day Time Working hours Break hours and Night Time Non Working hours are set to 00 00 for Sunday You can define a different Time Zone for your organization Further you can program each day of a week w...

Страница 786: ...han the Working hours and Break hours as the Night time Non working hours If the System Time Table suits you retain it You may redefine the Working days and Working hours You can also define different Working hours for each day of the week To define the Working Day select the related check box To define the Day Time Working Hours select the Start Time and the End Time from the combo boxes To defin...

Страница 787: ...Matrix NAVAN CNX200 System Manual 777 If you want to use the other customized time table click their tabs and follow the same instructions as above ...

Страница 788: ...s page More Click this button to view all parameter links on the page Less Click this button to view only the essential parameter links on the page Expand Click to expand a link to display all parameters under the link Collapse Click to collapse a link Hides all parameters under the link Settings Click to configure the settings of a parameter further More link Click to view all additional paramete...

Страница 789: ...hannels to route SIP to TDM TDM calls include any port type except SIP including Voice Mail calls answered by the system like DID DISA calls etc calls and vice versa System will use DSP channels for some features and Open SIP Clients will be able to use only limited features of NAVAN Refer to NAVAN Features supported with RTP Direct RTP for more details Direct RTP When this option is selected no D...

Страница 790: ... if selected RTP Mode is either Direct RTP or RTP Relay So the MoH file must be different from the default MoH file already present in the system The default MoH file must be converted into respective codec s format codecs which are programmed in MoH Vocoder Preference1 2 3 in the Jeeves and the converted MoH will be played when the selected RTP Mode is either Direct RTP or RTP Relay For detailed ...

Страница 791: ...ime sec This Timer defines the duration for which silence must be detected continuously for the system to consider it as silence detection and disconnect the call The valid range of this Timer is from 001 to 999 seconds By default it is set to 999 seconds Channel Reservation for SIP Trunks Define the number of voice channels you would like to reserve for SIP trunk calls in the field Channel Reserv...

Страница 792: ...ult Enabled To be able to send SIP messages over TCP you must configure TCP as the Default Transport for Outgoing Messages on the SIP Trunks page SIP Over TLS NAVAN supports transporting of SIP messages over Transport Layer Security TLS TLS offers secured SIP signaling To receive SIP messages over TLS Select the check box Enable SIP over TLS Default Enabled To be able to send SIP messages over TLS...

Страница 793: ...es to the remote peer The valid range for this port is 1025 65535 The default SIP TLS Port is 05061 Enter the RTP Listening Port address This port defines the port on which the VoIP Port of NAVAN listens for RTP Packets This port is also used as the source port for sending RTP packets to the remote peer The valid range for this port is 1024 65278 The default RTP Listening Port is 08000 UDP NAT Kee...

Страница 794: ...g Timer of the router The valid range is 001 999 seconds By default it is set to 120 seconds Router s Public IP Address This parameter is of relevance if the Ethernet WAN Port of NAVAN is located behind a NAT Router and SIP Messages are to be forwarded to the public network Router s Public IP Address specifies the fixed IP Address of your NAT router required for NAT Traversal in SIP messages Enter...

Страница 795: ...e SIP Port to be fetched using STUN in the SIP messages you must select Use SIP Port fetched using STUN check box Default enabled If you have forwarded SIP Port in the Router to the system which is applicable for SIP messages disable Use SIP Port fetched using STUN by clearing the check box To allow the RTP Port to be fetched using STUN you must select Use RTP Port fetched using STUN check box Def...

Страница 796: ...provisional Timer is 10 180 seconds Default 60 seconds Set the General Request Timer to the desired duration This is the time in seconds for which NAVAN waits for response for a transaction request This timer starts on the initiation of a transaction This timer stops on the receipt of a response for the request On expiry of the timer NAVAN clears the transaction This timer is used for Registration...

Страница 797: ...mer which the User Agent should send in its REGISTER request If the expiry value in the REGISTER message is less than this value the request will be rejected The valid range of this timer is from 10 to 99999 seconds Default 00045 seconds Enter the Private Key It may consist of a maximum of 24 characters all ASCII characters allowed Default Blank Private key is a security mechanism used by NAVAN to...

Страница 798: ...s are stored You must configure this table The Digest Authentication Table is common for all SIP trunks on which this feature is enabled When you enable this feature on a SIP trunk for all incoming calls SIP requests NAVAN will challenge the identity of the calling party i e the SIP device initiating the request to send its digest credentials When the calling party sends its credentials NAVAN auth...

Страница 799: ...ink The Digest Authentication Table page opens In the User ID field enter the User ID to be authenticated The User ID must be within 40 characters In the Password field enter the corresponding Password The Password must be within 16 characters Click Submit to save entries ...

Страница 800: ...to be used for this application and enable it For example SIP1 Set the SIP Trunk Mode of this trunk to Peer to Peer Keep the SIP ID field of the SIP trunk blank Set the Treat Incoming Peer to Peer call as option on the SIP trunk to Station Set the Send CLI option on the SIP trunk as Calling Party Wise You may also configure the Closed User Group CUG Table to avoid dialing the Trunk Access Code for...

Страница 801: ... all the outgoing calls Disable this flag if you do not want to apply toll control to the CUG numbers dialed by you The CUG Table you configure would look like this Now configure the Peer to Peer Table The Peer to Peer table stores up to 999 entries Each entry consists of the parameters Number Domain Address Name and Default Transport for Outgoing Message At location A you would have to configure ...

Страница 802: ...system checks the Peer to Peer Table configured It finds a match for the digit 3 and places the call to the destination IP Address 121 124 130 110 configured for this number How to configure For instructions on configuring the SIP Trunk parameters for the Peer to Peer application SIP Trunk Mode Peer to Peer Table SIP ID Treat incoming Peer to Peer calls as Station Send CLI see SIP Trunks For instr...

Страница 803: ...aracters maximum Default Blank The Domain Address can also be in the form of Address Port number In the Name field enter a name to identify the number string you configured It may be the name of your contact or any name you wish to assign to the number string The name may consist of 24 characters maximum Default Blank The name you configure here will not be used in SIP signaling In the Default Tra...

Страница 804: ...ag enabled and the table configured traffic coming from all IP Addresses other than those programmed in the White List will be blocked If the flag Enable IP Address based call traffic restriction is enabled but the White List IP Address Table is blank all incoming traffic will be rejected and it will not be possible to make VoIP calls to NAVAN Call Restriction will be applied on all the SIP Trunks...

Страница 805: ...ist IP Address link The White List IP Address page will open Select the Enable IP Address based call traffic restriction check box Enter the IP Address you want to allow and its corresponding Subnet Mask in the table You may refer to the table you prepared on the paper Click Submit to save your entries You may logout of Jeeves ...

Страница 806: ...ded IP Phone Virtual Extensions are assigned to the Master Extension A Master Extension can have multiple Virtual Extensions but a Virtual Extension can have only one Master Extension The Virtual Extension functions as any SLT or SIP extension of NAVAN It can be assigned all features and facilities like Class of Service Toll Control Call Forward Voice Mail just like any other extension of NAVAN In...

Страница 807: ...extension user The Number can be a maximum of 16 digits Default Blank Enter the Email ID of the extension user The Email ID can be a maximum of 64 characters Default Blank Click Submit These parameters are used by the SMS Server application To know more about this feature see SMS Server Click Access Code to expand In Access Code assign a number to the Extension ...

Страница 808: ...er Extension to which you want to assign this Virtual Extension Incoming calls for the Virtual Extension will land on this Master Extension referred to as Landing Destination Click the More link to expand Select the SMS Email ID Group Type you want to assign to the extension user Default Blank See SMS Email Group under SMS Server to know more Click Submit to save settings To configure another Virt...

Страница 809: ...r to the topic License Management to know more Make sure your Email Server uses SMTP and POP3 to send receive emails If you have both the SMS Gateway license and the SMS Server license and have activated both the SMS Gateway will be given priority To forward SMS as IM on SIP Extensions and to forward IM from SIP Extensions as SMS see SMS over IP How it works For this feature to work you must have ...

Страница 810: ... in a specific format Illustrated below is an example of the format Here The sender of the SMS is John 9898214345 The sender must send the message to the SIM Number of the Mobile Port of NAVAN that is 9898012345 The body of the message must contain the following To This is the destination where the Email is to be sent In this case James matrixrd org Smith 2001 Sub This is the message that will be ...

Страница 811: ...o their corresponding Email IDs In this case the Email ID of Smith is Smith matrixrd org and the Email ID of the Extension user 2001 is Bella matrixrd org If no match is found for the Email ID Name Group Name or Extension Number by default the system rejects the message The system also provides you the option to send the message to a specific recipient Send to Default recipient if you do not want ...

Страница 812: ...smsserver domain com The Subject must contain the destination where the SMS has to be delivered The destination can be Names Numbers of the users to whom the SMS is to be sent To send the SMS to multiple destinations enter the destinations separating them with a comma or semicolon Here the destination that is the recipients are James Smith Bella 9898981212 9845544544 The body must contain the mess...

Страница 813: ...t If a match is found in the Denied list the Email will be rejected If no match is found then it checks the destination where the SMS is to be forwarded The destination can be the recipients Number or Name The Subject field of the message specifies the destination To send the same SMS to multiple destinations enter the destinations separated by commas or semicolons If the destination is a Number t...

Страница 814: ...MS Server supports Bulk SMS that is a single message can be sent to multiple numbers The message can be sent using the email client by specific users How it works For this feature to work make sure you have enabled Email to SMS Forwarding See Email to SMS Forwarding minimum time delay between sending two consecutive SMS See SMS Configuration configure the Bulk SMS parameters and the Email IDs of t...

Страница 815: ...ystem also provides you the option to stop the process at any point of time if required The sender must contact the System Administrator to do so After the Bulk SMS request has been served the system updates the csv file and adds another column Status For each entry the Status of the SMS is updated The Status column may contain any one of the following Sent When any SMS is sent successfully by the...

Страница 816: ...d If attached file format is found to be csv subject is matched for Bulk SMS but user is not allowed to send Bulk SMS user means from which email is received User not allowed to send Bulk SMS If attached file format is found to be csv subject is matched for Bulk SMS user is allowed Bulk SMS feature user means from which email is received but Text data contains more than 160 characters i e consider...

Страница 817: ...t or through different Mobile Ports according to specific numbers and time To send messages through a fixed Mobile Port select Using Fixed Mobile Port and configure the SMS Routing Fixed Port table For detailed information see Fixed Port Routing SMS Server To send messages through certain preferred Mobile Port s during a defined time interval configure the SMS Routing LCR table For detailed inform...

Страница 818: ...h messages can be received and in the Denied column enter the numbers from which messages cannot be received You can also configure this list by clicking the Allowed Denied Numbers for receiving SMS link under SMS Routing Default Disabled If you want to allow multipart messages configure the following parameters 4 Select the Number of parts allowed for sending SMS from the list Default 1 If the SM...

Страница 819: ...the desired option for When recipient is specified in SMS then forward Email to You can select Recipient specified in SMS or Default Recipient Default Recipient specified in SMS If you want all incoming SMS to be delivered as Email to a specific recipient only select Default Recipient If you want the incoming SMS to be delivered as Email to the recipients specified in the SMS select Recipient spec...

Страница 820: ... Allow all except programmed in Denied List or Deny all except programmed in Allowed List If you select Allow all except programmed in Denied List in Denied Email ID column enter the Email IDs from which SMS cannot be sent If you select Deny all except programmed in Allowed List in Allowed Email ID column enter the Email IDs from which SMS can be sent You can also configure this list by clicking t...

Страница 821: ...l ID of the Sender to be sent to the recipient as signature in the SMS Send Name of Sender Enter the Name of the Sender to be sent to the recipient as signature in the SMS It is recommended that you configure the parameter Send Footer Signature in SMS so that the recipient knows the sender of the message If this parameter is not configured only the mobile port SIM number will be displayed to the r...

Страница 822: ...nflict occurs for the Recipient Name in Directory SMS to Email or Email to SMS then reject it Conflict occurred for Name X in Directory Please check the Name Where X is the Name written as recipient by sender Error Cause 5 If Number is not programmed for the Recipient Name in Directory request SMS to Email or Email to SMS then reject it Number is not found for Name X in the Directory Error Cause 6...

Страница 823: ...ck Submit You can generate a report of all the errors see SMS Server Reports for more information These Error Causes are also logged into the Fault Log See System Fault Log for more information Send Copy of SMS Click the Send Copy of SMS link to expand Select the Send copy of each SMS to Email ID check box and configure the Email IDS to which this copy of SMS must be sent by the SMS Server You can...

Страница 824: ...ort Routing Tables for the SMS Server application and SMS over IP application But the Least Cost Routing table is common for both these applications Fixed Port Routing SMS Server You can route the SMS through a fixed mobile port To do this you must determine the port through which you want to send the SMS and then configure the SMS Routing Fixed Port table Configuring Fixed Port Routing 1 Log in a...

Страница 825: ...Port No This is the Mobile Port number Port Name This is the name assigned to the Mobile Port This will be displayed only if you have assigned a name to the Mobile Port on the Trunks page Enable Port Select the Enable Port check box corresponding to the Mobile Port you want to use for sending SMSes Click Submit Make sure that you have selected the Allow sending SMS through this Port check box for ...

Страница 826: ...ailable mobile ports in your system If the Rotation check box is cleared all the SMSes will be sent using the first Mobile Port enabled by you For example if you have enabled MOB Port 1 and there is a request to send 5 SMSes then all the SMSes will be sent through MOB Port 1 only Port No This is the Mobile Port number Port Name This is the name assigned to the Mobile Port This will be displayed on...

Страница 827: ...idering both time of the day and destination number You can configure Time or Number or both as per your requirement If you have configured only the Time the system will check the time while sending the SMS and then route it according to the selected preference For example you want to send SMS from one group of trunks during 9 00 a m to 2 00 p m and from 3 00 p m to 8 00 a m through another group ...

Страница 828: ...ime and End Time for each time zone You can configure four different time zones Time Zone1 2 3 and 4 as per your requirement Number Configure the destination numbers strings to which the messages are to be sent Preference1 to 4 Select the trunks in the order of preference through which you want to send the SMS You can select up to 4 preferences Click Submit to save your settings ...

Страница 829: ... have configured the relevant SMTP and POP3 parameters in the SMS Server How to configure 1 Log in as System Engineer 2 Click the PBX Settings tab 3 On the left navigation bar click SMS Server 4 Click Mail Settings SMTP Configuration Contact your Network Administrator for the following information and configure the parameters as per the configurations done in the Email Server to register the SMS S...

Страница 830: ...ure the User ID and the Authentication Password as provided to you by your network administrator The User ID may consist of a maximum of 40 characters and the Password can be a maximum of 24 characters Default Blank Configure the SMTP Server Address and SMTP Server Port This is the Server s IP Address and Port number that is used to send outgoing mails If port is not programmed use the default por...

Страница 831: ...ration Contact your Network Administrator for the following information and configure the parameters as per the configurations done in the Email Server to register the SMS Server as a POP3 Client 1 Click the POP3 Configuration link to expand If the Email Server uses authentication select Requires Authentication as Yes Default No If your Email Server uses authentication you must also configure the ...

Страница 832: ...gs Timer Download interval Timer min is the time interval after which the POP3 Client of the SMS Server retries to fetch new mail from the Email Server Valid Range is 01 to 99 minutes Default 01 minute Test POP3 Settings After you have configured the POP3 parameters and submitted them the Click to Test POP3 Settings button appears Click the Click to Test POP3 Settings button to check if the POP3 p...

Страница 833: ...r SMS has been sent received You can generate Reports either Manually The report is generated whenever you want Or as per Schedule The report is generated on a preset Day Date and Time NAVAN allows you to set a variety of filters for printing the SMS Server Reports NAVAN supports Syslog Client for SMS Server Reports The Syslog Client enables the system to send records in syslog format to the remot...

Страница 834: ...e IP Address and Port of the remote Syslog Server Under Scheduled Report Settings If you have opted for Scheduled Reports in When scheduled backup is done send an email to enter the desired email ID The report will be generated and sent to this email ID To select the Scheduled Report options log into the SA mode Under Error Report Settings Select Ethernet as the Destination Port In the Destination...

Страница 835: ... Server click Filter Report to set the various filters as per your requirement Select the Direction You can select SMS to Email or Email to SMS or Both Select the Mobile Port s using which the SMSes are sent received You can select the desired range in the From and To fields Select the Dates during which the SMSes Emails are sent received You can select the desired range in the From and To fields ...

Страница 836: ...ore than to be applied to that value For example is you select 5 as the Part of the SMS and More than as filter the report will be generated for all the SMSes sent in more than 5 parts If you want reports to be generated for certain numbers select the Filter Numbers check box and configure the desired numbers in the table If you want reports to be generated for certain Email IDs select the Filter ...

Страница 837: ... online report click the Start button To stop printing click the Stop button Scheduled Report Generation 7 Under SMS Server click Report To Generate scheduled backup select the desired option as a particular day or day of the week or day of the month ...

Страница 838: ...ration 8 To generate the report manually under SMS Server click Report To Generate report now click the Generate button The report is generated and appears in a new window Click Export if you wish to save the report at the desired location The report will be saved in CVS format ...

Страница 839: ...ystem Manual 829 Online Error Report Generation 9 Under SMS Server click Report To Generate online error report click the Start button To stop printing click the Stop button Bulk SMS Status 10 Under SMS Server click Report ...

Страница 840: ...tatus of Bulk SMS process the status of the Bulk SMS process is displayed If the Current status of Bulk SMS process displays Running click the Abort button to stop the ongoing process midway 11 To clear all the database click the Clear Database button ...

Страница 841: ...ers and the SMS Budget parameters if required on the respective Mobile ports see Mobile Trunks enable SMS over IP for SIP extension users See Configuring Matrix SPARSH Mobile Soft Phone Clients as SIP Extension configure the SMS over IP Settings See How to Configure Wherever the SMS over IP Application hands over the handling of the SMS to the SMS Server Application make sure you have the SMS Serv...

Страница 842: ... one at a time When the destination is an Email ID the further handling of the SMS will be done by the SMS Server Application See SMS Server for more details When the destination is an Extension Number the system will search for the Extension Number in its database When a match is found and it is a SIP extension the system will check if the option SMS over IP is enabled for this SIP extension If i...

Страница 843: ...R table in SMS over IP Settings When the SMS is received on Mobile Port the system checks the Send SMS and the Call Budget parameters configured for the Mobile Port If Send SMS is disabled or the Call Budget exceeds then the SMS will be rejected If Send SMS is enabled and the Call Budget has not exceeded the system checks the senders number in the Denied numbers list as configured in the SMS over ...

Страница 844: ...igure the parameters Add Footer in SMS and Footer text so that the recipient knows the sender of the message If this parameter is not configured only the mobile port SIM number will be displayed to the recipient How to Configure You need to configure the following SMS over IP parameters 1 Log in as System Engineer 2 Click the PBX Settings tab 3 On the left navigation bar click VoIP Configuration t...

Страница 845: ...umbers on which messages can be sent and in the Denied column enter the numbers on which messages cannot be sent You can also configure this list by clicking the Allowed Denied Numbers for sending SMS link under SMS Routing Default Disabled Configure the Allowed Denied Numbers for receiving SMS list if you want to allow or restrict receiving messages from specific numbers To do this Select the All...

Страница 846: ...list of extensions to be assigned to a particular group Configure the type of Groups at each index in the SMS Email Group table For instructions see Configuring SMS Email Group table Assign the desired extensions to the SMS Email Group you created as per your requirement For instructions see More Features under SLT Extensions and More Features under SIP Extensions Assign a Global Personal Director...

Страница 847: ...ck the SMS Email Group link You can configure maximum 10 Groups 5 At the desired index and under the Type of Group column configure the Group Name The Group Name can be a maximum of 16 characters Default Blank 6 Click Submit to save your entries ...

Страница 848: ...838 Matrix NAVAN CNX200 System Manual ...

Страница 849: ...one with your computer has advantages such as initiate a call at a click of a mouse directly from a CRM system Customer Relationship Management or from a database view missed calls directly on your screen and call back with just one click transfer and call recording all can be initiated via mouse click The Matrix TAPI Service Provider TSP is developed using TAPI Standard 2 2 To use this feature yo...

Страница 850: ...led This is how CTI works After successful installation of the Matrix TSP in your computer Client and configuring the necessary parameters a binding CTI link is established between the Client and the NAVAN NAVAN communicates with the Client via Matrix TSP All the information is passed by NAVAN to the Matrix TSP and vice versa Third party softwares in the Client can also communicate with the Matrix...

Страница 851: ...ient For more details see Matrix TSP User Guide Enable Make Call Ring on SLT if you want the SLT to ring when an outgoing call is initiated from the CTI Client If Extended IP Phone is connected as an extension the speaker of the phone is automatically turned on when an outgoing call is initialed from the CTI Client Select the Debug check box to log the CTI Server events Click Resources on the left...

Страница 852: ...842 Matrix NAVAN CNX200 System Manual ...

Страница 853: ...also commonly referred to as Extension numbers Default station codes are SLT extensions 21 to 26 SIP extensions Blank Logical Group Codes Codes used for calling a group of extensions as in a Department group a group of trunks Default logical group codes Department groups 391 to 395 Trunks access codes 0 5 Feature Codes Codes used for invoking a feature Default feature codes there are different fea...

Страница 854: ...ait Timer the system understands the instruction as Call Forward Unconditional and waits for the destination phone number to be dialed Access Codes are related to various phases of a call When a call is processed by NAVAN it goes through a number of pre defined phases The different phases that a call typically passes through are Different access codes are dialed at different call phases Station Co...

Страница 855: ...ll Pick Up Group Dial Phase and Barge In Blocked Phase Similarly Station and Logical Group Codes too must be unique and should not match with any of the features invoked in the Dial phase How to configure NAVAN provides default Access Codes for extensions logical groups department and trunk groups and features It also provides country specific default Access Codes which are applied automatically w...

Страница 856: ...ence 3 Y Conversation Recording 1095 Y Department Group Call Forward 1179 Y Y Dial In Conference 19 Y Y DISA Login 1079 Y DND 18 Y Y DND Override 4 Y Dynamic Lock 14 Y Y Emergency Conference 1177 Y Flashing on Trunk Y Y Forced Call Answer 5 Y Forced Call Release Y Hot Desk 1091 Y Hot Line 15 Y Y Intercom 5 Interrupt Request 3 Y Invoke RCOC Y Keypad Lock Y Last Caller Recall 1092 Y Y Leave Temp Rej...

Страница 857: ...rt Access 69 Y Y Self Ring Test 1057 Y Set Call Chaining 1050 Terminate Conference 190 Y Transfer Flash Y Trunk Reservation 6 Y User Absent Present 104 Y Y Voice Help 1090 Y Y Voicemail 390 Y Y Walk In Class Of Service 111 Y Y Trunk Access Code TAC 1 0 Y Y Trunk Access Code TAC 2 5 Y Y Trunk Access Code TAC 3 Y Y Trunk Access Code TAC 4 Y Y Trunk Access Code TAC 5 Y Y Trunk Access Code TAC 6 Y Y D...

Страница 858: ...t Access Codes or change them to suit your preferences To change Access Codes see Extensions and Feature Codes for instructions Department Group 4 394 Y Y Department Group 5 395 Y Y Feature Access Code Call Phases Dial Routing Blocked Placed Matured 2 Way Matured 3 Way ...

Страница 859: ...uct an AC Impedance Test by making an outgoing call Or on an ongoing incoming call To conduct the AC Impedance Test you will need a telephone with a valid number You are recommended to use a mobile phone with Mute function the CO Trunk which you want to test The DSS Key assigned to this CO Trunk will display status as busy to all the user for the duration of the test Configuring Using Jeeves You c...

Страница 860: ...he handset of the configured number supports the Mute function Select the Test Mode You may select Reliable Recommended or Accurate The Reliable Test mode suggests the AC Impedance settings on the basis of most commonly used AC Impedances CO Terminations and CO Line Types across the globe The test using Reliable Test mode takes approximately 5 minutes to complete The Accurate Test mode suggests th...

Страница 861: ...answering the call As the Music on Hold begins to play Mute the microphone of your mobile phone If you are making the test call on a landline number mute the call using the Mute key of the phone If your phone does not have a Mute key unplug the handset cable from the phone body This is to prevent test signals from reflecting back into the mic of the handset After 5 seconds of Music on Hold you wil...

Страница 862: ... Impedances CO Terminations and CO Line Types across the globe The test using the Accurate Test mode takes 1 hour and 20 minutes to complete Click the Start Test button The message Setting up the Test appears on your screen While the test is being conducted in NAVAN you will hear pulsating tone on all the ports of the system After 5 seconds the message Test running successfully appears on your scr...

Страница 863: ...test using the Accurate Test mode After you have determined the best matching AC Impedance CO Termination CO Line Type and Return Loss by running the tests apply the same suggested settings on the CO Trunk you are testing You may configure the same settings to all other CO Trunks you have subscribed from the same CO exchange It is possible that the CO trunks subscribed from the same exchange diffe...

Страница 864: ...854 Matrix NAVAN CNX200 System Manual To generate the detailed test report click the Generate Test Report button ...

Страница 865: ...Matrix NAVAN CNX200 System Manual 855 The detailed test report appears in a new window You may print the report by clicking the Print in the test report window ...

Страница 866: ...inter in the Printer options You can also save the report in PDF format by selecting the PDF creator in your Printer options Close the window to return to the AC Impedance Test page Repeat the above steps to conduct further tests as per your requirement ...

Страница 867: ...served When the Operator answers this call a call is placed on the extension on which the alarm is set The extension rings for the duration of the Alarm Ring Timer When the extension user answers the call the Operator greets the extension user with the time and alarm message If the extension user does not answer the call till the Alarm Ring Timer has elapsed the Operator phone will display a text ...

Страница 868: ... attempts go unanswered the NAVAN places the call on the Operator phone The Operator phone rings till the end of the Alarm Ring Timer The Operator phone displays the extension number with the message No Reply The Alarm is now considered as served If the extension phone is busy NAVAN will continue to make Alarm Attempts at the Alarm Interval configured When all Alarm Attempts go unanswered the NAVA...

Страница 869: ...est Instead the alarm request should be canceled and a new one should be made The duration of Alarm Ring Timer the Number of Alarm Attempts and the Alarm Attempt Interval are configurable Alarms can be set for all extensions of the NAVAN including the Operator phone also Alarm settings will be retained in the system during power down and system upgrades How to configure The following parameters ar...

Страница 870: ...rator to select an Alarm Type Once Only or Daily and to select the alarm serving mechanism Automated or Personalized If you want to offer only Automated Alarms to extension users NAVAN allows the flexibility to set Automated as the default Alarm call serving mechanism This can be done by disabling the Configurable Alarm Category flag When this flag is disabled the system will consider the Alarm ca...

Страница 871: ...on key for Alarm calls which sends the string 53 to the system The system can be configured to translate 53 received from the SLT in to the feature access code for Voice guided Alarm calls 163 To configure the Alarms feature do the following Select the Alarm Notification Type for the extensions Configure as required the Alarm Call related parameters Number of Attempts Attempt Interval Configurable...

Страница 872: ... If you select Voice Message as notification type make sure that you also assign a Voice Module to the Alarm application See Voice Message Applications for more details Select Voice Mail only if you have the Voice Mail System installed in your NAVAN Click Submit to save Repeat the same steps to configure another extension type and extension number To configure Alarm Call parameters Click the PBX S...

Страница 873: ...Automated Disable this flag by clearing the check box if you do not want the system to provide the Operator the option of setting Personalized or Automated Alarm calls When this flag is disabled the system will follow the Automated Alarm call serving mechanism The Operator will not be prompted to choose between Automated and Personalized Alarm calls when setting Alarm calls for an extension phone ...

Страница 874: ...r to set the alarm for them If the Voice Mail System VMS is installed in the NAVAN it can offer voice guided Alarms to extension users and the Operator Voice guided alarms lead users through a menu helping them set the alarm in a step by step manner When a voice guided alarm is served the extension user gets a voice message announcing the alarm with the time Voice Guided Alarm set canceled by Oper...

Страница 875: ...pecial Alarm function key will not be able to set cancel alarm This extension user can set cancel alarm only by dialing the feature access code for voice guided alarms Non Voice Guided Alarms set canceled by Operator For Extended IP Phones To set Alarm for the extension user Press the key assigned the Remote Alarm function OR Dial 1072 003 Enter the Extension Number Enter Time in HH MM Select Once...

Страница 876: ...s set cancel by Extension Users For Extended IP Phone Users To set Alarm Press the key assigned the Alarm function OR Dial 161 Enter Time in HH MM 24 hours format Select Once Only or Daily Press Enter key You get a confirmation message and confirmation tone Go Idle To cancel Alarms Press the key assigned the Alarm function OR Dial 161 Select Cancel All Press Enter Key For SLT Users To set Alarms P...

Страница 877: ...et on an extension will be served even if DND is also set on the same extension Viewing and Printing Alarm Status The Operator can view the status of Alarms that are yet to be served from the System Administrator pages of Jeeves To view Alarm Status Log into Jeeves as System Administrator Click the Reports tab On the left navigation bar click the Wakeup Alarm link The unserved Alarm calls appear o...

Страница 878: ...868 Matrix NAVAN CNX200 System Manual click the Cancel Selected Alarms button at the bottom of the page To print this page click the Print button Click Logout button to exit SA mode if required ...

Страница 879: ...oup in the Global Directory Now when you dial one of these numbers 2640459 and get a busy tone you can either initiate Last Number Redial or set an Auto Redial request When you initiate Last Number Redial The system will dial an alternative number for the dialed number If the redialed number is busy you can set Last Number Redial again The system will dial a second alternative number If the second...

Страница 880: ...igure To use Alternate Number Dialing you must do the following 1 Make a List of Alternate Numbers 2 Create Alternate Number Groups 3 Configure Alternate Number Groups in the Global Directory 4 Enable the features Last Number Redial Global Directory in the Class of Service CoS group of the extensions to which Alternate Number Dialing facility is to be provided If desired Auto Redial Auto Redial Pr...

Страница 881: ...list are also configured in the Global Directory If any of these numbers do not exist in the Global directory already configure them in the Global Directory first Refer the topic Abbreviated Dialing for instructions on configuring the Global Directory To create Alternate Number Groups and configure them in the Global Directory Log into Jeeves as System Engineer Click the PBX Features tab On the le...

Страница 882: ... of 16 digits maximum Enter the contact Name against the Number The Name may contain up to 12 characters maximum In the Alternate Number Group column enter the number of the Alternate Number Group you assigned to the numbers For example if you have assigned Alternate Number Group 001 to all the numbers of the contact Midas Business Solutions enter this number against each number belonging to this ...

Страница 883: ...Redial in their Class of Service However only Global Directory Part 1 is enabled by default in their COS Alternate Number Dialing will work only for those numbers that exist in the Global Directory assigned to each extension So the Global Directory Part containing the Alternate Number Groups must be allowed to the extensions in their Class of Service For example if Alternate Number Groups are conf...

Страница 884: ... and headset connectivity is enabled on the Extended IP Phone the incoming speech audio will be diverted to the headset automatically the extension user can talk to the caller Auto Answer works only if the Extended IP Phone is in idle state the phone must not be busy with an active call or using a feature How to configure For Auto Answer to work you are required to do the following Enable Auto Ans...

Страница 885: ...use Extension users can set cancel Auto Answer and enable Headset connectivity from their Extended IP Phone by navigating the Menu of the phone To set Auto Answer Press the DSS Key assigned to Auto Answer function131 OR Press Enter Key Scroll down to select Phone Settings press Enter Key Enter Your User Password default 1111 Scroll down to select Call Answer Type press Enter Key You get the option...

Страница 886: ...Phone Settings press Enter Key Enter Your User Password default 1111 Scroll down to select Headset Connectivity press Enter Key You get the options Headset Not Connected Headset Connected Scroll to select Headset Connected and press Enter key 132 For instructions refer Phone Key Settings under Configuring Matrix SPARSH VP248 Extended IP Phone as SIP Extension and Configuring Matrix SPARSH VP330 Ex...

Страница 887: ...t works only when you have selected Extension s as the landing destination for incoming calls on the trunk Built In Auto Attendant will not work when the dialed extension has Privacy from Built In Auto Attendant enabled in its Class of Service So if you want to prevent external callers from accessing certain extensions enable Privacy from Built In Auto Attendant in their Class of Service See Priva...

Страница 888: ...ssage to the caller If the caller fails to dial a digit within the Built In Auto Attendant Beeps Timer the system will disconnect the call If the caller dials the extension number the system checks if the number is valid If the dialed digits are invalid the system plays Wrong Dial voice message to the caller This message is played once The system waits for the duration of the Built In Auto Attenda...

Страница 889: ...erve channels of the VMS as per your requirement The extension users will not have access to the channels reserved for incoming calls on the trunks when they try to access their mailbox If all the reserved channels are busy and there is an incoming call on the trunk it will land on the unreserved channel if free To reserve a channel configure the option Channel Reserved for Voice Mail Auto Attenda...

Страница 890: ...or instructions see CO Trunks Mobile Trunks SIP Trunks 6 For each trunk port configure Voice Mail Auto Attendant select the Voice Mail Auto Attendant Profile number To use the Built In Auto Attendant on trunks do the following 1 Make a list of the trunks by their port type CO Mobile SIP and port number on which you want to use the Built In Auto Attendant 2 Select the option Built In Auto Attendant...

Страница 891: ...played when the dialed extension does not respond This message is played once Built In Auto Attendant No Dial played when the caller has not dialed any number This message is played once Built In Auto Attendant Call Transfer to Operator played to the caller when the call is being transferred to the Operator This message is played once Pre recorded Built In Auto Attendant voice messages are provide...

Страница 892: ...xtension is found busy the system will disconnect the Built In Auto Attendant call instead of routing it to the Operator Default disabled Disconnect Built In Auto Attendant call when dialed number is not responding when this flag is enabled the system if there is no reply from the landing destination extension the system will disconnect the Built In Auto Attendant call instead of routing it to the...

Страница 893: ...he busy trunk port you are trying to access is available the system will ring your extension When you go OFF Hook you will be connected to the trunk port Each extension of the NAVAN can set only one Auto Call Back request at a time If you set another Auto Call Back request before the first one has been served the system will override the first request and serve the second The NAVAN has the capacit...

Страница 894: ...n set cancel Auto Call Back if the called number is busy or does not reply However if Auto Call Back Busy No Reply is to be denied to any of the extensions you may this feature in the class of service of these extensions For instructions on enabling disabling this feature on the different extension types refer the topics SLT Extensions and SIP Extensions If you want to increase or decrease the dur...

Страница 895: ...ack on Busy Press the Call Back Key on Busy Tone OR Dial 2 on Busy Tone You get confirmatory message Auto Call Back Set on the phone s display The LED of the DSS Key will be turned on Go idle To cancel Auto Call Back on Busy Press the Call Back Key OR Dial 102 You get confirmatory message Auto Call Back Canceled on the phone s display The LED of the DSS Key will be turned off Go idle For SLT Users...

Страница 896: ...Dial 102 You get confirmatory message Auto Call Back Canceled on the phone s display The LED of the DSS Key will be turned off Go idle For SLT Users To set Auto Call Back on No Reply On Ring Back Tone Dial 2 You get confirmatory tone Replace handset or you get dial tone after 3 seconds To cancel Auto Call Back on No Reply Pick up the handset Dial 102 You get confirmatory tone Replace handset or yo...

Страница 897: ... to 45 seconds as default The extension must go OFF Hook to get connected to the remote party If the extension is in the middle of any activity such as dialing ringing or speech the NAVAN will suspend Auto Redial until the extension becomes idle again After which it dials the requested number again Two types of Auto Redial are supported by the NAVAN Auto Redial normal and Auto Redial Priority that...

Страница 898: ...its functioning greatly depends on line condition Unlike Mobile and SIP trunks the line condition of Analog trunks may not always measure up to the standard requirement for Auto Redial to function How to configure For Auto Redial to work the you must Enable the features Auto Redial and Auto Redial Priority in the Class of Service CoS of the extensions to which this feature is to be allowed By defa...

Страница 899: ... Auto Redial Normal as well as Priority must be set to more than 5 seconds ii The Auto Redial Priority Count should be set to less than 15 How to use For Extended IP Phone Users To set Auto Redial When the external number you are trying is busy Go ON Hook on Busy Tone Press the DSS Key assigned to Auto Redial function OR Dial 17 Go Idle To cancel Auto Redial Press DSS Key assigned to Cancel Auto R...

Страница 900: ...890 Matrix NAVAN CNX200 System Manual Pick up the handset Dial 1070 Replace handset ...

Страница 901: ... talking to each other C calls A C gets busy tone C dials Barge In feature code C gets RBT and A gets beeps for Barge in timer By default 10 seconds During the beeps A may press Flash to answer the call If A does not respond till the end of the Barge In Timer set to 10 seconds by default A gets connected to C B is put on hold and is given hold on music If B disconnects while A and C are in speech ...

Страница 902: ...extensions are to be allowed Barge In and the extension that are to be protected against Barge In By default all extension port types have Barge In and Privacy from Barge In disabled in their Class of Service While it makes sense to offer all extensions Barge In providing Privacy from Barge In also to all extensions will not serve the purpose of Barge In Decide which extensions are to be allowed B...

Страница 903: ...Matrix NAVAN CNX200 System Manual 893 For SLT Users When dialed extension is busy Dial 4 on busy tone ...

Страница 904: ...example Extension Number 21 of NAVAN in the above illustration is not allowed the facility of long distance dialing It has access to all the CO trunks When the user of Extension 21 wants to access T1 T2 or T3 which are direct trunks from the CO to NAVAN the user dials 0 or the Trunk Access Code assigned and gets CO dial tone When the user dials the number NAVAN applies Toll Control Similarly when ...

Страница 905: ... on the trunk On finding 1 the system will ignore the first 0 dialed by the extension and let the extension user grab T1 or T2 by considering the second 0 The Extension user will get the CO dial tone from T1 or T2 of PBX A How to configure The PPDC should be configured only for Behind the PBX Applications For all normal applications this count must be set to 0 for all the trunks Otherwise external...

Страница 906: ...t from 1 to 6 i e trunks connected to the extensions of another PBX and assign the appropriate PPDC count to the trunk This would depend on the number digits in the Trunk Access Code defined for the trunks in the other PBX If the TAC is single digit select 1 If TAC is double or triple digit select 2 or 3 as applicable as the PPDC Click Submit at the bottom of the page to save your settings To log ...

Страница 907: ...iffer in the BLF indication LED color and cadence text message display they provide for the Call States Refer to the manufacturer s documentation for BLF Indication supported on the SIP phones How it works An Open Standard SIP Phone is registered as a SIP Extension with the extension number 3301 As the user of extension 3301 wants to monitor the trunk CO 001 BLF subscription is enabled on extensio...

Страница 908: ...l states of the CO 001 trunk for incoming calls from external numbers Since multiple calls can be made through a single trunk the BLF key will indicate the status of the first call detected by the system When the first call is terminated the status of the second call if ongoing will be indicated Similarly the status of all subsequent calls will be indicated after the previous call is terminated Ho...

Страница 909: ...a different amount depending on user requirement How it works When an extension allotted Call Budget makes a call The system checks the current call budget amount of the extension If the consumed amount is within the budget limit allotted to the extension The system allows the extension to make the call as per the Toll Control assigned to it After the call ends the system calculates and adds the c...

Страница 910: ...ture Call Budget is dependent on precise Call Cost Calculation So SMDR parameters and long distance codes must be configured correctly to prevent errors in calculation This feature works independent of any Call Accounting Software CAS installed with the NAVAN The NAVAN will calculate cost of phone calls made by extension phones even when no call budget is allocated136 How to configure To be able t...

Страница 911: ...one Users To assign Call Budget to an Extension Enter System Administrator mode Press DSS Key assigned to Set Call Budget for remote station function Enter Extension Number to which the call budget is to be assigned Enter Call Budget Amount Use leading zeroes if amount is fewer than 6 digits You get confirmatory message and confirmation tone Exit System Administrator mode To view Call Budget assig...

Страница 912: ...902 Matrix NAVAN CNX200 System Manual Exit System Administrator mode ...

Страница 913: ... Calls In this type of Call Budget you can define the maximum number of calls that can be made from a trunk By default the maximum number of Call Budget Calls is set to 9999 calls on the trunks This type of Call Budget is useful when the Service Provider offers a certain number of free calls or a certain number of free calls for a fixed period For instance the Service Provider offers 150 free call...

Страница 914: ... calls assigned to trunk is exhausted NAVAN will print system activity log bar outgoing calls from such trunks play an Error Tone to the extension users who attempt to access such trunks using Selective Trunk Access However incoming calls will remain unaffected and will be allowed on these trunks The consumed Call Budget Amount Minutes Calls can be reset manually at any time from the System Admini...

Страница 915: ...dget on Trunks The consumed Call Budget can be reset manually i e anytime as required desired or on a scheduled date either daily or on a particular date of the month To reset the Call Budget on trunks from the System Engineer mode Log into Jeeves as System Engineer Click the Status tab To reset Call Budget on CO Trunks on the left navigation bar click the CO link If you have set Call Budget to re...

Страница 916: ...ick the Reset button assigned to Reset Consumed Budget To reset Call Budget on SIP Trunks click the SIP Trunk link to open the page on the left navigation bar If you have set Call Budget to be reset on a scheduled date the date will appear in the Budget Reset Schedule Date field To reset Call Budget manually any time click the Reset button assigned to Reset Consumed Budget You may log out of Jeeve...

Страница 917: ...k How it works A is an External Caller B is an extension A calls a Trunk of NAVAN The Operator answers the call The Operator sets Call Chaining and transfers the call to B B disconnects the call with A but A is still connected The call comes back to the Operator if the Operator is free Now A is in speech with the Operator If A disconnects the call with B the call will be released It will not retur...

Страница 918: ...umber You get Ring Back Tone The called party answers Perform Call Transfer to the requested extension trunk When extension trunk disconnects your extension rings Go OFF Hook You get connected with the caller Go Idle after the conversation ends or you get dial tone after 3 seconds For SLT Users Answer the incoming call The caller requests for an extension trunk Dial Flash 1050 Caller gets on hold ...

Страница 919: ...calls are forwarded to the destination phone number only when the called party does not answer the phone Each extension can set a different time after which the call should be forwarded in case of no reply The default time is 30 seconds for all extensions and can be changed by configuring the Call Forward No Reply Timer If Busy or No Reply calls are forwarded to the destination phone number when t...

Страница 920: ...s in a routing group will be ignored by the system if the Ignore call forward set by member extension when call is routed on Routing Dept Group flag is enabled See System Parameters for more information Call Forward when set cancelled from the SA mode will not depend on the assigned CoS Feature Interaction Do Not Disturb DND When DND and Call Forward are set on an extension DND is given priority Y...

Страница 921: ...sions You can set Call Forward for All the Extensions from the SA mode only see Settings Call Forward for All Extensions using SA Mode Settings Call Forward for All Extensions using SA Mode Log into Jeeves as System Administrator Click the PBX Features tab On the left navigation bar click the Call Forward All Extensions link To set Call Forward of all Extensions to the Voice Mail select Forward Ca...

Страница 922: ...ng Press Enter key Select Dual Ring ON Press Enter key You get a confirmatory text message and confirmation tone Go Idle If the call is to be forwarded to an extension dial the extension number If the call is to be forwarded to an external number dial Trunk Access Code then the external phone number and terminate the command with For users world wide Trunk Access Code TAC for dialing external numb...

Страница 923: ...4 for Call Forward If Busy or No Reply Dial destination Phone Number Voice Mail Department Number You get confirmation tone Replace handset To set Call Forward Dual Ring Set the desired Call Forward type Dial 136 1 for Call Forward Dual Ring To cancel Call Forward Lift the handset Dial 130 You get confirmation tone Replace the handset To disable Dual Ring Lift the handset Dial 136 Dial 0 Replace H...

Страница 924: ...duled can be set on the same extension In this case priority is given to Call Forward over Call Forward Scheduled The logic for forwarding calls to the destination number remains the same as described in the Call Forward topic illustrated in the following example Extension user A sets Call Forward Unconditionally to extension B for Non working hours When there is a call on extension A the system f...

Страница 925: ...all Forward Scheduled can be set by extension users as well as for extension users from the System Administrator mode It is also possible to select the types of calls i e internal calls only or trunk calls or both to be forwarded to external numbers You can program the system to forward internal calls only or trunk calls only or both trunk calls and internal calls to the external number For this t...

Страница 926: ...ode can set or cancel Call Forward Scheduled for other extension users using Jeeves or by dialing SA commands from a telephone Setting Call Forward Scheduled using Jeeves Log into Jeeves as System Administrator Click the Extensions tab On the left navigation bar click the Extensions link The Extension numbers appear as tabs starting with SLT extensions To select a particular extension click the co...

Страница 927: ...all Forward Remote with Dual Ring The confirmation message Dual ring is On appears To set call forward for Night Break Time follow the same instructions as above To set Call Forward Scheduled for another extension follow the same instructions as above Setting Call Forward Scheduled using a Telephone For Extended IP Phone Users To set Call Forward Scheduled Press DSS key assigned to Call Forward Sc...

Страница 928: ...mber 1 0 to cancel CF Scheduled Exit SA mode Replace handset To set Call Forward Scheduled for the Night Break Lift handset Dial 1072 223 Extension number 3 1 Destination Number for CF Scheduled Unconditional Dial 1072 223 Extension number 3 2 Destination Number for CF Scheduled Busy Dial 1072 223 Extension number 3 3 Destination Number for CF Scheduled No Reply Dial 1072 223 Extension number 3 4 ...

Страница 929: ...led for the Day Lift handset Dial 1175 1 1 Destination Number for CF Scheduled Unconditional Dial 1175 1 2 Destination Number for CF Scheduled Busy Dial 1175 1 3 Destination Number for CF Scheduled No Reply Dial 1175 1 4 Destination Number for CF Scheduled Busy No Reply Dial 1175 1 5 1 for CF Scheduled Dual Ring Dial 1175 1 5 0 to cancel CF Scheduled Dual Ring Dial 1175 1 0 to cancel CF Scheduled ...

Страница 930: ...920 Matrix NAVAN CNX200 System Manual Replace handset ...

Страница 931: ... Number A dials the Call Forward Remote feature code followed by B s extension number the destination number where the calls for B should land The system routes all incoming calls for B to the destination number How to configure As Call Forward Remote can be invoked only from the SA mode either the feature SA Mode or SA Extension must be enabled in the Class of Service CoS of extensions that are t...

Страница 932: ... the radio button Forward Calls to Voice Mail and the type of call forward from the drop down list Default Unconditionally To forward calls of this extension to another extension select Forward Calls to Phone radio button and the type of call forward for this option from the drop down list Default Unconditionally Enter the extension number to which calls must be forwarded in the empty field provid...

Страница 933: ...extension click the extension number tab and follow the same instructions as above You can also forward the calls of all extensions at one go to the same destination To do this Click the PBX Features tab On the left navigation bar click the Call Forward All Extensions link Select the Forward Calls of all Extensions radio button and select the Call Forward type from the drop down list In the to Ext...

Страница 934: ...cel Press Enter key You get a confirmation tone and text message for Call Forward canceled Go Idle For SLT Users To set Call Forward Remote Lift handset Dial 1072 006 Enter Extension Number Dial 1 for All Calls Dial 2 for If Busy Dial 3 for If No Reply Dial 4 for If Busy or No Reply Dial 5 for Dual Ring Dial destination Phone Number Voice Mail You get confirmation tone Replace handset 138 If call ...

Страница 935: ...Matrix NAVAN CNX200 System Manual 925 To cancel Call Forward Remote Lift the handset Dial 1072 006 Dial the Extension Number Dial 0 You get confirmation tone Replace handset ...

Страница 936: ...ample the destination number for Night Break Time can be a mobile number and the destination number for Day Time can be another extension number Feature Interaction If Call Forward Unconditional and Call Forward When Not Registered have been set on the same SIP phone Call Forward Unconditional will have priority over Call Forward When Not Registered If Call Forward Scheduled Unconditional and Call...

Страница 937: ... appear as tabs click the desired SIP Extension number on which you want to set this feature Click Call Forward When Not Registered Select the destination for forwarding calls when the SIP Extension fails to register from the following Forward Calls to Voice Mail Forward Calls to Extension Number If you select this option you must enter the desired Extension Number in the corresponding box Forward...

Страница 938: ...n the corresponding box and assign a trunk to route the call by selecting the Trunk Access Code in the using TAC list Click the Apply Call Forward button The message Call Forward is set appears To set call forward for Night Break Time follow the same instructions as above To set Call Forward When Not Registered Scheduled for another extension follow the same instructions as above Call Forward When...

Страница 939: ... an external number enter the Trunk Access Code followed by the destination number and You get confirmation tone and message To cancel Call Forward When Not Registered Lift handset Press DSS key assigned to Call Forward When Not Registered if programmed OR Dial 13 Select Always and press Enter key Select Cancel and press Enter key To cancel Call Forward When Not Registered Scheduled for each time ...

Страница 940: ...enter the Trunk Access Code followed by the destination number and To set Call Forward When Not Registered Scheduled Dial 13 2 1 Destination Number for Day Time Dial 13 3 1 Destination Number for Break Time Dial 13 4 1 Destination Number for Night Time To cancel Call Forward When Not Registered Dial 13 1 0 To cancel Call Forward When Not Registered Scheduled Dial 13 2 0 for Day Time Dial 13 3 0 fo...

Страница 941: ...al or Consultation Hold NAVAN will send Re Invite message to the SIP Extension put on hold How it works Exclusive Hold When a call is put on Exclusive Hold NAVAN starts the Exclusive Hold Retrieval Timer programmable default 2 minutes The call remains connected to the Extended IP phone which placed it on hold The call remains on hold for the duration of this timer The extension user can retrieve t...

Страница 942: ...ll is not answered by Extended IP Phone To be able to place calls on Global Hold you must select Global Hold as the Default Call Hold Type in the System Parameters of NAVAN The Extended IP Phone which picks up the call must have a DSS Key to access the Trunk or the Extension which is put on hold See System Parameters for instructions NAVAN provides the flexibility to use Exclusive Hold and Global ...

Страница 943: ... System Parameters See System Parameters to know more DSS Keys Program DSS Keys for Trunks and Stations on the Extended IP Phones which are allowed to retrieve calls on Global Hold Global Hold Retrieval Timer Change the default setting of this timer to the desired duration if required Exclusive Hold Retrieval Timer Change the default setting of this timer to the desired duration if required For in...

Страница 944: ...u are in speech with a Trunk with an extension To put on Global Hold press Hold key twice in quick succession within 2 seconds To retrieve a call on Global Hold From any Extended IP Phone press the DSS Key of the Trunk extension put on Global hold To put a call on Global Hold when Global Hold is selected as the Default Call Hold Type You are in speech with a Trunk with an extension Press Hold key ...

Страница 945: ... description and instructions refer to the topic How to use in the following features Call Transfer Call Toggle Conference 3 Party Conference Multiparty Conference Dial In Call Park Mute Call Chaining Conversation Recording Flashing on Trunks Continued Dialing ...

Страница 946: ...useful when the CLI received and stored in the call log is not in the same format that is to be used to make calls save the numbers you can store the external numbers in your call logs in the Personal Directory and use them for Personal Abbreviated Dialing The maximum number of calls that can be stored under each Call Log type is 20 The logs will be cleared automatically using the First In First O...

Страница 947: ...nd You may enable any or all of the following flags by clicking on the respective check box Store Internal Calls in Missed Call Log Store Internal Calls in Answered Call Log Store Internal Calls in Dialed Call Log Click Submit at the bottom of the page to save your settings Log out of Jeeves or continue as required How to use The Call Logs feature allows you to view calls and edit numbers make cal...

Страница 948: ...tem will dial out the number you just viewed To view Call Logs on Extended IP Phone using DSS Key Press DSS Key programmed for Call Logs when the phone is idle Scroll to select the desired Call Log Call Log Missed Answered Dialed Follow the same steps as described for viewing Call Log entries using the Phone Menu OR Press the DSS Key assigned the Call Logs feature when it glows The phone will disp...

Страница 949: ...ss Enter key The phone will display the Number XXXXXXXXXXX Press Enter key The system will dial out the selected number using the Outgoing Trunks assigned for dialing 0 The dialed number will be logged in the Dialed call log and the Last Number Redial List Storing numbers of Call Logs in Personal Memory of the Extended IP Phone To store any external call record trunk call from Received Missed and ...

Страница 950: ...league The person can park the call and continue the conversation from the other part of the office The NAVAN offers two types of Call Park facility Call Park General Orbit The extension user can park calls in any of the 8 general Orbits which are like fictional extensions located in the system The calls parked in the General Orbit can be picked up from any extension by dialing the General Orbit N...

Страница 951: ...duration of the Call Park Release Timer which is set to 3 minutes by default If A is free the system will ring on A s phone A gets connected to C again If A does not retrieve the parked call till the end of the Call Park Release Timer C gets disconnected Parking Calls in Personal Orbit Parking calls in the Personal Orbit works the same way as in General Orbit The only difference is that A can park...

Страница 952: ...ed call from your phone when you are in speech with someone Press Transfer key Press DSS Key assigned to Call Park Retrieve Dial 116 OR Enter Orbit Number where you parked the call 1 9 Personal Orbit 1 General 2 9 For SLT Users To park a call You are in speech with extension external caller Dial Flash115 Orbit Number Personal Orbit 1 General 2 9 Call is parked To retrieve a parked call from your p...

Страница 953: ...Polycom NAVAN will send only first 3 ringing call s information in NOTIFY message to the SIP Extension which has requested Group Call Pickup This feature has been supported in SIP Phones of CISCO and POLYCOM SIP Extension which has subscribed for BLF of SIP Extension of NAVAN the NAVAN will send information for the call present in the first call loop only How it works Call Pickup Group Extensions ...

Страница 954: ...ickup Groups as required Assign each group a number The numbering of Call Pickup Groups must start from 01 and end at 08 Configuring Extensions in Call Pickup Groups For this feature to function open Jeeves Click the PBX Features tab On the left navigation bar click the Call Pickup Group Link Configure Call Pickup Group You may refer to the sheet of paper you prepared For each SLT SIP extension as...

Страница 955: ...DSS Key assigned to Call Pickup Selective OR Dial 12 Dial number of the Extension you want to pick up Talk Go idle For SLT Users To pick up a ringing extension in your Group Lift the handset Dial 4 Talk Replace handset To pick up any one of several ringing extensions ringing or the extension that is not in your group Lift the handset Dial 12 Dial number of the Extension you want to pick up Talk Re...

Страница 956: ...old To talk with C A dials Flash 1 Speech with C To talk with B A dials Flash 1 Speech with B A can toggle back to C by dialing Flash 1 Toggling between internal call and external call A is in speech with B and D external call is on Consultation Hold To talk with D A dials Flash 1 Speech with D To talk with B A dials Flash 1 Speech with B A can toggle back to D by dialing Flash 1 Toggling between ...

Страница 957: ...ion is required for this feature except for programming a DSS key for Call Toggle if required on the Extended IP Phone extensions See Phone Key Settings under Configuring Matrix SPARSH VP248 Extended IP Phone as SIP Extension and Configuring Matrix SPARSH VP330 Extended IP Phone as SIP Extension How to use For Extended IP Phone Users Call Toggle between two internal calls Speech with Extension 1 E...

Страница 958: ...ernal calls Speech with extension 1 Extension 2 on Consultation Hold To talk with extension 2 dial Flash 1 Speech with extension 2 Dial Flash 1 again Speech with extension 1 Call Toggle between an Internal Call and an External Call Speech with extension External party on Consultation Hold To talk with external party dial Flash 1 Speech with external party Dial Flash 1 again Speech with extension C...

Страница 959: ...n Hold dials the desired party s external number and transfers the call after or without notifying the desired party of the impending transfer Trunk to Trunk call transfer may be used to transfer incoming calls for out of office extension users to their cell phones or to connect personnel at remote or distant locations For instance an out of office executive who does not have long distance dialing...

Страница 960: ...d dials B s extension The Operator transfers the call when B s phone starts ringing If B answers the call B gets connected to C If B does not answer the call at the end of the Transfer While Ringing Timer programmable default 30 seconds the call is returned to the Operator C gets Ring Back Tone The Operator answers the call and is in speech with C However if the Operator is busy at the time of cal...

Страница 961: ...nes must be informed that their call would be disconnected at the end of the Trunk to Trunk Inactivity Timer and that they must dial any digit except to extend the call Call Transfer Blind Transfer to VMS C calls a Trunk of NAVAN C wants to talk to A The Operator attends the call The Operator puts C on Consultation Hold The Operator dials Feature Access Code for Blind Transfer to VMS and A s exten...

Страница 962: ...Basic Features Refer the topic Class of Service CoS to know more Call Transfer Related Timers Transfer While Ringing Timer This timer is related to Call Transfer While Ringing It is the time for which the system rings the extension By default it is set to 30 seconds At the end of the timer the call is returned to the transferring extension Transfer on Busy Timer This timer is related to Call Trans...

Страница 963: ...Extension Speech with extension Press DSS Key assigned to desired party Go ON Hook or press the Transfer Key OR Press Transfer Key You get feature tone Dial desired party s extension number Go ON Hook or press the Transfer Key Extension to Trunk Speech with extension Press DSS Key assigned to Trunk Dial External Number transfer target Go ON Hook or press the Transfer Key OR Press Transfer Key You ...

Страница 964: ... VMS Dial desired party s extension number Go ON Hook or press the Transfer Key OR Press Transfer key Dial 1078 Dial desired party s extension number Go ON Hook or press the Transfer Key For SLT Users Extension to Extension Transfer Speech with extension Press Flash Dial desired party s extension number Replace handset Extension to Trunk Speech with extension Press Flash Dial Trunk Access Code Dia...

Страница 965: ...desired party s extension number Replace handset Trunk to Trunk Transfer Speech with Trunk Dial Flash Dial Trunk Access Code Dial External Number Speech with the External Number Replace Handset Blind Transfer to VMS Speech with Trunk extension Press Flash Dial 1078 Dial desired party s extension number Replace handset ...

Страница 966: ...When the landing extension Operator transfers the incoming call to an extension putting the external caller on hold the system sends this information to the extension to which the call is transferred During the transfer the number of the landing extension Operator will be displayed on the transfer destination extension On successful call transfer the caller s number will be displayed on the transf...

Страница 967: ...CLIP Type for all SLT extensions To select CLIP type for SLT extensions Log into Jeeves as System Engineer Click the Extensions tab On the left navigation bar click the SLT Extensions link The page of the first SLT extension opens Click more Click Hardware Settings to expand As Caller ID Presentation Type select the CLIP Type supported by the SLT from the combo box DTMF FSK V 23 FSK Bellcore Defau...

Страница 968: ...mber tab and follow the instructions as above To replace characters received as CLI on telephones that do not support CLI prefixed with this character Click the PBX Settings tab On the left navigation bar click the System Parameters link On this page under General Parameters select the Replace from CLI check box In the Replace from CLI with the number string field enter the desired number string t...

Страница 969: ... s extension name and number Now Extension D calls extension E A picks up the call D will be able to view A s name and extension only if it has CLIR Override enabled and is an Extended IP Phone CLIP and Caller ID Presentation while Transfer Both these features will not work if CLIR is enabled How to configure CLIR and CLIR Override are Class of Service dependant features Extensions that are to be ...

Страница 970: ...sers To enable CLIR Lift handset Dial 103 1 You get confirmation tone Replace handset To disable CLIR Lift handset Dial 103 0 You get confirmation tone Replace handset 144 You are recommended to assign a DSS Key with LED to this feature When the assigned DSS key is pressed it will glow red indi cating that CLIR is enabled 145 If a DSS key with LED has been assigned when you press the key again the...

Страница 971: ...orward Scheduled Do Not Disturb Hot Line Trunk Reservation Walk In Class of Service Auto Redial Call Forward and Call Follow Me Do Not Disturb Hotline and Trunk Reservation are Class of Service dependent features These features can be set canceled from an extension only if these are included in its Class of Service CoS How to use The extension users can cancel all features set on their extension f...

Страница 972: ...left navigation bar click the Extensions link The Extension numbers appear as tabs starting with SLT extensions Click the desired extensions tab The extension details appear on your screen Click Cancel All Features to expand Click the Cancel All Features button The following features will get canceled if any is set on this extension user Walk in Class of Service Do Not Disturb Call Forward Call Fo...

Страница 973: ... the Day and Night Break that indicates which features of NAVAN the port is allowed to access during working hours and during non working hours A feature can be allowed or denied to an extension by enabling or disabling it in the CoS of that extension The CoS of all extensions may be uniform or different CoS can be assigned to different extensions according to the time of the day Doing so each ext...

Страница 974: ...Not Disturb Override DSS Call Pickup Station DSS Call Pickup Trunk Dynamic Lock Dynamic Lock Timer Emergency Conference Forced Answer Forced Release General Mailbox Access Global Directory Part 1 Global Directory Part 2 Global Directory Part 3 Global Directory Programming Hot Desk Hotline Intercom Interrupt Request Live Call Screening Live Call Supervision Message Wait Set Cancel Paging Feature Al...

Страница 975: ...on list you prepared by adding the features to be allowed to the select extensions Now to configure the CoS features to be allowed or denied to extensions go to SLT Extensions and SIP Extensions of Jeeves Click the extension settings link for SLT SIP Extension Select the desired extension number The default CoS group features appear under Class of Service The check boxes of features that are allow...

Страница 976: ...reak select its corresponding check box To deny a feature for the Day and or Night Break clear its check box Click Submit to save changes The following features can be set cancelled on extensions from the SA mode regardless of whether these features are allowed or denied in the CoS assigned to the extensions Call Forward DND Dynamic Lock and Timer Hotline Finally test the CoS you configured for ea...

Страница 977: ...ence Password is a four digit number string The default conference password is 1111 and must be changed before using this feature All the other participants must be informed about the conference You can also have external callers join the conference by providing them the DISA login Let us understand how Dial In Conference works with the following example Extension user A wants to schedule a Dial I...

Страница 978: ...d by the their numbers Remove a Participant from an on going Dial In Conference Only Extended IP Phone users can remove another participant from the Dial In conference The Extended IP phone displays the numbers of all the participants select the number of the participant to be removed from this list Temporarily Leave a Dial In Conference Any participant in a conference can dial the Temporarily Lea...

Страница 979: ...erence enable Play Beep when Raid Conference Dial in Conference begins See System Parameters for instructions If external parties are to be allowed to initiate or join the Conference Direct Inward System Access DISA must be enabled on the trunk on which they call You can program a DSS key for Dial In Conference Terminating a Conference Temporarily Leave Rejoining a Conference if required You can p...

Страница 980: ...erence You get Ring Back Tone When you are in speech with the party press the Conference Key The party is included in the conference To remove a participant from the Dial In conference While in Conference press the Conference Key The Multiparty Conference menu appears on the LCD Select the option Remove Party The numbers of the participants appear on your phone s display Scroll to select the parti...

Страница 981: ... the left navigation bar click the Dial In Conference Cancel link Enter the conference number 1 or 2 which you want to cancel in the Cancel Dial In Conference Number field Click Submit button Log out of Jeeves For SLT Users The instructions are the same as for Extended IP Phone users except you will not get any confirmatory or prompts as text messages on your phone Lift the handset You get dial to...

Страница 982: ... SLT users cannot Remove any participant from the Dial In Conference Dial In Conference using DISA To schedule a Dial In Conference Dial a DISA enabled Trunk Dial DISA Login Code 1079 Extension Number User Password if PIN Authentication is required After DISA Login beeps dial 191 Conference Number Conference Password To initiate or join a Dial In Conference After DISA Login beeps dial 192 Conferen...

Страница 983: ...ithdraw from the conference Dial 0 9 to end DISA session When you enter DISA mode you get beeps dial digits before the DISA Inactivity Timer elapses Never dial Flash when in DISA mode you will get disconnected Keep dialing any digit to continue the conference See Direct Inward System Access DISA to know more ...

Страница 984: ...Party Conference can be conducted with extensions of NAVAN and between extensions and external numbers It is also possible to conduct an Unsupervised 3 Party Conference wherein the operator connects two trunks through the system and withdraws from the three way speech NAVAN supports two simultaneous 3 Party Conferences If a call put on Consultation Hold is to be included in a Conference you must f...

Страница 985: ... three way speech A D and E are now in speech Any of them can disconnect to withdraw from the conference If A disconnects D and E are now in two way speech A B and C are in speech When A disconnects either B and C are also disconnected or speech is established between them depending on the option you select in If the Extension creating 3 party conference disconnects during Conference in the System...

Страница 986: ...es of conferences 3 Party Dial In and Multi party Conference How to use For Extended IP Phone Users Speech with Party 1 on trunk extension Press Conference Transfer key Party 1 put on Consultation Hold Dial the number of Party 2 If Party 2 is a trunk Dial Trunk Access Code to grab a trunk You get Trunk dial tone Dial telephone number of Party 2 You get ring back tone Speech with Party 2 Press the ...

Страница 987: ... A decides to hold a teleconference with B C D E and F Initiating a Multiparty Conference A dials B s number A and B are in speech A presses the Conference Key B is put on hold A gets feature tone B gets on hold music A dials C s number A is in speech with C A presses the Conference Key A 3 way speech is established A B and C are in speech a 3 party conference is established A presses the Conferen...

Страница 988: ... participant in a conference can dial the Cancel conference code 190 to end the conference all participants will get Error Tone and the system resource occupied by the conference will be freed OR Any participant in a conference can press the Conference Key if it is an Extended IP Phone The Multiparty Conference Menu appears on the LCD of the Extended IP Phone Scroll using the down arrow to select ...

Страница 989: ...nference in the Class of Service also includes 3 Party and Multi Party Conference Extensions that are denied Conference in their Class of Service will not be allowed Dial In as well as 3 Party and Multi party Conference If desired you may also change default value of the Release Conference if Idle for more than min Timer See System Timers and Counts If extension users are to be allowed to initiate...

Страница 990: ...press the Conference Key The Multiparty Conference menu appears on the LCD Select the option Remove Party The LCD displays the numbers of all the participants Selects the number of the participant you want to remove and press the Enter Key The selected participant is disconnected To temporarily leave multiparty conference While in Conference press the Conference Key The Multiparty Conference menu ...

Страница 991: ...party conference While you are all in speech dial Flash 190 To temporarily leave from the multiparty conference While you are all in speech dial Flash 191 To rejoin the multiparty conference Go OFF Hook Dial 191 To permanently leave from the multiparty conference Go ON Hook To use Multiparty Conference from DISA mode you may see the instructions For SLT Users under Conference Dial In ...

Страница 992: ... time for the extension user to dial the next digit If the user does not dial any digit within that time the system interprets it as the smaller Access Code and invokes the associated feature The time for which the system waits for the next digit to be dialed before resolving the Access Codes is called Conflict Dialing Timer This timer is set to 2 seconds and is programmable Refer the topics Acces...

Страница 993: ...t Dialing Timer which is set by default to 2 seconds and can be changed as desired If the duration of the Conflict Dialing Timer is long it may cause delay in the system s response to the feature If the duration is less the system may misinterpret the access codes Ensure that the value of the Timer is programmed optimally i e at least the default value To change the Conflict Dialing Wait Timer Log...

Страница 994: ...984 Matrix NAVAN CNX200 System Manual You may log out of Jeeves ...

Страница 995: ...P Extension puts the call on hold and then retrieves the call then for the hold duration silence will be recorded in the recorded file How it works A and B are extensions Both are assigned a mailbox each C and D are external parties A calls C C answers the call A dials the command for Conversation Recording in mid speech C is put on Consultation Hold The system sends a string of digits to the Voic...

Страница 996: ...ecording starts Decide whether you want Beeps to be played and accordingly enable disable the Play Beep when Call Taping Conversation Recording starts in the System Parameters How to use For Extended IP Phone Users To record a conversation You are in speech with another extension external number Press DSS Key assigned to Conversation Recording if programmed OR Press Transfer key and Dial 1095 You ...

Страница 997: ... messages For SLT Users To record a conversation You are in speech with another extension external number Dial Flash 1095 You get Feature tone Speech with party reestablished Recording starts Replace handset when conversation ends To listen to a recorded conversation Lift the handset Dial 390 Follow Voice Mail Prompts Replace handset ...

Страница 998: ...etc The Customer Name may consist of a maximum of 80 alphanumeric characters including punctuation marks So you can add a contact address to the Customer Name How to configure Customer Name can be programmed on the System Parameters and you can also change or correct the Customer Name you have assigned any time If you have not assigned the customer Name to the system Log into Jeeves as System Engi...

Страница 999: ...rking hours to route outgoing calls and land incoming calls from to the appropriate destination You can set the NAVAN to Night Mode until the office remains closed and set it back to operate as per the Time Table when work is resumed To cite another example the office must work for extended hours You can set NAVAN to Day Mode and set it back to operate as per the Time Table When you set the system...

Страница 1000: ...from the following Set System in Day Mode Working Hrs Set System in Night Mode Non Working Hrs Set System in Break Mode Operate System as per Timetable assignment default Click Submit to save settings Log out of Jeeves or continue as desired Setting Day Night Mode from SA mode using Jeeves Log into Jeeves as System Administrator Click the PBX Settings tab ...

Страница 1001: ...Night Mode from SA mode using a Telephone Enter SA mode from an SLT Extended IP Phone Dial 1072 018 Code Where Code is from 1 to 4 1 is for Day Mode 2 is for Night Mode 3 is for Break Mode 4 is for Operate system as per Time Table Exit SA mode If you are setting Day Night Mode from an Extended IP Phone using a DSS key refer the LED indication in table below LED Indication on DSS Key assigned to Da...

Страница 1002: ...g to know more Names of Extensions which are names of users Their names are assigned to SLT and SIP extensions to identify the extension users Names of Extensions are necessary for making internal calls using the Dial By Name feature How it works Press the Names key The prompt Name XXX appears on the phone display Enter the name of the desired party147 For example you wants to call Midas Biz enter...

Страница 1003: ...es to extensions Class of Service Dial By Name is allowed to all the Extended IP Phone users However the use of this feature is related to the following features which must be enabled in the Class of Service of the SIP extension users Internal Calls This is to be enabled so that the extension can call other extensions Global Directory Part 1 Global Directory Part 2 Global Directory Part 3 Global D...

Страница 1004: ...s Enter key to select the name The system displays the number being dialed out You get Ring Back Tone or Busy Tone Entered the wrong alphabet Go ON Hook Go OFF Hook Press the Names key again Enter the name initial letters of the contact s name ...

Страница 1005: ...In First Out logic whereby the earliest dialed number is replaced with the most recently dialed number To use this feature the Extended IP Phone user must invoke the Last Number Redial feature Doing so the Redial Number List will appear on the phone display The user may now navigate the list select the number to be dialed out The system will dial out the selected number using the same Outgoing Tru...

Страница 1006: ...6 Matrix NAVAN CNX200 System Manual The desired number is dialed out and appears on your phone s display You get ring back tone Talk when speech is established Go ON Hook after the conversation has ended ...

Страница 1007: ...runk Call Double Long Slow Long Slow Auto Call Back Short Slow Short Slow Short Slow Auto Redial Long Very Slow Long Very Slow Long Very Slow Alarm Call Long Fast Long Fast Long Fast Emergency Long Fast Long Fast Long Fast Operator Alarm Long Fast Long Fast Long Fast Message Wait Short Fast Short Fast Short Fast Programming Ring Continuous Continuous Continuous Ring Test Short Slow Short Slow Shor...

Страница 1008: ...System Engineer selects the Region as per the geographical location of the system NAVAN loads the country specific Distinctive Ring Type defined for the selected Region Refer the topic Default Settings for the default Distinctive Ring Type applied to your country region However if required you can change the default Ring Pattern and the Ring Text for SIP Extensions loaded by the system Call Events...

Страница 1009: ...Ring Pattern loaded by the system To configure Distinctive Rings Log into Jeeves as System Engineer Click the PBX Settings tab On the left navigation bar click the System Parameters link On the System Parameters page click Distinctive Rings to expand Select the desired Ring Pattern Ring Type for each call event feature that you want to customize You can also customise the Ring Text of each call ev...

Страница 1010: ...1000 Matrix NAVAN CNX200 System Manual Scroll to Call Progress Tones Set the Tone Demo Timer to the desired duration Click Submit to save changes You may log out of Jeeves ...

Страница 1011: ...e and Voice Message for DND Notification DND when set cancelled from the SA mode will not depend on the assigned CoS DND Override As the feature title suggests DND Override allows the caller to land on the called extension despite DND set on the extension DND Override will not work if the called extension has Privacy from DND Override enabled in its Class of Service DND Text Message A DND Message ...

Страница 1012: ...de in his Class of Service C does not have this feature DND Text messages as well as Voice Message Notification for DND have been programmed by the System Engineer A has set DND on his extension with the DND Text message In Meeting 150 B calls A As B has DND Override the Voice Message for DND Notification is played to B once and the DND message In Meeting set by A appears on B s phone display B ge...

Страница 1013: ... to persons in senior positions in the organization If you want to allow DND only to selected extensions disable this feature in the CoS of all other extensions other than these extensions Similarly if DND Override is to be to be allowed to the Operator and a few other extensions enable this feature in the CoS of the Operator and other extensions If Privacy from DND Override is to be allowed to ce...

Страница 1014: ... Press Enter key You get a text message DND Set on the phone s display and confirmation tone Go Idle To cancel DND Press DND Key again OR Dial 18 0 You get a text message DND Cancelled on the phone s display and confirmation tone For SLT Users To set DND Lift handset Dial 18 1 for Do Not Disturb Dial 18 2 for Unavailable Dial 18 3 for In Meeting Dial 18 4 for In Conference Dial 18 5 for Try on Mob...

Страница 1015: ...mber and confirmation tone Go Idle To cancel DND Remote Press the key assigned Remote DND function OR Dial 1072 001 Enter the Extension Number Scroll to select the message Cancel DND Press Enter key You get a text message DND Canceled on Extension number and confirmation tone Go Idle For SLT Users To set DND for an extension user Lift the handset Dial 1072 001 You get feature tone Dial Extension n...

Страница 1016: ...et confirmation tone Replace handset DND Override For Extended IP Phone Users and SLT Users Dial an extension number You get routing beeps and a DND Notification message if programmed and a DND Text message if using Extended IP Phone Dial 4 the DND Override Code during the message or the routing beeps The called extension will start ringing You will get Ring Back tone If the dialed phone is busy y...

Страница 1017: ...user assign DSS Keys with LED to the desired extensions trunks on their Extended IP Phone This is how DSS Call Pick Up works Extension user A has configured a DSS Keys for extension 2007 and CO trunk 1 on his her Extended IP Phone When a call lands on extension 2007 and it rings the DSS Key assigned to 2007 blinks fast in Blue color to indicate that the extension is ringing A presses the DSS Key t...

Страница 1018: ...runks on their Extended IP Phones See Phone Key Settings under Configuring Matrix SPARSH VP248 Extended IP Phone as SIP Extension and Configuring Matrix SPARSH VP330 Extended IP Phone as SIP Extension How to use For Extended IP Phone Users To use DSS Call Pick Up Station When the DSS key assigned to the station blinks fast in blue color to indicate that the station is ringing press the DSS Key You...

Страница 1019: ...level is Local Calls Toll Control Level 2 is not based on Time Zones By default the Call Privilege type set for this level is National Calls Toll Control Level 3 is not based on Time Zones By default Call Privilege No Calls is selected for this level The Call Privilege for each of the above Toll Control Levels can be redefined according to user requirements For example Toll Control Level 3 can be ...

Страница 1020: ...lt User Password The Dynamic Lock Timer can be set to a maximum of 99 minutes The Dynamic Lock Timer must be set to 00 when using Manual Dynamic Lock Dynamic Lock when set cancelled from the SA mode will not depend on the assigned CoS How it works The Pre requisites The Calls allowed for Lock Levels 0 allowed for Day and Night Break Level 1 Level 2 and Level 3 are configured in the Toll Control ap...

Страница 1021: ... the extension If this feature is enabled the system will start the decrement of the Dynamic Lock Timer The system will change the Toll Control back to the previous level on the expiry of this Timer However if the Decrement Dynamic Lock Timer feature is disabled in the Class of Service the system will reset the Toll Control as described in the previous step If Dynamic Lock Manual has been set the ...

Страница 1022: ... Dynamic Lock Manual the extension user Operation must set the Dynamic Lock Timer to 00 When the Dynamic Lock Manual is set Timer set to 00 the extension user Operator must dial the feature access code to restore the previous Toll Control Level When Dynamic Lock Automatic is set Timer set to desired number of minutes the system will restore the previous Toll Control Level at the end of the Timer T...

Страница 1023: ...ic Lock OR Dial 141 OR Enter Phone Menu by pressing Enter key You get the prompt Enter User Password Enter your User Password Select the desired Toll Control Level Toll Control Level 0 Toll Control Level 1 Toll Control Level 2 Toll Control Level 3 Press Enter key You get the text message OK and a confirmation tone Change your User Password first before you use this feature If you are still working...

Страница 1024: ...ge Lock Timer 00 Minutes and confirmation tone To set Dynamic Lock Automatic Press DSS key assigned to Dynamic Lock OR Dial 1072 002 OR Enter Phone Menu You get a text message Enter Room Phone Number Enter the extension number for which you want to set Dynamic Lock Select the option Change Lock Timer You get the following prompt XX Minutes Enter the desired number of minutes max 99 You get the tex...

Страница 1025: ...ock Timer Dial 00 You get confirmation tone Replace the Handset or you get dial tone after 3 seconds To set Dynamic Lock Automatic Pick up the handset Dial 1072 002 you get feature tone Dial Extension Number you get feature tone Dial 2 the code for Change Lock Timer Dial the number of Minutes you want to set the Timer You get confirmation tone Replace the Handset or you get dial tone after 3 secon...

Страница 1026: ... forming Department Groups see the topic Department Call For example you have formed a Department Group for Emergency Conference with the extensions A B and C as members The Access Code assigned to the Department Group is 391 Another Emergency Conference is established among the members of Department Group 392 This Department Group has extensions X Y and Z as members Now extension A wants to initi...

Страница 1027: ...erence A selects 392 from the list of ongoing Emergency Conferences Both the Emergency Conferences 391 and 392 are merged Canceling an Emergency Conference Only the initiator of the conference extension A can cancel the conference The initiator of the conference can cancel the conference at two stages When speech is established with one or more member extensions of the Emergency Conference departm...

Страница 1028: ...erence Or Dial 1177 Dial Department Group Number All free extensions in the group will ring You get connected to the extensions that answer If no resources are free you will get the Conf Resource full message on your LCD To merge Emergency Conferences While in Conference press the Conference Key The Multiparty Conference menu appears on the LCD Select the option Merge Conferences The LCD displays ...

Страница 1029: ...l stop ringing You can cancel the conference only if you have initiated it For SLT Users To initiate an Emergency Conference Dial 1177 Dial Department Group Number To cancel an Emergency Conference while in speech with one or more extensions Go ON Hook and then go OFF Hook Dial 190 To cancel an Emergency Conference while the extensions are ringing Go ON Hook during Ring Back Tone ...

Страница 1030: ...le port is not registered with the network SIM PIN is not valid the keypad of the extension phone is locked Emergency Number will always be out dialed through the outgoing trunks you selected for dialing these numbers except when you have grabbed a trunk using Selective trunk access code Selective Trunk Access DSS key In which case the number will be dialed only from the trunk you have grabbed Eme...

Страница 1031: ... code is 0 Now when an extension user of NAVAN located in Australia dials 0 of the emergency number the system will consider it as trunk access code and will apply the trunk access code logic Therefore in such cases the extension user must first dial the Trunk Access Code and then the Emergency Number In this case the extension user must dial 0 000 for emergency number dialing so that the system w...

Страница 1032: ...When an extension of NAVAN makes an emergency call the system hunts for the outgoing trunks selected for routing emergency numbers and dials out the number from a free trunk simultaneously the system informs the Operator that an extension has dialed an emergency number by ringing on the Operator extension for the duration of the Emergency Reporting Call Ring Timer configurable default 10 minutes I...

Страница 1033: ...and is not acknowledged that call is logged into the Emergency Alarms Log The log can be viewed by any Extended IP Phone user using the DSS Key assigned to Emergency Alarms Log only When an Emergency call is made by any extension user the LED of the DSS Key glows continuous RED To view the log from any Extended IP Phone user Press the DSS Key assigned to Emergency Alarms Log A list of the last 20 ...

Страница 1034: ...The system plays the Confirmation Tone followed by the Dial Tone The acknowledged Emergency call is removed from the Emergency Alarms Log and is logged into the System Activity Log with the details of the extension that acknowledged the call ...

Страница 1035: ...feature Flashing on Trunks must be allowed to the extension in its Class of Service CoS For instructions see SLT Extensions and SIP Extensions How to use For Extended IP Phone Users While in speech on trunk Press Transfer Key dial and the Desired Service Provider Code Or Press DSS Key assigned to Flashing on Trunks if programmed Dial the Desired Service Provider Code For SLT Users While in speech ...

Страница 1036: ... can be overwritten Extension A sets Follow Me on extension B After a period of time goes to extension C A can receive calls on extension C by setting Follow Me on extension C Follow Me set by A on extension B will be cancelled Follow Me cannot be chained If extension A sets Follow Me to extension B And extension B sets Follow Me on extension C Follow Me of extension A is automatically cancelled D...

Страница 1037: ...tension Press Forward key of your extension phone Select Cancel OR Dial 130 For SLT Users To set follow me from another extension Lift the handset of the other extension Dial 135 Dial your extension number Dial your user password Replace handset To cancel Follow me Lift the handset of your extension Dial 130 Replace handset ...

Страница 1038: ...ker of B s phone s is turned on goes OFF Hook A may now talk to B Forced Answer can be used only when the called extension is idle or ringing How to configure To be able to use Forced Answer extension users must have this feature enabled in their Class of Service CoS for the Day and Night Break time as required See SLT Extensions and SIP Extensions for instructions on configuring the different ext...

Страница 1039: ... called extension phone s speaker is turned on You are in speech with the called extension You may talk You can also dial 5 the feature code for Forced Answer immediately after dialing the desired extension number instead of dialing it during the Ring Back Tone This way you can talk to the desired extension user without waiting for the called extension user to answer your call ...

Страница 1040: ...ure command B gets confirmation tone A gets disconnected and gets error tone B must grab Trunk 1 again to get the dial tone of the network To be able to use Forced Call Disconnection the extension user must have a higher Priority than the extension user whom he she tries to forcibly disconnect To be able to use Forced Call Disconnection on a busy trunk the extension user must have grabbed that tru...

Страница 1041: ...ective Port must be enabled in the Class of Service CoS for the Day and Night Break time as required See SLT Extensions and SIP Extensions for instructions on configuring COS for the different extension port types How to use For Extended IP Phone Users To forcibly disconnect a busy extension trunk153 Press the DSS Key assigned to Forced Call Disconnection on Busy tone OR 153 You must have grabbed ...

Страница 1042: ...n Busy tone You get confirmation tone You may now dial the extension number grab the trunk For SLT Users To forcibly disconnect a busy extension trunk Dial on Busy tone You get confirmation tone You may now dial the extension number grab the trunk ...

Страница 1043: ...e system applies the CO to SLT Gain Setting Receive and Transmit Gain settings configured on the CO Trunk to adjust the speech volume level When the call is placed on the SLT Port the SLT to CO Gain Settings Receive and Transmit Gain settings on the SLT Port are applied to adjust the speech volume level Hence you can set different speech volume levels for each port type and the system automaticall...

Страница 1044: ... can move the call from the cellular number to the SPARSH Mobile Client The call is moved without being disconnected or redialing the number NAVAN will serve the Handover request only if the Cellular Number is configured in Application Settings in the corresponding Mobile Client s interface Refer the respective Mobile Client User Guide for details or the Mobile Number is configured in the system S...

Страница 1045: ...esk extension is busy an Auto Callback request is set automatically on the Help Desk extension As soon as the Help Desk extension is free the system will serve the auto callback request The Help Desk extension calls back extension 216 Also see Auto Call Back ACB How to configure To enable Help Desk feature on any extension Click SLT Extensions and SIP Extensions to which you want apply this featur...

Страница 1046: ...1036 Matrix NAVAN CNX200 System Manual Select the Assign Help Desk function to this Extension check box The selected extension will be designated as Help Desk Click Submit You may log out of Jeeves ...

Страница 1047: ...When Hot Desk is performed from the Hot Desking extension all the properties of the Host Extension are copied to the Hot Desk Extension On the Host Extension the user cannot perform any activity except Cancel Hot Desking You must cancel Hot Desk from both the Hot Desk Extension and the Host Extension After cancelling Hot Desk the Host Extension and the Hot Desk Extension acquire their original pro...

Страница 1048: ... Extension dial 1091 Dial Hot Desk Extension number Dial Hot Desk Extension User Password Go ON Hook On the Hot Desk Extension dial 1091 Dial own extension number Hot Desk Extension Number Dial own extension User Password You get confirmation Hot Desk cleared Go ON Hook ...

Страница 1049: ...les Manager has to frequently dial the number of the B Sr Co ordinator Sales C sets Hotline for B s number and also configures the Hotline Timer as 5 seconds C goes OFF Hook NAVAN give dials tone and waits for 5 seconds If no digit is dialed within the expiry of this time by A B s number will be dialed out automatically B in speech with A For immediate Hotline the Hotline Timer should be set to 00...

Страница 1050: ...k the Extensions link The Extension numbers appear on the tabs starting with SLT extensions To select a particular extension number or type click the tab Click Hotline to expand Select the type of Hotline you want to set for the extension user from the following To set Hotline for an Extension or Department Group select the radio button Hotline to Station or Department Group Enter the Extension nu...

Страница 1051: ... Phone Users To set Hotline on an Extension Department Group Press DSS key assigned to Hotline Scroll to select Set Hotline Station extension Department press enter key Enter Extension Department Group Number OR Dial 151 Extension Number Department Group Number To set Hot Outward Dialing for Trunk Press DSS key assigned to Hotline Scroll to select Set Hotline Outgoing Trunk press enter key Enter T...

Страница 1052: ...ion Department Group Dial 151 Extension Number Department Group Number To set Hot Outward Dialing For Trunk Dial 152 TAC To set Hot Outward Dialing with Number Dial 153 TAC External Number To set Hotline Timer Dial 154 seconds 000 255 To Cancel Hotline Hot Outward Dialing Dial 150 ...

Страница 1053: ...ublic network The modified CLI is presented to the extension phones and is stored in the Call Logs and SMDR see Station Message Detail Recording SMDR Extension users can call a number in the Call Logs without having to modify the CLI manually How it works Incoming CLI Modification parameters must be programmed in the system considering the dialing pattern supported by the local public network Acco...

Страница 1054: ...Enter the Area Code of the place where the NAVAN is installed The Area Code helps NAVAN detect whether the Incoming CLI received is a local number Do not enter any prefix for the Area Code For example if you want to enter Area Code for Mumbai enter only 22 Do not enter the prefix 0 to the area code By default Area Code is 265 Vadodara city International Prefix Enter the digits that are required as...

Страница 1055: ... you to dial Area Code with a particular Prefix for local numbers If you select this option you must also program the Prefix digits for the Area Code By default the option No Area Code not required is selected Prefix Area Code If you have enabled Area Code required to make local calls with Prefix Digit in the previous parameter enter the prefix digits for the area code for local calls in this fiel...

Страница 1056: ...of the timer C s call will be disconnected After the conversation between C and A is over and C goes on hook speech between B and A will be re established Feature Interactions Call States Interrupt Request works only if the dialed extension is busy The dialed extension may be busy with another extension or trunk external number Interrupt Request works only if the user about to be interrupted in is...

Страница 1057: ...Request Timer is the time for which the extension on which interrupt request is made gets the beeps By default the Timer is set to 45 seconds Default 045 seconds Valid Range 001 to 255 seconds Changing Interrupt Request Timer using Jeeves Log into Jeeves as System Engineer Click the PBX Settings tab On the left navigation bar click the System Timers and Counts link to open the page Scroll to reach...

Страница 1058: ...Log out of Jeeves or continue as required How to use For Extended IP Phone Users When dialed extension is busy Press DSS Key assigned to Interrupt Request OR Dial 3 on Busy Tone For SLT Users When dialed extension is busy Dial 3 on Busy Tone ...

Страница 1059: ...ect to B A dials the Intercom feature code 5 followed by B s number 3003 NAVAN places the Intercom call on B B s extension is idle at the time of the call and the speaker of B s phone goes OFF Hook creating a speech path between A and B A can now talk with B Feature Interactions Do Not Disturb DND If the called extension has set DND NAVAN will not place the intercom call on the called extension Pr...

Страница 1060: ... When the Intercom call is generated on SIP Extension having multiple call appearance and already a call is present on the SIP Extension then the NAVAN will place the Intercom call as normal call on the SIP Extension How to configure To provide this feature to extension users you must enable this feature in their Class of Service See SLT Extensions and SIP Extensions for instructions How to use Fo...

Страница 1061: ...alled 201 rings When the called extension answers speech is established between A and the called extension user On SIP extensions NAVAN supports Last Caller Recall using text lcr as access code enabling interoperability with IP Phones of Cisco and Polycom How to use For Extended IP Phone Users Press DSS Key assigned to Last Caller Recall OR Go OFF Hook Dial 1092 The system dials out the extension ...

Страница 1062: ...ess code used for dialing this number If Extension A has Dynamic Lock set and uses Redial feature the system will check for Toll Control as per the Lock Level set for Extension A before dialing out the number How to configure No particular configuration is required for this feature to work Redial is included in the Basic Features allowed to all extensions by default in their Class of Service CoS S...

Страница 1063: ...string dialed by the extension user to route the call to the desired secondary Service Provider How to configure To use this feature you must do the following Enable Automatic Number Translation feature on the trunk CO Mobile or SIP of your Primary Service Provider Select an Automatic Number Translation Table Number from 1 to 8 for the trunk Configure the Automatic Number Translation Table In the ...

Страница 1064: ... A requests Live Call Supervision for B s extension the system retrieves the last external number dialed by B and presents it on the display of A s phone If B has not dialed any external number A will get error tone with the message No Calls to Supervise displayed on the LCD If B has dialed internal as well as external numbers the last external number dialed by B will be displayed on LCD of A s ph...

Страница 1065: ... System Manual 1055 How to use For Extended IP Phone Users Press DSS key assigned to Live Call Supervision OR Dial 1098 Enter the Extension number to be supervised For SLT Users Dial 1098 Extension number to be supervised ...

Страница 1066: ...announcement is being made B dials Meet Me Paging code and A s number during the announcement B gets connected to A Paging is an announcement made to a group of extensions within a Page zone Extension users including those who are outside the Page zone who want to use Meet Me Paging to answer the Paging call will need to know the extension number they must call Therefore extension users who are pa...

Страница 1067: ... being made go ON Hook and then go OFF Hook Press the DSS key assigned to Meet Me Paging OR Dial 1093 Dial the number of the paging extension You get connected to the Paging extension user For SLT Users To answer a Paging call from any extension other than the Paged extensions While the announcement is being made lift the handset Dial 1093 Paging Extension Number You get connected to the Paging ex...

Страница 1068: ...e Wait will be indicated to Extension A according to the Message Wait Indication Type set for Extension A This may be in the form of a Stuttered Dial Tone a Voice Message Ring or LED or a combination of them If Extension A is an Extended IP Phone and has DSS key assigned for Retrieve New Message the LED of this key will glow to indicate new message wait Now Extension A can dial the feature access ...

Страница 1069: ...ve Message Wait key or dials the feature access code to Retrieve Message Wait the call will be placed first to the Voice Mail System When the extension user presses the Retrieve Message Wait key again the call will be placed to the extension that had set Message Wait Types of Message Wait Indication The system gives Message Wait indication to extensions according to the Message Wait Indication Typ...

Страница 1070: ...o configure To provide this feature to extensions you must do the following configuration on the extensions Enable the Message Wait feature in the Class of Service CoS of extensions This allows the extensions to set and cancel Message Wait on other extensions Only those extensions that have this feature in their CoS can set or cancel Message Wait on other extensions See SLT Extensions and SIP Exte...

Страница 1071: ...assigned to Message Wait OR Dial 1076 Dial the extension number on which you want to set Message Wait Select the option Set Message Wait Press Enter Key To cancel Message Wait Press DSS Key assigned to Message Wait OR Dial 1076 Dial the extension number on which you want to cancel Message Wait Select the option Cancel Message Wait Press Enter Key To retrieve Message Wait Press DSS Key assigned to ...

Страница 1072: ...1062 Matrix NAVAN CNX200 System Manual To Retrieve Message Wait Pick up the handset Dial 1077 ...

Страница 1073: ...al numbers to which the Mobility Extension users will forward their calls Configure these numbers in the Allowed List of Local Regional National and International Numbers as appropriate The Toll Control assigned to the extension will be applied when a call is forwarded to an external number Make sure that the extensions which are to be provided Mobility Extension have the required Toll Control lev...

Страница 1074: ...e Zone To do this they must set Call Forward Scheduled on their extension Dual Ring can also be set for Call Forward Scheduled Making calls The Mobility Extension User should make a call on the DISA enabled trunk of NAVAN from the external number and the system will provide the dial tone to the user after authenticating the external number with the help of the DISA CLI Authentication table On gett...

Страница 1075: ... Mobility Extension User dials 2 The Call of Party A is put on Hold Mobility Extension User will get Feature Tone Dial TAC number of Party B To make external call OR Dial Internal extension number to make call on extension Dial 0 on receiving Ring Back Tone RBT To perform Call Transfer On Busy Extension Mobility Extension User is in speech with Party A During speech Mobility Extension User dials 2...

Страница 1076: ...ne Dial number of Party B Make speech with Party B Dial 2 1 to put Party B in hold and speech with Party A Again dial 2 1 to put Party A in hold and speech with Party B Call Pickup To pick up the call of same Call Pickup Group Make a call on DISA enabled Trunk from Mobility Extension User After receiving dial tone dial 4 The call ringing on the extension of the same Call Pick up Group will get con...

Страница 1077: ...led Extension is busy To make a call on an internal extension which is busy During busy tone Dial 3 for interrupt request Dial 4 to Barge In Dial 5 to Raid Call Forward Unconditional To set Call Forward Unconditionally Make a call on DISA enabled Trunk from Mobility Extension User After getting Dial Tone dial 131 Extension Department Group VMS The system will give confirmation tone To set Call For...

Страница 1078: ...ne Call Forward Busy No Reply To set Call Forward Busy No Reply Make a call on DISA enabled Trunk from Mobility Extension User After the Dial Tone dial 134 Extension Department Group VMS The system will give confirmation tone To set Call Forward Busy No Reply on external number Make a call on DISA enabled Trunk from Mobility Extension User After the Dial Tone dial 134 TAC external number The syste...

Страница 1079: ...rd Type Number The system will give confirmation tone Mobility Extension users can have Call Forward and Call Forward Scheduled set on their extension by the Operator or by another extension user Using Call Forward Remote and by setting Call Forward Scheduled from the SA mode using SA commands or Jeeves the extension user Operator can set Call Forward and Call Forward Scheduled for any Mobility ex...

Страница 1080: ... on Hold will also be played to an extension when the option Route to Operator is selected as the Alarm Notification Type for the extension and the Operator extension is busy when the extension goes Off hook to answer the alarm call If your SIP Extension supports multiple call appearance and you want the system to play MOH to internal callers when your extension is busy enable the Play MOH to Queu...

Страница 1081: ...508 Thus when using a calling card users must dial a very lengthy number string each time they need to make a call using the calling card The use of Multi Stage Dialing saves the time and effort of dialing out lengthy digits in stages The Multi Stage Dialing makes use of the Automatic Number Translation table This table must be configured on the trunk from which extension users will make calls usi...

Страница 1082: ...2233 number of the Calling Card server It waits for the Calling Card server to answer the call When the call is matured i e the Calling Card server has answered the call the system dials the PIN number 1132121234 automatically and waits for the Pause Timer before dialing the destination number 0014125126508 Thus the extension user dials only the desired destination number while the system substitu...

Страница 1083: ...s on configuring ANT on different trunk types see CO Trunks Mobile Trunks SIP Trunks Configure the DTMF Out Dial on the Trunk Set the DTMF ON Time msec the DTMF Inter Digit Pause Timer msec and the Pause Time sec to the required values For instructions on configuring DTMF Out Dial on different Trunk types see CO Trunks Mobile Trunks SIP Trunks ...

Страница 1084: ...1074 Matrix NAVAN CNX200 System Manual If required you may configure the Call Proceeding Tone for Multi stage Dialing as Network tone Pseudo Tone or Silent For instructions see System Parameters ...

Страница 1085: ...s disconnected The receive path remains connected So A will be able to hear B but B will not be able to hear the conversation between A and C When A has finished consulting C to resume speech with B A presses the Mute key again The transmit speech path from A to B is restored A and B are in speech again How to use For Extended IP Phone Users To mute a call before making the call Press the Mute key...

Страница 1086: ...1076 Matrix NAVAN CNX200 System Manual To resume outgoing speech Press Flash Key Dial 1052 ...

Страница 1087: ...he extension user to place the handset of the phone correctly If the extension phone is an SLT OFF Hook Alert will be given to the Operator phone only The Operator phone must be an Extended IP Phone If the extension phone is a Extended IP Phone OFF Hook Alert will be give to both the Operator phone and the extension phone If the extension phone that is OFF Hook is Extended IP Phone the NAVAN will ...

Страница 1088: ...x NAVAN CNX200 System Manual Go to the parameter Give OFF Hook Alert to Operator select the check box to enable the flag Click Submit to save the change Log out of Jeeves or continue with configuring as required ...

Страница 1089: ...the fixed destination extension number for One Touch Transfer Extension C starts ringing A answers the call ringing on extension C Speech is established between extension C and B Extension A is disconnected How to configure To access this feature Make sure that Basic Features are enabled in the Class of Service assigned to you For instructions see Class of Service in SIP Extensions Make sure you h...

Страница 1090: ... down the Local Menu of the phone Select One Touch Transfer by pressing the Enter Key Select Set Transfer Number by pressing the Enter Key Enter the fixed destination extension number on which you want the call to be transferred You get the confirmation tone How to use For Extended IP Phone Users To use One Touch Transfer During an ongoing call press the DSS Key assigned to One Touch Transfer The ...

Страница 1091: ...same Paging is a one way communication As the mic of the paged extensions is muted during Paging the users of the paged extensions cannot speak to the paging extension How it works The Pre requisites Page Zones must be created You can create 12 different Page Zones The SIP extensions which are to be paged must be included in the Page Zones You can create 12 different Page Zones Each Page Zone acco...

Страница 1092: ... extensions in each Page Zone For each Page Zone number decide and assign the SIP extensions On a sheet of paper create a two column table for each page zone as shown below Write the numbers of the SIP extensions you want to include in the page zone in the member column Page Zone 1 Page Zone 2 Now program Page Zones using Jeeves To configure Page Zones Log into Jeeves as System Engineer Click the ...

Страница 1093: ...es you created on paper For each Index number select a Member extension Select the extension number you want to include in this Page Zone Default None Click Submit to save your Page Zone settings To configure another Page Zone click the Page Zone number tab In the new Page Zone select the member extensions Click Submit to save If you have finished configuring Page Zones you may log out ...

Страница 1094: ... from a SLT and SIP Extension For Extended IP Phone Users Press DSS Key assigned to Paging OR Dial 1074 Enter Page Zone Number on the prompt on your phone s display On the prompt Start Paging Page Zone Number make your announcement Go ON Hook at the end of your announcement For SLT Users Lift the handset You get dial tone Dial 1074 Page Zone Number Start your announcement Replace the handset after...

Страница 1095: ...o call before making the call or when their call is not answered How it works Publishing Presence Any SLT SIP Extension User can publish their presence by setting any of the messages listed in the following on their phone by dialing the access code for this feature SIP Extension users who want to publish their presence have two options Using the PUBLISH feature supported by the SIP Client Using th...

Страница 1096: ...e extension phone to be ON Hook it indicates the status of the phone to other extensions idle b On the Phone When the system detects the phone to be OFF Hook or in speech with another party or if it detects an incoming call placed on the phone it will indicate to the other extensions that this extension user is On the Phone with another party c DND Text message When the system detects that the ext...

Страница 1097: ...hone is equipped with a CLI display can see the status of another extension by dialing a feature access code then going ON Hook The system will ring back the SLT and send the Presence status of the desired extension as CLI SIP extension users can use the Presence feature of NAVAN to view the presence status of other extensions For this they must dial the feature access code and the number of the d...

Страница 1098: ... necessary if they want to view presence using the feature of NAVAN Publish Messages It is possible to customize the Publish Messages listed above from 6 to 9 viz I am Mobile In Meeting Out for Meal Out of Office Log into Jeeves as System Engineer Click the PBX Settings tab On the left navigation bar click the System Parameters link Scroll to Display Presence Status during Call on Extended IP Phon...

Страница 1099: ... string may consist of a maximum of 16 characters Click Submit at the bottom of the page to save your settings Click the SIP Extensions link under the Extensions Tab Now go to the desired SIP Extension number for which you want to enable the features PUBLISH and Presence Subscription Click VoIP to expand options ...

Страница 1100: ...ystem Administrator mode For Extended IP Phone Users Publishing Presence by Extension User Press DSS Key assigned to PUBLISH presence OR Dial 104 Enter User Password on the prompt Scroll to the desired Publish message from the menu Absent Present Auto Detect Away On the Phone Do Not Disturb I am Mobile In Meeting Out for Meal Out of Office Press Enter key to select message You get the confirmatory...

Страница 1101: ...ill be displayed on your phone s LCD Go ON Hook For SLT Users Publishing Presence by Extension User Lift the handset Dial 104 Password Index Number Replace handset Publishing Presence from SA Mode Lift the handset Dial 1072 014 Extension Number Index Number Index No Meaning 0 Absent 1 Present 2 Auto Detect 3 Away 4 On the Phone 5 Do Not Disturb 6 I am Mobile 7 In Meeting 8 Out for Meal 9 Out of Of...

Страница 1102: ... if your SLT has a CLI display Lift handset Dial 1097 Extension Number You get confirmation tone Go ON Hook during confirmation tone Your phone will ring and the status of the extension number you dialed will be displayed on your phone as CLI 5 Do Not Disturb 6 I am Mobile 7 In Meeting 8 Out for Meal 9 Out of Office Index No Meaning ...

Страница 1103: ...rupt Request or Barge In Extension C s call will be blocked and C will get error tone Now Extension A has set DND and Extension B attempts to override it using DND Override Since A has Privacy from DND Override B s call will be blocked and B will get error tone Privacy from Raid This type of Privacy protects an extension from intrusions by other extensions using Raid For example This type of Priva...

Страница 1104: ... So none of the extensions can raid the other You may disable this feature on extension which you want to protect from Raid By default Privacy from Interrupt Request Barge In and DND Override are disabled in the Class of Service of all Extension types You may enable this feature on extensions which you want to protect from intrusions using any of these features By default Privacy from Built In Aut...

Страница 1105: ...ate trunk lines trunk lines dedicated as help lines or emergency trunks or trunks designated as hotlines can be assigned greater priority How it works Priority can be assigned to all Trunk types Analog Mobile SIP and Extension types SLT SIP To understand how this feature works consider this illustration Priority Level Meaning 1 None 2 Lowest 3 Lower 4 Low 5 Normal 6 Medium 7 High 8 Higher 9 Highes...

Страница 1106: ...ll on Mobile Trunk 1 will be answered Though Mobile Trunk 1 and SIP Extension 301 have the same priority 7 Mobile Trunk 1 will be answered first following the chronological order When the Operator goes On hook after answering the call on Mobile Trunk 1 the call from SIP Extension 301 will be placed on the Operator phone with a Priority Ring programmable default Triple Ring When the Operator goes O...

Страница 1107: ...u can assign Priority to Trunks and Extension by configuring this parameter on the desired Trunk or Extension port type You can also configure Priority Ring if required See Distinctive Rings To select Priority for Trunks and Extensions Log into Jeeves as System Engineer Selecting Priority for Trunks Click the Trunks tab On the left navigation bar click the link of the desired Trunk type CO Trunks ...

Страница 1108: ...ult 9 Highest for all Trunk Types Click Submit to save Selecting Priority for Extensions Click the Extensions tab On the left navigation bar click the link of the desired Extension type SLT Extensions SIP Extensions for Extended IP Phone Settings When the page of the respective Extension type opens click the tab of the Extension number on which you want to set Priority ...

Страница 1109: ...k the More link to view additional parameters on this page Select a Priority level from 1 to 9 for the Extension Default 5 Normal for all Extensions Extensions designated as Operator can be assigned higher priority than other extensions Click Submit to save ...

Страница 1110: ... DSS Key How to configure See Abbreviated Dialing for instructions on configuring and assigning the Personal and Global Directories To assign the Short Codes or Abbreviated Numbers to be used for Quick Dial on DSS keys for each Extended IP Phone extension List down the numbers from the Personal Directory and Global Directory to be used for Quick Dial If the number is from the Personal Directory as...

Страница 1111: ...Matrix NAVAN CNX200 System Manual 1101 How to use For Extended IP Phone Users Press the DSS key assigned to the Quick Dial numbers The number will be dialed out Talk when the called party answers ...

Страница 1112: ...onnects two way speech is established between the remaining parties Feature Interactions Raid works only if the dialed extension is busy in two way speech The two way speech may be with another extension or with an external number on a trunk You cannot Raid on Trunks i e the external number which is in two way speech with an extension In this case C can raid the conversation between A and B but no...

Страница 1113: ... different Extension types By default beep is played as a warning to the extension being raided If required you may disable the beep played during Raid by clearing the Play Beep when Raid Call Taping Conversation Recording starts check box in the System Parameters page See System Parameters for instructions How to use For Extended IP Phone Users When dialed extension is busy Press DSS Key assigned...

Страница 1114: ...1104 Matrix NAVAN CNX200 System Manual For SLT Users When dialed extension is busy Dial 5 on Busy Tone ...

Страница 1115: ...ally made the call This can be overcome if NAVAN is able to route the returned call to the original caller s extension NAVAN makes this possible with the Return Call to Original Caller feature This feature is supported on Mobile and SIP Trunks RCOC is not supported when calls are made from Analog trunks due to the signaling limitations of Analog trunks How it works The Prerequisites RCOC must be e...

Страница 1116: ...hich the call was made check box in the System Parameters page Whenever there is an incoming call on any trunk the system checks the Apply RCOC only if the caller calls back on the same trunk from which the call was made flag in the System Parameters page If enabled the system matches the Trunk Port number and the Trunk Port type of the incoming call with the entry stored in the RCOC Table If disa...

Страница 1117: ...l check the RCOC Table If a matching record entry is found the system routes the call to the original caller and clears the record entry from the RCOC Table How to configure For this feature to work it must be enabled on the Trunk and in the Class of Service of the extensions See Enabling RCOC on Trunk and Enabling RCOC in Class of Service below for instructions If desired the related Timers the R...

Страница 1118: ...this feature on the desired trunk port Click Submit at the bottom of the page to save changes Similarly you can enable this feature on Mobile Ports also You may log out of Jeeves Enabling RCOC in Class of Service By default the RCOC feature is enabled in the Class of Service CoS of all extensions of NAVAN So all extensions of NAVAN are by default allowed this feature ...

Страница 1119: ... VMS module installed in it NAVAN can register as many as 48 Reminders set by the Operator and extension users How it works Personalized Reminder When the Reminder call serving mechanism is configured as Personalized The Operator Phone rings first156 displaying the number of the extension to which the reminder call is to be served When the Operator answers this call a call is placed on the extensi...

Страница 1120: ... attempts in all 3 attempts at an interval of 5 minutes between each attempt to call the extension If all Reminder call attempts go unanswered the NAVAN places the call on the Operator Phone The Operator Phone rings till the end of the Alarm Ring Timer The Operator Phone displays the number of the extension with the message No Reply The Reminder call is now considered as served If the extension ph...

Страница 1121: ...inders set by Operator as well as extension users appears on this page with details of time hours and minutes and serving mechanism personalized automated The Operator can view the Reminder report whenever required and can also print this report How to configure The configuration of Reminders is the same as Alarms To configure Reminders feature do the following Select the Alarm Notification Type f...

Страница 1122: ... 164 Follow Voice Mail System prompts For SLT Users Pick up the handset Dial 164 Follow Voice Mail System Prompts Replace handset If the SLT of the extension user has a special Reminder function key s he can set the reminder using this key For SLT with Reminder Key Press Reminder key the label on the SLT may differ from model to model Follow the Voice Mail System prompts to set cancel reminders SL...

Страница 1123: ...r Automated Press Enter key to set Reminder You get a confirmation tone and message To cancel Reminder set for the extension user Press key assigned for Remote Reminder function OR Dial 1072 033 Enter Extension Number Select Cancel All Press Enter Key For SLT To set Reminder for an extension Lift handset Dial 1072 033 Dial Extension Number Dial Date and Time in the format DDMMYYYYHHMM OR MMDDYYYYH...

Страница 1124: ...nsion Users For Extended IP Phone Users To set Reminder Press the Reminder key OR Dial 162 Enter Date and Time in the format DD MM YYYY HH MM OR MM DD YYYY HH MM users in USA Press Enter key You get a confirmatory text message and confirmation tone Go Idle To cancel Reminder Press Reminder Key again OR Dial 162 Select Cancel All Press Enter Key For SLT Users To set Reminder Lift handset Dial 162 D...

Страница 1125: ...can view the status of Reminders that are yet to be served from the System Administrator pages of Jeeves To view Reminder Status Log into Jeeves as System Administrator Click the Reports tab On the left navigation bar click the Reminders link The unserved Reminders appear on the page To cancel any of the unserved Reminders Select the Cancel Reminder check box of the extension number for which you ...

Страница 1126: ...he Cancel Selected Reminders button at the bottom of the page An alert message will appear Click the OK button The selected reminder will be deleted To print this page click the Print button Click Close to exit the page Click Logout to exit SA mode ...

Страница 1127: ... an Extended IP Phone at the desired location A can activate Room Monitor A can activate Room Monitor only if the Extended IP Phone at the desired location is idle When A activates Room Monitor the microphone of the Extended IP Phone on the ground floor is turned on A can now hear all the sounds taking place on the ground floor without anyone present there coming to know that they are being monito...

Страница 1128: ... For Extended IP Phone Users To enable Room Monitor on an extension Press the DSS Key assigned to Room Monitor Dial Extension Number to be monitored OR Dial 1073 Extension Number to be monitored For SLT Users Dial 1073 Extension Number to be monitored ...

Страница 1129: ...e following access codes are assigned to each Port Type Here Extension A must dial 69 25 01 where 69 is the feature code for Selective Trunk Access 25 is the port access code for the Mobile Port and 01 is the number of the Mobile Port which A wants to access Similarly if Extension A wants to access SIP Extension 10 A must dial 69 34 010 How to configure To be able to use Selective Port Access exte...

Страница 1130: ...ers To enable Selective Port Access on an extension Press DSS key assigned to Selective Port Access code OR Dial 69 Port Type Port Number Dial 89 Port Type Port Number for users in USA For SLT Users Dial 69 Port Type Port Number Dial 89 Port Type Port Number for users in USA ...

Страница 1131: ...own extension You can check the ringing volume of your extension phone How to use For Extended IP Phone Users Go OFF Hook Press DSS Key assigned to Self Ring Test OR Dial 1057 Go ON Hook Your phone rings Go OFF Hook to stop the ring Go ON Hook For SLT Users Lift the receiver Dial 1057 Replace receiver Your phone rings Lift the receiver to stop the ring Replace the receiver ...

Страница 1132: ...eve that call How it works NAVAN supports up to 10 call appearances on SIP extensions The number of call appearances that will be shared by the SIP Phones will depend on the number of call appearances you have configured for the SIP extension To provide SCA to the Open Standard IP Phones registered with the same ID the Shared Call Appearance flag must be enabled in the SIP Extension Settings of NA...

Страница 1133: ...n as Active when the call is answered B and C will not be able to make or receive a call from Call Appearance 2 A can put an Active call on public Hold or on private Hold When A puts an Active call on public hold NAVAN presents the state of this call as Held to A B and C Now B or C can retrieve the call by pressing the corresponding call appearance key When A puts an Active call on private Hold NA...

Страница 1134: ...gineer and the System Administrator thus preventing possible misuse of the features and facilities Admin Password For Accessing Jeeves The password can be a minimum of 4 characters to a maximum of 16 characters As this password is meant for restricting access to the Admin mode it must be kept strictly confidential to the Admin The default Admin Password is admin Changing the Admin Password using J...

Страница 1135: ... Engineer SE Password For Accessing Jeeves The password can be a minimum of 4 characters to a maximum of 16 characters As this password is meant for restricting access to the SE mode it must be kept strictly confidential to the System Engineer The default SE Password is 1234 The SE password is stored in the CPU If you forget the SE password the only way to restore the default SE password is to cha...

Страница 1136: ... can change the SE password again using the Jeeves When the Reset switch is pressed to restore the Default SE Password several other parameters of NAVAN are also set to default values So it is recommended to take proper precaution before using the Reset switch for any reason since it may result in defaulting some of the pages already configured For more details refer Using the Reset Switch System ...

Страница 1137: ... Change Password Under Change SA Extension Password Enter New Password The new password can be a minimum of 4 digits to a maximum of 12 digits The default SE Password is 1234 The default SA Password is 1111 Re enter New Password to confirm Click Submit button to save your new SA password You may log out of Jeeves Forgot the SA Password In case the System Administrator has forgotten the password a ...

Страница 1138: ...assword to confirm Click Submit button to save your new password You may log out of Jeeves User Password Extension Users can secure their respective extensions from unauthorized use with a password unique to each extension The User password too is a combination of any four digits The default User Password is 1111 which each user can change from their respective extensions Refer the topic User Pass...

Страница 1139: ...sers forget to lock their extensions and are away from their desks In such situations the System Administrator can protect the extension from unauthorized access and use by a locking the Keypad the extension phone This is possible only on Extended IP Phones b setting the User Status for the extension as Absent possible on Extended IP Phones and SLT extensions Read the feature description User Abse...

Страница 1140: ...Call Log Contact Call Forward Dynamic Lock User Status DND Call Cost Display Hotline Alarm Change User Password will not be accessible by the extension user Click Submit button Log out of Jeeves Extension users can also set their status as Absent or Present from their respective extension phones Refer User Absent Present Extended IP Phone extension users can also lock the keypad of their phones fr...

Страница 1141: ...one in the idle state During working hours in the idle state the phone display will look like this During Non working hours in the idle state the phone display will look like this During Non working hours in the idle state if the extension user has set User Absent and activated Keypad Lock on the phone the phone display will look like this Mon 20 DEC 16 58 303 Reception 2 Mon 20 DEC 16 58 N 303 Re...

Страница 1142: ...oming calls for the Day Break and Night So you can enable Trunk Auto Answer on a CO Mobile or SIP trunk only if you have selected Operator or Extensions as the destination for incoming calls on that trunk NAVAN handles incoming calls on the trunk according to the type of Trunk Auto Answer selected for the trunk For all Calls or When Busy or Delayed When Trunk Auto Answer For all Calls is enabled o...

Страница 1143: ...tendant Inactivity Timer If any of the landing destinations is free before the expiry of the Built In Auto Attendant Inactivity Timer the system places the call on that destination If none of the landing destinations is free at the end of the Built In Auto Attendant Inactivity Timer the system plays the Trunk Auto Answer Busy Bye message if assigned and releases the trunk port If the Busy Bye mess...

Страница 1144: ...of the Built In Auto Attendant Inactivity Timer the system plays the Trunk Auto Answer Busy Bye message and releases the trunk port If no Trunk Auto Answer Busy Bye message is assigned the system plays the Busy Tone for the duration of the Busy Tone Timer and releases the trunk port How to configure For this feature to work you must do the following 1 Enable Trunk Auto Answer on the CO Trunk Mobil...

Страница 1145: ...age for the Day Break and Night You may select different Greeting Ring Back Tone and Busy Bye Message for each time zone For detailed instructions see CO Trunks Mobile Trunks and SIP Trunks 2 Configure the Trunk Auto Answer related Timers if required The following Timers are of relevance to the Trunk Auto Answer Feature The Built In Auto Attendant Inactivity Timer default 60 seconds The Ring Back ...

Страница 1146: ...es you can record four different messages See the topic Voice Message Applications for instructions on recording and assigning voice modules to greeting messages If you do not want to use messages you may select the options Music on Hold or Do not Play any message ...

Страница 1147: ...th A NAVAN plays Beeps to B to indicate the call waiting To answer the waiting call B may dial Flash or press the HOLD key B will be connected to the caller A will be put on hold When there is an incoming call on a trunk for A but A is busy on another call A will not be provided any indication of the waiting call How to configure For Trunk Call Waiting to work on an extension it must be enabled in...

Страница 1148: ...nk lines for the desired duration To do this Extension A grabs a trunk by dialing the Trunk Access Code The Trunk is busy Extension A dials the feature access code for Trunk Reservation Access Code for the busy trunk As soon as the trunk is free A s extension rings A answers the call and gets connected to the trunk and gets dial tone A can now make as many calls as required The trunk remains reser...

Страница 1149: ...r the Day and Night Break time as required See SLT Extensions and SIP Extensions for instructions on configuring Class of Service of different extension port types If you want to increase or decrease the duration of the Trunk Reservation Timer Log into Jeeves as System Engineer Click the PBX Settings tab On the left navigation bar click the System Timers and Counts link ...

Страница 1150: ... 255 minutes Click Submit to save How to use For Extended IP Phone Users To set Trunk Reservation when Trunk you access is busy Press DSS Key assigned to Trunk Reservation OR Dial 6 on Busy Tone To release a reserved Trunk wait for the Timer to expire or cancel Trunk Reservation manually To cancel Trunk Reservation Manually Press DSS Key assigned to Trunk Reservation OR Dial 102 ...

Страница 1151: ...X200 System Manual 1141 For SLT Users To set Trunk Reservation when Trunk you access is busy Lift handset Dial 6 on Busy Tone Replace handset To cancel Trunk Reservation Manually Lift handset Dial 102 Replace handset ...

Страница 1152: ...so block external calls There are more options for indicating availability to other extensions Refer the topic Presence to know more How it works When an extension user of Extended IP Phone sets User Absent the letter A appears on the phone s display The letter A disappears when the extension user sets User Present When an extension user of Extended IP Phone calls the extension which has set User ...

Страница 1153: ...nt on your extension Dial 104 User Password 1 For System Administrator To set User Absent on an extension Dial 1072 014 Extension Number 0 To set User Present on an extension Dial 1072 014 Extension Number 1 The System Administrator can also set an extension as Absent Present using Jeeves For instructions read Additional Security to Extension Users ...

Страница 1154: ...user to use the default User Password whereas in the case of others the system will not allow feature access without changing the User Password In the case of Hot Desking the default password will work only for one extension involved The User Password for an extension can be changed only from that extension phone only Since the Mailbox can be accessed using the default User Password extension user...

Страница 1155: ...Matrix NAVAN CNX200 System Manual 1145 Dial New User Password You get confirmation tone Replace handset Extended IP Phone ...

Страница 1156: ...cluding profile level H 263 MPEG4 H 264 bandwidth standard annexes frame rate image size must be conformed between the communicating video terminals NAVAN will not modify or alter any of these attributes which can effect the characteristics of the video stream during communication For a video call two VoIP channels of NAVAN will be consumed During the entire video call those VoIP channels are rese...

Страница 1157: ... the access code the other two parties are connected but the call is converted into an audio call Auto Call Back ACB No Reply You cannot access ACB No Reply when you try to initiate a video call and the called party is ringing Forced Answer You cannot access Forced Answer when you try to initiate a video call and the called party is ringing To dial Flash make sure your IP Phone supports Flash dial...

Страница 1158: ... record a Voice Module with the desired help message and then assign the recorded Voice Module to the Voice Help application For instructions read the topic Voice Message Applications The Voice Module on which you will record the message has a duration of 16 seconds maximum The length of your help message must be within this limit or the message will be truncated when you record How to use For Ext...

Страница 1159: ...6 seconds each or less in a Voice Module When the recorded voice modules are assigned to the features applications they are played to the callers extension users whenever the feature application is activated Depending on the feature application the voice message recorded in the voice modules are played once or continuously At a time the system can play four voice modules simultaneously to external...

Страница 1160: ...endant Conference Number159 Message Please dial the Conference Number Built In Auto Attendant Conference Password Message Please dial the Conference Password Built In Auto Attendant Call Transfer to Operator Transferring the call to the Operator This message is played to the caller when he does not dial any number and the call is transferred to the Operator Voice Message for Features Alarms A voic...

Страница 1161: ...Dial Tone Message can be used to prompt them to dial the number For example Please dial the number Voice Message for Ring Back Tone When a caller dials an extension if the extension is free the caller gets a Ring Back Tone Instead of the Ring Back Tone the caller can be played a message like The dialed extension is ringing Voice message for Busy Tone When a caller dials an extension if the extensi...

Страница 1162: ...User Greeting1 and Greeting2 are played followed by dial tone Voice Guidance Time Based Greetings NAVAN supports 3 time based greetings Morning Afternoon Evening greetings Messages like Good Morning Good Afternoon Good Evening can be recorded These time based greetings are played to callers before the Built In Auto Attendant Greetings Message on a Built In Auto Attendant enabled trunk On an Auto A...

Страница 1163: ...n reassign the default Voice Modules to other Voice Message Applications as required Voice Module Number Voice Message Application Voice Message 01 Music On Hold 02 Morning Greeting Built In Auto Attendant Good Morning 03 Afternoon Greeting Built In Auto Attendant Good Afternoon 04 Evening Greeting Built In Auto Attendant Good Evening 05 Built In Auto Attendant Welcome Greeting for Day Time Workin...

Страница 1164: ...28 kbps Audio Sample Size 16 bit Channels 1 mono Audio Sample Rate 8 KHz Audio Format PCM The name of the file must not consist of any space For example the name of the file cannot be Greeting Message1 It must be GreetingMessage1 The messages must not exceed 16 seconds Any wav file present in Voice Module folder through system FTP shall have file size less than 350KB If you copy any wav file havin...

Страница 1165: ...odules link located at the bottom of the page Enter your SE password The FTP window opens containing all the voice module folders Each Voice Module Number has a separate folder The folder name indicates the Voice Module number Click the folder to view the existing audio files in the folder ...

Страница 1166: ... CNX200 System Manual To upload a Voice Message on a Voice module right click the desired Voice Module folder and select the Open Link in FireFTP option from the right click menu Log in to FireFTP with your SE password ...

Страница 1167: ... have saved your Voice Prompt audio files on your computer Browse for the folder where you have saved the Voice Modules and click OK The folders and files on the computer appear on the left The FireFTP pane on the right displays the existing file in the Voice Module folder Delete the existing audio file in the folder of the FireFTP ...

Страница 1168: ...1158 Matrix NAVAN CNX200 System Manual To copy the audio file from the location it is saved on the computer select the file and click the Upload Arrow The file you selected appears on FireFTP window ...

Страница 1169: ...nual 1159 Repeat the same to select other audio files Close the FTP window by clicking x of the FireFTP tab Return to the Voice Message Applications page on Jeeves The voice message you assigned to the Voice Module will be uploaded ...

Страница 1170: ...ically detects and displays the duration of the voice message you recorded So you need not define the duration However you may define the duration or change the duration of a recorded Voice Module manually if you want the recorded voice message to be played for a specific duration For example the message you recorded in the voice module 14 for Alarm Notification is 16 seconds long but you want to ...

Страница 1171: ... Ethernet Port LAN or WAN as applicable of NAVAN in the Address bar For example ftp 192 168 101 243 Click Go or Press Enter key on your keyboard The Log on as window of the FTP server opens In the Password field enter the SE password default 1234 and click the Log On button ...

Страница 1172: ...ign the Voice Module Number to the desired Voice Message Application Click Submit to save your settings You may Logout of Jeeves now Converting the Default MoH file into Respective Codec s Format If the RTP Mode is set as RTP Relay or Direct RTP the system plays a different MoH file which is separate from the default MoH already present in the system This different MoH file is created by convertin...

Страница 1173: ... Ethernet Port LAN or WAN as applicable of NAVAN in the Address bar For example ftp 192 168 101 243 Click Go or Press Enter key on your keyboard The Log on as window of the FTP server opens In the Password field enter the SE password default 1234 and click the Log On button ...

Страница 1174: ... files on your local drive Now log into FTP server of NAVAN as per instructions mentioned above Open the voicemodule folder It contains a folder naming MoH_RTPRelay Open this folder Paste all the files sent from Matrix Support within this folder Wait until all the files are transferred properly When you are done reboot your system NAVAN automatically checks the validity of these converted MoH file...

Страница 1175: ...tension port parameters as Walk out automatically on completion of call Or Walk out on user request Walk In Class of Service is protected with the User Password To be able to use this feature extension users must first change the default User Password 1111 How it works With the help of this illustration let us understand how Walk in Class of Service works In this illustration Extension user A has ...

Страница 1176: ...tension 201 has Walk out on user request selected as the Walk Out Mode for the extension extension user A must manually walk out by dialing the feature code for Walk Out If Extension user A does not Walk Out the system will perform a walk out for A only when another extension user walks into extension 201 At a time only one extension user can walk in to another extension Calls made after walk in w...

Страница 1177: ...e Source Extension 301 The following set of features of the Destination Extension will remain unaffected Key map Language Priority Call Pick Up group Personal Directory CAUTION There is a risk of fraudulent calls being made from your extension if a third party comes to know the User Password of your extension The cost of such fraudulent calls will have to be borne by the owner of NAVAN So protect ...

Страница 1178: ...NAVAN CNX200 System Manual Click the link of the extension type SLT Extensions SIP Extensions The page of the selected extension type opens To select an extension number on the page select the Extension Number tab ...

Страница 1179: ...ded IP Phone Users To perform a Walk In on the Destination Extension Press DSS Key assigned to Walk In Class of Service if programmed OR Dial 111 Select Walk in and press Enter key You get the prompt Walk in from which Station Dial your extension number You get the prompt Enter your User Password Dial your User Password default password will not be accepted You get the confirmation message Walked ...

Страница 1180: ...e walked out of the Destination Extension when you go ON Hook after making a call or accessing a feature If the extension you are walking in has Walk out automatically on completion of call as the Walk Out mode and you go ON Hook before you make the call you will be Walked Out You must Walk In again For SLT Users To perform a Walk In Lift the handset of the Destination Extension Dial 111 1 Dial yo...

Страница 1181: ...ting wav When user press 0 VMS prompts Your Alarm is Acknowledged Acknowledge wav Daily Alarm with Snooze Off The VMS plays system greeting as per the time zone and the Extension Name followed by the message This is your Daily Wake up Call Music of 5 seconds DailyWake up Greeting wav Daily Alarm with Snooze On VMS plays system greeting as per time zone and the Extension Name followed by the messag...

Страница 1182: ...der When Alarm Verification is disabled the VMS will not confirm the alarm and reminder set by the extension user To configure Alarm Verification Log into Jeeves as System Engineer Click the PBX Settings tab On the left navigation bar click the System Parameters link On the System Parameters page click Alarm to expand Select the Voice Guided Alarm Verification check box to enable Alarm Verificatio...

Страница 1183: ...arm Dial 2 VMS responds with You have set Daily Wake up Alarm at DailyWakeupVeri wav followed by the prompt To Confirm Press 1 To Re enter Press 2 AlarmConf wav Dial 1 to confirm the time set for alarm VMS responds with Your Daily Wake up Alarm is set DailyWakeupSet wav followed by the prompt Thanks for using this Service Thankservice wav If no alarm is set the VMS responds with Sorry Your Wake Up...

Страница 1184: ...v VMS further responds with Thanks for using this Service Thankservice wav OR Dial 2 the VMS responds with You have set Automated Wake up alarm at AutoWakeupVeri wav followed by the prompt To Confirm Press 1 To Re enter Press 2 AlarmConf wav Dial 1 the VMS responds with Your Automated Wake up Alarm is set AutoWakeupSet wav followed by the prompt Thanks for using this Service Thankservice wav If al...

Страница 1185: ...S prompts You have not entered any input NoInput wav If invalid time is entered the VMS prompts You have entered invalid input InvalidInput wav Dial valid time VMS prompts You have set Reminder for ReminderVeri wav followed by the prompt To Confirm Press 1 To Re enter Press 2 AlarmConf wav Dial 1 to confirm the date and time set for Reminder the VMS responds with Your Reminder is set ReminderSet w...

Страница 1186: ...eminder is set PerReminderSet wav followed by the prompt Thanks for using this Service Thankservice wav If Reminder is not set the VMS responds with Sorry Your Reminder cannot be set Please call Operator for further assistance ReminderNoset wav VMS further responds with Thanks for using this Service Thankservice wav OR Dial 2 VMS responds with You have set Automated Reminder for AutoReminderVeri w...

Страница 1187: ... with Your message has been sent Msgsent wav If you press 1 the VMS prompts Record your message after the beep and press any digit to end Recmsg wav Follow the prompts If Message Verification is disabled the VMS will not offer to verify and re record your message Your message will be sent to all mailboxes and the VMS will respond with Your message has been sent Msgsent wav The length of the messag...

Страница 1188: ...nt takes the caller back to the Home Node Transfer when extension answers When the caller dials the extension number the VMS Auto Attendant transfers the call when the extension answers goes OFF Hook If the extension does not answer165 the VMS Auto Attendant transfers the call to the mailbox of the extension If no mailbox is assigned to the extension the VMS Auto Attendant takes the caller back to...

Страница 1189: ...s on each extension To select Call Transfer Type in the Voice Mail Auto Attendant parameter on the extensions and Department Groups for instructions See Voice Mail Auto Attendant under SLT Extensions See Voice Mail Auto Attendant under SIP Extensions For Department groups see the feature description for Department Call for instructions ...

Страница 1190: ...y the prompt Please dial the extension number or to dial by name press 7 To leave message press 6 To go to operator press 9 For more options press 0 To disconnect press Welmsg01 wav Dial valid extension number and talk Extension Users When you call the VMS by dialing 390 The VMS takes you to your mailbox Dial 0 to reach the home node VMS responds with a greeting followed by Welcome Message Welcome...

Страница 1191: ...uto Attendant answers the call The VMS greets the caller with the Greeting message followed by the Welcome Message Welcome Please dial the extension number Or to dial by name press 7 To leave message press 6 To go to operator press 9 For more options press 0 To disconnect press Welmsg01 wav The caller dial 7 VMS prompts Please enter first three letters of the name DialName wav The caller dials val...

Страница 1192: ...he selected extension Talk If the digits you dialed are invalid VMS prompts Sorry no match found Empty wav followed by the prompt Welcome Please dial the extension number Or to dial by name press 7 To leave message press 6 To go to operator press 9 For more options press 0 To disconnect press Welmsg01 wav Dial 7 and follow the prompts Extension users can use Dial by Name also to reach another exte...

Страница 1193: ...e this feature extension users must have Email based notification enabled in Voice Mail Settings To provide extension users Email based notification of new messages Log into Jeeves as System Engineer Click the Extensions tab On the left navigation bar click the link of the desired extension type SLT Extensions SIP Extensions The page of the selected extension type opens On this page select the ext...

Страница 1194: ...tification option Send without attachment or Send with attachment Default Do not send In the E mail Address field enter the email address of the extension user to which the notification for new messages should be sent Click Submit to save settings To configure the same feature on another extension click the desired extension number tab and follow the same steps as described above ...

Страница 1195: ...ime for each Time Zone Program the phone number to which the notification call is to be made from the corresponding extension page If the number is an external number configure the Trunk Access Code to be used for making the calls When Immediate is selected as the Type of notification A new message arrives in the mailbox of the extension user The system checks the preferred start and end time of t...

Страница 1196: ... configured in the time zone When Notification type is Scheduled notification call is made for all messages received before the start time configured in the time zone Where multiple time zones are configured notification call will be made at the start time of the next time zone How to configure For Voice Mail Notification via Call you need to configure Voice Mail Notification via Call parameters w...

Страница 1197: ...e you can set different time zones according to the user preferences Configure the following parameters against the Profile Number you select For Each Time Zone Time Zone 1 to 4 configure the Start Time and the End Time The valid range is 00 00 to 23 59 If you want to receive notifications on a holiday select the Notify on Holiday check box Click Submit to save changes Now assign the profile numbe...

Страница 1198: ...ge that was sent by the Sender and delivers it to the Sender s mailbox in the form of new message with the prompt This message was not delivered to Extension Name 5 seconds of the message with the Date and Time if enabled in Play Message Details How to use When you call the VMS by dialing 390 The VMS takes you to your mailbox VMS responds with You have n new messages followed by Enter your mailbox...

Страница 1199: ...end recording VMS prompts To re record the message press 1 to confirm press 2 RecAgain wav Dial 2 to confirm The VMS prompts To request read receipt press 1 to ignore read receipt press 2 Askcfrm wav Dial 1 or 2 VMS responds with Your message has been sent Msgsent wav Extension users must be careful in dialing destination numbers If invalid destination is entered then the VMS will clear all the en...

Страница 1200: ...eral Mailbox The extension user can access the General Mailbox if this feature is enabled in the Class of Service of the extension and the Password assigned to the General Mailbox if configured is known by the extension user How to configure To offer extension users the facility of the General Mailbox when their mailbox is full you must do the following Configure the When Mailbox is full option in...

Страница 1201: ...age VMS prompts Enter the Extension number for which you wish to leave message LeavemsgE wav The caller dials the desired extension number VMS prompts Record your message after the beep and press any digit to end Recmsg wav If no mailbox is assigned to the dialed extension number the VMS prompts Mailbox not assigned To disconnect press 1 To go to Home Position Press 0 NoMailbox wav The caller spea...

Страница 1202: ...e record the message press 1 to confirm press 2 RecAgain wav If Message Verification is disabled the VMS does not playback the recorded message and prompts Your message has been recorded and press hash pound to end If the extension you called is busy you may leave a message for another extension It is mandatory for the caller extension user to terminate the recording by dialing or the digit config...

Страница 1203: ...y the prompt Enter your mailbox password Enterpwd wav Enter your mailbox password The VMS checks the utilized mailbox memory if 80 of the mailbox memory has been consumed the VMS prompts the caller Your Mailbox is 80 Full Please Delete old messages of your mailbox MB80Full wav if 100 of the mailbox memory has been consumed the VMS prompts the caller Your Mailbox is Full Please Delete old messages ...

Страница 1204: ...s press 1 to listen old message press 2 to send a message press 3 to change your mailbox settings press 4 to go to home position press 0 Mmmm wav Dial 4 to go to Mailbox Settings The VMS responds with For Mailbox Name Press 1 For message redirection Press 2 To delete all old messages of your mailbox press 3 For Mailbox Greetings press 4 For Assistance Number press 5 For Personal Number press 6 To ...

Страница 1205: ...Make sure the Assistance Number is an extension number To programme Personal Mobile Alternative Number for your Mailbox Dial 6 VMS prompts Enter the Destination and dial hash to end MsgPhonel wav Any external number can be configured as the Personal Mobile Alternative Number To Redirect Messages in your Mailbox see Redirecting Messages To record personal greetings for your mailbox see Recording Pe...

Страница 1206: ...r configurable default 30 seconds When Extension A answers the call within this timer Extension A gets connected to the VMS The VMS answers the call and allows access to Extension A s mailbox If Extension A does not answer the Message Notification call within the Message Wait Timer the system will ring on the extension again for as many times as the Message Wait Ring Count configurable default 10 ...

Страница 1207: ...abled each time a caller or an extension user records a message the VMS offers to the caller extension user the option verify the recorded message and re record the message if they want When the caller extension user uses the option to verify and re record the message the VMS sends the message to the mailbox of the receiver How to configure By default Message Verification is enabled in the VMS So ...

Страница 1208: ...1198 Matrix NAVAN CNX200 System Manual By default Message Verification is enabled To disable Message Verification clear the check box Click Submit to save changes ...

Страница 1209: ...vered to Extension Name 5 seconds of the message How to use Call the VMS by dialing 390 The VMS takes you to your mailbox VMS responds with You have n new messages followed by the prompt Enter your mailbox password Enterpwd wav Enter your mailbox password VMS prompts You have n new no new messages Newmsgs wav Nonewmsg wav VMS prompts To listen to new messages press 1 to listen to old messages pres...

Страница 1210: ...umbers If invalid destination is entered then the VMS will clear all the entries and will ask the mailbox owner to re enter all the destinations again Once a valid destination number is entered and no more extensions are selected the VMS understands it to be the end of list and sends the message ...

Страница 1211: ...message redirection Press 2 To delete all old messages of your mailbox press 3 For Mailbox Greetings press 4 For Assistance Number press 5 For Personal Number press 6 To go to previous menu press 0 Chgmbset wav Dial 4 The VMS prompts For Personal Greetings press 1 For Conditional Greetings press 2 To go to previous menu press 0 MbGrt wav Dial 1 The VMS prompts For working hours greeting press 1 fo...

Страница 1212: ...ilbox Name Press 1 For message redirection Press 2 To delete all old messages of your mailbox press 3 For Mailbox Greetings press 4 For Assistance Number press 5 For Personal Number press 6 To go to previous menu press 0 Chgmbset wav Dial 4 The VMS prompts For Personal Greetings press 1 For Conditional Greetings press 2 To go to previous menu press 0 MbGrt wav Dial 2 The VMS prompts For Busy press...

Страница 1213: ...s wav Nonewmsg wav VMS prompts To listen to new messages press 1 to listen to old messages press 2 to send a message press 3 to change your mailbox settings press 4 to go to home position press 0 Mmmm wav 3 Dial 4 VMS prompts For Mailbox Name press 1 For message redirection press 2 To delete all old messages of your mailbox press 3 For Mailbox Greetings press 4 For Assistance Number press 5 For Pe...

Страница 1214: ...g messages for Department Groups Log into Jeeves as System Administrator Click the PBX Settings tab On the left navigation bar click the Department Group link Click the desired Department Group Number tab for which you want to set message redirection Click Redirect VMS Messages to expand In Redirect Messages to Extension enter the extension number on which you want the messages to be redirected Cl...

Страница 1215: ...l 1072 314 Source Station Code Destination Station Where Source Station is the Access Code of any SLT SIP Extension Department Group Destination Station is the Access Code of any SLT SIP Extension Department Group or General Mailbox Code is 0 to Cancel Message Redirection 1 is to Set Message Redirection Exit SA mode ...

Страница 1216: ...1206 Matrix NAVAN CNX200 System Manual ...

Страница 1217: ...for accessing the Jeeves the FTP Server used for uploading files into the system the Telnet Port used to access the system for maintenance To configure the Administrative Settings Log into Jeeves as System Engineer Click the Maintenance tab 166 HTTP Hyper Text Transport Protocol is the communication protocol used to connect to servers on the World Wide Web 167 HTTPS uses SSL Secured Socket Layer t...

Страница 1218: ...e will always be given to the Hostname during DNS Server resolution In such case it is recommended to change either the Hostname or the Domain Name in DNS Proxy table to fully utilize the DNS Proxy service of NAVAN For more details about DNS Proxy in NAVAN refer DNS Proxy In Web Server HTTP Port enter the HTTP Port number The valid value can be 80 or 88 or any value ranging from 1025 to 65535 Defa...

Страница 1219: ... accessing the Jeeves thus adding additional security measures for your system If the Web Server HTTPS Port is to be used in Web Server Certificate select the certificate If you want to allow users to access the system s FTP Server from the WAN Port select the FTP Server Access from WAN check box In FTP Server Port box enter the FTP Server Port The valid value can be 21 or any value ranging from 1...

Страница 1220: ...s to only user specific parameters hence if required you may change the default passwords The new password must not be less than 4 characters and it can have up to 12 characters To change the Passwords Log into Jeeves as System Engineer Click the Maintenance tab On the left navigation bar click the Change Password link Under Change SE Password Enter the new password in New Password Type the new pa...

Страница 1221: ... confirmation in Re Enter Password to Confirm Under Change Admin Password Enter the new password in New Password Type the new password again for confirmation in Re Enter Password to Confirm Click Submit to save To change the SA Password using SA Jeeves see System Security ...

Страница 1222: ...not To execute this process see Upgrade Firmware from Hosted Server Before you upgrade the firmware make sure the factory fitted Pen Drive has enough space for the new firmware Before firmware upgrade you may backup the system s latest configuration locally in your PC laptop See Backup Configuration for detailed information Later on you can easily restore that configuration once firmware has been ...

Страница 1223: ...rs System reboots automatically and you can start operating the system thereafter To confirm whether the firmware has been upgraded successfully refer Confirming Firmware Upgrade During the firmware upgrade process the system will reboot thus all active data connections and active calls if present will be terminated When the system restarts the System SYS LED Blinks for 2 to 3 minutes Do not begin...

Страница 1224: ...s This is required when you do not want to configure the system again and want the previously saved configuration to be restored Before configuration restore make sure that the Pen Drive is present in the system and it has sufficient space for the new configuration files To take a backup of the configuration refer the topic Backup Configuration Configuration Restore from the Jeeves To restore conf...

Страница 1225: ...onfiguration Management to expand Beside Backup Configuration click Backup You are prompted to save the configuration in zip format Save it to the desired location in your PC laptop The name of the zip file will be of the format Matrix_NavanConfig_ MACAddress_Of_NAVAN Auto Firmware Upgrade You can use Auto Firmware Upgrade to have the system automatically download the firmware stored at a central ...

Страница 1226: ... server returns the matrix_firmware html file Thereafter NAVAN compares its existing firmware s Version Revision with those received in the matrix_firmware html file and takes suitable action The table below describes a typical case and the corresponding action taken by the NAVAN After NAVAN decides the Version Revision of the firmware with which it needs to be upgraded it sends another GET reques...

Страница 1227: ...his field blank Also make sure that you have selected Connection Type as DHCP under Ethernet WAN parameters See Configuring Ethernet WAN Port under chapter Configuring Matrix NAVAN for Data Applications The DHCP server provides the Provisioning Server address in Option 224 The default Port differs as per the protocol you select For HTTP the default Port is 80 and for HTTPS the default Port is 443 ...

Страница 1228: ...23 and value of MM can range from 00 to 59 Configure the Request Timeout which is used when NAVAN tries to connect to the Provisioning Server for TCP TLS binding This timer specifies for how long NAVAN should wait for the successful binding over the requested protocol Its value can range from 01 to 99 seconds Default 60 seconds Click Submit to save changes To check the status of Auto Firmware Upgr...

Страница 1229: ...tab On the left navigation bar click the Firmware and Configuration Management link Check the last option Firmware Status The following information related to Firmware Upgrade process appears Current Firmware Version This field displays the current version and revision of NAVAN s firmware Last Upgraded On This field displays the firmware with which NAVAN last upgraded itself either through the Pro...

Страница 1230: ... this field remains blank Last time Auto Synchronized with Server This field displays the date in DD MM YYYY format and time in HH MM format when NAVAN last synchronized with the Provisioning Server for Auto Firmware Upgrade for new firmware upgrades If time is not available this field remains blank Status of Last Synchronization This field displays the status of last synchronization ...

Страница 1231: ...Syslog Client for System Activity Logs The Syslog Client enables the system to send activity logs in syslog format to the remote Syslog Server You can view the logs on the remote server How it works The Syslog Server address must be assigned to which the system can send the activity log If the System Administrator extension is an Extended IP Phone a DSS Key can be assigned for System Activity Log ...

Страница 1232: ...er is dialed by the system 14 DD MM YYYY HH MM SS Log In XXXX Station name User Status Present via Access Codes Date Time and Extension Number 15 DD MM YYYY HH MM SS Log Out XXXX Station name User Status Absent via Access Codes Date Time and Extension Number 16 DD MM YYYY HH MM SS Reg Fail Authentication PW Invalid SIPTrk TT SIP Trunk registration failure due to invalid Authentication Password 17 ...

Страница 1233: ...When less that 80 of the USB memory of VMS has been utilized 38 DSP Frame Sync error Slot SS Internal system DSP error 39 DSP Drop error Slot SS Internal system DSP error 40 DSP Time Out error Slot SS Internal system DSP error 41 DSP DMA Address error Slot SS Internal system DSP error 42 Message Notification Retry Count over for XXXXXX When Message notification via call is set as immediate and not...

Страница 1234: ... IP Address and the port of the remote Syslog Server The valid range of this port is 1025 to 65535 To generate System Activity Log Report i e offline whenever desired select Destination Port Default None In the Destination IP Address Port enter the IP Address and the port of the remote Syslog Server Click Submit to save settings You can start and stop System Activity Log Online and Report from the...

Страница 1235: ...top capturing the System Activity Log Online click the Abort button To start capturing the System Activity Log Report click the Start button To stop capturing the System Activity Log Report click the Abort button To clear System Activity Logs from the buffer click the Clear SAL button By default the online and offline reports are printed on the destination port assigned by you ...

Страница 1236: ...ick the View button System Activity Log appears on your screen To print this report on the local printer connected to your computer click the Print button An alert message will appear Click the OK button The System Activity Log Report will be printed on the local printer connected to your computer ...

Страница 1237: ...o start Dial 1072 024 0 to stop To start stop offline Report generation Dial 1072 023 1 to start Dial 1072 023 0 to stop To clear Activity Logs Dial 1072 022 Reverse SA Password Exit SA mode You may print the logs captured on the Syslog Server after suitable modification of the format The Online System Activity Log report would look like this 16 02 2011 16 51 48 VMS USB Memory 100 Full The Offline...

Страница 1238: ...P Phone as SIP Extension and Configuring Matrix SPARSH VP330 Extended IP Phone as SIP Extension To view the System Activity Log from System Administrator Mode Go Off hook Press the DSS key assigned to System Activity Log Display OR Dial 1072 009 The last recorded Activity log appears on your phone s display in this following format Date Time Activity Index The Date and Time are in DD MM YYYY HH MM...

Страница 1239: ...m Administrator extension is a Extended IP Phone a DSS Key can be assigned for System Fault Log Whenever a fault is detected the LED of the Fault Log DSS key if assigned is turned ON If more than one Extended IP extension is assigned Fault Log DSS Key the LED of all keys will be turned ON The System Administrator must acknowledge the Fault indication by pressing the Fault Log key or by dialing the...

Страница 1240: ... SIP Trunks while the other SIP Trunks functioning normally You need to restart the system to resolve the problem How to configure To be able to use this feature you must enable storage of Fault Logs and assign a Destination Port for the Fault Logs If the System Administrator phone is an Extended IP Phone you may assign a DSS key for System Fault Logs For instructions on assigning a feature to DSS...

Страница 1241: ...id range of this port is 1025 to 65535 To generate System Fault Log Report i e offline whenever desired select Destination Port Default None In the Destination IP Address Port enter the IP Address and the port of the remote Syslog Server Click Submit to save settings How to use You can start and stop System Fault Log Online and Report from the System Administrator mode using Jeeves or dialing SA C...

Страница 1242: ...Abort button To start capturing the System Fault Log Report click the Start button To stop capturing the System Fault Log Report click the Abort button To clear System Fault Logs from the buffer click the Clear SFL button By default the online and offline reports are printed on the destination port assigned by you To view System Fault Log on your computer screen click the View button System Fault ...

Страница 1243: ...tem Administrator mode To generate Fault logs from an extension phone Enter SA mode from a SLT Extended IP Phone To start stop Online fault log generation Dial 1072 028 1 to start Dial 1072 028 0 to stop To start stop offline Report generation Dial 1072 027 1 to start Dial 1072 027 0 to stop To clear Fault Logs Dial Exit SA mode You may print the logs captured on the Syslog Server after suitable m...

Страница 1244: ... EHLO Command Failed 09 AUTH CRAM MD5 Command Failed 10 CRAM MD5 Login Failed 11 AUTH LOGIN Command Failed 12 Invalid Username for LOGIN 13 Invalid Password for LOGIN 14 AUTH PLAIN Login Failed 15 Can t Open Attachment File 16 MAIL FROM Command Failed 17 RCPT TO Command Failed 18 DATA Command Failed 19 SMTP Mail Failed During final process to Prepare Mail 20 Mail Failed Wait For Server Response VM...

Страница 1245: ...Matrix NAVAN CNX200 System Manual 1235 57 The system does not have enough memory to make a copy of the message pointed to by msgp Error Code Error Description ...

Страница 1246: ...ult Log glows The System Administrator may press the DSS key or dial the System Fault Log feature access code to acknowledge it On pressing the DSS Key or dialing of the acknowledgment command the LED of the Fault Log key is turned OFF How to use To view the System Fault Log from System Administrator Mode Go Off hook Press the DSS key assigned to System Fault Log Display OR Dial 1072 010 The Fault...

Страница 1247: ... captured and stored in the NAVAN NAVAN also supports Filters and Promiscuous mode for capturing packets which you can use to specify the types of data packets to be captured How to use Using PCAP Trace for the interfaces of NAVAN To use PCAP Trace for the interfaces of NAVAN Log into Jeeves as System Engineer Click the Maintenance tab On the left navigation bar click the Troubleshooting link The ...

Страница 1248: ...e Promiscuous Mode check box if you want specific data packets to be captured When you enable Promiscuous mode the NAVAN will capture all network traffic However this will work only in a non switched environment When Promiscuous Mode flag is disabled the system will capture only traffic that is directly related to it Only traffic to from or routed through the NAVAN will be picked up by the PCAP Tr...

Страница 1249: ...trace file in the folder The current packets captured will not be deleted after you have saved the trace file The current packets will be deleted when you start the PCAP capture again You may log out of Jeeves Now you can open the trace files using Wireshark or Ethereal or any other similar software which supports opening of trace files Using PCAP Trace for SPARSH VP248 Matrix Extended IP Phone PC...

Страница 1250: ...ef ghi jkl mno pqrs tuv wxyz Voice Mail Call Back Cancel Forward DND Names Mute Conference Transfer Hold Release Redial CA04 CA03 CA02 CA01 1 2 3 4 5 6 7 8 9 0 abc def ghi jkl mno pqrs tuv wxyz Call Back Cancel Forward DND Names Mute Conference Transfer Hold Release Redial CA04 CA03 CA02 CA01 Local Menu Mon 10 MAY 15 40 2001 Reception L O C A L M E N U Net wo rk Parame ters Net wo rk Statu s NET W...

Страница 1251: ...CAP Enter the Local Menu of the phone again by pressing the DSS key Enter the Network Parameters submenu Select PCAP and press Enter The message Stop PCAP appears on your phone display Press Enter key You get the confirmation message Stopped NET WORK PARAM ETERS PPPo E Se rv ic e Na me Se rver Add re ss Se rver Port VLAN S etti ng CAP P PCAP T RACE Sta rt PCAP PCAP T RACE Sta rted PCAP T RACE Stop...

Страница 1252: ...P server of the phone You are not required to set any filters the phone captures all packets that it sends and receives To use PCAP Trace When the phone is in idle state press the DOWN key to access the Network Settings The cursor appears under Network Parameters Press Enter key to select Network Parameters The Network Parameters submenu appears Scroll with the DOWN navigation key to PCAP Press En...

Страница 1253: ...s the DOWN key to access the Network Settings The cursor appears under Network Parameters Press Enter key to select Network Parameters The Network Parameters submenu appears Scroll with the DOWN navigation key to PCAP and press Enter key The message Stop PCAP appears on your phone display Press Enter key You get the confirmation message Stopped Go idle ...

Страница 1254: ...FTP server opens In User Name type se lower case In Password enter the current User Password set for the phone Click Log on On successful login the FTP window will open You will see the different Configuration folders in this window Click the ramdisk folder In the ramdisk folder right click the trace pcap file and copy it on to your local disk Open the trace pcap file using Wireshark or Ethereal o...

Страница 1255: ... WAN connectivity during troubleshooting How to use Log into Jeeves as the System Engineer Click the Maintenance tab On the left navigation bar click the Troubleshooting link Click the Ping tab In Settings enter the Domain IP address of a remote host Select the Number of packets which signifies the number of ping packets to be sent to the remote host For example if you select 10 then the system wi...

Страница 1256: ...Wait for the system to stop pinging automatically once the configured Number of packets are sent to the remote host The Ping Statistics that is the reply received from the remote end is displayed within Result To clear the Result click Clear You may logout of the Jeeves ...

Страница 1257: ...provides you the facility to use traceroute either over ICMP or over UDP This provides an added advantage of successfully executing traceroute even if the intermediate routers block the ICMP packets resulting in failure of the traceroute operation over ICMP How to use Log into Jeeves as the System Engineer Click the Maintenance tab On the left navigation bar click the Troubleshooting link Click th...

Страница 1258: ...te host whose Domain Name or IP Address you have configured click Trace To stop tracing click Stop OR Wait for the system to stop tracing automatically The statistics of the process is displayed within Result To clear the Result click Clear You may logout of the Jeeves ...

Страница 1259: ... Syslog170 Client for debugging The Syslog Client enables the system to send debug messages in syslog format to the remote Syslog Server on the IP network You can view the system debug messages on the remote Syslog Server If remote Syslog Server is not available due to any reason still you can view the debug online in real time under the Web Jeeves and save the debug for future reference For detai...

Страница 1260: ...can enable the Debug for the SMS Server Parameters Select the check box of the respective parameter you want to debug SMTP Client POP3 Client SMS Record SMS Sender and the desired Mobile Port SMS Receiver and the desired Mobile Port SMS Server debug will be captured in the same Syslog Server IP Address and Port configured for Data Debug Voice Debug Select Ethernet as the Debug Port and specify the...

Страница 1261: ...S Debug In the Syslog Server IP Address Port field enter the server address and server port number where the debug log is to be sent The valid port number can be 514 or any number between 1025 to 65535 Select the application processes you want to debug VMS Application SMTP Configuration Transfer VoIP Ethernet Port Debug Select the Enable Debug check box to send debug to the Syslog server In the Sy...

Страница 1262: ...ers in the Start Port and End Port fields To debug a single port define the Start and End Port numbers as the same In the Debug field select Enable to start Port State debug I O Debug Select the Port Type for which you want to debug I O communication Mobile VoIP CO SLT VMS In the Start Port field enter the number of the selected Port Type from which the system should start debugging In the End Por...

Страница 1263: ... locally as per your requirement To view the debug under Jeeves Click the Online Debug button A new window pops up to display the online debug To start debug capture click the Start button A dialog pops up displaying the debug file name naming format of the file is Debug_ Current Time txt Click OK to confirm To view the updated debug logs on the screen click the Refresh button periodically ...

Страница 1264: ...orted by the system If you click the Start button again without saving the captured debug the older file along with all debug logs will be deleted and a newer file will be created So it is recommended to save the existing debug file locally before making any such action if you want to retain the captured debug If you want to clear the display area on the screen and delete the debug file which is s...

Страница 1265: ...tion The manager communicates with multiple SNMP Agents implemented in the network It generates SNMP requests and receives SNMP responses and notifications traps informs The SNMP Manager is an SNMP Client Managed device or the network element is a part of the network that requires some form of monitoring and management For example switches routers servers Management Information Base MIB is the com...

Страница 1266: ...the Manager must download and install the MIB files on the local disk To download these files Click the Click to download MIB button You will get a prompt with the option to open the file or save the file to a location Save the file on the local disk SNMP Settings Click SNMP Settings to expand Select the Enable SNMP check box Default Disabled ...

Страница 1267: ...essibility to the SNMP Manager You can select Any IP Address or Specific IP Addresses If Any IP Address is selected then Manager with any IP Address should be allowed to access the system SNMP Server If you want to restrict the accessibility of the SNMP Manager select Specific IP Addresses and configure the IP Addresses of specific Managers within the IP Addresses 1 to 5 Default Blank If SNMP vers...

Страница 1268: ...hentication Password for the User Name you have assigned The Authentication Password must be a minimum of 8 characters and may have up to 24 characters Default Blank When both Authentication and Privacy are required select Authentication with Privacy Incoming SNMP Message will require authentication and these messages will be encrypted which will be decrypted at the receivers end only If you selec...

Страница 1269: ...lowing parameters Select Enable Notification check box if you want NAVAN to generate Trap or Inform messages for error conditions Select the Notification Type You may select Trap or Inform If you want the system to send notification messages without acknowledgement select Trap If you want the system to send notification messages with acknowledgement select Inform If you select Inform as the Notifi...

Страница 1270: ...ou get notifications of errors information and warnings for events related to the Application Network Extension Trunk Ports CO Mobile SIP Trunks SMS Server SMS Gateway Voice Mail System VoIP and combined option for Data including VPN Wi Fi and Access Policy Refer to the table at the end of this topic for the event list You can choose the type of notification you want by setting the notification fi...

Страница 1271: ...re the system is installed The system is designed to work efficiently with the default settings So if the country region specific default settings match their requirements users may not even need to alter or customize the values of various parameters They may work with default settings for the most part customizing only some of the parameters to match their specific requirements The country specif...

Страница 1272: ...Canada Winnipeg GMT 06 00 Scheduled 5 03 English T3 0 9 6 030 Canada Calgary GMT 07 00 Scheduled 5 03 English T3 0 9 6 031 Canada Vancouver GMT 08 00 Scheduled 5 03 English T3 0 9 6 032 Chile GMT 04 00 Scheduled 6 Spanish 0 9 033 China GMT 08 00 08 English 0 9 034 Colombia GMT 05 00 Spanish 035 Costa Rica GMT 06 00 Spanish 036 Croatia GMT 01 00 English 037 Cuba GMT 05 00 Scheduled 18 Spanish 0 9 0...

Страница 1273: ...English 074 Mozambique GMT 02 00 Portuguese 075 Myanmar GMT 06 30 English 076 Namibia GMT 01 00 Scheduled 13 03 English T3 9 0 6 077 Nepal GMT 05 45 English 078 Netherlands GMT 01 00 English 079 New Zealand GMT 12 00 Scheduled 14 24 English 0 1 080 Nigeria GMT 01 00 English 081 Norway GMT 01 00 Scheduled 15 English 9 0 082 Oman GMT 04 00 English 083 Pakistan GMT 05 00 English 084 Paraguay GMT 04 0...

Страница 1274: ...ited States Chicago Dallas Des Moines Memphis Minneapolis New Orleans Oklahoma Omaha St Louis GMT 06 00 Scheduled 3 03 English T3 0 9 6 113 United States Albuquerque Boise Cheyenne Denver Salt Lake City GMT 07 00 Scheduled 3 03 English T3 0 9 6 114 United States Las Vegas Los Angeles Phoenix San Francisco Seattle GMT 08 00 Scheduled 3 03 English T3 0 9 6 115 United States Juneau GMT 09 00 Schedule...

Страница 1275: ...meters all the parameters on the LAN page of Jeeves WAN parameters all the parameters on the WAN page of Jeeves Certificate Management all the parameters on the Certificate Management page of Jeeves Date and Time DST parameters SNTP parameters Dial Tone Type CPTG Type Companding Algorithm A Law Law Voice Module System Activity Log System Fault Log SMDR SIM PIN of Mobile Network Parameters Hostname...

Страница 1276: ...d default settings The system counting down the seconds will appear on your screen You are returned to the Login page of Jeeves You may now enter SE mode again Without the SE Password you cannot restore default values via the software If you forget the SE Password you can restore the default SE Password using the Reset switch However if you use the Reset switch to default the SE password it will a...

Страница 1277: ...enance tab On the left navigation bar click the Restart the System link You will get the message This will restart the system Do you want to continue Click OK Enter Reverse SE Password on the prompt The SE password you enter must be the current password For Example if it is 1234 enter 4321 and click OK The system will restart ...

Страница 1278: ... and the Ethernet WAN Port of NAVAN do not clash and the PC and the Ethernet WAN Port of the NAVAN are in the same Subnet VMS Firmware Upgrade You can upload the VMS Firmware using the FTP To access the FTP and upgrade the VMS firmware individually without upgrading the System firmware follow the instructions as given for Windows FTP and FireFTP Upgrade in the topic Voice Message Applications When...

Страница 1279: ...ddress of the Ethernet WAN LAN Port of NAVAN in the Address bar as ftp 192 168 101 243 Click Go or Press Enter key on your keyboard The Log on as window of the FTP server opens In the Password field enter the SE password default 1234 and click the Log On button ...

Страница 1280: ...1270 Matrix NAVAN CNX200 System Manual All the System folders will be displayed Click the USB folder and then click the VmsCard folder Click the System_Data folder Click the Mailbox folder ...

Страница 1281: ...window These appear according to the Extension Numbers assigned to the users Click the desired extension users folder for example 206 Each Extension Users folder contains the following in wav format Extension Users Messages Customized Mailbox Greetings The recorded Station Name ...

Страница 1282: ...etailed instructions see Recording Voice Messages To upload customized System Greetings Messages Call Type Abbreviation File Format Serial number ddmmyyyy hhmm Call Type wav Extension Users Messages Call forward CF 002 03072010 1005 CF 616 wav Call Taping CT 005 15072010 1048 CT 616 629 wav Conversation Recording CR 010 11072010 1356 CR 2652630555 wav Broadcast Message BM 009 03212012 1005 BM 2001...

Страница 1283: ...lder to upload prompts responses open System Prompts and Responses folder The existing audio files with their unique names and wav extension appear Go to the location CD Pen Drive or Local disk where you have stored the custom voice messages Copy the custom message file e g click to copy Thankyou wav Return to the FTP window Click the desired folder The Thank you message is a response so open the ...

Страница 1284: ...file with the same file name you will be prompted if you want to replace the existing file Click OK The progress of file transfer will appear on your screen Follow the same procedure to copy other audio files Close the FTP window after the files are transferred ...

Страница 1285: ...5 seconds but less than 10 seconds to set following parameters to default values All parameters within the LAN page under the LAN WAN tab Web Server HTTP Port in the Administrative Settings page under the Maintenance tab Admin Password SE Password 2 Press the Reset switch for more than 10 seconds to set following parameters to default values All parameters within the LAN page under the LAN WAN tab...

Страница 1286: ...ing and DMZ pages under the Firewall Security tab All parameters within the Administrative Settings page under the Maintenance tab Admin Password SE Password If you press the Reset switch for more than 10 seconds then the system will restart along with restoring default settings for the above mentioned Jeeves pages parameters ...

Страница 1287: ...Matrix NAVAN CNX200 System Manual 1277 CHAPTER 24 System Status Network Status To view Network port Status Log into Jeeves as System Engineer Click the Status tab ...

Страница 1288: ...8 Matrix NAVAN CNX200 System Manual On the left navigation bar click the Network link You may log out of Jeeves You can also view Network Status on an Extended IP Phone extension by dialing system commands ...

Страница 1289: ... Log into Jeeves as System Engineer Click the Status tab On the left navigation bar click the System Details link System Details displays the current Firmware version revision of the system the Master and the modules of the NAVAN You may log out of Jeeves ...

Страница 1290: ...ivity To view the active channels and their activities Log into Jeeves as System Engineer Click the Status tab On the left navigation bar click the Call Activity link The page displays the status of the calls along with the ports and trunks involved ...

Страница 1291: ...sources To view Voice Mail Memory Status Log into Jeeves as System Engineer Click the Voice Mail IVR tab On the left navigation bar click the Status link Then click the VMS link The status of the Voice Mail Memory Status appears on your screen Voice Mail Memory Status Total Memory of the VMS in MB and Minutes Total Memory Consumed by Prompts and Responses in MB and Minutes Total Memory Allotted to...

Страница 1292: ...out the mailbox Extension Number This is the extension number you selected for viewing mailbox status Name This is the name assigned to the extension Personal Mailbox assigned If mailbox is assigned to the extension it displays Yes If no mailbox is assigned No will appear Mailbox Size minutes This is the size of the mailbox in minutes assigned to the extension Redirect Set It displays Yes if the e...

Страница 1293: ... extension or a range of extensions To delete messages using the SE mode The following page appears In the Delete Messages of Extensions From box enter the extension number from which you want the VMS to start deleting the messages In the To box enter the last extension number till which you want the VMS to delete the messages The valid digits are 0 to 9 and A combination of and cannot be used to ...

Страница 1294: ... list the Extension Names of the extension users and Personal Conditional Greetings will not be deleted To delete only Personal Conditional Greetings in Delete Voice Messages select No If you select the Delete Personal Greetings check box the Personal Greetings recorded for all the time zones will be deleted If you select the Delete Conditional Greetings check box the Conditional Greetings recorde...

Страница 1295: ...into Jeeves as System Administrator Click the Status tab On the left navigation bar click the VMS link Check Delete Voice Mail Messages option Follow the same steps as explained above to delete the messages from SE mode You may log out of Jeeves ...

Страница 1296: ... Status Log into Jeeves as System Engineer Click the Status tab On the left navigation bar click the CO link The status of CO Trunk 1 appears on your screen To view the status of the other CO trunk click the respective tab For example click CO 1 You may log out of Jeeves ...

Страница 1297: ...h you have installed the Matrix TSP Port It displays the Port of the Client on which the CTI binding with the Server is established TSP Version It displays the Software Version of the Matrix TSP installed in the Client Status It displays the status of the Client and Server binding that is whether the link is up or down You may log out of Jeeves You can also view the CTI Status page by logging into...

Страница 1298: ...It also shows errors and alerts when SIM is absent the wrong SIM PIN has been entered SIM PUK is required IMEI Number This is the unique identification number of each Mobile port in the GSM engine Firmware Version of Engine This shows the firmware version of the mobile engine SIM ID This is the Integrated Circuit Card ID ICC ID of the SIM Card inserted in the Mobile port Each SIM is internationall...

Страница 1299: ...the consumed call budget is set on the Mobile port Call Budget Reset Schedule Date This shows whether the consumed Call Budget on the Mobile port is to be reset Daily or on a particular date of a month Reset Consumed Budget Amount Minutes Calls This editable field allows the System Engineer to reset the consumed Call Budget Amount Minutes Calls at any time manually Call Duration MM SS This is the ...

Страница 1300: ...ion The system maintains the statistics for the last 999 calls When the total number of outgoing calls exceeds 999 the system will stop calculating ACD and ASR and will display ASR and ACD calculated on the basis of the last 999 calls only Therefore the System Engineer must manually reset ASR and ACD when the total number of calls reaches 999 When you reset ASR and ACD the number of call matured a...

Страница 1301: ...Matrix NAVAN CNX200 System Manual 1291 VoIP Status To view VoIP Status Log into Jeeves as System Engineer Click the Status tab On the left navigation bar click the VoIP link You may log out of Jeeves ...

Страница 1302: ...System Engineer Click the Status tab On the left navigation bar click the SIP Trunk link The status of SIP Trunk 1 appears on your screen To view the status of other SIP trunks click the corresponding trunk name number tab For example to view SIP trunk 2 s status click SIP 2 tab You may log out of Jeeves ...

Страница 1303: ... the SMPP Client s connection request Status This field displays any one of the following Binding Type This field displays the type of SMPP Client Binding that is Transmitter Receiver or Transceiver Address This field displays the SMPP Client s IP Address and Port Status Description Not Connected When the SMPP Server does not receive any request from the SMPP Client Connected When the SMPP Server ...

Страница 1304: ... System Manual SIP Extension Status To view SIP Extension Status Log into Jeeves as System Engineer Click the Status tab On the left navigation bar click the SIP Extension link After viewing this page you may log out of Jeeves ...

Страница 1305: ...Status tab On the left navigation bar click the DHCP link The MAC Addresses displayed in the table are hyperlinked You can add any specific IP address to the IP Reservation Table Click on the hyperlink the IP Reservation Table opens in a new window Click Add The IP address appears in the IP Reservation Table under LAN WAN ...

Страница 1306: ...1296 Matrix NAVAN CNX200 System Manual Wireless LAN To view the Wireless LAN Host details Log into Jeeves as System Engineer Click the Status tab On the left navigation bar click the Wireless LAN link ...

Страница 1307: ... following details for each tunnel that has been established VPN Protocol used for creating the tunnel Mode of the tunnel that is Client or Server Tunnel number User name Remote LAN Networks IP Address and Subnet Connection status of the tunnel Number of tunnels configured Click the IP Address Assignment tab The page displays the following details The protocol used for creating the tunnel to which...

Страница 1308: ...1298 Matrix NAVAN CNX200 System Manual The End IP Address ...

Страница 1309: ...Matrix NAVAN CNX200 System Manual 1299 Multi VLAN To view the Multi VLAN Status details Log into Jeeves as System Engineer Click the Status tab On the left navigation bar click the Multi VLAN link ...

Страница 1310: ...1300 Matrix NAVAN CNX200 System Manual ...

Страница 1311: ...hones Extended Mobile Soft phone Applications Up to 2 2G GSM Modules To Make Voice Calls over Cellular GSM Networks Quad Band GSM 850 900 1800 1900 MHz Support Up to 2 3G GSM Modules To Make Voice Calls and Access High speed Internet over 3G HSPA Networks Tri Band UMTS HSPA 850 900 1800 MHz and 900 1800 2100 MHz Support VoIP GSM PSTN Gateway Built in Gateways for Call Routing between GSM VoIP and ...

Страница 1312: ...A EVDO USB Modem Connectivity Multi VLAN on Ethernet WAN Quality of Service QoS Applications DSCP Destination Source MAC IP Advance Routing Port Forwarding Triggering Static Route DNS Proxy MAC Address Cloning Networking Protocols TCP IP UDP RTP SNTP NAT STUN DHCP DNS Dynamic DNS Standard IEEE 802 11 b g n 2 4 GHz Security WEP WPA WPA2 Wi Fi Features Wireless Multimedia WMM MAC Address Access Cont...

Страница 1313: ...Attendants Greetings by Day Night Break Hours and Holidays Attend 4 callers at a time 4 Graphs each with 64 Nodes Number of Mailboxes 32 Users and 5 Group Mailboxes Greetings and Messages Personalized Greetings for Mailbox Users Unified Messaging Voice Mail to Email Notification Notification Alerts Message Wait Lamp Stuttered Dial Tone Ring Voice Message LED Lamp Conversation Recording Built in 4G...

Страница 1314: ...s Supported English Spanish Portuguese French German Italian External Power Adaptor 24VDC 2A Power Consumption Typical 20W USB Terminal Maximum Output Load 800mA Dimension W x H x D 320 x 51 x 200 mm Installation Wall Mount Table Top Rack Mount Unit Weight Max 1 25kg 2 75lbs Operating Temperature 10 C to 50 C 14 F to 122 F Operating Humidity 5 95 RH Non Condensing Storage Temperature 40 C to 85 C ...

Страница 1315: ... Quality of Service Layer 3 DIFFServ and TOS Data Network LAN Port RJ45 10 100 Base T PoE Optional PC Port RJ45 10 100 Base T LCD Display 2 Lines and 6 Lines Display Security Password Protected Configuration Power Supply Input 5VDC 2A through External Adaptor 90 265 VAC 47 63Hz and Power over Ethernet PoE Power Consumption 5W Typical Mechanical Dimensions WxHxD 20 7 x 23 2 x 4 5 cm Material ABS Pl...

Страница 1316: ...ive Quality of Service Layer 2 CoS Layer 3 DIFFServ and TOS Data Network LAN Port RJ45 10 100 Base T PoE Optional PC Port RJ45 10 100 Base T LCD Display 2 x 24 Character Display Security TLS SRTP Power Supply Input 5VDC 2A through External Adaptor 100 240 VAC 50 60 Hz Power Consumption 4W Typical Mechanical Dimensions WxHxD 20 7 x 23 2 x 4 5 cm Material ABS Plastic Installation Mounting Wall Mount...

Страница 1317: ...e T PoE Optional PC Port RJ45 10 100 Base T LCD Display 2 x 24 Character Display Security TLS SRTP Power Supply Input 5VDC 2A through External Adaptor 100 240 VAC 50 60 Hz Power Consumption 5 50 W Typical Mechanical Dimensions WxHxD 20 7 x 23 2 x 4 5 cm Material ABS Plastic Installation Mounting Wall Mount and Table Top Environmental Operating Temperature 0 C to 45 C Operating Humidity 5 to 95 RH ...

Страница 1318: ...av Ten 013 Num11 wav Eleven 014 Num12 wav Twelve 015 Num13 wav Thirteen 016 Num14 wav Fourteen 017 Num15 wav Fifteen 018 Num16 wav Sixteen 019 Num17 wav Seventeen 020 Num18 wav Eighteen 021 Num19 wav Nineteen 022 Num20 wav Twenty 023 Num21 wav Twenty One 024 Num22 wav Twenty Two 025 Num23 wav Twenty Three 026 Num24 wav Twenty Four 027 Num25 wav Twenty Five 028 Num26 wav Twenty Six 029 Num27 wav Tw...

Страница 1319: ...is not valid 055 Extra2 wav Blank 056 Invalpwd wav Invalid password 057 PreName wav More than one match found Matching names will be played one by one Press 1 after the name you wish to select To skip to the next name press 2 to go to home position press 0 058 Empty wav Sorry no match found 059 Plscont wav Please continue 060 DialAgn wav Invalid destination Enter all the destinations again 061 Noe...

Страница 1320: ...ion press 0 080 MbGrtCond wav For Busy press 1 For No Reply press 2 For Unconditional press 3 To go to previous menu press 0 081 Extra3 wav Blank 082 Extra4 wav Blank 083 Invalcmd wav The Programming command you entered is not valid 084 Okcmd wav Command has been executed 085 Extra5 wav Blank 086 Extra6 wav Blank 087 Num1000 wav Thousand 088 LeavemsgI wav Dial 1 to leave a message 2 to dial an ext...

Страница 1321: ...to leave message 111 LeavemsgH wav Enter the Room number or the Extension number for which you wish to leave message 112 NoMailbox wav Mailbox not assigned To Disconnect press 1 To go to Home Position Press 0 113 Checkout wav Sorry The Guest has been checked out 114 XferMailbox wav Please hold transferring the call to mailbox 115 Match wav The Name is Selected 116 Msgfail wav This message was not ...

Страница 1322: ...ilbox press 3 For Mailbox Greetings press 4 For Assistance Number press 5 For Personal Number press 6 To go to previous menu press 0 137 Extra8 wav Blank 138 MbGrtZone_NE wav For Working Hours Greetings press 1 For Non working Hours Greetings press 2 To go to previous menu press 0 139 MbGrtPlay wav To record greetings press 1 to play greeting press 2 To go to previous menu press 0 140 Extra9 wav B...

Страница 1323: ... message 2 to dial an extension 3 to dial by name 4 to go to Operator 0 to go to Home position to disconnect press Pound 171 MsgdestU wav Enter the destinations and dial Pound to end 172 EntertimeI wav Enter the time HH MM in Twenty four hour format To cancel all alarms press Pound 173 EntertimeU wav Enter the time HH MM in Twelve hour format To cancel all Alarm press Pound For AM press 1 For PM p...

Страница 1324: ...98 AutoWakeupVeri wav You have set Automated Wake up Alarm at 199 PerWakeupSet wav Your Personal Wake up Alarm is set 200 AutoWakeupSet wav Your Automated Wake up Alarm is set 201 DailyPerWakeupSet wav Your Daily Wake up Personal Alarm is set 202 DailyAutoWakeupVeri wav You have set Daily Automated Wake up Alarm at 203 DailyPerWakeupVeri wav You have set Daily Personal Wake up Alarm at 204 DailyAu...

Страница 1325: ...enNewMsg wav Blank 225 Extra_ListenOldMsg wav Blank 226 Extra_MbMngOptn wav Blank 227 Extra_MbMsgOptn wav Blank 228 Extra_ReplayMsg wav Blank 229 Extra_AndPress wav Blank 230 Extra_Press wav Blank 231 Extra_TheMsg wav Blank Number Filename Prompts Response 1 HolidayMsg01 wav Welcome We are closed due to holiday To leave message press 6 For Assistance press 9 To disconnect press 2 HolidayMsg02 wav ...

Страница 1326: ...Please press 9 for assistance or press hash to disconnect 07 Welmsg07 wav Welcome Please dial the extension number Or to dial by name press 7 To leave message press 6 To go to operator press 0 For more options press 9 To disconnect press 08 Welmsg08 wav Welcome We are closed for Lunch To leave message press 6 For assistance press 0 To disconnect press pound 09 Welmsg09 wav Welcome We are closed at...

Страница 1327: ...r Absent Present 1072 014 Change SA password 1072 015 Change SA mode timer 1072 016 Display Registered GSM Network ID 1072 017 Set Day Night mode 1072 018 Clear System Activity Log 1072 022 Start Abort SAL in Offline mode 1072 023 Start Abort SAL in Online mode 1072 024 Cancel Dial In Conference 1072 026 Start Abort SFL in Offline mode 1072 027 Start Abort SFL in Online mode 1072 028 Display Port ...

Страница 1328: ...ort extension wise 1072 137 Set filter to print internal calls with duration greater than that given here 1072 138 Start Abort Offline Internal Call Report 1072 141 Enable Disable Internal Scheduled Reports 1072 142 Program Time for Internal Daily Scheduled Reports 1072 143 Program Day and Time for Internal Weekly Scheduled Reports 1072 144 Program Date and Time for Internal Monthly Scheduled Repo...

Страница 1329: ...er Status Report 1072 917 Remote Reminder 1072 033 Voice Guided Alarm Remote 1072 034 Voice Guided Reminder Remote 1072 035 Enable Disable Scheduled Alarm Report 1072 036 Program Time for Scheduled Alarm Report 1072 037 Enable Disable Scheduled Reminder Report 1072 038 Program Time for Scheduled Reminder Report 1072 039 Enable Disable Scheduled Room Status Report 1072 041 Program Time for Schedule...

Страница 1330: ...1072 220 Reset consumed Budget Amount minutes on MOBILE manually 1072 221 Reset ASR and ACD for Mobile port 1072 222 Set Cancel Scheduled Call Forward 1072 223 Broadcast Message 1072 301 Record custom Voice Prompt for a node in a graph 1072 302 Play back Voice Prompt recorded for a node in a graph 1072 303 Record System Greeting Message 1072 304 Play back System Greeting Message recorded 1072 305 ...

Страница 1331: ...Location Code Number TAC Account Code by Number 1058 Account Code Account Code by Name 1059 Account Name Once Only Alarm 161 Hours Minutes 1 Daily Alarms 161 Hours Minutes 2 Cancel Once Only Daily Alarm 161 Set Cancel Voice Guided Alarm 163 Follow VMS Prompts Auto Call Back On Busy 2 Auto Call Back On No Reply 2 Cancel Auto Call Back 102 Auto Redial 17 Cancel Auto Redial 1070 Barge In 4 Last Ten d...

Страница 1332: ...oup VMS Call Forward If No Reply All Calls to External Number 133 Trunk Access Code Dest Number Call Forward If Busy or No Reply 134 Extension Department Group VMS Call Forward If Busy or No Reply All to External Number 134 Trunk Access Code Dest Number Call Forward Dual Ring 1361 Disable Call Forward Dual Ring 1360 Cancel Call Forward 130 Call Forward Scheduled 1175 Time Zone Put the caller on Ho...

Страница 1333: ...eech with Extension Flash TAC External Number Go OnHook Blind Transfer to Mail Box VMS Flash 1078 Extension Enable disable CLIR 103 Cancel all Extension features 1051 Conference 3 Party Flash 0 Conference Unsupervised Flash Schedule a Conference 194 Conference Number Conference Password Initiate a Conference 195 Conference Number Conference Password To include a Extension in a midway of conference...

Страница 1334: ...Not Disturb with Text Message 18 DND Message Number Cancel Do Not Disturb 18 0 DND Override 4 Set Dynamic Timer 142 User Password Minutes Change Toll Control Level 141 User Password Level Flashing on Trunks Flash 3 To access Floor Service 38 Set Call Follow Me 135 Extension User Password Cancel Call Follow Me 130 Forced Answer 5 Forced Call Disconnection To access General Mailbox 1176 Follow Voice...

Страница 1335: ...ng 152 Trunk Access Code HOD with Number 153 Trunk Access Code Number Cancel Hotline HOD 150 Interrupt Request 3 Last Caller Recall 1092 Last Number Redial 7 Set Live Call Supervision 1098 Destination Extension Meet Me Paging Caller 1093 Page Zone Number Meet Me Paging Called Party 1093 Extension Number of the Caller Message Wait Set Cancel 1076 Extension Code Message Wait Retrieval 1077 Mute 1052...

Страница 1336: ...No To view Presence Status 1097 Extension Number Raid 5 RCOC in DISA Mode on dial tone Set Reminder 162 DD MM YYYY HH MM Cancel Reminder 162 Set Cancel Voice Guided Reminder 164 Follow VMS Prompts Room Monitor 1073 Extension Selective Port Access 69 Port Type Port Number Self Ring Test 1057 Enter System Administrator Mode 1 92 SA Password Exit SA Mode 1 92 SA Command 1072 Reserve a Trunk 6 Cancel ...

Страница 1337: ...Help Voice Mail Walk In Class Of Service User Absent 104 User Password 0 User Present 104 User Password 1 Change User Password 114 Old User Password New User Password Voice Help 1090 Voice Mail System 3931 To Walk In 111 1 Your Extension Number Your User Password To Walk Out 111 0 ...

Страница 1338: ...0 6 1206 WA 2 0 7 1207 NE 2 0 8 1208 ID 2 0 9 1209 CA 2 0 10 1210 TX 2 0 11 1212 NY 2 0 12 1213 CA 2 0 13 1214 TX 2 0 14 1215 PA 2 0 15 1216 OH 2 0 16 1217 IL 2 0 17 1218 MN 2 0 18 1219 IN 2 0 19 1224 IL 2 0 20 1225 LA 2 0 21 1226 Ontario 2 0 22 1228 MS 2 0 23 1229 GA 2 0 24 1231 MI 2 0 25 1234 OH 2 0 26 1239 FL 2 0 27 1240 MD 2 0 28 1242 Bahamas 2 0 29 1246 Barbados 2 0 30 1248 MI 2 0 31 1250 BC ...

Страница 1339: ... 1276 VA 2 0 45 1281 TX 2 0 46 1284 BVI 2 0 47 1289 Ontario 2 0 48 1301 MD 2 0 49 1302 DE 2 0 50 1303 CO 2 0 51 1304 WV 2 0 52 1305 FL 2 0 53 1306 Saskatchewan 2 0 54 1307 WY 2 0 55 1308 NE 2 0 56 1309 IL 2 0 57 1310 CA 2 0 58 1312 IL 2 0 59 1313 MI 2 0 60 1314 MO 2 0 61 1315 NY 2 0 62 1316 KS 2 0 63 1317 IN 2 0 64 1318 LA 2 0 65 1319 IA 2 0 66 1320 MN 2 0 Index Area Code Area Name Pulse Rate Type...

Страница 1340: ...347 NY 2 0 79 1351 MA 2 0 80 1352 FL 2 0 81 1360 WA 2 0 82 1361 TX 2 0 83 1386 FL 2 0 84 1401 RI 2 0 85 1402 NE 2 0 86 1403 Alberta 2 0 87 1404 GA 2 0 88 1405 OK 2 0 89 1406 MT 2 0 90 1407 FL 2 0 91 1408 CA 2 0 92 1409 TX 2 0 93 1410 MD 2 0 94 1412 PA 2 0 95 1413 MA 2 0 96 1414 WI 2 0 97 1415 CA 2 0 98 1416 Ontario 2 0 99 1417 MO 2 0 100 1418 Quebec 2 0 Index Area Code Area Name Pulse Rate Type Ig...

Страница 1341: ... 1450 Quebec 2 0 114 1456 NANParea 2 0 115 1469 TX 2 0 116 1473 Grenada 2 0 117 1478 GA 2 0 118 1479 AR 2 0 119 1480 AZ 2 0 120 1484 PA 2 0 121 1500 NANParea 2 0 122 1501 AR 2 0 123 1502 KY 2 0 124 1503 OR 2 0 125 1504 LA 2 0 126 1505 NM 2 0 127 1506 NewBrunswick 2 0 128 1507 MN 2 0 129 1508 MA 2 0 130 1509 WA 2 0 131 1510 CA 2 0 132 1512 TX 2 0 133 1513 OH 2 0 134 1514 Quebec 2 0 Index Area Code ...

Страница 1342: ...561 FL 2 0 147 1562 CA 2 0 148 1563 IA 2 0 149 1567 OH 2 0 150 1570 PA 2 0 151 1571 VA 2 0 152 1573 MO 2 0 153 1574 IN 2 0 154 1575 NM 2 0 155 1580 OK 2 0 156 1585 NY 2 0 157 1586 MI 2 0 158 1600 Canada 2 0 159 1601 MS 2 0 160 1602 AZ 2 0 161 1603 NH 2 0 162 1604 BC 2 0 163 1605 SD 2 0 164 1606 KY 2 0 165 1607 NY 2 0 166 1608 WI 2 0 167 1609 NJ 2 0 168 1610 PA 2 0 Index Area Code Area Name Pulse R...

Страница 1343: ...181 1631 NY 2 0 182 1636 MO 2 0 183 1641 IA 2 0 184 1646 NY 2 0 185 1647 Ontario 2 0 186 1649 T CIsland 2 0 187 1650 CA 2 0 188 1651 MN 2 0 189 1660 MO 2 0 190 1661 CA 2 0 191 1662 MS 2 0 192 1664 Montsrat 2 0 193 1670 CNMI 2 0 194 1671 GU 2 0 195 1678 GA 2 0 196 1682 TX 2 0 197 1684 AS 2 0 198 1700 NANParea 2 0 199 1701 ND 2 0 200 1702 NV 2 0 201 1703 VA 2 0 202 1704 NC 2 0 Index Area Code Area N...

Страница 1344: ...1717 PA 2 0 215 1718 NY 2 0 216 1719 CO 2 0 217 1720 CO 2 0 218 1724 PA 2 0 219 1727 FL 2 0 220 1731 TN 2 0 221 1732 NJ 2 0 222 1734 MI 2 0 223 1740 OH 2 0 224 1754 FL 2 0 225 1757 VA 2 0 226 1758 St Lucia 2 0 227 1760 CA 2 0 228 1762 GA 2 0 229 1763 MN 2 0 230 1765 IN 2 0 231 1767 Dominica 2 0 232 1769 MS 2 0 233 1770 GA 2 0 234 1772 FL 2 0 235 1773 IL 2 0 236 1774 MA 2 0 Index Area Code Area Nam...

Страница 1345: ...02 VT 2 0 249 1803 SC 2 0 250 1804 VA 2 0 251 1805 CA 2 0 252 1806 TX 2 0 253 1807 Ontario 2 0 254 1808 HI 2 0 255 1809 DomRepub 2 0 256 1810 MI 2 0 257 1812 IN 2 0 258 1813 FL 2 0 259 1814 PA 2 0 260 1815 IL 2 0 261 1816 MO 2 0 262 1817 TX 2 0 263 1818 CA 2 0 264 1819 Quebec 2 0 265 1828 NC 2 0 266 1829 DomRepub 2 0 267 1830 TX 2 0 268 1831 CA 2 0 269 1832 TX 2 0 270 1843 SC 2 0 Index Area Code A...

Страница 1346: ...284 1866 NANParea 2 0 285 1867 Yukon 2 0 286 1868 Tri Tob 2 0 287 1869 St K N 2 0 288 1870 AR 2 0 289 1876 Jamaica 2 0 290 1877 NANParea 2 0 291 1878 PA 2 0 292 1888 NANParea 2 0 293 1900 NANParea 2 0 294 1901 TN 2 0 295 1902 N Scotia 2 0 296 1903 TX 2 0 297 1904 FL 2 0 298 1905 Ontario 2 0 299 1906 MI 2 0 300 1907 AK 2 0 301 1908 NJ 2 0 302 1909 CA 2 0 303 1910 NC 2 0 304 1912 GA 2 0 Index Area C...

Страница 1347: ...317 1937 OH 2 0 318 1939 PrtoRico 2 0 319 1940 TX 2 0 320 1941 FL 2 0 321 1947 MI 2 0 322 1949 CA 2 0 323 1951 CA 2 0 324 1952 MN 2 0 325 1954 FL 2 0 326 1956 TX 2 0 327 1970 CO 2 0 328 1971 OR 2 0 329 1972 TX 2 0 330 1973 NJ 2 0 331 1978 MA 2 0 332 1979 TX 2 0 333 1980 NC 2 0 334 1985 LA 2 0 335 1989 MI 2 0 336 0117 Kazkstan 2 337 01120 Egypt 2 338 01127 South Africa 2 Index Area Code Area Name P...

Страница 1348: ...146 Sweden 2 352 01147 Norway 2 353 01148 Poland 2 354 01149 Germany 2 355 01151 Peru 2 356 01152 Mexico 2 357 01153 Cuba 2 358 01154 Argentine 2 359 01155 Brazil 2 360 01156 Chile 2 361 01157 Colombia 2 362 01158 Venezuela 2 363 01160 Malaysia 2 364 01161 Australia 2 365 01162 Indonesia 2 366 01163 Philippines 2 367 01164 NZ 2 368 01165 Singapore 2 369 01166 Thailand 2 370 01181 Japan 2 371 01182...

Страница 1349: ...221 Senegal 2 387 011222 Mauritania 2 388 011223 Mali 2 389 011224 Guinea 2 390 011225 IvoryCoast 2 391 011226 BurkinaFaso 2 392 011227 Niger 2 393 011228 Togolese 2 394 011229 Benin 2 395 011230 Mauritius 2 396 011231 Liberia 2 397 011232 SierraLeone 2 398 011233 Ghana 2 399 011234 Nigeria 2 400 011235 Chad 2 401 011236 CenAfrica 2 402 011237 Cameroon 2 403 011238 CapeVerde 2 404 011239 SaoTome 2...

Страница 1350: ...nya 2 420 011255 Tanzania 2 421 011256 Uganda 2 422 011257 Burundi 2 423 011258 Mozambiqu 2 424 011260 Zambia 2 425 011261 Madagascar 2 426 011262 Reunion 2 427 011263 Zimbabwe 2 428 011264 Namibia 2 429 011265 Malawi 2 430 011266 Lesotho 2 431 011267 Botswana 2 432 011268 Swaziland 2 433 011269 Comoros 2 434 011290 StHelena 2 435 011291 Eritrea 2 436 011297 Aruba 2 437 011298 FaroeIsland 2 438 01...

Страница 1351: ...75 Belarus 2 455 011376 Andorra 2 456 011377 Monaco 2 457 011378 SanMarino 2 458 011379 VaticanCity 2 459 011380 Ukraine 2 460 011381 Yugoslavia 2 461 011385 Croatia 2 462 011386 Slovenia 2 463 011387 Bosnia 2 464 011389 Macedonia 2 465 011420 Czech Repub 2 466 011421 Slovakia 2 467 011423 Liechtensten 2 468 011500 Falkland 2 469 011501 Belize 2 470 011502 Guatemala 2 471 011503 El Salvador 2 472 ...

Страница 1352: ... 011670 East Timor 2 489 011672 Antarctic 2 490 011673 Brunei 2 491 011674 Nauru 2 492 011675 PapuaNewGuin 2 493 011676 Tonga 2 494 011677 SolomonIslnd 2 495 011678 Vanuatu 2 496 011679 Fiji 2 497 011680 Palau 2 498 011681 Wallis Island 2 499 011682 Cook Islands 2 500 011683 Niuel Island 2 501 011684 AmerSamoa 2 502 011685 WSamoa 2 503 011686 Kiribati 2 504 011687 NewCaledonia 2 505 011688 Tuvalu ...

Страница 1353: ...11960 Maldives 2 522 011961 Lebanon 2 523 011962 Jordan 2 524 011963 SyrianArab 2 525 011964 Iraq 2 526 011965 Kuwait 2 527 011966 SaudiArabia 2 528 011967 Yemen 2 529 011968 Oman 2 530 011971 UAE 2 531 011972 Israel 2 532 011973 Bahrain 2 533 011974 Qatar 2 534 011975 Bhutan 2 535 011976 Mongolia 2 536 011977 Nepal 2 537 011992 Tajikistan 2 538 011993 Turkmenistan 2 539 011994 Azerbaijani 2 540 0...

Страница 1354: ...1344 Matrix NAVAN CNX200 System Manual 543 2 544 2 545 2 546 2 547 2 2 998 2 999 2 Index Area Code Area Name Pulse Rate Type Ignore Digit Count ...

Страница 1355: ...service by using NAVAN as a router System VPN Services for example Guests cannot configure a VPN tunnel using NAVAN and send data to external network 4 Internet unless blocked by Access Restriction Policies 5 Sync time from NAVAN s NTP Server as well as from the Internet 6 NAVAN s Web Server HTTP HTTPS 7 DHCP Server 8 FTP Server 9 DMZ 10 QoS will be applicable to Guests 11 Port Triggering 12 Port ...

Страница 1356: ...1346 Matrix NAVAN CNX200 System Manual NAVAN Features tested on IP Phones of different Brands ...

Страница 1357: ...Matrix NAVAN CNX200 System Manual 1347 ...

Страница 1358: ... is set as RTP Relay or Direct RTP system will use DSP channels for the following features Conference Raid Interrupt Request Barge In Conversation Recording Paging NAVAN features supported on Open SIP Clients If Open SIP Phones are connected as SIP Extensions and the RTP mode is set as RTP Relay or Direct RTP users can make internal calls external calls as well as access the following features and...

Страница 1359: ...e Authentication Protocol CLIP Calling Line Identification and Presentation CLIR Calling Line Identity Restriction CO Central Office COS Class of Service CPD Call Progress Detection CPTG Call Progress Tone Generation CPU Call Pickup CTS Clear to Send CUG Closed User Group DDI Direct Dialing In DH DH Diffie Hellman DHCP Dynamic Host Configuration Protocol DISA Direct Inward System Access DND Do Not...

Страница 1360: ...System IPS Intrusion Prevention System IP Internet Protocol IPSec Internet Protocol Security IR Interrupt ISP Internet Service Provider ITU International Telecommunication Union IVDT Integral Voice Data Terminal L2TP Layer Two Tunneling Protocol LAN Local Area Network LCD Liquid Crystal Display LCR Least Cost Routing LCS Live Call Screening LED Light Emitting Diode LIFO Last in First Out LNR Last ...

Страница 1361: ...ift Keying PSTN Public Switched Telephone Network PUK Personal Unlock Key QoS Quality of Service RBT Ring Back Tone RF Radio Frequency RTC Real Time Clock RTS Request to Send RXD Receive data SA System Administrator SAL System Activity Log SE System Engineer SFL System Fault Log SIP Session Initiated Protocol SIM Subscriber Identity Module SLT 2 wire Analog Station Single Line Telephone SMDR Stati...

Страница 1362: ...Key Integrity Protocol TWT Two Wire Trunks 2 wire Analog Trunk Card UPS Un interrupted Power Supply VMS Voice Mail System VMA Voice Message Application VPN Virtual Private Network WLAN Wireless Local Area Network WWAN Wireless Wide Area Network WAN Wide Area Network WEP Wired Equivalent Privacy Wi Fi Wireless Fidelity WPA Wi Fi Protected Access WH Working Hours ...

Страница 1363: ...2 Products which have been damaged by lightning storms water or power surges or which have been neglected altered used for a purpose other than the one for which they were manufactured repaired by customer or any party without Matrix s written authorization or used in any manner inconsistent with Matrix s instructions 3 Products received improperly packed or physically damaged 4 Products damaged d...

Страница 1364: ...ty Except for the obligations specifically set forth in this Warranty Policy Statement in no event shall Matrix be liable for any direct indirect special incidental or consequential damages whether based on contract or any other legal theory and where advised of the possibility of such damages Neither Matrix nor any of its distributors dealers or sub dealers makes any other warranty of any kind wh...

Страница 1365: ...erence at his own expense Part 68 This equipment complies with Part 68 of the FCC rules and the requirements adopted by the ACTA Administrative Council for Terminal Attachments On the bottom side of this equipment is a label that contains among other information a product identifier in the format US MTXIS01BNAVAN If requested this number must be provided to the telephone company Installation and R...

Страница 1366: ...1356 Matrix NAVAN CNX200 System Manual ...

Страница 1367: ...l its users This General Public License applies to most of the Free Software Foundation s software and to any other program whose authors commit to using it Some other Free Software Foundation software is covered by the GNU Lesser General Public License instead You can apply it to your programs too When we speak of free software we are referring to freedom not price Our General Public Licenses are...

Страница 1368: ...this General Public License The Program below refers to any such program or work and a work based on the Program means either the Program or any derivative work under copyright law that is to say a work containing the Program or a portion of it either verbatim or with modifications and or translated into another language Hereinafter translation is included without limitation in the term modificati...

Страница 1369: ...ot derived from the Program and can be reasonably considered independent and separate works in themselves then this License and its terms do not apply to those sections when you distribute them as separate works But when you distribute the same sections as part of a whole which is a work based on the Program the distribution of the whole must be on the terms of this License whose permissions for o...

Страница 1370: ...ivalent access to copy the source code from the same place counts as distribution of the source code even though third parties are not compelled to copy the source along with the object code 4 You may not copy modify sublicense or distribute the Program except as expressly provided under this License Any attempt otherwise to copy modify sublicense or distribute the Program is void and will automat...

Страница 1371: ...ave made generous contributions to the wide range of software distributed through that system in reliance on consistent application of that system it is up to the author donor to decide if he or she is willing to distribute software through any other system and a licensee cannot impose that choice This section is intended to make thoroughly clear what is believed to be a consequence of the rest of...

Страница 1372: ...E THE PROGRAM AS PERMITTED ABOVE BE LIABLE TO YOU FOR DAMAGES INCLUDING ANY GENERAL SPECIAL INCIDENTAL OR CONSEQUENTIAL DAMAGES ARISING OUT OF THE USE OR INABILITY TO USE THE PROGRAM INCLUDING BUT NOT LIMITED TO LOSS OF DATA OR DATA BEING RENDERED INACCURATE OR LOSSES SUSTAINED BY YOU OR THIRD PARTIES OR A FAILURE OF THE PROGRAM TO OPERATE WITH ANY OTHER PROGRAMS EVEN IF SUCH HOLDER OR OTHER PARTY...

Страница 1373: ...ypothetical commands show w and show c should show the appropriate parts of the General Public License Of course the commands you use may be called something other than show w and show c they could even be mouse clicks or menu items whatever suits your program You should also get your employer if you work as a programmer or your school if any to sign a copyright disclaimer for the program if neces...

Страница 1374: ...1364 Matrix NAVAN CNX200 System Manual ...

Страница 1375: ...ed Alarm 858 How to configure 859 How to use 864 Personalized Alarm 857 Alternate Number Dialing 869 How it works 869 How to configure 870 How to use 873 Anonymous Calls 506 Answer Signaling 336 Answer Supervision 479 Appendix 1301 Application based QoS Policy 264 Application of NAVAN 18 ARM Debug 1251 Auto Answer 874 How it works 874 How to configure 874 How to use 875 Auto Attendant 877 How it w...

Страница 1376: ...Calculation CCC 622 Call Cost Display 631 1321 How to configure 631 How to use 631 Call Duration Control 342 460 How it works 632 How to configure 634 Call Duration Control CDC 632 Call Duration Display 637 How it works 637 Call Forward 341 909 1322 How it works 909 How to configure 911 How to use 912 Call Forward Scheduled 1322 Call Forward When Not Registered 926 How to configure 926 Call Forwar...

Страница 1377: ... 23 CLI Based Routing 643 How it works 643 How to configure 644 Closed User Group How it works 647 How to configure 649 Closed User Group CUG 647 CO Interface 7 CO Line Type 478 CO Lines 4 CO Network 4 CO Status 1286 CO Termination 477 CO Trunks 464 SMDR Storage 442 476 501 CO trunks 4 Computer Telephony Integration CTI 839 Conducting AC Impedance Test 849 Conference Multiparty 977 How it works 97...

Страница 1378: ...IP Network 28 Conversation Recording 985 1323 How it works 985 How to configure 985 How to use 986 Cost Factor 679 CPTG Region Codes 308 Create a PPTP VPN Client 196 Creating a L2TP over IPSec Client 172 Creating a new VPN Connection in Windows 7 196 Creating a new VPN Connection in Windows XP 164 Creating a PPTP VPN Client 164 Creating a QoS Policy 260 Creating an IPSec Policy 218 Creating an IPS...

Страница 1379: ...face 473 498 DTMF Detection 481 504 DTMF Out Dial 481 503 Dynamic Lock 1009 1324 How it works 1010 How to configure 1011 How to use 1012 E Email Based Notification 1183 How to configure 1183 Emergency Alarms Log 1023 Emergency Conference 1016 Emergency Detection and Reporting 1022 How it works 1022 How to configure 1023 Emergency Dialing 1020 How to configure 1020 How to use 1020 Emergency Numbers...

Страница 1380: ...r ence 977 Incoming CLI Modification 765 1043 How it works 1043 How to configure 1043 Information Node 536 Initiating a Dial In Conference 968 Initiating a Multiparty Conference 977 Installation Site 20 Installing Matrix NAVAN 19 Cables 20 Extension Telephones 20 Installation Site 20 Power Supply 20 Installing the Voice Mail System 96 Intercom 1049 How it works 1049 How to configure 1050 How to us...

Страница 1381: ...ix SPARSH MS Android Application 407 Matrix SPARSH MS iPhone Application 407 Maximum Registration Timer 787 Meet Me Paging 1056 1325 How it works 1056 How to configure 1056 How to use 1057 Menu Node 536 Message Notification 1196 How it works 1196 How to use 1196 Message Notification Timers 771 Message to predefined user Node 537 Message Verification 1197 How it works 1197 How to configure 1197 Mes...

Страница 1382: ...AP for Matrix Extended IP Phone 1239 Peer to Peer Calling 790 How it works 790 How to configure 792 Permanently Leave from a Multiparty Confer ence 978 Personal Abbreviated Dialing 561 Personal Directory 343 Personal Identification Number PIN 26 Personalized Reminder 1109 PIN Dialing 703 Ping 1245 Port 4 Port Forwarding 277 Configuring Port Forwarding 278 Port State Debug 1252 Port Triggering 280 ...

Страница 1383: ...rity Settings 269 1257 Configuring the Security Settings 270 Selective Port Access 1326 Self Ring Test 1121 1326 How to use 1121 Sending Messages 1199 How to use 1199 Service and Repair 24 Service Provider 4 Set Cancel Hotline by Extension Users 1041 Set Cancel Hotline for Extension Users 1040 Setting the Real Time Clock RTC 299 Setting up a Wireless Network 149 Setting up NAVAN for VPN Connection...

Страница 1384: ...Auto Attendant 437 VoIP 445 SIP UDP Port 783 SIP RTP Ports 783 Site to Site VPN 160 SLT Extensions 324 Call Budget 339 Caller ID on Call Transfer 340 Class of Service 325 Hardware Settings 334 Select Trunks for Outgoing Calls 327 SMDR Storage 339 Toll Control 326 Voice Mail Auto Attendant 337 Voice Mail Settings 330 SMDR 707 Online 707 Posting 707 Report 707 Storage 707 SMDR Storage 473 496 SMPP S...

Страница 1385: ...ngineer Login 106 System Engineer Mode 99 System Engineers 1 System Fault Log 1229 How to configure 1230 How to use 1231 Online 1229 Report Offline 1229 System Fault Log Display 1236 How to use 1236 System Greetings 528 System Parameters 761 Alarm 768 Distinctive Rings 768 DND Text Message 766 General Parameters 762 Greeting Message Time 767 Incoming CLI Modification 765 Publish Message 767 System...

Страница 1386: ...re 1148 How to use 1148 Voice Mail 1327 Voice Mail IVR 521 General Settings 522 Home Node 524 Leave Message Option 525 Message Play Options 526 Timers 527 VMS General Parameters 522 Voice Mail Auto Attendant 471 494 Voice Mail Auto Attendant Profile 528 Assigning Voice Mail Auto Attendant Pro files to Extensions 530 Assigning Voice Mail Auto Attendant Pro files to Trunks 531 Voice Mail Features 11...

Страница 1387: ... 1165 Walk out on user request 1165 Walk In Class Of Service 1327 Walk In Class of Service 1165 How it works 1165 How to configure 1167 Walk In Walk Out 340 WAN Interface 10 Warning 3 Warning for RF Safety 24 Warranty Statement 1353 Web based GUI 101 White List IP Address 794 How it works 794 How to configure 794 Wireless Wi Fi Network 149 Wireless LAN 1296 Wireless LAN WLAN Connectivity 31 Wirele...

Страница 1388: ...Version 2 March 2015 MATRIX COMSEC Head Office 394 GIDC Makarpura Vadodara 390010 India Ph 91 265 2630555 E mail Support MatrixComSec com Website www MatrixTeleSol com ...

Отзывы: