background image

Managing your Lomond printer  


Page 80 of 106  


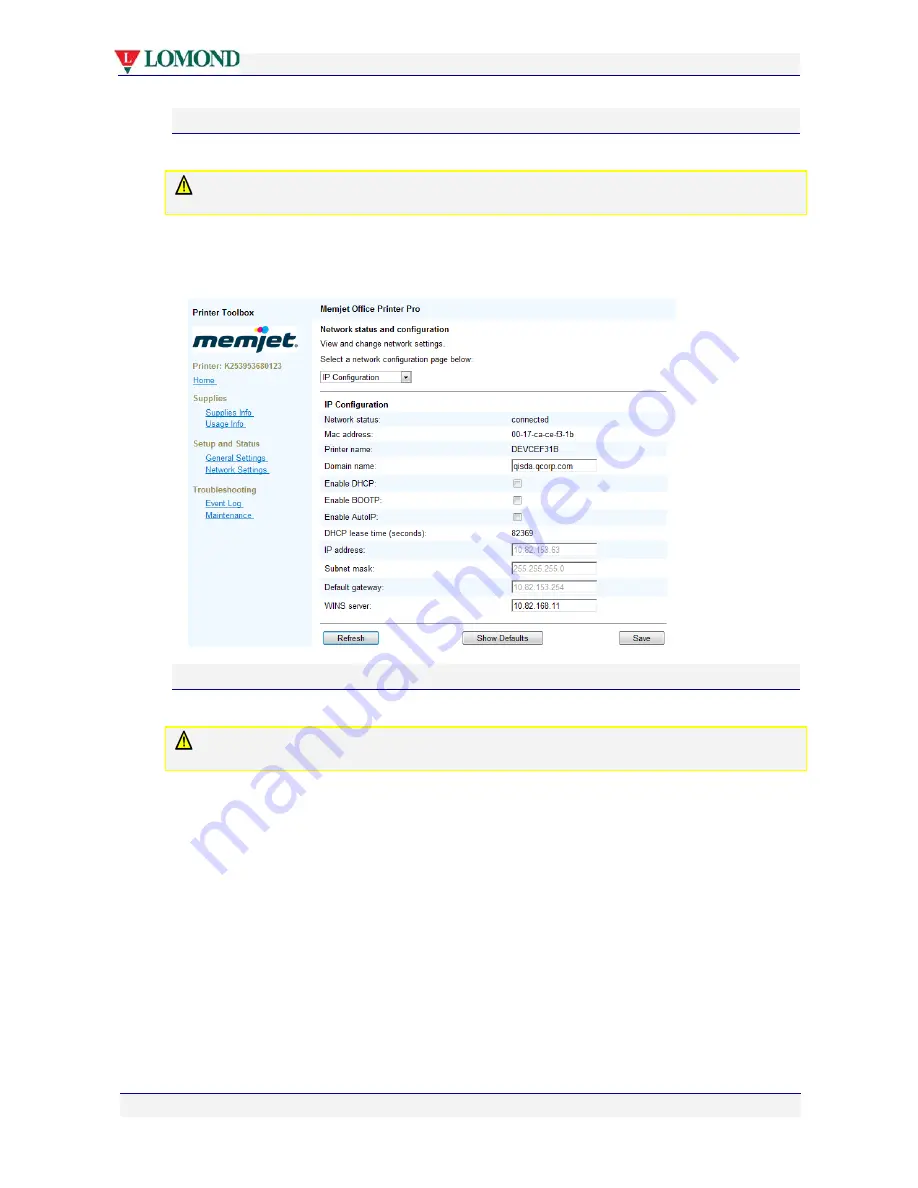
IP Configuration settings 

This screen allows you to view and change IP Configuration settings on your printer. 

  Changing printer settings through this screen 

may cause your printer to become unusable

Always refer to your support personnel first before making any changes. 

To access the IP Configuration settings page from the Home Page, select 

Network Settings

then


click the 

Select a network configuration page below 

arrow and


select

 IP 

Configuration


SNMP Configuration 

This screen allows you to view and change SNMP Configuration settings on your printer. 

  Changing printer settings through this screen 

may cause your printer to become unusable

Always refer to your support personnel first before making any changes. 


Содержание EvoJet Office 2

Страница 1: ...Lomond EvoJet Office 2 Windows User Guide ...

Страница 2: ...ighlight warnings potential hazards or best practice procedures and have the following meanings Danger potential risk of personal injury including electrical shock burns etc Warning potential risk of damage to printer and or surroundings Important what you need to know to get the best from your printer ...

Страница 3: ...o power it down Removal of power to your printer in any other manner may damage your printer Switching off your printer Do not switch off your printer if any of your ink tanks have been removed Always ensure all the ink tanks are installed before doing so Failure to do so may compromise ink delivery in your printer Ensure adequate ventilation to your printer Blocking ventilation openings around th...

Страница 4: ...ded period of time e g a couple of weeks it should be turned off using the Power On Off button All ink tanks and printhead must be installed before you turn off your printer Do not remove consumables unless replacing them Printheads and ink tanks should remain in the printer once installed Their removal and re insertion is not recommended unless replacement is necessary Your printer works best on ...

Страница 5: ...ting the printer 18 18 Installing the ink tanks 18 Installing the printhead cartridge 24 Loading paper 21 Loading A4 Letter size paper 21 Loading US Legal size paper 23 Using intermediate paper sizes 24 Installing printer drivers 28 Installing a USB driver 28 Installing a network driver 36 Installing a network driver on a server 41 Assigning a static IP address 41 Installing additional printers 43...

Страница 6: ...t settings profiles 58 Borderless prints 58 Page orientation 58 Custom paper sizes 59 Multi page N up 61 Manual duplex 61 Booklets 63 About resizing 65 Using Tray 2 65 Common printer messages and alerts 70 Paper out 70 Ink low 71 Out of ink 71 Paper jam 72 Managing your Lomond printer 75 Accessing the Toolbox application 75 Toolbox information screens 76 Supplies information 77 Printhead details 7...

Страница 7: ...Toolbox 85 Resetting original configuration settings 87 Factory default printer settings 87 Factory default printer driver settings 87 Supplies and accessories 88 Paper 88 Choosing the right paper 89 Paper storage and handling 89 Ink 90 Sourcing new ink 90 Ink storage and handling 90 Replacing ink tanks 90 Printhead cartridge 90 Sourcing new printhead cartridges 90 Printhead cartridge storage and ...

Страница 8: ... access Toolbox Home Page 98 Toolbox links are not working 98 Printer slows down between pages 98 Error operational status messages 99 Status messages on your printer s LCD screen 99 Alert windows status messages 99 Specifications 101 Appendices 102 Relocating your Lomond printer 102 Local relocation 102 Remote relocation 103 Unpacking your printer 104 Repackaging your printer 105 Notices and Regu...

Страница 9: ...your Lomond printer What is in the box When you open the box containing your new Lomond printer you will find the following The Lomond printer A power cord Ink tanks in their blister pack A software and documentation CD A Lomond printhead cartridge A Quick Start Guide ...

Страница 10: ...ng this document It identifies and locates the components that will be mentioned throughout the rest of this document Printer Front view Tray 1 1 Ink tank access cover 2 Printhead cover 3 Control panel 4 Tray 1 Main paper tray 5 Output tray 6 Paper stop 1 Paper width guide 2 Paper length guide 1 2 3 4 5 6 1 2 ...

Страница 11: ... 2 Multi purpose tray closed 1 USB port 4 Side access door 2 Ethernet port 5 Side access door latch 3 Power socket 6 Tray 2 Multi purpose tray Tray 2 Multi purpose tray open 1 Side access door 3 Tray 2 Multi purpose tray 2 Paper feed open tab 4 Paper guide 1 4 3 5 6 1 2 3 4 2 ...

Страница 12: ...inter Page 12 of 106 Internal view 1 Ink tank access cover 6 Printhead 2 Ink tank cover open 7 Printhead latch 3 Ink tank cover closed 8 Ink tank in slot 4 Fluidic couplings 9 Ink tank coupling 5 Printhead cover 1 2 3 4 5 6 7 6 8 9 ...

Страница 13: ...r Page 13 of 106 Printhead cartridge 1 Printhead handles 5 Protective cover 2 Electrical contacts tape 6 Foil vacuum bag 3 Nozzles protective tape 7 Cardboard packing box 4 Protective cover flaps 8 Cover retaining clip 1 2 3 4 4 5 6 7 8 ...

Страница 14: ...Getting to know your Lomond printer Page 14 of 106 Ink tanks 1 Ink tank blister pack 2 Pull tab 1 2 ...

Страница 15: ...tons along with one LCD screen and one attention lamp to communicate printer status information The Power On Off button is also backlit as shown below 1 Power On Off button with power lamp 5 OK Resume button 2 LCD screen 6 Down button 3 Attention lamp 7 Menu button 4 Up button 8 Stop Cancel button Connector bays 1 USB port and USB cable 2 Power socket and power cord 3 Ethernet port 1 3 2 2 4 5 6 1...

Страница 16: ...uld be retained in case you ever need to transport your printer to a remote location See Remote relocation on page 103 To unpack your new printer 1 Ensure the printer box is upright and on a level surface 2 Open the box and identify the Shipping Checklist see page 9 3 Carefully extract all the contents of the box and check the contents against those shown in the Shipping Checklist See Unpacking yo...

Страница 17: ... for transportation to a remote site you will need to re use this to avoid damage to the paper picker Figure 1 Tray 1 and packaging material Removing the printhead latch stay Before you can open the printhead latch you will need to remove the printhead latch stay used to ensure the printhead latch remains closed during transport DO NOT dispose of this packing material Should you need to repackage ...

Страница 18: ...nter and adequate ventilation during use refer to the figure below for the various clearances required on each side of the printer Installing the ink tanks Original ink tanks are supplied in a blister pack as shown in the Ink tanks section on page 14 When installing a new Lomond printer use ONLY the ink tanks provided in the packaging Specifically DO NOT install a USED ink tank To install the ink ...

Страница 19: ...s a specific ink tank slot for each color Check the color coding on the ink tank and the slot and insert each ink tank into its respective ink tank slot as shown Note the double black ink tank fits into the rightmost slot DO NOT apply excessive force when inserting each ink tank in its slot There is a mechanical key on each ink tank that prevents it being inserted into the wrong slot in the printe...

Страница 20: ...ls in the printer The power lamp on the control panel will continue to blink throughout this process This is normal You can now proceed with the installation of the printhead cartridge Powering up your printer To power up your printer 1 Connect one end of the supplied power cord to the power socket on your printer This image cannot currently be displayed This image cannot currently be displayed ...

Страница 21: ...r sizes from Tray 1 Intermediate size paper such as Executive 7 10 and Statement 5 8 should be fed into the printer from Tray 2 Some paper may be single sided This means the manufacturer applies special processing to one side of such paper to achieve best results When loading such paper into the paper tray remember to always load it with the recommended print side facing down For information on us...

Страница 22: ...um number of sheets in Tray 1 does not reach any higher than the indicator line as shown below Figure 2 Tray 1 loaded to its maximum capacity 7 Grip the top of the Paper Length guide with thumb and forefinger and squeeze the two tabs together to unlock it 8 Slide the guide until it rests gently against the edge of the paper stack ensuring that it is aligned with the A4 or Letter mark on the label ...

Страница 23: ...en them then fan them a few times do not crease the paper Remove any obvious loose paper dust from the surface or edges of the paper Align the edges of the sheets on a level surface 5 Load the paper stack into the Tray 1 with the recommended print side facing down 6 Ensure the maximum number of sheets in Tray 1 does not reach any higher than the indicator line see Figure 2 7 Grip the top of the Pa...

Страница 24: ...idge on page 13 for the location of these features Do not place the unprotected printhead cartridge on any surface prior to installation in the printer Protect the printhead cartridge at all times from contamination by air borne contaminants such as dust or fibres DO NOT unpack the printhead cartridge until the printer has been prepared for installation Delay in installation of the printhead after...

Страница 25: ...il bag 8 Inspect the integrity of the foil vacuum sealing The foil bag should be formed tightly to the contours of the printhead cartridge as shown above If the foil is loose to any degree then the seal has been compromised If a poor seal is suspected DO NOT USE the printhead cartridge Report the issue to your supplier 9 Carefully rip the foil packaging open at the notch Use scissors if your foil ...

Страница 26: ...ntacts While holding the printhead cartridge by the handle with one hand grasp the pull tab with the other hand and slowly and carefully peel back the plastic strip covering the electrical contacts Dispose of the removed strip immediately and do not allow the removed strip to contact the electrical contacts 13 Remove the protective strip from the printhead nozzles While holding the printhead cartr...

Страница 27: ...14 Raise the printhead latch fully until it is upright so you can insert the printhead into the printer at an angle 15 When the printhead cartridge is fully inserted into the printer rotate it to a vertical position as shown until it clicks into place 16 Slowly close the printhead latch until a click is heard The fluidic couplings should advance and seal to the printhead cartridge ...

Страница 28: ...o such differences To install the latest printer drivers for your Lomond printer use the latest Lomond printer drivers CD and ensure you have an active connection to the Internet For a locally connected printer see Installing a USB driver on page 28 For a networked printer see Installing a network driver on page 36 You will normally not need to uninstall an older Lomond printer driver as the insta...

Страница 29: ...plug the printer USB cable from your PC 2 Insert the installation CD in your PC CD ROM DVD drive You should see the Welcome window If the above window is not displayed start a copy of Windows Explorer and navigate to the CD ROM DVD drive where you inserted the installation CD Double click on WinSetup to bring up the Welcome window 3 Click Install Printer Software If your PC is connected to the Int...

Страница 30: ... the Internet your supplier has not implemented this check 5 If you have not installed any other Lomond printer driver the License Agreement dialog box should be displayed Select I accept and click Next 6 If this is the first time you are installing a Lomond printer OR you have uninstalled all Lomond printer drivers the Printer Connections dialog box will appear Select Configure to print using USB...

Страница 31: ...r printer drivers on page 44 To add another printer select Add another printer For further information see Installing additional printers on page 43 If you have a current version of Lomond printer drivers already installed the following selection dialog box will appear For further information on adding a printer see Installing additional printers on page 43 repairing a printer driver see Repairing...

Страница 32: ...w the instructions and click Next to continue 7 The Preinstalling Drivers window opens 8 A dialog box also opens asking you to power on the device and connect the USB cable Follow the directions and the window will close automatically If you are upgrading a local printer driver and the printer is attached this window will not be displayed ...

Страница 33: ... Next More warning windows similar to those displayed in point 7 above may appear Follow the directions to disregard the warnings and continue the installation A small message window may appear informing you that the driver has been installed Ignore this DO NOT attempt to print until you see the final window shown in the next step Click Finish If more warning windows are displayed simply ignore an...

Страница 34: ...t personnel 11 This screen may be displayed after a firmware upgrade Click Yes to reconnect Accept any other screen confirming reconnection 12 A final dialog box is displayed informing you that software installation has finished This dialog box may take two forms as shown below Which one is displayed will depend on whether you are required to reboot or otherwise As you can see both contain two che...

Страница 35: ... If you have chosen to print a Test page and one is not printed inform support personnel If you have upgraded your drivers the following window will be displayed instead 13 If you are asked to reboot save all work close all applications and reboot ...

Страница 36: ... use the Windows Add Printer Wizard to install your Lomond printer driver Doing so will result in an incomplete software installation and limited printer functionality To experience all the documented features use ONLY the procedure set out here To install a Lomond printer driver for a networked printer 1 Insert the installation CD in your PC CD ROM DVD drive You should see the Welcome window If t...

Страница 37: ... is available on your supplier web site you will see the following dialog box Click Yes to download the latest drivers You will not see the above dialog box if the CD contains the latest version of Lomond SFP drivers your PC is not connected to the Internet your supplier has not implemented this check 3 If you have not installed any other Lomond printer driver the License Agreement dialog box shou...

Страница 38: ...tallation utility pre installs some software and searches for compatible printers on your network 6 A dialog box appears displaying a list of networked printers Select the printer you wish to use and click Next If your printer is not listed 1 Click Back 2 Check that your printer is connected to the network it is turned on the power lamp is lit and steady ...

Страница 39: ...ontinue If the printer is not found contact support personnel To get a printout of the IP address of your printer follow the steps below 1 When the printer is idle and the Ready message is displayed on the LCD screen press the Menu button and then press the OK Resume button to select Print internal page 2 Use the Up or Down button to select Configuration page and then press the OK Resume button 3 ...

Страница 40: ... in the selected printer is now checked If the firmware is older than the one that came with your driver software you will be given the option to update it Check with support personnel before doing so 9 If you decided to update the printer firmware the following window will be displayed Follow the directions This process may take a few minutes A progress bar is displayed to keep you informed as sh...

Страница 41: ...ations and reboot at your earliest convenience before printing on your Lomond printer Installing a network driver on a server Networked Lomond printers may be connected from a service running on a networked server that has been set up by your support personnel or directly by installing the networking driver on your current PC For information on setting up your printer driver as a service on a serv...

Страница 42: ... page 80 5 Clear the Enable DHCP Enable BOOTP and Enable AutoIP check boxes as shown All available fields in that Toolbox page may now be altered 6 Make the required changes in the appropriate fields You will need to assign at least the IP address and the Subnet mask fields and most likely the Default gateway field as well If you are unsure speak to your Network Supervisor before making any change...

Страница 43: ...inter driver Doing so will result in an incomplete software installation and limited printer functionality To experience all the documented features use ONLY the procedure set out here To install additional Lomond printer drivers 1 Insert the installation CD in your PC CD ROM DVD drive You should see the Welcome window If the above window is not displayed 1 Launch a copy of Windows Explorer and na...

Страница 44: ...on page 38 For a USB connected printer select Configure to print using USB and click Next then continue at the section titled Installing a USB driver on page 28 Updating your printer drivers Where an older version of Lomond drivers is found on your PC the installer sequence will offer an option to update such a driver Updating your Lomond printer driver follows similar sequences as found in Instal...

Страница 45: ...lling a network driver on page 36 You may not be asked to confirm the License Agreement but this may vary between brands All other steps will remain the same Updating printer firmware Lomond printer firmware resides in each printer and not all networked printers may need to have their firmware updated each time you load a new printer driver on your PC In such cases you may need to update the firmw...

Страница 46: ... should see something similar to the following in your Windows Explorer window 2 Double click on WinSetup to bring up the required window 2 If a current driver is found on your PC the following dialog box will be displayed 3 Select Firmware and click Next The installation software will search for printers that have older firmware 4 If no printers with older firmware are found you will be informed ...

Страница 47: ...umstances Doing so may damage your printer Should the firmware update be interrupted for any reason contact support personnel 7 A final dialog box is displayed informing you that firmware update has completed The dialog box shown in Step 2 above will be re displayed Repairing printer drivers Where your support personnel directs you to do so or when you feel there may be something wrong with your p...

Страница 48: ... Explorer and navigate to the CD ROM DVD drive where you inserted the installation CD You should see something similar to the following in your Windows Explorer window 2 Double click on WinSetup to bring up the required window 2 If a current driver is found on your PC the following dialog box will be displayed ...

Страница 49: ...mond printer again Uninstalling older printer drivers You will generally not need to uninstall older Lomond printer drivers on your PC as you are given the option to update them see Updating your printer drivers on page 44 If however you are asked to remove older Lomond printer drivers from you PC 1 Ensure your printer is switched on and the power lamp is lit and steady 2 Click the Windows Start i...

Страница 50: ... Previously installed drivers will be displayed in the dialog box as shown here Select the appropriate one and click Remove One or if more than one printer driver is listed you may use the Remove All button 7 If you select Remove All a confirmation window will be displayed Click Yes to continue ...

Страница 51: ...onnect the printer USB cable When you have done so click Next Always disconnect the USB cable DO NOT continue without disconnecting 9 A progress bar may be displayed as shown below in a separate dialog box Wait for the removal operation to finish 10 When the Successful uninstall dialog is displayed click Finish ...

Страница 52: ...omond printer Page 52 of 106 11 You may be asked to reboot your computer to complete the uninstall procedure You need not reboot at this point but you must do so before installing a new version of Lomond printer driver ...

Страница 53: ...mmon printer messages and alerts section on page 70 for possible causes and solutions If you cannot fix the problem follow the instructions in the Troubleshooting section on page 94 until the Ready message appears on the LCD screen Once you are ready to print choose your paper issue a Print command from your application select your print options Before issuing a Print command you may find it usefu...

Страница 54: ...There are three ways in which you can print a test page using the buttons on your printer Control Panel using the built in Print Test Page button on the printer driver on your PC using the Print Demonstration button from the Toolbox On the printer You can print a test page without installing a printer driver by using the buttons on your printer Control Panel This is useful in case you suspect your...

Страница 55: ...the General tab click the Print Test Page button A message window should be displayed as shown below A test page should be printed on your Lomond printer Check that the test page prints If not see the Troubleshooting section on page 94 for help Using the Toolbox You may also print a test page from the Toolbox application as follows 1 Open the Toolbox Home Page see Accessing the Toolbox application...

Страница 56: ...of your PC screen In the Lomond Office Printer Pro dialog box select the print job and press Delete on your keyboard Note that cancelling a Duplex or a Booklet print job in this way after the first side has been printed may not prevent the second side from being printed Using print properties To select a Lomond printer click the Name arrow in the Printer pane of your Print dialog box as shown in F...

Страница 57: ...gs are retained and used for all following prints of your current document s These settings will not revert to the default settings until you close the document s or restore the default settings manually Printer properties Help Help is available for most configurable properties in your Lomond printer driver To bring up this help you have two options In any tab of the Properties dialog box see Figu...

Страница 58: ...s This 2 Follow the instructions for creating saving and restoring print settings shown in the popup window 3 Once you have finished configuring and saving your printer settings click OK to save your work and exit the Properties dialog box Some applications will not bring up a Print dialog box at all In those cases any Print command you launch will use the defaut printer settings you have selected...

Страница 59: ... can only be fed manually one sheet at a time The largest paper size you can print on is US Legal See Using Tray 2 on page 65 for instructions on setting up and feeding paper into the Tray 2 To print on custom sized paper 1 Click the Custom Sizes button in the General tab of the Properties dialog box see Figure 5 on page 57 The Custom Media Size dialog box will appear 2 Fill in the Media Name with...

Страница 60: ...you have selected Tray 2 7 Click OK again to save your selection and exit the Properties dialog box 8 Select this new size in the scaling option in your application s Print dialog box For example in Microsoft Office Word 2003 in its Print dialog box Ensure that you have selected the appropriate paper size option in the Scale to paper size field ...

Страница 61: ...ish to print on one sheet 3 Save your selection by clicking OK until you are back at the Print dialog box see Figure 4 on page 54 Manual duplex Duplex or two sided printing produces a more compact document allowing you to cut down the amount of paper you use Although your Lomond printer is not equipped with an automatic duplexing mechanism you can still print on both sides of each sheet by manuall...

Страница 62: ...ox 4 Click the Duplex Settings arrow and select either Long Edge or Short Edge Notice where the binding rings appear in the Page Preview image top right in the following figure as you change from one to the other 5 When you have selected the orientation that suits you click OK to save your settings and exit 6 Once you have launched a print command one side of each page is printed first after which...

Страница 63: ...the paper tray and press the OK Resume button The remaining contents will be printed on the reverse side Examine your printout to ensure it matches your needs otherwise repeat this operation using the other Duplex Settings selection in Step 4 You may combine duplex printing with other allowable options to achieve just the sort of printout you require Booklets Booklets are generated by folding in h...

Страница 64: ...yout tab as shown below click the Booklet arrow and select Booklet Left Binding or Booklet Right Binding See how your binding selection changes the booklet layout picture in the top right of the dialog box 5 When you have selected the binding orientation that suits you click OK to save your settings and exit 6 Once you have launched a print command one side of the document is printed first after w...

Страница 65: ...ay need to use the resizing option When resizing the document page size and the target paper size need to be communicated to the Lomond printer driver To do so you will need to set the appropriate document scaling option in your application s Print dialog box For example in Microsoft Office Word 2003 in its Print dialog box Set the Scale to paper size option to the size of the paper in your Lomond...

Страница 66: ... of 106 To print from Tray 2 1 Remove the external packing tape as illustrated below if you have not done so and then open Tray 2 to load papers 2 Raise Tray 2 into position as shown using the paper feed open tab Tray 2 should lock into place ...

Страница 67: ...Printing with your Lomond printer Page 67 of 106 3 Remove the external packing tape as illustrated below 4 Pull the tray extension as shown below ...

Страница 68: ...ay 2 holding them against the side Then slide the the Width Adjustment guide until the papers rest against the side 6 Issue a Print command from your application When the Print dialog box appears fill out the page range and other information required to print your selection and click Properties ...

Страница 69: ... you are using custom paper sizes refer to Custom paper sizes on page 59 9 The Paper out message will appear on the LCD screen waiting for you to insert appropriate papers And if you have enabled duplex printing by selecting Duplex Settings a message with instructions on how to perform a manual feed will be displayed Follow the on screen instructions to proceed ...

Страница 70: ... error has not been fixed You will find the full set of Alert window messages in Alert windows status messages on page 99 Paper out Perhaps the most common of the set of conditions you will be encountering the Paper out alert usually indicates your paper tray is empty If you attempt to print when there is no paper in the paper tray the messages informing you of that fact will appear on both your P...

Страница 71: ...an Ink Low message you should replace ink tanks as needed see Installing the ink tanks on page 18 You can continue to print for the moment utilising ink still in the printer1 but if the ink runs out altogether your printer will halt and you will not be able to print until you have replaced the empty ink tank s When you replace the ink tank the ink low message on your printer s LCD screen may not d...

Страница 72: ...s is to ensure the printhead does not remain uncapped when not printing An uncapped printhead may become dehydrated and even unusable if left in that state for too long When the feed mechanism determines that a sheet has not completed its travel through the printer and exited correctly you will be notified and the printer will stop printing until the error is cleared Alert window on your PC Messag...

Страница 73: ...printer taking care not to tear it 4 If you cannot see or grab the paper from the side door opening look for a jammed sheet of paper in Tray 1 area 5 Remove the jammed sheet carefully from Tray 1 if found taking care not to tear it 6 Look in the output tray for a jammed sheet of paper 7 Remove the jammed sheet carefully if found 8 Slide Tray 1 back into position 9 Close the side access door and th...

Страница 74: ...rror is cleared The next time you issue a Print command the following messages will appear on both your PC and printer Alert window on your PC Message on your printer s LCD screen Tilt error Action Required Your printout will not proceed until the printer is sitting level Once you have corrected the tilt of your printer it will undergo a quick printhead flush and clean displaying another alert win...

Страница 75: ...w you to view information on printer supplies and usage view and change current printer settings perform some simple troubleshooting Accessing the Toolbox application You may use the Toolbox application on both local Lomond printers connected via a USB cable and network connected Lomond printers To access the Toolbox application from your PC 1 Click the Windows Start icon on your taskbar 2 Click A...

Страница 76: ...ut depending on your supplier and the browser you are using Toolbox information screens Toolbox information screens are accessed through hyperlinks found in the Home Page For these hyperlinks to work ensure you have JavaScript enabled Specifically if you cannot access information screens in Internet Explorer IE under Windows 2003 2008 you will need to lower the Security setting in IE to allow Java...

Страница 77: ... Printhead Details page shows usage and identification details as well as a link to your printhead supplier s web page as shown below To access the Printhead Details page from the Home Page navigate to the Supplies Information page then either click Print head pages printed or select Print Head Details from the Select a supplies page below arrow Ink details An information page for each ink color i...

Страница 78: ... color from the Select a supplies page below arrow The Black Ink Information page is shown below Information displayed on this page may vary depending on your supplier Usage information Information on the number and type of pages printed is displayed in the Usage Information page To access the Usage Information page from the Home Page select Usage Info Information displayed on this page may vary d...

Страница 79: ...en you may also change the language used in all Toolbox screens To do this click the Language arrow and select your language then click Save Your printer driver language will not be affected by this change To access the General Settings page from the Home Page select General Settings Network Settings This screen allows you to view and change basic network status and configuration settings of your ...

Страница 80: ...nel first before making any changes To access the IP Configuration settings page from the Home Page select Network Settings then click the Select a network configuration page below arrow and select IP Configuration SNMP Configuration This screen allows you to view and change SNMP Configuration settings on your printer Changing printer settings through this screen may cause your printer to become u...

Страница 81: ... below arrow and select SNMP Configuration Toolbox Troubleshooting screens The following screens may help in troubleshooting problems with your Lomond printer Event Log Your Lomond printer logs errors into a special buffer in printer memory The Event Log screen displays any errors that have beeen logged by the printer as it responds to your commands or performs maintenance functions ...

Страница 82: ...e Maintenance page allows you to clean the printhead and print various diagnostic pages that can be useful in determining printer problems and helping to solve them To access the Maintenance page from the Home Page select Maintenance For information on how and when to use the various Clean Printhead buttons refer to Printhead cleaning using the Toolbox on page 85 The remaining buttons shown above ...

Страница 83: ...ave entered an extended maintenance activity Check your PC screen for further information When undergoing extended maintenance the following Alert window will be displayed While this window is displayed your printer will not acknowledge any Print commands This may take a few minutes Printing will resume when maintenance is complete Restoring print quality If your printouts start to display streaks...

Страница 84: ...pears on the LCD screen 6 Print a test page to determine whether the problem has been resolved 7 If the problem is still not resolved you may repeat step 2 a final time within 10 minutes to initiate the most thorough cleaning operation available and then select Full maintenance Before issuing a test print again wait until the power lamp stops blinking and the Ready message appears on the LCD scree...

Страница 85: ... in their operation to those appearing in the printer driver Services tab Wiping your printhead Before wiping the printhead you will need A clean lint free cloth or similar Clean water Suitable Cleaning Cloth Clean lint free cloth Spectacle glasses wipe Clean sponge unused Do not use Toilet paper newspaper paper towels or cleaning wipes containing soap chemicals scents Suitable Water Bottled drink...

Страница 86: ...he direction of the nozzles 4 Using another clean area on the cloth gently wipe the printhead in the opposite direction Reinsert the printhead into the printer as described in Installing the printhead cartridge on page 24 Dispose of cloth and thoroughly wash hands To avoid degradation of print quality Hold the printhead cartridge only by the handles Avoid touching the unprotected ink couplings pri...

Страница 87: ...ntouts do not match your expectations resetting the print options on your printer driver back to their original default settings may solve the problem To reset your printer driver to the original factory default setting installed when you first set up your printer 1 Click the Windows Start icon on your taskbar 2 Select Devices and Printers 3 Right click the Lomond Office Printer Pro in the Printer...

Страница 88: ...ality of the output Choosing paper that is compatible with your Lomond printer and using the right paper for each job are key to achieving the best quality results For good results paper should always be in good condition when used in your printer Do not use the paper if the sheets are in poor condition Do not use the paper if it is moist dusty has surface or edge dust folded curled or wrinkled to...

Страница 89: ...prepared side will generally be unsuitable For successful duplex printing the first side of the printed sheet should be dry and the sheet must be very flat when re loaded into the paper tray to ensure the second side is printed correctly Curled or cockled paper will cause misfeeds Try printing a small sample If the result is not up to expectations try printing on heavier grade or higher quality pa...

Страница 90: ...e 14 or in individual ink tank packaging You do not need to switch off your printer to replace ink cartridges To replace the ink tanks in your printer 1 Ensure all Print commands have terminated and the printer is idle 2 Lift the ink tank access cover and the four ink tank covers to reveal the ink tanks in their slots see the printer Internal view on page 12 3 Carefully remove the ink tanks from t...

Страница 91: ... cartridges to temperatures higher than 60 ºC 140 ºF Allow printhead cartridges to acclimatise to ambient temperature before using in your printer Replacing the printhead cartridge Your new printhead cartridge will be delivered packaged as shown in the Printhead cartridge section on page 13 You do not need to switch off your printer to replace the printhead cartridge To replace the printhead cartr...

Страница 92: ...pt to release the printhead latch in any other manner by yourself 6 Rotate and lift the printhead latch as shown to reveal the printhead cartridge Always lift the printhead latch as far as possible It should be vertical when fully opened 7 Grasp the printhead cartridge by the handles and rotate the printhead cartridge towards the latch to disengage it as shown This image cannot currently be displa...

Страница 93: ...ridge section on page 13 use it to cover the old printhead cartridge as there is always a chance some ink will remain in the printhead cartridge 9 Insert the new printhead cartridge following the instructions contained in the Installing the printhead cartridge section on page 24 Always consider the environment when disposing of printhead cartridges Follow your supplier instructions to ensure you a...

Страница 94: ...ould be displayed on the screen If an ink low message is displayed on the LCD screen it indicates low ink levels You may continue to print but you should replace relevant ink tanks as they are empty If an Out of ink message is displayed on the LCD screen it indicates out of ink conditions or missing ink tanks The printer will not function until you replace those ink tanks If a Paper jam message is...

Страница 95: ...plies specifically to networked printers If you have set up your Lomond printer using a specific IP address see Installing a network driver on page 36 and your Test page does not print the most likely cause is an incorrect IP address during installation Uninstall the printer see Uninstalling older printer drivers on page 49 and then re install it using the correct IP address Check that your Test P...

Страница 96: ...e printer tray the wrong way up In all cases you will need to re load papers to your paper tray Re loading paper Paper reams can sometimes have adjacent sheets sticking together at the edges Similarly paper dust may be present and noticeable on sheet edges or surfaces These issues may give rise to mis picking To minimise mis picking re load the paper tray following these directions Flex the sheets...

Страница 97: ...ing Use recommended paper types to minimise curl Heavy graphics usually requires higher quality paper Remove the sheets from the output tray more often if curl is still a problem Make sure the side access door is firmly closed Can no longer print to a networked printer If you can no longer print to a networked printer the most probable cause is that the IP address of the printer cannot be reached ...

Страница 98: ...ause is that the Server has restricted access to JavaScript Contact support personnel and inform them of the problem Printer slows down between pages Your Lomond printer will always print a page at its rated speed from start of page to end of page If you see your printer slowing down between pages the most likely cause is slow delivery of data to your printer For some documents your computer may n...

Страница 99: ...is covered in the following table and classified into one of three types of message User Intervention required operational status reached requiring your intervention Warning recoverable error state requiring your intervention Fatal error if you encounter these errors contact support personnel Message Type Message on the LCD screen User Intervention Required User action required to resume printing ...

Страница 100: ...nk clean electrical contacts and re seat it Unauthorized Magenta Ink Tank Installed Remove ink tank clean electrical contacts and re seat it Unauthorized Black Ink Tank Installed Remove ink tank clean electrical contacts and re seat it Multiple Unauthorized Ink Tanks Installed Remove ink tank clean electrical contacts and re seat it The Black Ink Tank is missing Insert or re seat the ink tank Ensu...

Страница 101: ... OEM authorized refill systems Ink Dye based Ink dry time Less than 1 second Paper dry to the touch before leaving printer Ink replenishment Individual ink tank replacement Paper sizes Tray1 A4 US Letter and US Legal Tray 2 6 x 4 to US Legal Paper types Plain paper glossy and matte microporous coated inkjet paper Paper weight Tray 1 70 to 120 gsm 19 lb to 32 lb Tray 2 70 to 240 gsm 19 lb to 75 lb ...

Страница 102: ...y message is displayed on the LCD screen press the Menu button 2 Use the Up or Down button to select Transport mode and then press the OK Resume button 3 Press the OK Resume button again to confirm The power lamp begins to blink and the Transport mode Setting message appears on the LCD screen 4 Wait until the power lamp stop blinking and the printer is powered off Your printer is now in transport ...

Страница 103: ...ns 5 Wrap each ink tank in clean lint free absorbent material and place them in a sealed plastic bag as a precaution against any spillages during transport DO NOT remove the printhead before re packaging the printer The printhead is best left in the printer during transport 6 Empty Tray 1 and re insert the paper picker stay see Removing the paper picker stay on page 17 to secure the paper picking ...

Страница 104: ...ge 104 of 106 Unpacking your printer This section provides a simple visual guide to unpacking your new Lomond printer See Setting up your Lomond printer on page 16 for detailed information on how to proceed after unpacking ...

Страница 105: ...Appendix Repacking Page 105 of 106 Repackaging your printer This section provides a simple visual guide to repackaging your printer for transport as discussed in Remote relocation on page 103 ...

Страница 106: ...6 of 106 Notices and Regulatory statements This is a place holder for Certificates and Statements to be inserted as appropriate by Brand Partner s Edition Notice FCC Compliance European Community WEEE directive Industry Canada Environmental Protection ...

Отзывы: