Operation Panel
4-16
Job Log History (Sending Job Log History)
This sets the sending of the Job Log History.
The options available in the Job Log History menu are as follows:
• Auto Sending (Automatic Sending of Job Log History)...4-16
• Send History (Sending job log history)...4-17
• Destination (Setting the destination)...4-18
• Subject (Setting job log subject)...4-19
• Personal Info. (Personal information setting)...4-20
1
In the
Report
menu, press
U
or
V
to select
Job Log History
.
2
Press
[OK]
. The
Job Log History
menu appears.
Auto Sending (Automatic Sending of Job Log History)
This function automatically sends the job log history to the specified destination whenever a set number of jobs has been
logged. Set the destinations in advance by referring to
Destination (Setting the destination) on page 4-18
.
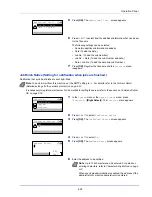
1
In the
Job Log History
menu, press
U
or
V
to select
Auto
Sending
.
2
Press
[OK]
. The
Auto Sending
menu appears.
3
Press
U
or
V
to select
Off/On
.
4
Press
[OK]
. The
Off/On
screen appears.
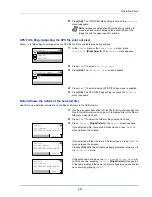
5
Press
U
or
V
to select
On
or
Off
.
6
Press
[OK]
. The Auto Sending is set and the
Job Log History
menu reappears.
If
On
is selected, continue on and select the settings.
7
Press
U
or
V
to select
Auto Sending
.
Note
When user login administration is enabled,
Job Log History
is displayed when logged in with
administrator authority.
To send E-mail from this machine, set the SMTP setting to
On
. For details, refer to the
Protocol Detail (Detailed
settings for the network protocol) on page 4-63
.
It is necessary to register a mail server. For the method for setting the server, refer to the section on
Command
Center RX on page 2-18
.
Job Log History:
Destination
Exit
03
Send History
02
01
Auto Sending
Note
If something other than
Show All
is set at
Disp.
Status/Log (Display Status/Log setting)
(
page 4-94
), then the
log in screen appears. Enter the login user name and
password, and press
[Login]
(
[Right Select]
).
Auto Sending:
Exit
01
Off/On
Off/On:
Off
01
On
02
*
Job Log History:
Destination
Exit
03
Send History
02
01
Auto Sending
Содержание ECOSYS P4040dn
Страница 1: ...ECOSYS P4040dn PRINT OPERATION GUIDE ...
Страница 16: ...xii ...
Страница 22: ...Machine Parts 1 6 ...
Страница 58: ...Preparation before Use 2 36 ...
Страница 66: ...Printing 3 8 ...
Страница 202: ...Operation Panel 4 136 ...
Страница 250: ...Maintenance 7 12 ...
Страница 273: ...8 23 Troubleshooting 3 Close the rear cover 4 Open and close the top cover to clear the error ...
Страница 274: ...Troubleshooting 8 24 ...
Страница 306: ...Appendix A 32 ...
Страница 314: ...Index 4 W Waste Toner Box 1 2 Replacing 7 7 Wide A4 4 55 Wireless Network Interface Kit A 11 X XPS Fit to Page 4 55 ...
Страница 315: ......
Страница 318: ...Rev 1 2014 12 2P7KDEN001 ...


