background image

13

En

Connections

Connecting the AV Receiver

Speaker Configuration

The following table indicates the channels you should use 
depending on the number of speakers that you have. 
For 9.2-channel surround-sound playback, you need 9 
speakers and 2 powered subwoofers.

*1

If you’re using only one surround back speaker, connect it to 
the 

SURR BACK/ZONE 3 L

 terminal. 

No matter how many speakers you use, 2 powered sub-
woofers are recommended for a really powerful and solid 
bass.
To get the best from your surround sound system, you 
need to set the speaker settings. You can do this automati-
cally (

29

) or manually (

53

).

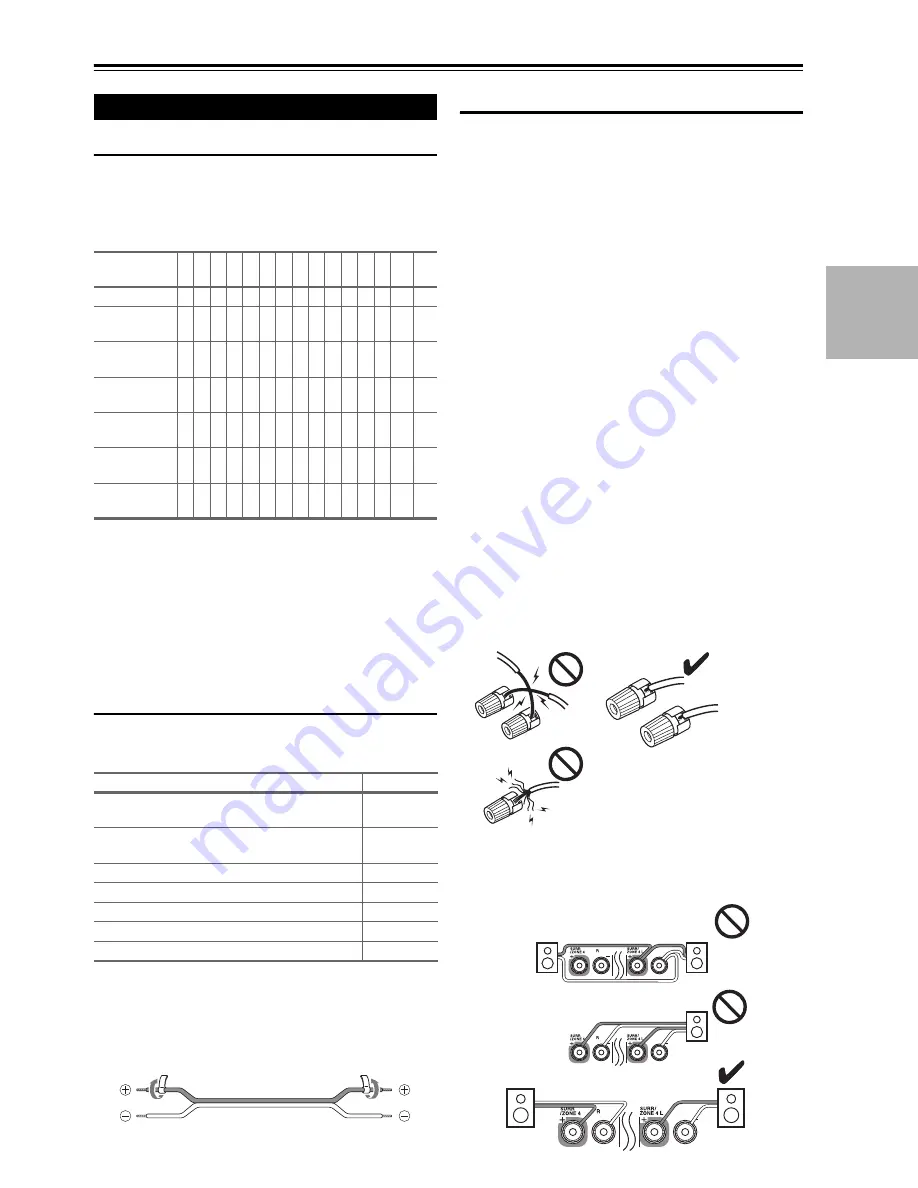
Attaching the Speaker Cable Labels

The AV receiver’s positive (+) speaker terminals are all 
red (the negative (–) speaker terminals are all black).

The supplied speaker cable labels are also color-coded and 
you should attach them to the positive (+) side of each 
speaker cable in accordance with the table above. Then all 
you need to do is to match the color of each label to the 
corresponding speaker terminal.

Speaker Connection Precautions

Read the following before connecting your speakers:
• You can connect speakers with an impedance of between 

4 and 16 ohms. If the impedance of any of the connected 
speakers is 4 ohms or more, but less than 6 ohms, be sure 
to set the minimum speaker impedance to “

4ohms

” 

(

54

). If you use speakers with a lower impedance, and 

use the amplifier at high volume levels for a long period 
of time, the built-in protection circuit may be activated.

• Disconnect the power cord from the wall outlet before 

making any connections.

• Read the instructions supplied with your speakers.
• Pay close attention to speaker wiring polarity. In other 

words, connect positive (+) terminals only to positive (+) 
terminals, and negative (–) terminals only to negative (–) 
terminals. If you get them the wrong way around, the 
sound will be out of phase and will sound unnatural.

• Unnecessarily long, or very thin speaker cables may 

affect the sound quality and should be avoided.

• If you use 4 or 5 speakers, connect each of the two sur-

round speakers to the 

SURR/ZONE 4 L/R

 terminals. 

Do not connect them to the 

SURR BACK/ZONE 3 

L/R

FRONT WIDE/ZONE 2 L/R

, or 

FRONT HIGH 

L/R

 terminals.

• Be careful not to short the positive and negative wires. 

Doing so may damage the AV receiver.

• Make sure the metal core of the wire does not have con-

tact with the AV receiver’s rear panel. Doing so may 
damage the AV receiver.

• Don’t connect more than one cable to each speaker ter-

minal. Doing so may damage the AV receiver.

• Don’t connect one speaker to several terminals.

Connecting Your Speakers

Number of 
speakers

2 3 4 5 6 7 7 7 8 8 9 9 9 10 11

Front speakers

✔ ✔ ✔ ✔ ✔ ✔ ✔ ✔ ✔ ✔ ✔ ✔ ✔ ✔ ✔

Center 
speaker

✔ ✔ ✔ ✔ ✔ ✔ ✔ ✔ ✔ ✔ ✔ ✔

Surround 
speakers

✔ ✔ ✔ ✔ ✔ ✔ ✔ ✔ ✔ ✔ ✔ ✔ ✔

Surround back 
speaker

*1

✔ ✔

Surround back 
speakers

✔ ✔

Front high 
speakers

✔ ✔ ✔

Front wide 
speakers

✔ ✔ ✔ ✔

Speaker

Color

Front left, Front high left, Front wide left, 
Zone 2 left

White

Front right, Front high right, Front wide right, 
Zone 2 right

Red

Center

Green

Surround left, Zone 4 left

Blue

Surround right, Zone 4 right

Gray

Surround back left, Zone 3 left

Brown

Surround back right, Zone 3 right

Tan

Содержание DTR-70.2

Страница 1: ...AV Receiver DTR 80 2 DTR 70 2 Instruction Manual ...

Страница 2: ... the apparatus does not operate normally by fol lowing the operating instructions Adjust only those controls that are covered by the operating instructions as an improper adjustment of other controls may result in damage and will often require extensive work by a qualified technician to restore the apparatus to its normal operation E If the apparatus has been dropped or damaged in any way and F Wh...

Страница 3: ...or plastic items on this unit for a long time because they may leave marks on the case This unit s top and rear panels may get warm after prolonged use This is normal If you do not use this unit for a long time it may not work properly the next time you turn it on so be sure to use it occasionally For U S models FCC Information for User CAUTION The user changes or modifications not expressly appro...

Страница 4: ...ontroller doesn tworkreliably try replacing the batteries Don t mix new and old batteries or different types of batteries If you intend not to use the remote controller for a long time remove the batteries to prevent dam age from leakage or corrosion Remove expired batteries as soon as possible to prevent damage from leakage or corrosion Aiming the Remote Controller To use the remote controller po...

Страница 5: ...peaker Setup 53 Audio Adjust 57 Source Setup 60 Listening Mode Preset 65 Miscellaneous 66 Hardware Setup 67 Lock Setup 69 Using the Audio Settings 69 NET USB 73 About NET 73 Connecting the AV Receiver 73 Listening to Internet Radio 74 Playing Music Files on a Server 75 Remote Playback from Media Server Personal Computer 78 Network Settings 79 About USB 81 Multi Zone 83 Connecting Zone 2 83 Connect...

Страница 6: ...ol DTR 80 2 7 Digital Inputs 4 Optical 3 Coaxial DTR 70 2 6 Digital Inputs 3 Optical 3 Coaxial Component Video Switching 3 Inputs 1 Output Universal Port for the Optional Dock for iPod 9 HD Radio 10 tuner module North American mod els DAB tuner module Australian models 2 Independent Subwoofer Pre Outs Banana Plug Compatible Speaker Posts Powered Zone 2 3 4 Internet Radio Connectivity SIRIUS Intern...

Страница 7: ... Apple performance standards Apple is not responsible for the operation of this device or its compliance with safety and regulatory standards 10 HD Radio and the HD Radio Ready logo are proprietary trademarks of iBiquity Digital Corporation To receive HD Radio broadcasts you must install an Onkyo UP HT1 HD Radio tuner module sold separately 11 SIRIUS XM and all related marks and logos are trademar...

Страница 8: ...button 50 h Tone and buttons 69 88 i Display 9 j Movie TV button 42 k Music button 42 l Game button 42 m Dimmer button North American models 25 n Memory button 33 o Tuning Mode button 32 p Display button 25 q Setup button 49 r Tuning Preset 32 to 33 arrow and Enter buttons s Return button t Master Volume control 25 u Zone 2 and Off buttons 87 v Zone 3 and Off buttons 87 w Zone 4 and Off buttons 87...

Страница 9: ...Zone 2 indicator 87 d Z4 Powered Zone 4 indicator 87 e Listening mode and format indicators 42 70 f NETWORK indicator 74 75 79 g Tuning indicators RDS indicator Australian models 39 AUTO indicator 32 TUNED indicator 32 FM STEREO indicator 32 h SLEEP indicator 26 i Bi AMP indicator 15 j BTL indicator 16 k Headphone indicator 28 l Audyssey indicator 29 56 Dynamic EQ indicator 60 Dolby Vol indicator ...

Страница 10: ...INLET p GND screw q 12V TRIGGER OUT A B C jacks r Composite video S Video and analog audio jacks BD DVD IN VCR DVR IN and OUT CBL SAT IN GAME IN PC IN TAPE IN and OUT TV CD IN and PHONO IN s MULTI CH input jacks FRONT L R CENTER SURR L R SURR BACK L R and SUBWOOFER t PRE OUT jacks FRONT L R CENTER SURR L R SURR BACK L R FRONT HIGH WIDE L R SW1 SW2 ZONE 2 L R SUBWOOFER and ZONE 3 L R SUBWOOFER u SI...

Страница 11: ... q w buttons 32 b D TUN button Tuner remote mode only 32 c CH button 33 d Number buttons 32 1 When you want to change the remote controller mode without changing the current input source press Mode and within about 8 seconds press Remote Mode Then with the AV receiver s remote controller you can control the component corresponding to the button you pressed 2 These buttons can be used when not in R...

Страница 12: ...es the bass sounds of the LFE Low Frequency Effects channel The volume and quality of the bass output from your subwoofer will depend on its position the shape of your listening room and your listening position In general a good bass sound can be obtained by installing the subwoofer in a front corner or at one third the width of the wall as shown g h Surround back speakers Left and Right These spe...

Страница 13: ...time the built in protection circuit may be activated Disconnect the power cord from the wall outlet before making any connections Read the instructions supplied with your speakers Pay close attention to speaker wiring polarity In other words connect positive terminals only to positive terminals and negative terminals only to negative terminals If you get them the wrong way around the sound will b...

Страница 14: ...hould be connected to each pair of terminals If you re using only one surround back speaker connect it to the SURR BACK ZONE 3 L terminal Strip 1 2 to 5 8 12 to 15 mm of insulation from the ends of the speaker cables and twist the bare wires tightly as shown 1 2 to 5 8 12 to 15 mm Surround back left speaker Surround left speaker Surround right speaker Front high left speaker Front high right speak...

Страница 15: ...ofer connect it to SW1 PRE OUT Bi amping the Front Speakers The FRONT L R and SURR BACK ZONE 3 L R terminal posts can be used with front speakers and surround back speak ers respectively or bi amped to provide separate tweeter and woofer feeds for a pair of front speakers that support bi amping providing improved bass and treble performance When bi amping is used the AV receiver is able to drive u...

Страница 16: ...RONT WIDE ZONE 2 L R terminal posts can be used with front wide speakers or passive subwoofers Once you ve connected the passive subwoofers and turned on the AV receiver you must set the Passive Subwoofer setting to Use 54 When the passive subwoofers are used the Powered Zone 2 4 cannot be used If you use one passive subwoofer connect it to the SUBWOOFER1 terminals Connecting a Power Amplifier If ...

Страница 17: ...best pic ture quality some TV manufacturers label their compo nent video sockets slightly differently Analog RGB This is a conventional analog interface to connect a PC and a display device also called D Sub or D subminiature S Video S Video separates the luminance and color signals and pro vides better picture quality than composite video Composite video Composite video is commonly used on TVs VC...

Страница 18: ...een on the TV select the input of the HDMI component connected to the AV receiver If the TV power is off or the TV is set to another input source this may result in no sound from the AV receiver or the sound may be cut off When the Audio TV Out setting is set to On 67 to hear from your TV s speakers by controlling the AV receiver s volume the sound will be output from the AV receiver s speakers to...

Страница 19: ...video recorder IN 3 CBL SAT Satellite cable set top box etc OPTICAL IN 1 GAME Game console IN 2 TV CD TV CD player IN 3 1 Other components D MONITOR OUT Composite video and S Video TV projector etc BD DVD IN Analog audio composite video and S Video Blu ray Disc DVD player VCR DVR IN VCR or DVD recorder digital video recorder CBL SAT IN Satellite cable set top box etc GAME IN Game console PC IN Ana...

Страница 20: ... With the connections described above you cannot record the video through the AV receiver To make a connection for video recording 41 With u Remote Interactive you can use the following special functions Auto Power On When you start playback on a component connected via u while the AV receiver is on Standby the AV receiver will automatically turn on and select that com ponent as the input source D...

Страница 21: ...ary power surge that might interfere with other electrical equipment on the same circuit If this is a problem plug the AV receiver into a different branch circuit Do not use a power cord other than the one supplied with the AV receiver The supplied power cord is designed exclusively for use with the AV receiver and should not be used with any other equipment Never disconnect the power cord from th...

Страница 22: ...f not connected to the same output you have selected in the Mon itor Out setting the Monitor Out setting will be automatically switched to Analog 23 In this case the setting of the output resolution will be that for HDMI output 50 Moreover it will be switched to 1080i when 1080p or 1080p 24 is selected and to Through when Auto is selected Monitor Out setting set to Both Both Main or Both Sub Video...

Страница 23: ...tion Formats Audio component can be connected by using any of the following audio connection formats analog analog multi channel optical coaxial or HDMI When choosing a connection format bear in mind that the AV receiver does not convert digital input signals for ana log line outputs and vice versa For example audio signals connected to an optical or coaxial digital input are not out put by the an...

Страница 24: ...tandby indicator goes off Pressing the remote controller s On again will turn on any components connected via u Turning Off Press On Standby on the front panel or Press Receiver followed by Standby on the remote controller The AV receiver will enter Standby mode To prevent any loud surprises when you turn on the AV receiver always turn down the volume before you turn it off On Receiver Standby On ...

Страница 25: ... the AV receiver s display Tip North American models Alternatively you can use the AV receiver s Dimmer This manual describes the procedure using the remote controller unless otherwise specified Selecting the Language Used for the Onscreen Setup Menus Playing the Connected Component 1 Use the input selector buttons to select the input source 2 Start playback on the source component See also Contro...

Страница 26: ...minutes in 10 minute steps The SLEEP indicator lights on the display when the sleep timer has been set The specified sleep time appears on the display for about 5 seconds then the previous display reappears Selecting Speaker Layout Press Receiver followed by SP Layout repeat edly 9 2 ch playback Speaker Layout SB FH The sounds from surround back and front high speakers are output by priority Speak...

Страница 27: ...n will be superimposed on the TV screen The language is English only 2 Use q w e r to make the desired selection Audio Performs audio settings For details refer to Using the Audio Settings 69 Video 1 You can change the following settings Wide Mode Picture Mode Brightness Con trast Hue and Saturation The remote controller s Video acts as a shortcut for this menu See also Picture Adjust 63 Info 2 3 ...

Страница 28: ... 1 on the remote controller Changing the Input Display 1 Press Tape Game or VCR DVR so that TAPE GAME or VCR DVR appears on the display 2 Press and hold down Tape Game or VCR DVR about 3 seconds to change the input display Repeat this step to select MD CDR or DOCK For the Tape input selector the input display changes in this order For the Game input selector the setting changes in this order For t...

Страница 29: ...rs will enjoy Audyssey MultEQ XT32 takes measurements at up to 8 positions within the listening area Position the micro phone at ear height of a seated listener with the micro phone tip pointed directly at the ceiling using a tripod Do not hold the microphone in your hand during measure ments as this will produce inaccurate results First measurement position Also referred to as the Main Listening ...

Страница 30: ...through the subwoofer Use the volume control on the subwoofer Caution When the Subwoofer setting is set to 1ch the left hand subwoofer SW1 alone will be measured When the Subwoofer setting is set to 1ch with two subwoofers connected the right hand subwoofer SW2 will not be measured and no sound will be output An error will occur if you set Subwoofer to 2ch with out connecting any subwoofers or wit...

Страница 31: ...s Manually You can manually make changes to the settings found dur ing Audyssey MultEQ XT32 Room Correction and Speaker Setup See also Speaker Configuration 54 Speaker Distance 55 Level Calibration 56 Equalizer Settings 56 Note Please note that THX recommends any THX main speakers be set to 80Hz THX If you set up your speakers using Audyssey MultEQ XT32 Room Correction and Speaker Setup please mak...

Страница 32: ...section describes the procedure using the but tons on the front panel unless otherwise specified Using the Tuner Press Tuner to select either AM or FM In this example FM has been selected Each time you press Tuner the radio band changes between AM and FM Actual display depends on the country 1 Press Tuning Mode so that the AUTO indicator lights on the display 2 Press Tuning q w Searching stops whe...

Страница 33: ... of adding The Best of XM programming to the SIRIUS service The Best of XM service is not available to SIR IUS Canada subscribers at this time Please check with SIRIUS Canada for any updates using the numbers and web address below Family friendly packages are also available to restrict channels featuring content that may be inappropriate for children To subscribe to SIRIUS U S and Canadian custome...

Страница 34: ...heast either through a window or out side Area 2 Point the antenna toward the sky in the north or northeast either through a window or outside Area 3 Point the antenna toward the sky in the north or northwest either through a window or outside Area 4 Point the antenna toward the sky in the west northwest or southwest either through a window or out side Area 5 Put the antenna outside and point it s...

Страница 35: ...t are locked must be unlocked before you can listen to them See SIRIUS Parental Lock 36 for more informa tion 4 Use q w to select SAT Radio Mode and e r to select SIRIUS Pressing e r cycles through the following options None Select if you re not using Satellite Radio SIRIUS Select to use SIRIUS Satellite Radio 5 When you ve finished press Setup Setup closes Press Tuner repeatedly to select SIRIUS ...

Страница 36: ...ng Repeat this procedure for all of your favorite SIRIUS Satellite Radio channels To select a preset use Preset e r on the AV receiver or the remote controller s CH 1 Select the preset that you want to delete See the previous section 2 While holding down Memory press Tuning Mode on the AV receiver The preset is deleted and its number disappears from the display 1 Press Receiver followed by Setup T...

Страница 37: ...dware Setup 1 Remote ID 2 Multi Zone 3 Tuner 4 HDMI 5 Auto Power Down 6 Network 7 Firmware Update SIRIUS Parental Lock Enter Code 0 1 2 3 4 5 6 7 8 9 5 Use e r to select a number on the screen and then press Enter Repeat this for each of the four digits in the PIN number If you re entering the PIN number for the very first time the default is 0000 The following screen appears If you ve already set...

Страница 38: ...UPDATING Displayed while the SiriusConnect receiver s firmware is being updated INVALID CHANNEL Displayed if you select an unavailable channel CALL SIRIUS Displayed when you select a channel to which you are not subscribed Call SIRIUS if you want to subscribe CHECK SIRIUS TUNER Displayed if the SiriusConnect receiver is not con nected Make sure the SiriusConnect receiver is con nected properly and...

Страница 39: ...all When tuned to an RDS station that s broadcasting text information the text can be displayed Displaying Radio Text RT Note The message Waiting may appear while the AV receiver waits for the RT information If the message No Text Data appears on the display no RT information is available Finding Stations by Type PTY You can search for radio stations by type Listening to Traffic News TP You can se...

Страница 40: ...Pop M Rock music Rock M Middle of the road music Easy M Light classics Light M Serious classics Classics Other music Other M Weather Weather Finance Finance Children s programmes Children Social affairs Social Religion Religion Phone in Phone In Travel Travel Leisure Leisure Jazz music Jazz Country music Country National music Nation M Oldies music Oldies Folk music Folk M Documentary Document Ala...

Страница 41: ...can be recorded to a video recorder e g VCR DVD recorder connected to the VCR DVR OUT jack Recording Separate AV Sources Here you can record audio and video from completely separate sources allowing you to overdub audio onto your video recordings This function takes advantage of the fact that when an audio only input source TV CD Phono etc is selected the video input source remains unchanged In th...

Страница 42: ...des Game THX Movie TV Music Press Receiver first Movie TV Music Game The Dolby Digital and DTS listening modes can only be selected if your Blu ray Disc DVD player is connected to the AV receiver with a digital audio connection coaxial optical or HDMI The listening modes you can select depend on the format of the input signal To check the format see Displaying Source Information 25 While a pair of...

Страница 43: ...round sound This is a further sound enhancement to 5 1 channel sound with two additional speakers that provide greater sound envelopment and more accurate positioning of sounds G This is DTS ES surround sound This surround system can produce a discrete or a matrix encoded sixth channel from existing DTS 5 1 encoded material H This is Dolby Digital EX surround sound This provides a center back surr...

Страница 44: ...mode with video games especially those that bear the Dolby Pro Logic II logo S xcn m Dolby PLIIx Movie and Dolby PLIIx Music These modes use the Dolby Pro Logic IIx modes to expand 5 1 channel sources for 7 1 channel playback D nm Dolby Pro Logic IIz Height Dolby Pro Logic IIz Height is designed to more effectively use existing program material when height channel speaker outputs are present Dolby...

Страница 45: ...xcn m This mode uses Neo 6 to expand 5 1 channel sources for 6 1 7 1 channel playback D n 5 m 5 Audyssey DSX 10 Audyssey DSX is a scalable system that adds new speakers to improve surround impression Starting with a 5 1 system Audyssey DSX first adds Wide channels for the biggest impact on envelopment Research in human hearing has proven that information from the Wide channels is much more critica...

Страница 46: ...mbination of Dolby Pro Logic II IIx 2 and THX Cin ema Music Games modes can be used S D H cnm The combination of Dolby Pro Logic IIz Height 3 and THX Cin ema Music Games modes can be used S D F G H nm The combination of DTS Neo 6 and THX Cinema Music Games modes can be used S D F H cnm THX Ultra2 Cinema This mode expands 5 1 channel sources for 7 1 channel playback It does this by analyzing the co...

Страница 47: ...transmit surround sound content over a stereo signal which listeners can enjoy as either surround sound or normal stereo S xcn m D nm The combination of Neural Surround and THX Cinema Music Games modes can be used S xcn m D nm Neural Digital Music 5 This is a new surround mode specifically designed to enhance the playback of compressed digital music content It provides listeners with an expanded s...

Страница 48: ...ble for classical or operatic music this mode emphasizes the surround channels in order to widen the stereo image and simulates the natural rever beration of a large hall A S D F G H cn 11 m 12 Unplugged Suitable for acoustic instruments vocals and jazz this mode emphasizes the front stereo image giving the impression of being right in front of the stage Studio Mix Suitable for rock or pop music l...

Страница 49: ...sign 1 Volume Setup 2 OSD Setup 3 12V Trigger A Setup 4 12V Trigger B Setup 5 12V Trigger C Setup 6 Miscellaneous 1 Speaker Settings 2 Speaker Configuration 3 Speaker Distance 4 Level Calibration 5 Equalizer Settings 6 THX Audio Setup 2 Speaker Setup 1 Remote ID 2 Multi Zone 3 Tuner 4 HDMI 5 Auto Power Down 6 Network 7 Firmware Update 7 Hardware Setup 1 Multiplex Mono 2 Dolby 3 DTS 4 Audyssey DSX ...

Страница 50: ...e output from both HDMI outputs but HDMI OUT MAIN will become a priority depending on the reso lution video signals may not be output from HDMI OUT SUB Both Sub Select this if your TVs are connected to the HDMI OUT MAIN and HDMI OUT SUB Video signals are output from both HDMI outputs but HDMI OUT SUB will become a priority depending on the reso lution video signals may not be output from HDMI OUT ...

Страница 51: ...on when the Monitor Out setting is set to Analog 50 and the Resolution set ting is set to Through 2 These settings are not available when the Monitor Out set ting is set to Analog 50 HDMI Input If you connect a video component to an HDMI input you must assign that input to an input selector For example if you connect your Blu ray Disc DVD player to HDMI IN 2 you must assign HDMI 2 to the BD DVD in...

Страница 52: ...2 to the BD DVD input selector If you ve connected your TV to the AV receiver with a component video cable you can set the AV receiver so that composite video and S Video sources are upcon verted and output by the COMPONENT VIDEO MONI TOR OUT 1 You can set this for each input selector by selecting the option 1 This applies only when Monitor Out setting is set to Ana log 50 Here are the default ass...

Страница 53: ...r in the Home menu 71 Subwoofer Input Sensitivity 0dB to 15dB in 5 dB step Some DVD players output the LFE channel from their analog subwoofer output at 15 dB higher than normal With this setting you can change the AV receiver s sub woofer sensitivity to match your DVD player Note This setting only affects signals connected to the AV receiver s multichannel input SUBWOOFER jack If you find that yo...

Страница 54: ...Audyssey DSX PLII Neo 6 Audyssey DSX included Orchestra Unplugged Studio Mix TV Logic Game RPG Game Action Game Rock Game Sports All Ch Stereo Full Mono Note When you have selected Yes the Surround Back setting is set to None the Front High or Front Wide setting is set to 80Hz THX if set to None The Front High Front Wide setting cannot be used in either of the following cases Bi amping or bridging...

Страница 55: ...nnot be selected LPF of LFE Low Pass Filter for the LFE Channel 80Hz 90Hz 100Hz 110Hz 120Hz With this setting you can specify the cutoff frequency of the LFE channel s low pass filter LPF which can be used to filter out unwanted hum The LPF only applies to sources that use the LFE channel Double Bass With the Double Bass function you can boost bass out put by feeding bass sounds from the front lef...

Страница 56: ...tone of speakers individually with a 15 band equalizer The vol ume of each speaker can be set 56 Equalizer Manual You can adjust the equalizer for each speaker manu ally If you selected Manual continue with this procedure Audyssey This is selected automatically by Audyssey MultEQ XT32 Room Correction and Speaker Setup function The Audyssey indicator will light 9 and Dynamic EQ and Dynamic Volume b...

Страница 57: ...will not be active in THX listening mode No Audyssey Dynamic EQ Audyssey Dynamic Volume Dolby Volume will be active in THX listening mode depending on the set ting Note This setting is fixed at Yes if Loudness Plus is set to On Main menu Audio Adjust With the Audio Adjust functions and settings you can adjust the sound and listening modes as you like Multiplex Mono Multiplex This setting determine...

Страница 58: ... in Dolby Pro Logic IIz enables the listener to select how much gain is applied to the front high speakers There are three settings Low Mid and High and the front high speakers are accentuated in that order While Mid is the default listening setting the listener may adjust the Height Gain Control to their personal preference Low Low PLIIz Height Gain becomes active Mid Medium PLIIz Height Gain bec...

Страница 59: ...you can specify by how much the front left and right channel output is attenuated in order to create the center channel Setting a value 0 in the middle is set to hear a sound Sound is spread in left and right the outside so that the set value is made big Please adjust by liking Audyssey DSX Soundstage 3dB to Reference to 3dB With this setting you can adjust the soundstage when using Audyssey DSX N...

Страница 60: ...t reference level Reference Level Audyssey Dynamic EQ Reference Level Offset 0dB It should be used when listening to movies 5dB Select this setting for content that has a very wide dynamic range such as classical music 10dB Select this setting for jazz or other music that has a wider dynamic range This setting should also be selected for TV content as that is usually mixed at 10 dB below film refe...

Страница 61: ...ave balance at any volume level Before using this function connect and position all of your speakers About Audyssey Dynamic EQ Audyssey Dynamic EQ solves the problem of deterio rating sound quality as volume is decreased by taking into account human perception and room acoustics Dynamic EQ selects the correct frequency response and surround levels moment by moment at any user selected volume setti...

Страница 62: ...aracter input screen Name To correct a character Note To name a radio preset use Tuner to select AM or FM and then select the preset 33 North American models You cannot enter a custom name for SIRIUS radio presets Name Edit is not operable when the input selector is set to NET USB To restore a custom name to the default erase the custom name by entering an empty white space for each letter 1 Use q...

Страница 63: ... Green Contrast Blue Brightness Blue Contrast The receiver has been designed to incorporate setup and calibration standards established by the Imaging Science Foundation ISF The ISF has developed carefully crafted industry recognized standards for optimal video performance and has implemented a training program for technicians and installers to use these standards to obtain optimal picture quality...

Страница 64: ...o 1080i 1080p 24 Select this for 1080p output at 24 frames per second and video conversion as necessary When the Mon itor Out is set to Analog this setting will be changed to 1080i You can specify the output resolution for the HDMI out puts and have the AV receiver upconvert the picture reso lution as necessary to match the resolution supported by your TV Available only when Source has been select...

Страница 65: ...l audio signal is played DVD etc 2ch Source With this setting the default listening mode for 2 chan nel 2 0 stereo sources in a digital format such as Dolby Digital or DTS Dolby D Dolby D Plus TrueHD With this setting you can specify the listening mode to be used when a Dolby Digital or Dolby Digital Plus for mat digital audio signal is played DVD etc Specifies the default listening mode for Dolby...

Страница 66: ...The Power On Volume cannot be set higher than the Maximum Volume setting Headphone Level 12dB to 0dB to 12dB With this preference you can specify the headphone vol ume relative to the main volume This is useful if there s a volume difference between your speakers and your head phones OSD Setup On Screen Display This preference determines whether operation details are displayed on screen when an AV...

Страница 67: ...onent through your TV s speakers Nor mally this should be set to Off Note Listening mode cannot be changed when this setting is set to On and the input source is not HDMI If On is selected and the audio can be output from the TV the AV receiver will output no sound through its speakers In this case TV Sp On appears on the display When TV Control is set to On this setting is fixed to Auto With some...

Страница 68: ...matically when the HDMI Control RIHD is set to On first time Power Control Off Power Control disabled On Power Control enabled To link the power functions of p compatible com ponents connected via HDMI select On This setting is set to On automatically when the HDMI Control RIHD is set to On first time Note The Power Control setting can be set only when the HDMI Control RIHD setting is set to On HD...

Страница 69: ...er while update Universal Port via NET You can update the firmware via Internet Check the network connection before update via USB You can update the firmware from a USB mass stor age device You can update the Onkyo dock s firmware Do not shut down the power of the AV receiver while update Note This update shall not be performed when no dock is connected to UNIVERSAL PORT jack With this preference...

Страница 70: ... to disturb anyone Late Night For Dolby Digital and Dolby Digital Plus sources the options are Off Late Night function off Low Small reduction in dynamic range High Large reduction in dynamic range For Dolby TrueHD sources the options are Auto The Late Night function is set to On or Off automatically Off Late Night function off On Late Night function on Note The effect of the Late Night function d...

Страница 71: ... return to On This setting cannot be used while a pair of headphones is con nected Audio Selector You can set priorities of audio output when there are both digital and analog inputs Audio Selector ARC The audio signal from your TV tuner can be sent to the HDMI OUT MAIN of the AV receiver 1 With this selection the TV s audio can be automati cally selected as a priority among other assignments HDMI...

Страница 72: ...f try setting the format to PCM If noise is produced when fast forwarding or reversing a DTS CD try setting the format to DTS Fixed Mode Auto The format is detected automatically If no digital input signal is present the corresponding analog input is used instead PCM Only 2 channel PCM format input signals will be heard If the input signal is not PCM the PCM indi cator will flash and noise may als...

Страница 73: ...rk Internet Access for Internet radio To receive Internet radio your Ethernet network must have Internet access A narrowband Internet connection e g 56K modem ISDN will not provide satisfactory results so a broadband connection is strongly recom mended e g cable modem xDSL modem etc Please consult your ISP or computer dealer if you re unsure Note To receive Internet radio with the AV receiver your...

Страница 74: ...ing to vTuner Internet Radio Listening to Internet Radio 1 Press NET USB repeatedly to select the Internet Radio screen The NETWORK indicator lights 9 NET USB Menu qwer Enter Display Top Menu Internet Radio 1 vTuner Internet Radio 2 Pandora Internet Radio 3 Rhapsody 4 SIRIUS Internet Radio 5 Slacker Personal Radio 6 Mediafly 7 Napster 8 9 10 1 Go to Menu MENU Note When the NETWORK indicator flashe...

Страница 75: ...er the preset name and Internet address URL 4 Click Save to save the Internet radio station Playing Music Files on a Server Unit Information WEB Setup Menu Preset Internet Radio Save Customer Setting Refresh 1 Internet Radio Information 2 Network setting Delete Delete Delete No 1 2 3 Name Tuner Internet Radio URL 1 Start your computer or media server 2 Press NET USB to select the Server screen The...

Страница 76: ... so that the AV receiver can play the music files stored on your computer Note Windows Media Player 11 can be downloaded for free from the Microsoft Web site 4 Use q w to select an item and then press Enter A list of music files appears 5 Use q w to select a music file and press Enter or 1 to start playback Playback starts and the following screen appears To return to the previous menu during play...

Страница 77: ...ain uncompressed PCM digital audio Sampling rates of 8 kHz 11 025 kHz 12 kHz 16 kHz 22 05 kHz 24 kHz 32 kHz 44 1 kHz 48 kHz 64 kHz 88 2 kHz and 96 kHz are supported Incompatible files cannot be played Quantization bit 8 bit 16 bit 24 bit Number of channels 2 WAV files must have a wav or WAV filename extension AAC AAC stands for MPEG 2 MPEG 4 Audio Sampling rates of 8 kHz 11 025 kHz 12 kHz 16 kHz 2...

Страница 78: ...the operating system of your personal computer is Win dows 7 Windows Media Player 12 is already installed For more information see the Microsoft Web site Supported Music File Formats See Supported Audio File Formats 77 Note For remote playback this product does not support the following music file formats FLAC and Ogg Vorbis Windows Media Player 12 Setup This section explains how to configure Wind...

Страница 79: ... Right click menu appears For selecting another media server select media server from Other Libraries menu on Windows Media Player 12 4 Select the product from right click menu Play to window appears and playback on the prod uct starts Operations during remote playback can be made from Play to window of Windows 7 on your personal computer During remote playback opera tions such as Playback Pause F...

Страница 80: ...provided by your ISP Proxy URL To use a Web proxy enter its URL here Proxy Port If you re using a Web proxy enter a proxy port number here Control This setting enables or disables control over the network Enable Control over the network enabled Disable Control over the network disabled Note When set to Enable power consumption on standby mode increases Port Number This is the network port used for...

Страница 81: ... USB devices with hub functions are not supported Playing Music Files on a USB Device This section explains how to play music files on a USB mass storage device About USB See Controlling iPod for iPod connection 91 USB port USB port DTR 80 2 1 Plug your USB mass storage device into the AV receiver s USB port 2 DTR 80 2 Press NET USB repeatedly to select the USB Front or USB Rear screen DTR 70 2 Pr...

Страница 82: ...ard which allows USB storage devices to be connected to computers without the need for spe cial drivers or software Note that not all USB MP3 players sup port the USB Mass Storage Class standard Refer your USB MP3 player s instruction manual for details Protected WMA music files on an MP3 player cannot be played Onkyo accepts no responsibility whatsoever for the loss or dam age to data stored on a...

Страница 83: ...e set ting is set to Yes Connecting Your Zone 2 Speakers to an Amp in Zone 2 This setup allows 9 2 channel playback in your main lis tening room and 2 channel stereo playback in Zone 2 with a different source in each room Note With the default settings the Zone 2 volume must be set on the Zone 2 amp If your Zone 2 amp has no volume control set the Zone 2 Out setting to Variable so that you can set...

Страница 84: ...nt source in each room This is called Powered Zone 3 as the Zone 3 speakers are powered by the AV receiver Note that when Powered Zone 3 is turned off you can enjoy 9 2 channel playback in your main room Note With this setup the Zone 3 volume is controlled by the AV receiver Powered Zone 3 cannot be used if Speakers Type Front is set to Bi Amp or BTL 54 This setting cannot be used if the Front Hig...

Страница 85: ...he AV receiver Note With this setup the Zone 4 volume is controlled by the AV receiver Powered Zone 4 cannot be used if Powered Zone 2 or Pow ered Zone 3 is set to Not Act This setting cannot be used if Front High Front Wide set ting is set to Yes Hookup Use an RCA audio cable to connect the AV receiver s PRE OUT ZONE 3 L R jacks to an analog audio input on your Zone 3 amp Use an RCA audio cable t...

Страница 86: ...nu doesn t appear make sure the appropri ate external input is selected on your TV 2 Use q w to select Speaker Setup and then press Enter The Speaker Setup menu appears 3 Use q w to select Speaker Settings and then press Enter The Speaker Settings menu appears 4 Use q w to select Powered Zone 2 Powered Zone 3 or Powered Zone 4 and use e r to select Not Act FRONT WIDE ZONE 2 L R SURR BACK ZONE 3 L ...

Страница 87: ...ITOR OUT is output from ZONE 2 OUT compo nent This section explains how to turn Zone 2 3 4 on and off how to select an input source for Zone 2 3 4 and how to adjust the volume for Zone 2 3 4 Controlling Zone 2 3 4 from the AV receiver Note When Zone 2 3 4 is turned off the output from the 12V TRIG GER OUT goes low 0 volts Using Zone 2 3 4 1 To turn on Zone 2 3 4 and select an input source press Zo...

Страница 88: ... tone and balance function have no effect on ZONE 2 PRE OUT when the Zone 2 Out setting is set to Fixed 86 and Powered Zone 2 setting is set to Not Act 86 The Zone 3 volume tone and balance function have no effect on ZONE 3 PRE OUT when the Zone 3 Out setting is set to Fixed 86 and Powered Zone 3 setting is set to Not Act 86 Even if you repeatedly press the remote controller s Zone to select zones...

Страница 89: ...ain menu doesn t appear make sure the appropriate external input is selected on your TV 2 Use q w to select Miscellaneous and then press Enter The Miscellaneous menu appears 3 Use q w to select 12V Trigger A B or C Setup and then press Enter The 12V Trigger A B C Setup screen appears 4 Use q w to select Delay and use e r to select trigger signals 0sec Trigger A default 1sec Trigger B default 2sec ...

Страница 90: ...em to the AV receiver located in the cabinet via the connecting block Using a Multiroom Kit with Other Components In this setup an IR emitter is connected to the AV receiver s IR OUT jack and placed in front of the other component s remote control sensor Infrared signals received at the AV receiver s IR IN jack are fed through to the other component via the IR emitter Signals picked up by the AV r...

Страница 91: ...s able to read the iPod iPhone The USB indicator flashes if the AV receiver can not read the iPod iPhone 3 Press Display to switch to Extended Mode 3 A list of your iPod model s contents appears To open a folder use q w to select it and then press Enter Tip With the default settings the iPod iPhone can be manipu lated in Standard Mode 2 Pressing Display again switches back to Standard Mode 2 The f...

Страница 92: ...pending on the region Connecting an Onkyo Dock No Onkyo Dock Cable Note Page A UP A1 Dock Universal Port Option Dock When UP A1 Dock that seated iPod is con nected the power consumption on standby mode slightly increases You can control your iPod when Port is selected as the input source See the UP A1 Dock s instruction manual for more information 93 B RI Dock Analog audio RCA See the RI Dock s in...

Страница 93: ...h the RI Dock you can easily play the music stored on your Apple iPod through the AV receiver and enjoy great sound and watch iPod slideshows and videos on your TV In addition the onscreen display OSD allows you to view navigate and select your iPod model s contents on your TV and with the supplied remote controller you can control your iPod from the comfort of your sofa You can even use the AV re...

Страница 94: ...ration iPod and iPod nano the click wheel is disabled during playback By pressing Remote Mode that s been programmed with the remote control code for your Dock you can control your iPod in the Dock See Entering Remote Control Codes for details on entering a remote control code 98 See the Dock s instruction manual for more information UP A1 Dock Port is preprogrammed with the remote control code fo...

Страница 95: ...e and select your music while looking at your TV Extended mode Video Playlists Movies Music Videos TV Shows Video Podcasts or Rentals are displayed on your TV and you can navigate and select your video while looking at your TV 3 In Extended mode see 2 Playlist is used as the page jump button With the page modes you can quickly locate your favorite songs even when your song lists artist lists and s...

Страница 96: ... external input is selected on your TV 2 Use q w to select Remote Controller Setup and then press Enter The Remote Controller Setup menu appears 3 Use q w to select Remote Mode Setup and then press Enter The Remote Mode Setup menu appears 1 Remote Mode Setup 2 Activities Setup 8 Remote Controller Setup TV BD DVD VCR DVR CBL SAT GAME PC AUX 8 1 Remote Mode Setup 4 Use q w to select remote mode and ...

Страница 97: ...ENTER button of your remote to activate OK Ready 15 15 Approx 16ft 5 m Incoming sensor Remote control sensor Transmitter 15 off center Left Right Up Down 12 When you searched for the model a message Successful will appear Now the transfer is successful Go to step 15 When you did NOT search for the model the following screen appears Push any key except for arrow buttons and Enter to see if the comp...

Страница 98: ... down Remote Mode to which you want to enter a code press and hold down Dis play about 3 seconds The Remote Mode button lights Note Remote control codes cannot be entered for Receiver and Zone Only TV remote control codes can be entered for TV Except for Receiver TV and Zone remote control codes from any category can be entered as Remote Mode However these buttons also work as input selector butto...

Страница 99: ...reprogrammed with the remote control code for controlling a component that supports the p 1 limited to some models The component must be able to receive remote control commands via p and be connected to the AV receiver via HDMI 1 The p supported by the AV receiver is the CEC system control function of the HDMI standard Resetting Remote Mode Buttons 1 While holding down Remote Mode that you want to...

Страница 100: ... the Controlling Your iPod about the operation of iPod 94 c d a a b i e f h g j k n m l Press the appropriate Remote Mode first TV DVD player DVD recorder Blu ray Disc player HD DVD player VCR PVR Satellite receiver Cable receiver CD player CD recorder MD recorder Cassette tape deck a On Standby b 9 Input TV VOL q w c Guide Top Menu d q w e r Enter e Setup f 1 3 2 5 4 7 6 1 3 g Search 1 2 1 2 2 Re...

Страница 101: ...Mode Setup 2 Activities Setup 8 Remote Controller Setup My Movie My TV My Music 8 2 Activities Setup 8 2 Activities Setup My Movie Source TV Power On Source Power On Receiver Power On Receiver Source Change Source Play BD DVD Enable Enable Enable Enable Enable Source Power On Enable Source component will turn on Disable Source component will not turn on This option enables the source component to ...

Страница 102: ...15 off center Left Right Up Down 8 2 Activities Setup My Movie Wait 8 2 Activities Setup My Movie Return Successful Learning Commands 1 While holding down Remote Mode for the mode in which you want to use the command press and hold down On until Remote Mode button lights about 3 seconds 2 On the supplied remote controller press the but ton you want to learn the new command Note The following butto...

Страница 103: ...ect the Receiver remote control ler mode 2 Press On to turn on the AV receiver 3 Press TV CD to select the TV CD input source 4 Press 1 to start playback on the CD player You can program Activities so that all four actions are performed with just one button press Making Macros Each Activities can store one macro and each macro can contain up to 32 commands Running Macros Deleting Macros Using Norm...

Страница 104: ... this unit Home Receiver Audio Make sure that the digital input source is selected properly 53 Make sure that all audio connecting plugs are pushed in all the way 17 Make sure that the inputs and outputs of all compo nents are connected properly 18 20 Make sure that the polarity of the speaker cables is correct and that the bare wires are in contact with the metal part of each speaker terminal 13 ...

Страница 105: ...ers when Front High Front Wide is set to Yes 54 Make sure the speakers are configured correctly 54 Check the digital audio output setting on the con nected device On some game consoles such as those that support DVD the default setting is off With some DVD Video discs you need to select an audio output format from a menu Depending on the input signal some listening modes cannot be selected 43 48 I...

Страница 106: ...lution is set to any resolution not supported by the TV no video is output by the HDMI outputs 51 If the message Resolution Error appears on the AV receiver s display this indicates that your TV does not support the current video resolution and you need to select another resolution on your DVD player Australian models Specify the TV system used in your area in the TV Format 66 On your TV make sure...

Страница 107: ...rrect input is selected To prevent signal loops and damage to the AV receiver input signals are not fed through to outputs with the same name VCR DVR IN to VCR DVR OUT Zone 2 3 4 The Zone 2 3 4 speakers only output sources that are connected to an analog input Check to see if the source component is connected to an analog input Powered Zone 2 cannot be used if Passive Sub woofer is set to Use 54 P...

Страница 108: ...in the Network setting 3 HDMI Control RIHD setting is set to On Depending on the TV status the AV receiver will enter Standby mode as usual 68 79 93 When a pair of headphones is connected the listen ing mode is set to Stereo unless it s already set to Stereo Mono or Direct In some cases corrected values suitable for home theater use may be set automatically Use the Multiplex setting on the Audio A...

Страница 109: ...ect your TV to the COMPO NENT VIDEO MONITOR OUT If the video source is connected to an S Video input connect your TV to a MONITOR OUT S If the video source is connected to a composite video input connect your TV to MONITOR OUT V 2 On the main menu select Input Output Assign and then select HDMI Input Select the relevant input selector and assign it to 51 3 On the main menu select Input Output Assi...

Страница 110: ...B Direct mode Tone Control Characteristics 10 dB 50 Hz BASS 10 dB 20 kHz TREBLE Signal to Noise Ratio 110 dB LINE IHF A 80 dB PHONO IHF A Speaker Impedance 4 or 6 Ω 16 Ω Input Sensitivity Output Level and Impedance 1 Vp p 75 Ω Component and S Video Y 0 7 Vp p 75 Ω Component PB CB PR CR 0 28 Vp p 75 Ω S Video C 1 Vp p 75 Ω Composite Component Video Frequency Response 5 Hz 100 MHz 0 dB 3 dB FM Tunin...

Страница 111: ...E PC TAPE TV CD AUX PHONO Multichannel Inputs 7 1 Analog VCR DVR TAPE ZONE 2 PRE OUT ZONE 3 PRE OUT Analog Multichannel Pre Outputs 9 Subwoofer Pre Outputs 2 Speaker Outputs Main L R C SL Z4L SR Z4R SBL Z3L SBR Z3R LW Z2L SW1 RW Z2R SW2 Front High L R Phones 1 6 3 ø SETUP MIC 1 RS232 1 Ethernet 1 IR Input 2 IR Output 1 12 V Trigger Out 3 USB 2 Front and Rear Universal Port 1 RI 1 ...

Страница 112: ...B Direct mode Tone Control Characteristics 10 dB 50 Hz BASS 10 dB 20 kHz TREBLE Signal to Noise Ratio 110 dB LINE IHF A 80 dB PHONO IHF A Speaker Impedance 4 or 6 Ω 16 Ω Input Sensitivity Output Level and Impedance 1 Vp p 75 Ω Component and S Video Y 0 7 Vp p 75 Ω Component PB CB PR CR 0 28 Vp p 75 Ω S Video C 1 Vp p 75 Ω Composite Component Video Frequency Response 5 Hz 100 MHz 0 dB 3 dB FM Tunin...

Страница 113: ... GAME PC TAPE TV CD AUX PHONO Multichannel Inputs 7 1 Analog VCR DVR TAPE ZONE 2 PRE OUT ZONE 3 PRE OUT Analog Multichannel Pre Outputs 9 Subwoofer Pre Outputs 2 Speaker Outputs Main L R C SL Z4L SR Z4R SBL Z3L SBR Z3R LW Z2L SW1 RW Z2R SW2 Front High L R Phones 1 6 3 ø SETUP MIC 1 RS232 1 Ethernet 1 IR Input 2 IR Output 1 12 V Trigger Out 3 USB 1 Front Universal Port 1 RI 1 ...

Страница 114: ...ital video signals Other devices connected to the AV receiver via HDMI must also support HDCP 1 DVI Digital Visual Interface The digital display interface standard set by the DDWG 3 in 1999 2 HDCP High bandwidth Digital Content Protection The video encryption technology developed by Intel for HDMI DVI It s designed to protect video content and requires a HDCP compatible device to display the encry...

Страница 115: ...lu ray Disc DVD player is up to three Blu ray Disc recorder DVD recorder Digital Video Recorder is up to three Cable Satellite Set top box is up to four Do not connect the AV receiver to the other AV receiver AV amplifier via HDMI When the p compatible component more than the above mentioned is connected the linked operations are not guaranteed Operations that can be performed with p connection Fo...

Страница 116: ... the TV speakers from the menu screen of the TV and confirm that the audio is output from the speakers of the TV and not from the speakers connected to the AV receiver 6 Select Use the speakers connected from the AV receiver from the menu screen of the TV and confirm that the audio is output from the speak ers connected to the AV receiver and not from the TV speakers Note Perform the above operati...

Страница 117: ... on and Ethernet cable is connected to rear panel of the AV receiver Never unplug or turn off the AV receiver during updating pro cess Never plug or unplug an HDMI cable and Ethernet cable during updating process Never unplug the power cord during updating process Do not access the AV receiver from PC during updating process It will take about 60 minutes to update the firmware The AV receiver will...

Страница 118: ... reap pear when you finish the update and turn on the AV receiver 6 Message Complete appears on the front dis play of the AV receiver indicating that the update has been completed 7 Using On Standby on the front panel turn off and on the AV receiver Do not use On or Standby on the remote controller Congratulations Now you have the latest firmware on your Integra AV receiver Error Code Description ...

Страница 119: ...opy the zip file 4 Remove the USB storage device from your PC and connect it to the USB port on the AV receiver When the AV receiver has two USB ports you can use either one 5 Make sure the AV receiver and TV are turned on If the AV receiver is in standby mode press On Standby on the AV receiver to light up the front display 6 Select the USB input source Now Initializing is displayed on the front ...

Страница 120: ... Then retry the update Error Code Description 10 20 USB storage device is not detected Make sure the USB flash memory or USB cable is prop erly connected to the USB port If the USB storage device has its own power supply use it to power the USB storage device 14 An update file is not found in the root folder of the USB storage device or an update file is for other model Retry download following in...

Страница 121: ...XGA SVGA VGA HDMI 1080p 24 1080p 1080i 720p 480p 576p 480i 576i Component 1080p 1080i 720p 480p 576p 480i 576i S Video Composite 480i 576i PC IN Analog RGB SXGA 2 2 2 2 2 XGA 2 2 2 2 2 SVGA 2 2 2 2 2 VGA 2 2 2 2 2 Component S Video Composite 1080p 1080i 720p 480p 576p 480i 576i 480i 576i HDMI 1080p 24 1080p 1080i 720p 480p 576p 480i 576i Component 1080p 1 1080i 720p 480p 576p 480i 576i S Video Com...

Страница 122: ...122 En Memo ...

Страница 123: ...123 En Memo ...

Страница 124: ...ision of ONKYO U S A CORPORATION 18 park Way Upper Saddle River N J 07458 U S A Tel 800 225 1946 201 818 9200 Fax 201 785 2650 http www integrahometheater com Integra Division of ONKYO CORPORATION Sales Product Planning Div 2 1 Nisshin cho Neyagawa shi OSAKA 572 8540 JAPAN Tel 072 831 8023 Fax 072 831 8163 En ...

Отзывы: