WindO/I-NV4 User’s Manual
4-27
3 Project Settings Dialog Box
4
Pro
je
ct S
ettin
gs
■
Enable Maintenance
Select this check box to display the maintenance screen during operation. The methods for displaying the
maintenance screen are as follows.
Press the upper-left corner of the MICRO/I screen for three seconds or more.
If the base screen is switched before three seconds have elapsed, the load operation for the maintenance screen will
be canceled. Please press the screen again.
■
Use Large Font
Select this check box to display text on the MICRO/I in high-quality fonts. The
Japanese
or
European
font is
replaced with the high-quality fonts depending on the magnification.
To use high-quality fonts, the fonts must be downloaded to the MICRO/I at the same time as the project. To
download fonts, specify the high-quality fonts under
Optional Fonts to be downloaded
in the
Font Settings
tab.
For details on high-quality fonts, refer to Chapter 2 “High-quality Fonts” on page 2-10.
■
Enable Two-point Push
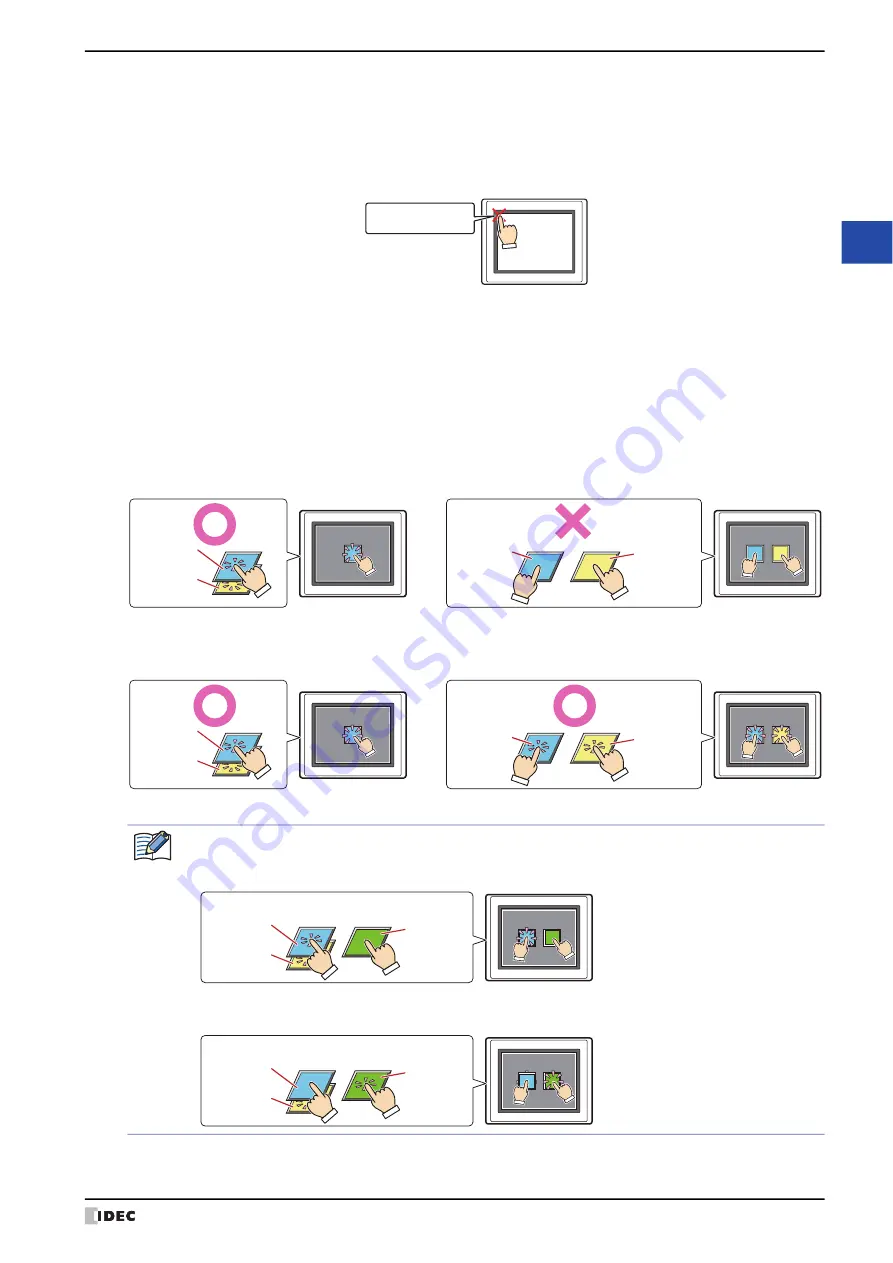
Select this check box to enable two-point push for touch switches. When two-point push is enabled, the bottom
switch and the switch above it operate in order.
On an analog touch panel
, this function operates two overlapping switches when the two are pressed. This is not a
function to simultaneously operate two non-overlapping switches when they are both pressed.
On a projected capacitive touch panel
, this function operates both switches even when two non-overlapping touch
switches are pressed at the same time.
*1 HG2J-7U only
*5 HG5G/4G/3G/2G-V, HG4G/3G, HG2G-5F/-5T, HG1G/1P only
Press and hold
3 or more seconds
MICRO/I
Place overlapping
switch 1 and switch 2.
MICRO/I
Place switch 1 and
switch 2 side by side.
MICRO/I
Both of the two overlapping
switches work.
Button 2
Operates
Button 1
Operates
Pressing two non-overlapping switches
at the same time does not work.
Button 2
Does not
operate
Button 1
Does not
operate
MICRO/I
MICRO/I
Even if two non-overlapping switches
are pressed at the same time,
both switches will work.
Button 2
Operates
Button 1
Operates
Button 2
Operates
Button 1
Operates
Both of the two overlapping
switches work.
Place overlapping
switch 1 and switch 2.
Place switch 1 and
switch 2 side by side.
The overlapping touch switches and the non-overlapping touch switch are pressed at the same time on the
projected capacitive touch panel;
• If you press the overlapping touch switches first, the non-overlapping touch switches will not operate.
• If you press the non-overlapping touch switch first, only the back switch of the overlapping touch
switches will operate.
MICRO/I
Press the overlapping switch first.
Place overlapping switch 1 and switch 2.
Place switch 1,2 and switch 3 side by side.
1
1
2
2
Button 2
Operates
Button 1
Operates
Button 3
Does not
operate
MICRO/I
Press the non-overlapping switch first.
2
2
1
1
Button 2
Operates
Button 3
Operates
Button 1
Does not
operate
Place overlapping switch 1 and switch 2.
Place switch 1,2 and switch 3 side by side.
Содержание WindO/I-NV4
Страница 1: ...B 1701 16 User s Manual...
Страница 50: ...1 WindO I NV4 Specifications 2 18 WindO I NV4 User s Manual Baltic ANSI 1257 Cyrillic ANSI 1251...
Страница 108: ...5 WindO I NV4 Common Operations and Settings 2 76 WindO I NV4 User s Manual...
Страница 256: ...7 BACnet Communication 3 148 WindO I NV4 User s Manual...
Страница 372: ...6 Screen Restrictions 5 32 WindO I NV4 User s Manual...
Страница 390: ...5 Part Library Function 6 18 WindO I NV4 User s Manual...
Страница 420: ...3 Text 7 30 WindO I NV4 User s Manual...
Страница 522: ...5 Key Button 8 102 WindO I NV4 User s Manual Password Input These keys switch the user on the Password Input Screen...
Страница 628: ...2 Multi State Lamp 9 34 WindO I NV4 User s Manual...
Страница 924: ...4 Meter 11 76 WindO I NV4 User s Manual...
Страница 990: ...7 Timer 12 66 WindO I NV4 User s Manual...
Страница 1030: ...4 Using Data and Detected Alarms 13 40 WindO I NV4 User s Manual...
Страница 1098: ...4 Using the Data 15 22 WindO I NV4 User s Manual...
Страница 1248: ...5 Restrictions 22 18 WindO I NV4 User s Manual...
Страница 1370: ...2 Monitoring on the MICRO I 25 28 WindO I NV4 User s Manual...
Страница 1388: ...4 Restrictions 26 18 WindO I NV4 User s Manual...
Страница 1546: ...5 Module Configuration Dialog Box 30 36 WindO I NV4 User s Manual...
Страница 1614: ...3 Settings 34 14 WindO I NV4 User s Manual...
Страница 1694: ...5 HG1P 35 80 WindO I NV4 User s Manual 5 6 Dimensions Unit mm Cable Dimensions 191 169 56 70 6 51 55 7...
Страница 1726: ...5 Text Alignment A 10 WindO I NV4 User s Manual...


