background image

Connecting


the


cables


Notes:


1.


Make


sure


you


turn


off


the


server


before


connecting


any


cables


to


or


disconnecting


any


cables


from


the


server


or


hot-plug


adapter.


2.


For


additional


cabling


instructions,


see


the


User’s


Guide


on


the


IBM


xSeries


Documentation


CD


and


the


documentation


that


comes


with


the


options.


It


might


be


easier


for


you


to


route


any


cables


before


you


install


certain


options.


3.


Cable


identifiers


are


printed


on


the


cables


that


come


with


the


server


and


options.


Use


these


identifiers


to


connect


the


cables


to


the


correct


connectors.


For


example,


the


hard


disk


drive


cables


are


labeled


“HDD


option.”


Two


cable-restraint


brackets


are


on


the


rear


of


the


server.


Route


the


power


cords


through


the


power-cord


restraint


bracket.


After


you


connect


the


cables


to


the


selected


devices,


route


the


cables


(for


example,


the


cables


that


are


connected


to


the


I/O


connectors)


through


the


I/O


cable-restraint


bracket.


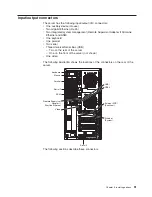
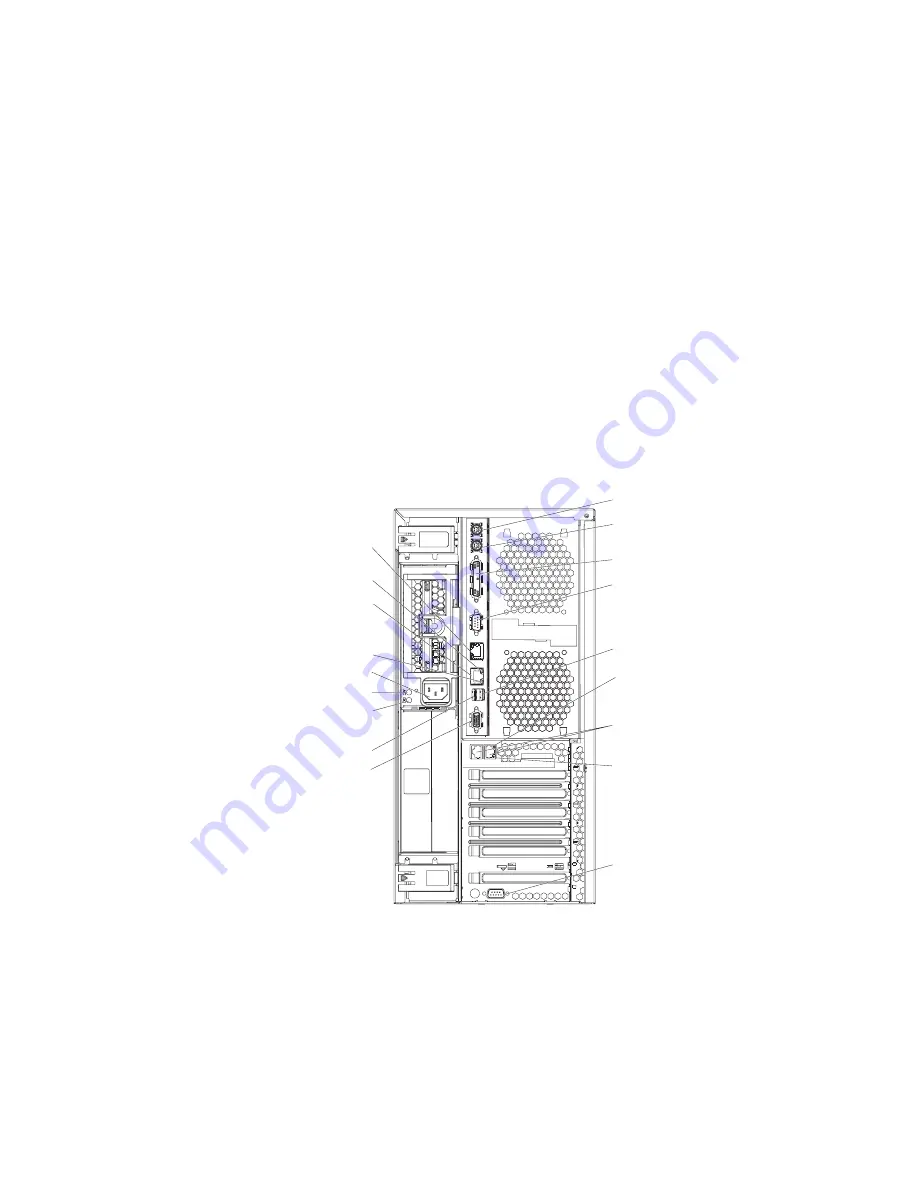
See


the


following


illustrations


for


the


locations


of


the


input


and


output


connectors


on


the


server.


Note:


The


USB


3


connector


is


on


the


front


of


the


server.


Keyboard connector

Mouse connector

Serial 1 connector

Serial 2 connector

USB 1 connector

ASM

Remote Supervisor

Adapter II

SlimLine Ethernet

Video connector

Ethernet link LED

Ethernet activity LED

Power cord connector

AC power LED

DC power LED

USB 2 connector

Parallel connector

Ethernet link 2
status LED

Ethernet connectors 1 and 2

Ethernet link 1
status LED

PO

WER SUPPL

Y

FILLER

REQ

UIRED FOR

SYSTEM COOLING

WITH EMPTY SLO

T

DO NO

T

THR

O

W
 A

W

A

Y

A

TTENTION:

PO

WER SUPPL

Y

FILLER

REQ

UIRED FOR

SYSTEM COOLING

WITH EMPTY SLO

T

DO NO

T

THR

O

W
 A

W

A

Y

A

TTENTION:


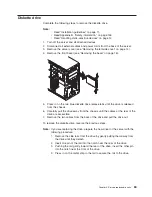
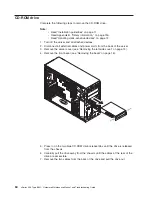
Chapter


3.


Installing


options


49

Содержание xSeries 236 8841

Страница 1: ...xSeries 236 Type 8841 Hardware Maintenance Manual and Troubleshooting Guide...

Страница 2: ......

Страница 3: ...xSeries 236 Type 8841 Hardware Maintenance Manual and Troubleshooting Guide...

Страница 4: ...ilable on the World Wide Web at http www ibm com pc support 11th Edition October 2007 The most recent version of this document is available on the World Wide Web at http www ibm com support Copyright...

Страница 5: ...outes les consignes de type Attention et Danger avant de proc der aux op rations d crites par les instructions Lesen Sie alle Sicherheitshinweise bevor Sie eine Anweisung ausf hren Accertarsi di legge...

Страница 6: ...rrent diagnostic BIOS flash and device driver files from http www ibm com support For a list of supported options for the server go to http www ibm com pc us compat iv xSeries 236 Type 8841 Hardware M...

Страница 7: ...el 16 Replacing hot swap fans 17 Replacing a front fan 1 or 2 18 Replacing a center fan 3 or 4 19 Replacing a rear fan 5 or 6 20 Installing the 670 Watt hot swap power supply option 21 Replacing a hot...

Страница 8: ...3 Light path diagnostics panel 84 Chapter 5 Diagnostics 87 General checkout 87 Checkout procedure 88 Diagnostic tools overview 89 POST error logs 90 Viewing error logs from the Configuration Setup Uti...

Страница 9: ...s 134 Temperature error messages 136 Fan error messages 136 Power error messages 137 System shutdown 137 Voltage related system shutdown 137 Temperature related system shutdown 138 DASD checkout 138 H...

Страница 10: ...lass A emission compliance statement 190 Australia and New Zealand Class A statement 190 United Kingdom telecommunications safety requirement 191 European Union EMC Directive conformance statement 191...

Страница 11: ...elated documentation This Hardware Maintenance Manual and Troubleshooting Guide is provided in Portable Document Format PDF It contains information to help a user solve problems or to provide helpful...

Страница 12: ...also in the multilingual Safety Information document which is on the IBM xSeries Documentation CD Each statement is numbered for reference to the corresponding statement in the Safety Information docu...

Страница 13: ...internal Ultra320 SCSI connector dual channel SCSI controller with RAID capabilities v Three Universal Serial Bus USB v1 1 or v2 0 connectors one on the front and two on the rear of the enclosure v K...

Страница 14: ...control button shield if installed Cover release latch Model type serial number Operator information panel CD eject button CD ROM drive activity LED green Operator information panel This panel contai...

Страница 15: ...x 1 or Tx Rx 2 When these two green LEDs are lit they indicate that there is activity between the server and the network USB 3 connector Connect a USB device to this connector Diskette eject button Pr...

Страница 16: ...nect a parallel device to this connector Serial 1 connector Connect a 9 pin serial device to this connector USB 1 connector Connect a USB device to this connector Ethernet link 1 status LED This LED i...

Страница 17: ...ting system does not run and all core logic except for the service processor is shut down however the server can respond to requests from the service processor also called the baseboard management con...

Страница 18: ...ted from the power source 1 2 The server can be turned off in any of the following ways v You can turn off the server from the operating system if your operating system supports this feature After an...

Страница 19: ...daptec HostRAID configuration v Preboot Execution Environment PXE boot agent utility program Starting the Configuration Setup Utility program To start the Configuration Setup Utility program 1 Turn on...

Страница 20: ...10 xSeries 236 Type 8841 Hardware Maintenance Manual and Troubleshooting Guide...

Страница 21: ...ing Orange can also indicate touch points on hot swap components See the instructions for removing or installing a specific hot swap component for any additional procedures that you might have to perf...

Страница 22: ...evices in their static protective packages until you are ready to install them To reduce the possibility of damage from electrostatic discharge observe the following precautions v Limit your movement...

Страница 23: ...R SUPPLY 1 2 3 A B 1 2 3 FA N TE M PERAT URE Flange Server door Complete the following steps to remove the server door 1 Read the safety information beginning on page v and Installation guidelines on...

Страница 24: ...he following steps to remove the server left side cover 1 Push the plastic cover release latch near the edge of the side cover to the right to release the cover 2 While pushing the plastic cover relea...

Страница 25: ...llation guidelines on page 11 2 Turn off the server and peripheral devices and disconnect all power cords and external cables see Turning on the server on page 7 then remove the cover see Removing the...

Страница 26: ...ezel 1 Remove the left side cover and locate the bezel release lever 2 Press up on the bezel release lever 3 Pull the top of the bezel away from the chassis then lift the bezel to disengage the bottom...

Страница 27: ...lling this option see Replacing a rear fan 5 or 6 on page 20 or Installing the 670 Watt hot swap power supply option on page 21 Attention To help ensure proper cooling if a fan fails replace it within...

Страница 28: ...ling do not remove the left side cover for more than 30 minutes during this procedure 3 Place your fingers into the fan assembly latch on the top of the failing fan 4 Squeeze the fan assembly latch to...

Страница 29: ...cated by the arrow on the latch to open the release lever 4 Pull the fan out of the server using the release lever 5 Press the orange fan release latch in the direction indicated by the arrow on the l...

Страница 30: ...fans 5 and 6 1 Read the safety information beginning on page v and Installation guidelines on page 11 2 Press in on the orange fan release latch on the side of the fan then rotate the fan away from t...

Страница 31: ...y and the two rear hot swap fans must be installed in the server Attention To help ensure proper cooling if a fan fails replace it within 48 hours v When the 670 Watt hot swap power supply option is i...

Страница 32: ...has this label attached There are no serviceable parts inside these components If you suspect a problem with one of these parts contact a service technician Complete the following steps to install th...

Страница 33: ...server and insert the tabs into the corresponding holes c Press in on the top half of the fan until it clicks into place d Position the second fan so that the notched area is facing down and the moun...

Страница 34: ...Read the safety information beginning on page v and Installation guidelines on page 11 2 Disconnect the power cord from the power supply 3 Push on the orange release latch in the center of the power s...

Страница 35: ...follows Non hot plug 33 MHz 32 bit PCI slot 1 is on PCI bus A Non hot plug 64 bit PCI Express x4 slot 2 is on PCI bus B independent of slots 1 3 4 5 and 6 Non hot plug 64 bit PCI Express x4 slot 3 is...

Страница 36: ...er cords and all external cables Remove the cover 3 See the documentation that comes with the adapter for any cabling instructions and information about jumper or switch settings It might be easier fo...

Страница 37: ...6 Press the adapter firmly into the expansion slot lower the adapter retention latch and make sure that the latch is in the locked closed position Attention Incomplete insertion might cause damage to...

Страница 38: ...tention latch Tab Adapter PCI X divider Complete the following steps to install or replace a hot plug PCI or PCI X adapter 1 Read the safety information beginning on page v and Installation guidelines...

Страница 39: ...ating system for information about enabling a hot plug PCI X slot 9 If you have other options to install or remove do so now otherwise go to Completing the installation on page 45 Installing an IBM Re...

Страница 40: ...ss the Remote Supervisor Adapter II SlimLine Guide into place on the system board Remote Supervisor Adapter II SlimLine guide Remote Supervisor Adapter II SlimLine Remote Supervisor Adapter II SlimLin...

Страница 41: ...les Remove the cover and air baffle assembly Attention To avoid breaking the retaining clips or damaging the ServeRAID 7k adapter connector open and close the clips gently 3 Open the retaining clip on...

Страница 42: ...er in the rack before installing the hard disk drives v You do not have to turn off the server to install hot swap drives in the hot swap drive bays However you must turn off the server when performin...

Страница 43: ...error correcting code ECC DIMMs These DIMMs must be compatible with the latest PC3200 SDRAM Registered DIMM specification For a list of supported options for the server go to http www ibm com us comp...

Страница 44: ...inning on page v and Installation guidelines on page 11 2 Turn off the server and peripheral devices and disconnect the power cords and all external cables Remove the cover and air baffle assembly Att...

Страница 45: ...on the bottom of the heat sink or fan sink or set down the heat sink or fan sink Note Removing the heat sink or fan sink from the microprocessor destroys the even distribution of the thermal grease an...

Страница 46: ...essor release lever 4 Install a VRM in the VRM connector a Center the VRM over the connector Make sure that the VRM is oriented and aligned correctly b Carefully but firmly push down the VRM to seat t...

Страница 47: ...socket Align the triangle on the corner of the microprocessor with the triangle on the corner of the socket and carefully press the microprocessor into the socket Attention v Do not use excessing for...

Страница 48: ...protective plastic cap from the bottom of the heat sink Notes 1 Do not set down the heat sink after you remove the protective plastic cap Thermal grease Heat sink 2 Do not touch the thermal grease on...

Страница 49: ...the installation on page 45 Replacing a microprocessor and heat sink This section provides instructions for replacing a microprocessor and heat sink Complete the following steps to replace a microproc...

Страница 50: ...er the connector Make sure that the VRM is orientated and aligned correctly b Carefully but firmly push down the VRM to seat the VRM in the connector c Make sure that the VRM clips on both sides of th...

Страница 51: ...n indicator Microprocessor release lever Microprocessor connector Microprocessor v Carefully close the microprocessor release lever to secure the microprocessor in the socket 7 Install a heat sink on...

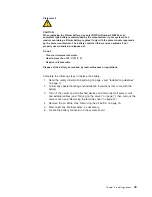
Страница 52: ...handled correctly to avoid possible danger If you replace the battery you must adhere to the following instructions Note In the U S call 1 800 IBM 4333 for information about battery disposal v If you...

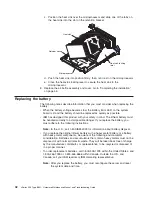
Страница 53: ...tery as required by local ordinances or regulations Complete the following steps to replace the battery 1 Read the safety information beginning on page v and Installation guidelines on page 11 2 Follo...

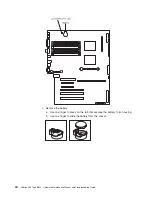
Страница 54: ...ttery a Use one finger to press on the tab that secures the battery to its housing b Use one finger to slide the battery from the socket 44 xSeries 236 Type 8841 Hardware Maintenance Manual and Troubl...

Страница 55: ...stallation reinstall the bezel reinstall the server cover reinstall the door reconnect all the cables that you disconnected earlier and for certain options run the Configuration Setup Utility program...

Страница 56: ...zel 1 Read the safety information beginning on page v and Installation guidelines on page 11 2 Insert the two tabs on the bottom of the bezel into the matching holes on the server chassis 3 Push the t...

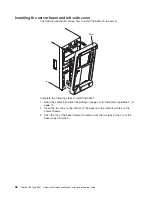
Страница 57: ...ce the bottom lip of the left side cover over the bottom edge of the server chassis 3 Rotate the left side cover to a vertical position inserting the tabs at the top of the left side cover into the ma...

Страница 58: ...n beginning on page v and Installation guidelines on page 11 2 Set the door on the bottom hinge 3 Locate the flange on the top edge of the door 4 Press the flange downward while pressing the top of th...

Страница 59: ...nt bracket After you connect the cables to the selected devices route the cables for example the cables that are connected to the I O connectors through the I O cable restraint bracket See the followi...

Страница 60: ...as a symmetric multiprocessing SMP server You might have to upgrade the operating system to support SMP For more information see the section about using the ServerGuide Setup and Installation CD in t...

Страница 61: ...ront of the server not shown v One video The following illustration shows the locations of the connectors on the rear of the server Keyboard Mouse Parallel Serial 1 Serial 2 Ethernet System External S...

Страница 62: ...quire Category 5 or higher cabling For more information about the Ethernet controllers see the User s Guide 8 1 Integrated system management Remote Supervisor Adapter II SlimLine Ethernet and ASM conn...

Страница 63: ...modes of operation Standard Parallel Port SPP Enhanced Parallel Port EPP and Extended Capability Port ECP If you configure the parallel port to operate in bidirectional mode it supports the EPP and E...

Страница 64: ...ard that has a mouse port the USB keyboard emulates a mouse and you will not be able to disable the mouse settings in the Configuration Setup Utility program 3 Check to make sure that your NOS support...

Страница 65: ...al connectors 78 System board internal cable connectors 79 System board switches and jumpers 80 System board external connectors 82 System board LEDs 83 Light path diagnostics panel 84 This chapter de...

Страница 66: ...2 1 Turn off the server and disconnect all power cords and external cables then remove the server cover see Removing the left side cover on page 14 2 Remove the air baffle Air baffle assembly Note It...

Страница 67: ...t stops or clicks in the fully open position approximately 135 angle as shown Then see the documentation provided with the microprocessor option for complete installation instructions Attention You mu...

Страница 68: ...B Safety information on page 153 v Read Handling static sensitive devices on page 12 Complete the following steps to replace damaged or contaminated thermal grease on the microprocessor and heat sink...

Страница 69: ...age 153 v Read Handling static sensitive devices on page 12 1 Turn off the server and any attached devices 2 Disconnect all external cables and power cords from the back of the server 3 Remove the ser...

Страница 70: ...se the previous steps Notes 1 Thread the cable through the opening in the chassis and extend it into the server before attaching the operator information panel 2 Secure the cable in the cable clamps a...

Страница 71: ...dapters and spacers see Installing or replacing an adapter on page 25 5 Remove the two center fans see Replacing a center fan 3 or 4 on page 19 6 Remove the plastic baffle 7 Disconnect the diagnostics...

Страница 72: ...er see Removing the left side cover on page 14 5 Disconnect and remove adapters and spacers see Installing or replacing an adapter on page 25 6 Remove the central fan and adapter support bracket see C...

Страница 73: ...rom the chassis 6 Carefully pull the drive away from the chassis until the cables at the rear of the drive are accessible 7 Remove the two cables from the back of the drive and pull the drive out To r...

Страница 74: ...from the back of the server 3 Remove the server cover see Removing the left side cover on page 14 4 Remove the front bezel see Removing the bezel on page 16 5 Press in on the two blue CD ROM drive rel...

Страница 75: ...to remove the hard disk drive backplane Note v Read Installation guidelines on page 11 v Read Appendix B Safety information on page 153 v Read Handling static sensitive devices on page 12 1 Turn off t...

Страница 76: ...stallation guidelines on page 11 v Read Appendix B Safety information on page 153 v Read Handling static sensitive devices on page 12 1 Turn off the server 2 Disconnect all external cables and power c...

Страница 77: ...Read Appendix B Safety information on page 153 v Read Handling static sensitive devices on page 12 When working with some options you must first remove the center fan and or adapter support bracket to...

Страница 78: ...ir baffle assembly 3 Disconnect any cables that are connected to the full length adapters 4 Lift the adapter retention clip on top of the adapter support bracket for the location of this clip see the...

Страница 79: ...removed or disconnected reverse the preceding steps Remember to reroute the cables that you disconnected and to reconnect the center fan cable to the system board see System board internal connectors...

Страница 80: ...server Note To reinstall the center fan support bracket and other components that you removed or disconnected reverse the preceding steps Remember to reroute the cables that you disconnected and to re...

Страница 81: ...ividers 3 Remove the adapter support bracket a Press the release tab on each end of the adapter support bracket There are two latches one at each end of the adapter support bracket b Slide the adapter...

Страница 82: ...the bezel on page 16 4 Remove the server cover see Removing the left side cover on page 14 5 Remove the two front fans see Replacing a front fan 1 or 2 on page 18 6 Disconnect and remove adapter cards...

Страница 83: ...of the chassis Front USB connector assembly Complete the following steps to remove the front USB connector Note v Read Installation guidelines on page 11 Installation guidelines on page 11 v Read Appe...

Страница 84: ...e previous steps threading the cable carefully Switch card assembly Complete the following steps to remove the switch card assembly Note v Read Installation guidelines on page 11 v Read Appendix B Saf...

Страница 85: ...ight be easier to remove this component if the server is placed on its side To install the switch card assembly line up the two tabs with the notches on the chassis and snap the assembly into place th...

Страница 86: ...spacers see Installing or replacing an adapter on page 25 6 Remove the center fan and adapter support bracket see Center fan and adapter support bracket on page 67 7 Remove the air baffle 8 Disconnect...

Страница 87: ...mplete the following steps 1 Lower the left or microprocessor side of the system board into the server chassis first then slide the system board to that side until it stops and lower the right or adap...

Страница 88: ...sor Adapter II Slimline DIMM 2 DIMM 3 DIMM 4 DIMM 4 DIMM 5 DIMM 6 DIMM 7 DIMM 8 PCI Express x4 slot 2 PCI Express x4 slot 3 ServeRAID 7k VRM Microprocessor 2 Microprocessor 1 PCI X slot 4 64 bit 3 3V...

Страница 89: ...on the system board Fans 5 and 6 J28 Serial port 2 J53 Front fans 1 and 2 J56 SCSI channel A J51 SCSI channel B J58 IDE J46 Power switch J42 Operator panel J40 Front USB J41 Diagnostic panel J36 Diske...

Страница 90: ...e Force BMC override Force power on NMI button Table 5 describes the function of each switch on the switch block Table 5 Switches 1 8 Switch number Default value Switch description 8 Off Reserved 7 Of...

Страница 91: ...ministrator password check if an administrator password is set See the User s Guide on the IBM xSeries Documentation CD for additional information about the power on password 1 Off Force power on When...

Страница 92: ...ystem board external connectors The following illustration shows the external input output connectors on the system board 82 xSeries 236 Type 8841 Hardware Maintenance Manual and Troubleshooting Guide...

Страница 93: ...t 6 power LED DIMM 3 error LED DIMM 4 error LED DIMM 5 error LED DIMM 6 error LED DIMM 7 error LED DIMM 8 error LED Remote Supervisor Adapter II SlimLine error LED PCI X bus A error LED slot 1 PCI X b...

Страница 94: ...ht path diagnostics LEDs the problems that they indicate and actions to solve the problems LED Problem Action POWER SUPPLY 1 Lit LED Power supply 1 has failed 1 Remove ac power from the server 2 Repla...

Страница 95: ...LED on the system board indicates a problem with a microprocessor make sure that the microprocessor is installed correctly Replace the failing microprocessor S_ERR A soft error has occurred 1 Restart...

Страница 96: ...86 xSeries 236 Type 8841 Hardware Maintenance Manual and Troubleshooting Guide...

Страница 97: ...rmine whether the failing server is part of a shared hard disk drive cluster two or more servers sharing external storage devices If you suspect that it is part of a cluster you can run all diagnostic...

Страница 98: ...eep or more than one beep sounds look up the error in Beep symptoms on page 104 or No beep symptoms on page 108 if an error is displayed look up the first error in POST error codes on page 108 9 Check...

Страница 99: ...dable read only memory ROM on the system board are the primary method of testing the major components of the server see Diagnostic programs error codes and messages on page 91 v ServerGuide error symp...

Страница 100: ...ce processor Note The system error log is available only with the Remote Supervisor Adapter II SlimLine Viewing error logs from the Configuration Setup Utility program To view the POST error log the s...

Страница 101: ...rror codes might not appear when you run the diagnostic programs 2 If diagnostic error codes appear that are not listed in the tables make sure that the server has the latest levels of BIOS Remote Sup...

Страница 102: ...ms with either no mouse or a USB mouse attached to the server you will not be able to navigate between test categories using the Next Cat and Prev Cat buttons All other functions provided by mouse sel...

Страница 103: ...light path diagnostics panel 3 Check the system service label 4 Look inside the server if necessary Many errors are first indicated by the illumination of the system error light in the operator infor...

Страница 104: ...ternal component as indicated in step 3 look on the system board for lit error LEDs see System board LEDs on page 83 For example a microprocessor error will light the LED next to the failing microproc...

Страница 105: ...DC power LED For more information about the ac and dc power LEDs see Power supply LED errors on page 116 Updating the BMC firmware Use the baseboard management controller BMC firmware update utility...

Страница 106: ...rebooting If the server does not turn on and the heartbeat LED H8 on the system board is not on you will need to reset the BMC firmware See System board LEDs on page 83 for the location of the heartbe...

Страница 107: ...IOS is not installed Recovering the BIOS code If power to the server is interrupted while POST BIOS code is being updated flash update the server might not restart reboot correctly or might not displa...

Страница 108: ...it 11 Insert into the diskette drive the BIOS recovery diskette that you have created from http www ibm com support 12 Turn on the server and the monitor 13 After the update session is completed turn...

Страница 109: ...e system board To set the power on password reset switch and erase a forgotten password complete the following steps 1 Read Appendix B Safety information on page 153 and Handling static sensitive devi...

Страница 110: ...can be difficult to solve For example a short circuit can exist anywhere on any of the power distribution buses Usually a short circuit will cause the power subsystem to shut down because of an overcu...

Страница 111: ...ceives a LINK pulse from the hub switch If the LED is off there might be a defective connector or cable or a problem with the hub switch v Make sure that you are using the correct device drivers which...

Страница 112: ...er v Make sure that the cable is connected to the Ethernet controller v Make sure that the PCI system BIOS code is current v Reseat the adapter v Determine whether the interrupt IRQ setting that is as...

Страница 113: ...RAID error codes 133 POST ISPR error procedures 134 Temperature error messages 136 Fan error messages 136 Power error messages 137 System shutdown 137 Voltage related system shutdown 137 Temperature r...

Страница 114: ...or break v Three beeps 4 Four continuous beeps One beep after successfully completing POST indicates the system is functioning properly Note See System replaceable units on page 144 to determine which...

Страница 115: ...dary interrupt mask register failed v System board 2 2 1 Interrupt vector loading failed v System board 2 2 2 Keyboard controller failed 1 System board 2 Keyboard 2 2 3 CMOS power failure and checksum...

Страница 116: ...if installed 7 12C Cable 3 3 3 No operational memory in system Note In some memory configurations the 3 3 3 beep code might sound during POST followed by a blank display screen If this occurs and the...

Страница 117: ...he following components one at a time in the order shown restarting the server each time v Trained service technician only Microprocessor 1 v Trained service technician only Microprocessor 2 if instal...

Страница 118: ...l not start power supply ac LED is on v See Power supply LED errors on page 116 POST error codes In the following error codes X can be any number or letter Note See System replaceable units on page 14...

Страница 119: ...Computer cover or cable cover was removed without a key being used 1 Run the Configuration Setup Utility program 2 System board 177 178 Security hardware error 1 Run the Configuration Setup Utility p...

Страница 120: ...oard controller error v System board 602 Invalid diskette boot record 1 Diskette 2 Diskette drive 3 Cable 4 System board 604 Diskette drive error 1 Run the Configuration Setup Utility program and diag...

Страница 121: ...connected to J36 on system board 2 Power switch assembly 3 System board 1600 The system management processor is not functioning Do the following before replacing a FRU 1 Ensure that BMC reset switch i...

Страница 122: ...iagnostics 3 Hard disk drive 4 SCSI backplane 5 Cable 6 System board 2400 Video controller test failure 1 Video adapter if installed 2 System board 2462 Video memory configuration error 1 Video adapte...

Страница 123: ...POST 2 Ensure that the PCI adapter and all other adapters are set correctly in the Configuration Setup Utility program Utility program If the memory resource settings are not correct change the settin...

Страница 124: ...I backplane 3 Cable 4 System board I9990305 Hard disk sector error no operating system installed 1 Install operating system to hard disk I9990650 AC power has been restored 1 Check cable 2 Check for i...

Страница 125: ...lure LED next to the failing microprocessor is on 1 Failing microprocessor 2 System board PCI PCI error LED on system board at failing adapter will also be lit 1 Failing adapter 2 System board VRM VRM...

Страница 126: ...tem error log and BMC log for any listed problems If the system starts with no errors a Power switch assembly b System board 2 Remove the adapters and disconnect the cables and power connectors to all...

Страница 127: ...SB external loopback test again 3 System board 015 XXX 198 Remote Supervisor Adapter II SlimLine installed or USB device connected during USB test 1 If Remote Supervisor Adapter II SlimLine is install...

Страница 128: ...XXX 002 Failed optional microprocessor test 1 Optional microprocessor 2 2 System board 166 051 000 System Management Failed Unable to communicate with RSA It may be busy Run the test again 1 Flash la...

Страница 129: ...System board 166 260 000 System Management Failed Restart RSA error After restarting RSA communication was lost Unplug and cold boot to reset RSA 1 Disconnect all server and option power cords from t...

Страница 130: ...nostics panel LED test for the failing LED 180 XXX 001 Failed front LED panel test 1 Operator information card 2 System board 180 XXX 002 Failed diagnostics LED panel test 1 Operator information card...

Страница 131: ...e and termination 2 Hard disk drive backplane 3 Hard disk drive 217 XXX 000 Failed hard disk drive test Note If RAID is configured the hard disk drive number refers to the RAID logical array v Hard di...

Страница 132: ...XX 00n Failed Ethernet test on adapter in PCI slot n 1 Adapter in PCI slot n 2 System board 415 XXX 000 Failed Modem test 1 Cable Note Ensure modem is present and attached to server 2 Modem 3 System b...

Страница 133: ...into the manual tray release opening 2 Run CD ROM diagnostics 3 CD ROM drive Diskette drive error symptoms Note See System replaceable units on page 144 to determine which components should be replace...

Страница 134: ...the server stopped responding and try the diagnostic test again 2 If the hard disk drive diagnostic test runs successfully replace the drive you removed with a new one Intermittent error symptoms Note...

Страница 135: ...y 2 If a KVM switch is present make sure that it is switched to this server 3 Mouse or pointing device 4 System board Memory error symptoms Note See System replaceable units on page 144 to determine w...

Страница 136: ...tall microprocessor 2 in the connector for microprocessor 1 then restart the server If no beep code occurs microprocessor 1 might have failed replace the microprocessor 3 Startup microprocessor Monito...

Страница 137: ...ult configuration memory connector or bank of connectors enabled If you have installed a Remote Supervisor Adapter II SlimLine in the server make sure that the video cable is connected to the Remote S...

Страница 138: ...IBM reseller or IBM marketing representative 2 Video adapter if installed 3 System board Wrong characters appear on the screen 1 If the wrong language is displayed update the BIOS code with the corre...

Страница 139: ...if supported does work 1 Reseat the connector 2 Power switch card 3 System board The server does not turn on 1 Verify that v The power cables are properly connected to the server v The power supply L...

Страница 140: ...on the HAL dll file name choose Properties select Version tab click Internal Name Serial port error symptoms Note See System replaceable units on page 144 to determine which components should be repla...

Страница 141: ...e SCSI RAID program cannot view all installed drives or the NOS cannot be installed v Verify that there are no duplicate SCSI IDs or IRQ assignments v Verify that the hard disk drive is connected prop...

Страница 142: ...d in the system error log the Remote Supervisor Adapter II SlimLine messages will appear as text descriptions To determine a possible error condition for the Remote Supervisor Adapter II SlimLine see...

Страница 143: ...ove jumpers 3 ServeRAID controller 3E20H POST detected that the ServeRAID controller is in the wrong PCI expansion slot 1 Install the ServeRAID controller in the correct PCI expansion slot see the doc...

Страница 144: ...ller b Replace the controller Notes a SCSI channel cable details if any appear elsewhere in this publication b The adapter controller detects a configuration change Do not choose Save Changes Instead...

Страница 145: ...ad jumpers on the controller and try to flash the firmware code to the card 2 Isolate between SCSI subsystem and controller by disconnecting all SCSI cables attached to the suspect card and reboot CAU...

Страница 146: ...11 2 Replace power supply x System board is over recommended temperature level warning system board is over recommended temperature 1 Ensure system is being properly cooled see System reliability guid...

Страница 147: ...100 System running non redundant power level noncritical system does not have redundant power 1 Add another power supply 2 Remove options from system 3 System can continue to operate without redundanc...

Страница 148: ...nes on page 11 2 Replace CPU x System shutoff due to CPU x under temperature level critical CPU x is under temperature v Ambient temperature must be within normal operating specifications see Features...

Страница 149: ...lled reseat the I2C cable between Remote Supervisor Adapter and system board 2 Memory DIMMs 3 System board Failure reading 12C device Check devices on bus 1 1 Reseat the I2C cable between the operator...

Страница 150: ...r disconnect the following devices one at a time until you find the failure turn on the server and reconfigure each time v Any external devices v Surge suppressor device on the server v Modem printer...

Страница 151: ...ginal reported failure v Diagnostics version Type and version level v Hardware configuration Print print screen configuration currently in use BIOS level v Operating system software Type and version l...

Страница 152: ...142 xSeries 236 Type 8841 Hardware Maintenance Manual and Troubleshooting Guide...

Страница 153: ...s 1 Go to http www ibm com support 2 Under Search technical support type 8872 or 8874 and click Search 3 Under Document type select Parts information and click Go System The major components of the xS...

Страница 154: ...449 6 CD combo drive optional 26K5379 6 CD combo drive optional 26K5381 6 CD RW DVD drive optional 39M3539 6 CD RW DVD RW drive optional 26K5383 6 CD half high combo drive optional 39M0135 6 DVD half...

Страница 155: ...123 21 Memory 512 MB all models except 01x 39M5817 22 System board all models 39Y7118 23 Fan assembly 92 mm all models 39M2694 24 Fan guide microprocessor all models 13N0937 25 Switch assembly all mod...

Страница 156: ...Kit thermal grease all models 41Y9292 Kit slide optional 41Y7754 Lens all models 41Y7709 Line cord 2 8m all models 39M5081 Mouse assembly three button all models 39Y9876 Rack bottom cover optional 41Y...

Страница 157: ...445 40K9442 German 129 40K9444 Greek 319 40K9445 Hebrew 212 40K9446 Hungarian 208 40K9447 Icelandic 197 40K9448 Italian 141 40K9449 Italian 142 40K9450 Japanese 194 40K9451 Korean 413 40K9452 Norwegi...

Страница 158: ...wer cord part number Used in these countries and regions 02K0546 China 13F9940 Australia Fiji Kiribati Nauru New Zealand Papua New Guinea 13F9979 Afghanistan Albania Algeria Andorra Angola Armenia Aus...

Страница 159: ...as Barbados Belize Bermuda Bolivia Brazil Caicos Islands Canada Cayman Islands Costa Rica Colombia Cuba Dominican Republic Ecuador El Salvador Guam Guatemala Haiti Honduras Jamaica Mexico Micronesia F...

Страница 160: ...150 xSeries 236 Type 8841 Hardware Maintenance Manual and Troubleshooting Guide...

Страница 161: ...nd IntelliStation systems operating systems and programs come with information that contains troubleshooting procedures and explanations of error messages and error codes If you suspect a software pro...

Страница 162: ...tp www ibm com services or go to http www ibm com planetwide for support telephone numbers In the U S and Canada call 1 800 IBM SERV 1 800 426 7378 Hardware service and support You can receive hardwar...

Страница 163: ...the customer or that makes the equipment unsafe v Before you start the machine ensure that other service representatives and the customer s personnel are not in a hazardous position v Place removed co...

Страница 164: ...installing main units v Before you start to work on the machine unplug the power cord If you cannot unplug it ask the customer to power off the wall box that supplies power to the machine and to lock...

Страница 165: ...ers and service personnel from injury This guide addresses only those items However good judgment should be used to identify potential safety hazards due to attachment of non IBM features or options n...

Страница 166: ...es until they are inserted into the product v Avoid contact with other people v Wear a grounded wrist strap against your skin to eliminate static on your body v Prevent the part from touching your clo...

Страница 167: ...stallation maintenance or reconfiguration of this product during an electrical storm v Connect all power cords to a properly wired and grounded electrical outlet v Connect to properly wired outlets an...

Страница 168: ...N When laser products such as CD ROMs DVD ROM drives fiber optic devices or transmitters are installed note the following v Do not remove the covers Removing the covers of the laser product could resu...

Страница 169: ...r supply do not turn off the electrical current supplied to the device The device also might have more than one power cord To remove all electrical current from the device ensure that all power cords...

Страница 170: ...odos os equipamentos ao qual esse produto ser conectado a tomadas corretamente instaladas v Sempre que poss vel utilize apenas uma das m os para conectar ou desconectar cabos de sinal v Nunca ligue qu...

Страница 171: ...o enviar a bateria pelo correio para a IBM Instru o 3 PRECAUCI N Quando produtos a laser unidades de CD ROM unidades de DVD dispositivos de fibra tica transmissores etc estiverem instalados observe o...

Страница 172: ...fornecida ao dispositivo O dispositivo tamb m pode ter mais de um cabo de alimenta o Para remover toda a corrente el trica do dispositivo assegure que todos os cabos de alimenta o estejam desconectad...

Страница 173: ...Appendix B Safety information 163...

Страница 174: ...164 xSeries 236 Type 8841 Hardware Maintenance Manual and Troubleshooting Guide...

Страница 175: ...Appendix B Safety information 165...

Страница 176: ...166 xSeries 236 Type 8841 Hardware Maintenance Manual and Troubleshooting Guide...

Страница 177: ...Appendix B Safety information 167...

Страница 178: ...168 xSeries 236 Type 8841 Hardware Maintenance Manual and Troubleshooting Guide...

Страница 179: ...Appendix B Safety information 169...

Страница 180: ...nnect ce produit v Lorsque cela est possible n utilisez qu une seule main pour connecter ou d connecter les c bles d interface v Ne mettez jamais un quipement sous tension en cas d incendie ou d inond...

Страница 181: ...ION Si des produits laser sont install s tels que des unit s de CD ROM ou de DVD des p riph riques contenant des fibres optiques ou des metteurs r cepteurs prenez connaissance des informations suivant...

Страница 182: ...nt pas l arriv e de courant lectrique l int rieur de la machine Il se peut que votre unit dispose de plusieurs cordons d alimentation Pour isoler totalement l unit du r seau lectrique d branchez tous...

Страница 183: ...taktsteckdosen mit ordnungsgem geerdetem Schutzkontakt anschlie en v Signalkabel m glichst einh ndig anschlie en oder l sen v Keine Ger te einschalten wenn die Gefahr einer Besch digung durch Feuer Wa...

Страница 184: ...sfaserkabeln oder Transmitter installiert ist beachten Sie folgendes v Das Entfernen der Abdeckungen des CD ROM Laufwerks kann zu gef hrlicher Laserstrahlung f hren Es befinden sich keine Teile innerh...

Страница 185: ...pannungsschalter am Netzteil wird die Stromversorgung f r den Server nicht unterbrochen Der Server k nnte auch mehr als ein Netzkabel aufweisen Um die gesamte Stromversorgung des Servers auszuschalten...

Страница 186: ...atura collegata a questo prodotto ad una presa elettrica correttamente cablata e munita di terra di sicurezza v Quando possibile collegare o scollegare i cavi di segnale con una sola mano v Non accend...

Страница 187: ...sposizioni nazionali e locali Avviso 3 ATTENZIONE Quando si installano prodotti laser come ad esempio le unit DVD CD ROM a fibre ottiche o trasmettitori prestare attenzione a quanto segue v Non rimuov...

Страница 188: ...non disattiva la corrente elettrica fornita all unit L unit potrebbe disporre di pi di un cavo di alimentazione Per disattivare la corrente elettrica dall unit accertarsi che tutti i cavi di alimentaz...

Страница 189: ...Appendix B Safety information 179...

Страница 190: ...180 xSeries 236 Type 8841 Hardware Maintenance Manual and Troubleshooting Guide...

Страница 191: ...Appendix B Safety information 181...

Страница 192: ...182 xSeries 236 Type 8841 Hardware Maintenance Manual and Troubleshooting Guide...

Страница 193: ...tomas de alimentaci n con un cableado correcto cualquier equipo que vaya a estar conectado a este producto v Si es posible utilice una sola mano cuando conecte o desconecte los cables de sent al v No...

Страница 194: ...local Declaraci n 3 PRECAUCI N Cuando instale productos l ser como por ejemplo CD ROM unidades DVD dispositivos de fibra ptica o transmisores tenga en cuenta las advertencias siguientes v No retire la...

Страница 195: ...an la corriente el ctrica suministrada al dispositivo Es posible tambi n que el dispositivo tenga m s de un cable de alimentaci n Para eliminar la corriente el ctrica del dispositivo aseg rese de desc...

Страница 196: ...186 xSeries 236 Type 8841 Hardware Maintenance Manual and Troubleshooting Guide...

Страница 197: ...OF ANY KIND EITHER EXPRESS OR IMPLIED INCLUDING BUT NOT LIMITED TO THE IMPLIED WARRANTIES OF NON INFRINGEMENT MERCHANTABILITY OR FITNESS FOR A PARTICULAR PURPOSE Some states do not allow disclaimer of...

Страница 198: ...dows NT are trademarks of Microsoft Corporation in the United States other countries or both UNIX is a registered trademark of The Open Group in the United States and other countries Java and all Java...

Страница 199: ...red and warranted solely by third parties IBM makes no representations or warranties with respect to non IBM products Support if any for the non IBM products is provided by the third party not IBM Som...

Страница 200: ...he user will be required to correct the interference at his own expense Properly shielded and grounded cables and connectors must be used in order to meet FCC emission limits IBM is not responsible fo...

Страница 201: ...protection requirements resulting from a nonrecommended modification of the product including the fitting of non IBM option cards This product has been tested and found to comply with the limits for C...

Страница 202: ...Japanese Voluntary Control Council for Interference VCCI statement 192 xSeries 236 Type 8841 Hardware Maintenance Manual and Troubleshooting Guide...

Страница 203: ...connectors 78 the server 49 caution statements defined 2 CD ROM drive activity LED 5 eject button 5 problems 123 removing 64 CD ROM drive continued specifications 3 checkout general 87 power 100 proc...

Страница 204: ...k drive activity LED 5 problems 124 status LED 5 hard disk drive activity LED 5 hard disk drive backplane removing 65 hardware major components 143 problems determining 87 heat output 3 heat sink ther...

Страница 205: ...nector 6 53 password administrator 99 power on jumper 99 PCI bus A 25 bus B 25 bus C 25 fan guide removing 72 PCI expansion slots 3 pointing device auxiliary device connector 52 port connectors 82 Uni...

Страница 206: ...s 132 size 3 software problems 132 specifications 3 statements types of 2 switch card assembly removing 74 switch power on password override 81 system board connectors external port 82 internal cable...

Страница 207: ...W Web site compatible options iv DIMM specification 33 online publications 1 support iv weight 3 Index 197...

Страница 208: ...198 xSeries 236 Type 8841 Hardware Maintenance Manual and Troubleshooting Guide...

Страница 209: ......

Страница 210: ...Part Number 25K8114 1P P N 25K8114...

Отзывы: