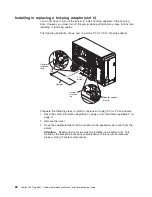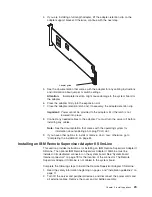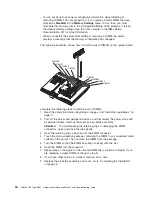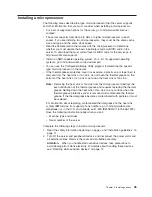
Installing
or
replacing
an
adapter
The
following
notes
describe
the
types
of
adapters
that
the
server
supports
and
other
information
that
you
must
consider
when
installing
an
adapter:
v
Locate
the
documentation
that
comes
with
the
adapter
and
follow
those
instructions
in
addition
to
the
instructions
in
this
section.
If
you
must
change
the
switch
or
jumper
settings
on
the
adapter,
follow
the
instructions
that
come
with
the
adapter.
v
Avoid
touching
the
components
and
gold-edge
connectors
on
the
adapter.
v
You
can
install
full-length
adapters
and
non-hot-plug
adapters
in
slots
4
and
5.
v
A
full-length
adapter
cannot
be
installed
in
slot
1
if
the
ServeRAID-7k
option
is
installed.
v
The
hot-plug
slot
(slot
6)
supports
full
and
half-length
hot-plug
and
non-hot-plug
adapters.
The
hot-plug
feature
is
operating
system
dependant.
See
the
documentation
that
comes
with
your
operating
system
to
see
if
it
supports
this
feature.
v
The
32-bit
PCI
slot
(slot
1)
supports
5.0
V
and
3.3
V
PCI
adapters,
with
the
exception
that
you
cannot
install
a
long
adapter
in
slot
1
on
servers
with
ServeRAID-7k
installed.
v
The
64-bit
PCI-X
slots
4
through
6
support
3.3
V
signaling
PCI
or
PCI-X
adapters;
they
do
not
support
5.0
V
signaling
adapters.
v
The
PCI
bus
configuration
is
as
follows:
–
Non-hot-plug,
33
MHz
32-bit
PCI
slot
1
is
on
PCI
bus
A.
–
Non-hot-plug,
64-bit
PCI
Express
x4
slot
2
is
on
PCI
bus
B
(independent
of
slots
1,
3,
4,
5,
and
6).
–
Non-hot-plug,
64-bit
PCI
Express
x4
slot
3
is
on
PCI
bus
C
(independent
of
slots
1,
2,
4,
5,
and
6).
–
Non-hot-plug,
100
MHz
64-bit
PCI-X
slots
4
and
5
and
the
integrated
SCSI
controller
with
RAID
capabilities
are
on
PCI
bus
D.
–
Hot-plug,
133
MHz
64-bit
PCI-X
slot
6
is
on
PCI
bus
F.
Note:
If
an
optional
ServeRAID
controller
is
installed,
it
overrides
the
standard
functionality
of
the
integrated
SCSI
controller
with
RAID
capabilities.
The
ServeRAID
controller
must
be
installed
in
its
dedicated
connector
on
the
system
board.
v
The
system
scans
PCI
and
PCI-X
slots
1
through
6
to
assign
system
resources.
The
system
then
starts
(boots)
the
system
devices
in
the
following
order,
if
you
have
not
changed
the
default
boot
precedence:
integrated
Ethernet
controller,
integrated
SCSI
controller
with
RAID
capabilities,
and
then
PCI
and
PCI-X
slots
1
through
6.
Note:
To
change
the
boot
precedence
for
PCI
and
PCI-X
devices,
start
the
Configuration/Setup
Utility
program
and
select
Start
Options
from
the
main
menu.
See
the
User’s
Guide
on
the
IBM
xSeries
Documentation
CD
for
details
about
using
the
Configuration/Setup
Utility
program.
v
The
server
uses
a
rotational
interrupt
technique
to
configure
PCI
adapters
so
that
you
can
install
PCI
adapters
that
do
not
support
sharing
of
PCI
interrupts.
Chapter
3.
Installing
options
25
Содержание xSeries 236 8841
Страница 1: ...xSeries 236 Type 8841 Hardware Maintenance Manual and Troubleshooting Guide...
Страница 2: ......
Страница 3: ...xSeries 236 Type 8841 Hardware Maintenance Manual and Troubleshooting Guide...
Страница 20: ...10 xSeries 236 Type 8841 Hardware Maintenance Manual and Troubleshooting Guide...
Страница 96: ...86 xSeries 236 Type 8841 Hardware Maintenance Manual and Troubleshooting Guide...
Страница 152: ...142 xSeries 236 Type 8841 Hardware Maintenance Manual and Troubleshooting Guide...
Страница 160: ...150 xSeries 236 Type 8841 Hardware Maintenance Manual and Troubleshooting Guide...
Страница 173: ...Appendix B Safety information 163...
Страница 174: ...164 xSeries 236 Type 8841 Hardware Maintenance Manual and Troubleshooting Guide...
Страница 175: ...Appendix B Safety information 165...
Страница 176: ...166 xSeries 236 Type 8841 Hardware Maintenance Manual and Troubleshooting Guide...
Страница 177: ...Appendix B Safety information 167...
Страница 178: ...168 xSeries 236 Type 8841 Hardware Maintenance Manual and Troubleshooting Guide...
Страница 179: ...Appendix B Safety information 169...
Страница 189: ...Appendix B Safety information 179...
Страница 190: ...180 xSeries 236 Type 8841 Hardware Maintenance Manual and Troubleshooting Guide...
Страница 191: ...Appendix B Safety information 181...
Страница 192: ...182 xSeries 236 Type 8841 Hardware Maintenance Manual and Troubleshooting Guide...
Страница 196: ...186 xSeries 236 Type 8841 Hardware Maintenance Manual and Troubleshooting Guide...
Страница 207: ...W Web site compatible options iv DIMM specification 33 online publications 1 support iv weight 3 Index 197...
Страница 208: ...198 xSeries 236 Type 8841 Hardware Maintenance Manual and Troubleshooting Guide...
Страница 209: ......
Страница 210: ...Part Number 25K8114 1P P N 25K8114...


