


6-24
GROUP 3 ELECTRICAL SYSTEM
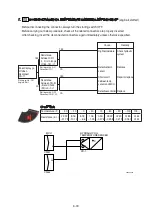
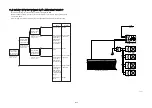
1. WHEN STARTING SWITCH IS TURNED ON, MONITOR PANEL DISPLAY DOES NOT APPEAR
余
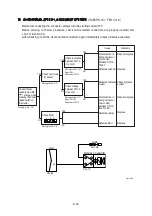
Before disconnecting the connector, always turn the starting switch OFF.
余
Before carrying out below procedure, check all the related connectors are properly inserted and
short of fuse No. 8, 14.
余
After checking, insert the disconnected connectors again immediately unless otherwise specified.
YES
YES
NO
NO
Check voltage
between
CN-56A (2)
and (3)
Check voltage
between CN-5
(9) and (10)
CLUSTER
BATT (24V)
GND
POWER IG (24V)
1
2
3
CN-56A
11
10
9
CN-5
NO.8
FUSE
NO.14
FUSE
Starting switch : ON
Voltage : 20~32V
Cause
Remedy
Defective cluster
Disconnection in
wiring harness or
poor contact
between
CN-5-CN-56A
Disconnection in
wiring harness or
poor contact
between CN-5 (9)
-GND or fuse No.
8, 14
Replace
Repair or replace
(after clean)
Repair or replace
(after clean)
380L6ES01
Starting switch : ON
Voltage : 20~32V
YES
NO
20~32V
0V
Check voltage
Содержание HX430L
Страница 11: ...SECTION 1 GENERAL Group 1 Safety Hints 1 1 Group 2 Specifications 1 10 ...
Страница 161: ...4 6 MEMORANDUM HYUNDAI HEAVY INDUSTRIES CO LTD CONSTRUCTION EQUIPMENT DIV ...
Страница 205: ...4 50 No of pin Receptacle connector female Plug connector male 14 1 7 6 14 MG610406 KET SDL CONNECTOR 13 ...
Страница 528: ...8 88 Assemble relief valve assy 45 using torque wrench ÂTightening torque 26Ü2 6 kgfÂm 188Ü18 8 lbfÂft 31 43098TM95 ...
Страница 548: ...8 108 Remove lock nut 22 and then boot 23 14 36078RL14 2507ARL10 ...
Страница 559: ...8 119 14 15 3 Install cover 3 to body 1 and tighten bolts 14 Torque 10 12 5 kgf m 72 3 90 4 lbf ft 7 21078DA10 ...
Страница 589: ...8 149 1 STRUCTURE GROUP 11 WORK EQUIPMENT B SECTION C SECTION B SECTION A C C A B A 21078DA 44 ...


