background image

Operating manual

CNC 8055

CNC 8055i

WORKING 

WITH OPERATIONS OR

 CYCLES

3.

·MC· O

PTION

S

OFT

: V02.2

X

·87·

P

o

cket cycle with a profile

3.5

Pocket cycle with a profile

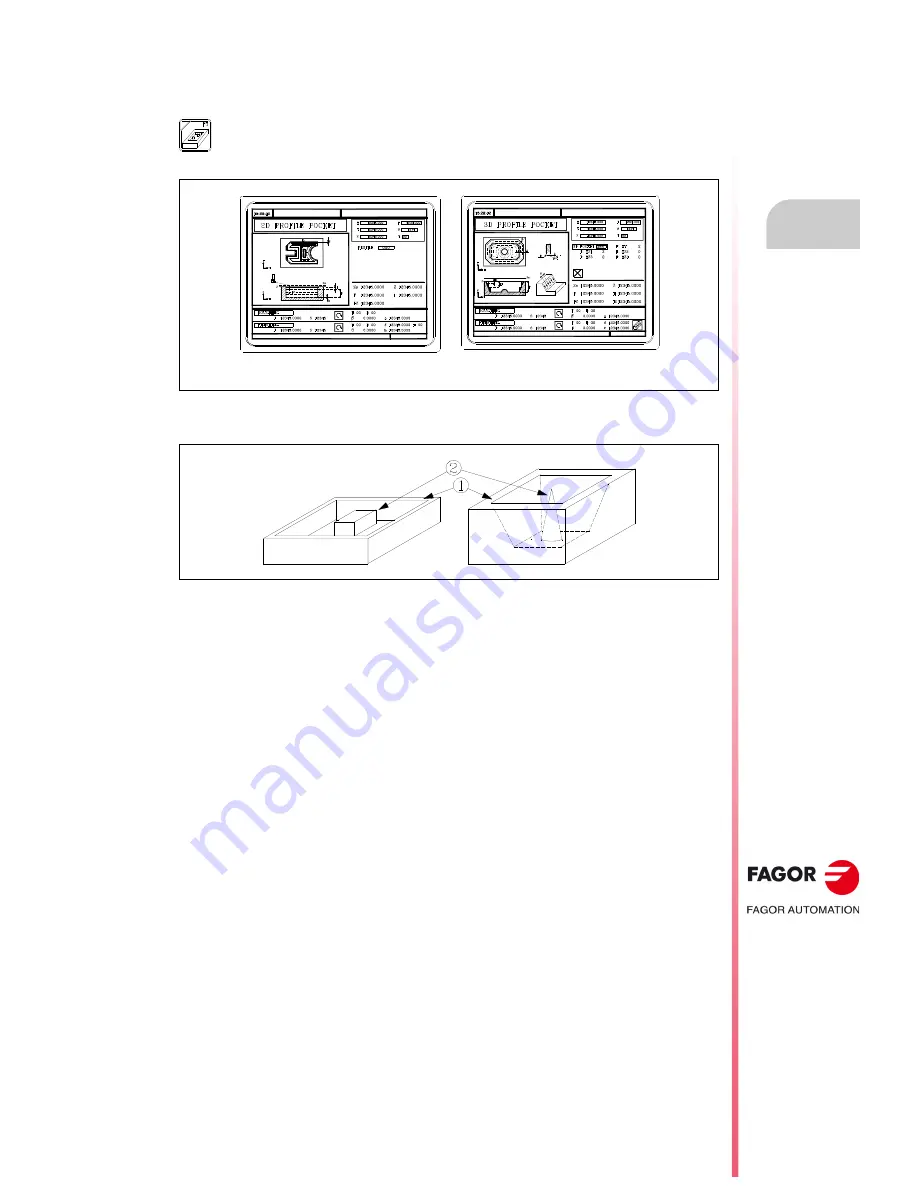
A pocket is composed by an external contour or profile (1) and a series of internal contours or profiles
(2). These internal profiles are called islands.

• In 2D pockets (top left figure), all the walls of the outside profile and of the islands are vertical.

• In 3D pockets (top right figure), one, several or all the walls of the outside pocket and/or of the

islands are not vertical (up to a maximum of 4).

Programming 2D pockets with profile.

When defining the profile, one must indicate, besides the outside contour of the pocket, the contour
or contours of the islands.

The machining in Z is defined with the following parameters:

Zs

Safety plane coordinate.

Z

Part surface coordinate.

P

Pocket depth.

I

Step in Z.

Fz

Penetrating feedrate in Z.

The following must be defined in the data area for the roughing operation:

The sideways penetration angle.

The milling pass.

The following must be defined in the data area for the finishing operation:

The sideways penetration angle.

Finishing stock on the side walls.

z

Finishing stock at the bottom.

N

Number of finishing passes in Z.

This key accesses the pocket-with-profile operation.

There are two types of pocket with profile; 2D and 3D.

Pocket with 2D profile

Pocket with 2D profile

Содержание 8055i FL EN

Страница 1: ...CNC 8055 MC Operating manual Ref 1705 Soft V02 2x...

Страница 2: ...associated documentation however Fagor Automation does not guarantee the validity of those applications Therefore except under the express permission from Fagor Automation any CNC application that is...

Страница 3: ...oving an axis to a particular position coordinate 42 2 5 2 Incremental movement 42 2 5 3 Continuous jog 43 2 5 4 Path jog 44 2 5 5 Movement with an electronic handwheel 46 2 5 6 Feed handwheel 47 2 5...

Страница 4: ...125 CHAPTER 4 OPERATING IN ISO MODE 4 1 Editing blocks in ISO mode 128 4 2 Programming assistance 129 4 2 1 Zero offsets and presets 129 4 2 2 Work zones 129 4 2 3 Insert labels and repetitions from...

Страница 5: ...thernet Option Option Option RS232 serial line Standard Standard Standard 16 digital inputs and 8 outputs I1 to I16 and O1 to O8 Standard Standard Standard Another 40 digital inputs and 24 outputs I65...

Страница 6: ...ping Stand Stand Stand Stand Stand Stand Stand Tool life monitoring Opt Opt Opt Stand Opt Opt Opt Probing canned cycles Opt Opt Opt Stand Opt Opt Opt DNC Stand Stand Stand Stand Stand Stand Stand Stan...

Страница 7: ...atures Manual Open communication INST Improvements to Look Ahead machining INST Blocks with helical interpolation in G51 PRG G84 Tapping with relief PRG List of features Manual Spindle parameter OPLDE...

Страница 8: ...r parameters MAXGEAR1 4 P2 5 SLIMIT P66 and MAXSPEED P0 INST Retracing function of 2000 blocks INST Quick block search OPT Local subroutines within a program PRG Avoid spindle stop with M30 or RESET S...

Страница 9: ...ge of default value for generalmachine parameters MAINOFFS P107 MAINTASF P162 and FEEDTYPE P170 INST New variable EXTORG INST PRG Image handling via DNC PRG Save restore a trace of the oscilloscope OP...

Страница 10: ...10 CNC 8055 CNC 8055i Version history...

Страница 11: ...id electrical discharges and fire hazards do not apply electrical voltage outside the range selected on the rear panel of the central unit Ground connection In order to avoid electrical discharges con...

Страница 12: ...disturbances coming from the machine tool The machine tool must have all the interference generating elements relay coils contactors motors etc uncoupled DC relay coils Diode type 1N4000 AC relay coi...

Страница 13: ...ltage of the external power supply over 33 Vdc and against reverse connection of the power supply Monitor The type of protection fuse depends on the type of monitor See identification label of the uni...

Страница 14: ...ower Before manipulating the connectors inputs outputs feedback etc make sure that the unit is not connected to AC power Symbol for danger or prohibition It indicates actions or operations that may ca...

Страница 15: ...ing used to make the box must have a resistance of 170 kg 375 pounds 2 Attach a label indicating the owner of the unit person to contact type of unit and serial number 3 In case of failure also indica...

Страница 16: ...16 CNC 8055 CNC 8055i Returning conditions...

Страница 17: ...C is available in the downloads section of FAGOR S corporate website at http www fagorautomation com Type of file Declaration of conformity WARRANTY TERMS The warranty conditions for the CNC are avail...

Страница 18: ...18 CNC 8055 CNC 8055i Declaration of conformity and Warranty conditions...

Страница 19: ...o prevent electrical shock at the monitor of the 8055 CNC use the proper mains AC connector A with 3 wire power cables one of them for ground connection Before turning on the monitor of the 8055 CNC a...

Страница 20: ...20 CNC 8055 CNC 8055i Additional notes...

Страница 21: ...irected to the end user It describes how to operate and program in TC mode It contains a self teaching manual MCO TCO model Directed to the end user It describes how to operate and program in MCO and...

Страница 22: ...22 CNC 8055 CNC 8055i Fagor documentation...

Страница 23: ...command keys Specific keys of the MC model Select the X character Select the A character Select the R character These keys may be used for Selecting and defining the machining operations Govern the ex...

Страница 24: ...55i 1 GENERAL CONCEPTS MC OPTION SOFT V02 2X Keyboard JOG keys These keys may be used for Moving the axes of the machine Governing the spindle Modifying the feedrate of the axes and the spindle speed...

Страница 25: ...ed out at the beginning and at the end of the part program If they are not defined the CNC will issue an error message when trying to execute a part program OEM manufacturer s parameters OEM parameter...

Страница 26: ...displayed must be preceded by the symbol If a line begins with the CNC assumes that the whole line is a program comment Examples 44 M MIN Is message 44 and displays the text M MIN General text The CNC...

Страница 27: ...N1001 ERROR 1 ZULAKETA ZIKLOA F 0 P998000 P998999 They are the profiles for the pocket with profile cycle that are defined by the user with the profile editor In the MC mode the user defines them wit...

Страница 28: ...e to MC or MCO mode it cannot find program P999997 because it has been deleted it is initialized like on power up When modifying the texts of program P999997 turn the CNC off and back on so it assumes...

Страница 29: ...e sequence SHIFT RESET the CNC shows page 0 defined by the manufacturer if there is no page 0 it shows the standard screen of the work mode Press any key to access the work mode There are 2 work modes...

Страница 30: ...ces that are not supported in MC mode the CNC changes the Start icon at the top of the window from green to gray and shows a message indicating that it is an invalid action For example if M3 Start is...

Страница 31: ...CNC 8055 CNC 8055i MC OPTION SOFT V02 2X 2 31 OPERATING IN JOG MODE The standard screen of the MC mode is the following When pressing the two color key the CNC shows the special screen of the MC mode...

Страница 32: ...his window shows the CNC messages 4 This window may show the following data X Y Z coordinates of the axes In small characters the axis coordinates referred to machine reference zero These values are u...

Страница 33: ...speed being applied Theactivespindlespeedgear range TheCNCdoesnotshowthisdatawhentext28ofprogram 999997 has not been defined 8 When accessing a work cycle this window shows the help text associated wi...

Страница 34: ...m currently selected 5 The X Y Z axes have the following fields The spindle S has the following fields The auxiliary axes only show the real current position of the axis COMMAD It indicates the progra...

Страница 35: ...ey is used to close the window The window is only displayed when there are more than one active message Direct access to the oscilloscope The oscilloscope may be accessed from the auxiliary screen by...

Страница 36: ...st move the Z axis by hand The standard screen shows the operations to be carried out by the operator In each case it shows the status of the Z axis and the various actions to be executed by the opera...

Страница 37: ...data has been eliminated to adapt them to the two and a half axis configuration This data referred to operations of the Z axis Positioning 1 and 2 Profile milling and profile 1 milling Surface milling...

Страница 38: ...for simulation or execution the CNC selects that part program and shows it highlighted next to the green start symbol in the top center window When the top center window shows the part program select...

Страница 39: ...or Z The CNC will highlight the coordinate of that axis indicating that it is selected 2 Key in the value to preset the axis To quit the preset mode press ESC 3 Press ENTER for the CNC to assume that...

Страница 40: ...a single axis To home a single axis press the key of the desired axis and the key for home search In either case the CNC requests confirmation of the command text 48 of program 999997 After searching...

Страница 41: ...If the magnifying glass is placed on top of an offset G54 G59 G159N7 G159N20 editing start on the first axis of that offset Load the active zero offset into the table Position the magnifying glass ov...

Страница 42: ...rticular coordinate are made one at a time as follows 2 5 2 Incremental movement Turn the JOG switch to one of the JOG positions The incremental movement must be made one axis at a time To do that pre...

Страница 43: ...to that indicated by the new key The following cases are possible when working with F in mm rev The spindle is running The spindle is stopped but a spindle speed S has been selected The spindle is sto...

Страница 44: ...the same way whether path jog is on or off The rest of the keys move only the axis and in the indicated direction The movements in path jog may be aborted by pressing the STOP key or setting the jog s...

Страница 45: ...e jog movements This mode assumes as axis feedrate the one selected in jog mode and it will also be affected by the feedrate override switch If F0 is selected it assumes the one indicated by machine p...

Страница 46: ...hlights it When pressing the button again the CNC selects the next axis and so on in a rotary fashion To deselect the axis hold the button pressed for more than 2 seconds Once the axis has been select...

Страница 47: ...is way the machining feedrate will depend on how fast the handwheel is turned The following CNC variables return the number of pulses the handwheel has turned HANPF provides the number of pulses of th...

Страница 48: ...heel mode When selecting the path handwheel mode the CNC behaves as follows If there is a general handwheel it will be the one working in path handwheel mode The individual handwheels if any will rema...

Страница 49: ...currently selected The D offset number associated with the tool The position values of the tool change point The CNC does not show this window when text 47 of program 999997 has not been defined To se...

Страница 50: ...the execution of M06 General machine parameter TOFFM06 P28 indicates whether the machine is a machining center or not If g m p If TOFFM06 P28 YES instead of displaying the tool change point the CNC wi...

Страница 51: ...ls may contain the following information The tool is selected after executing the subroutine General machine parameter P71 TAFTERS YES The movement to the change point only takes place when executing...

Страница 52: ...ne associated with the tool general machine parameter TOOLSUB P60 Executes function M06 to make the tool change When selecting a new tool in jog mode or working in M mode the CNC only selects the tool...

Страница 53: ...with the tools must consider those values Arithmetic parameters P290 P291 and P292 contain the values set by the operator as tool change position in X Y and Z respectively In subroutine 55 of the prev...

Страница 54: ...hen editing the active tool it is possible To modify the I and K data Select another tool T RECALL and modify the I and K data When NOT editing the active tool it is possible To modify the I K and D d...

Страница 55: ...y to select the T field 2 Key in the desired tool number and press RECALL If the tool is defined the CNC will show the values stored in the table If the tool is not defined the CNC assigns an offset w...

Страница 56: ...atic tool changer 0 199 normal tools 200 255 special tools When requesting a new worn out tool real life greater than nominal life the CNC will select the next tool of the same family instead Tool sta...

Страница 57: ...ns assigned to the selected tool The R and L data indicate the tool dimensions radius and length I and K indicate the offset the CNC must apply to compensate for tool wear The CNC adds the value of th...

Страница 58: ...uring the length 1 Approach the tool to the part and touch it with it 2 Then press the keystroke sequence Z ENTER The tool has been calibrated The CNC assigns the corresponding length L to it and rese...

Страница 59: ...st be defined Not all the data will always be available the cycle will show the necessary data according to the chosen operation Safety distance Ds for probe approach Probing feedrate F Type of calibr...

Страница 60: ...Probe position In this zone one must indicate whether the cycle assumes the probe position defined in the machine parameters or the position defined in this zone To select one of them use the cursor t...

Страница 61: ...will appear in level 2 of the tool calibration mode In this case part centering with a probe will not be displayed i Icon for selecting the axis and the direction X X Y Y of the first probing movemen...

Страница 62: ...a 0 value it generates the corresponding error message F Probing feedrate for measuring If not programmed or programmed with a 0 value it generates the corresponding error message Fa Probe positioning...

Страница 63: ...ox the screen will show a help message Data to be entered Icon to select the type of part to be centered rectangular or circular Icon to choose between machine coordinates and part coordinates Icon to...

Страница 64: ...le if it has been selected If coordinate preset is active and the new part zero changes the CNC will request confirmation 6 If the new coordinate preset has been applied and it is working in part coor...

Страница 65: ...value the CNC will display the corresponding error message Dr Withdrawal distance Distance the tool retracts after touching the probe to take the measurement If not programmed or programmed with a 0 v...

Страница 66: ...ng the ordinate axis If not programmed it will assume the value of general machine parameter PRBYMAX P43 Ymin Approximate Y axis coordinate of the least positive side of the probe Approximate coordina...

Страница 67: ...highlights the current value Enter the new value and press START The CNC assumes that value and refreshes the real spindle speed The maximum spindle speed is saved in the MDISL variable This variable...

Страница 68: ...nform the PLC about the status of each key The corresponding register bit will be set to 1 when the key is pressed and 0 when it is not pressed The register bit for each key is The status of the lamp...

Страница 69: ...o fit the number of instructions that have been saved To execute or modify an MDI line that has been executed earlier proceed as follows Go into MDI mode Press the UP ARROW or DOWN ARROW key to open t...

Страница 70: ...70 Operating manual CNC 8055 CNC 8055i 2 OPERATING IN JOG MODE MC OPTION SOFT V02 2X ISO management...

Страница 71: ...ing standard machining cycle changes the display and turns on the lamp of the key that has been pressed indicating the selected type Standard machining operations or cycles may be selected with each o...

Страница 72: ...ter 5 Saving programs describes in detail how to do it and how to use those programs To de select a cycle and return to the standard screen press the key for the selected cycle the one with the lamp o...

Страница 73: ...ning the machining geometry 6 Machining conditions for the operation The CNC will highlight an icon a coordinate or one of the data defining the operation or cycle indicating that it has been selected...

Страница 74: ...pindle turning speed S Spindle turning direction Machining tool T Place the cursor over this data key in the desired value and press ENTER Press ESC to quit the tool calibration mode and return to the...

Страница 75: ...Zs Part approaching plane The CNC calculates it at 1 mm from the part surface Part surface It is set with parameter Z The tool moves in rapid G00 to the safety plane Zs moves on in rapid to the appro...

Страница 76: ...de 3 1 3 Cycle level All the cycles have several editing levels Each level has its own screen and the main window of the cycle indicates with tabs the available levels and which one is selected To cha...

Страница 77: ...xecution and editing Press ESC to switch from editing mode to execution mode Press ESC to switch from executing mode to editing mode For further information on simulating and executing cycles see the...

Страница 78: ...ed in background cannot be executed or simulated and the current position of the machine cannot be assigned to a coordinate Use the following keys to inspect or change a tool while editing in backgrou...

Страница 79: ...and the machining conditions in Z Zs Z P I Fz Also in the area for roughing operation data it must be defined whether the milling operation is carried out with or without tool compensation Level 2 The...

Страница 80: ...y also be defined incrementally To do that select the desired coordinate with the cursor and press the two color key Both coordinates of the selected point will be shown preceded by the icon that indi...

Страница 81: ...ue and press ENTER If the penetration step is programmed with a positive sign I the cycle recalculates the step so all the penetrations are identical this being equal to or less than the one programme...

Страница 82: ...ey The canned cycle will show the profile programs currently defined Place the cursor on the profile program to be copied and press P PROG The CNC requests the number of the new profile and it allows...

Страница 83: ...z Also you must define the milling pass in the data area for the roughing operation and the finishing stock z in the data area for the finishing operation Grooving operation The following data must be...

Страница 84: ...shown at the bottom right roughing and finishing area may be used to select the corner to start milling the surface The data E and are defined one by one Place the cursor in the corresponding window k...

Страница 85: ...the desired value and press ENTER When programming parameter E with a value smaller than the tool radius the CNC executes the slot milling with an E value equal to the tool radius Machining conditions...

Страница 86: ...86 Operating manual CNC 8055 CNC 8055i 3 WORKING WITH OPERATIONS OR CYCLES MC OPTION SOFT V02 2X Surface milling and slot milling operations Clockwise milling of the different types of slots...

Страница 87: ...file When defining the profile one must indicate besides the outside contour of the pocket the contour or contours of the islands The machining in Z is defined with the following parameters Zs Safety...

Страница 88: ...rofile defined Profile P Z4 They usually correspond to the contour of the third island defined The machining in Z is defined with the following parameters Zs Safety plane coordinate Z Part surface coo...

Страница 89: ...tep is programmed with a positive sign I the cycle recalculates the step so all the penetrations are identical this being equal to or less than the one programmed If programmed with a negative sign I...

Страница 90: ...ss ESC Copying a profile program Press the key The canned cycle will show the profile programs currently defined Place the cursor on the profile program to be copied and press P PROG The CNC requests...

Страница 91: ...is X Ordinate axis Y Autozoom Yes Validate Initial point X 20 Y 8 Validate Straight line X 20 Y 40 Validate Straight line X 145 Y 40 Validate Straight line X 145 Y 25 Validate Clockwise arc Xf 145 Yf...

Страница 92: ...40 Validate Straight line X 145 Y 40 Validate Straight line X 145 Y 40 Validate Straight line X 20 Y 40 Validate Straight line X 20 Y 0 Validate Lower left corner ENTER Chamfer 15 ENTER Lower right co...

Страница 93: ...th profile P Z1 Configuration Profile End Save profile P XY 3 RECALL Abscissa axis X Ordinate axis Y Autozoom Yes Validate Initial point X 20 Y 0 Validate Straight line X 20 Y 40 Validate Straight lin...

Страница 94: ...profile P XY Configuration Profile pocket profile Profile island profile End Save profile P XY 4 RECALL Abscissa axis X Ordinate axis Y Autozoom Yes Validate Initial point X 20 Y 0 Validate Straight...

Страница 95: ...th profile End Save profile Depth profile P Z2 Configuration Profile island depth profile End Save profile P Z1 2 RECALL Abscissa axis X Ordinate axis Z Autozoom Yes Validate Initial point X 20 Z 0 Va...

Страница 96: ...ss cycle The following data must be defined The center coordinates Xc Yc the radius of the boss R the amount of stock to be removed Q and the machining conditions in Z Zs Z P I Fz This key accesses th...

Страница 97: ...orresponding window key in the desired value and press ENTER Type of corner Circular boss Center coordinates radius and stock to be removed These data are defined one by one The center coordinates Xc...

Страница 98: ...OR CYCLES MC OPTION SOFT V02 2X Rectangular and circular boss cycles Milling pass Finishing stock on the side walls and at the bottom z Number of finishing passes N Place the cursor in the window for...

Страница 99: ...ng data must be defined The starting point X Y the pocket dimensions L H the inclination angle the type ofcorner and the machining conditions in Z Zs Z P I Fz This key accesses the circular pocket and...

Страница 100: ...Xc Yc the inside radius Ri and the outside radius Re of the pocket and the machining conditions in Z Zs Z P I Fz In the roughing area one must define the sideways penetration angle the milling pass a...

Страница 101: ...rner Circular pocket Center coordinate and radii These data are defined one by one The center coordinates Xc Yc are defined as the coordinates of the first and last points To define the radii R Ri Re...

Страница 102: ...n the rectangular pocket the penetration is carried out from the pocket center following the first machining path The path is followed as many times as needed so it ends back in the center of the pock...

Страница 103: ...vel 1 The following data must be defined The target point X Y Z the axis moving order and the type of feedrate Level 2 The following data must be defined The target point X Y Z the axis moving order t...

Страница 104: ...lue shown in the top right window and press ENTER The top right window shows the tool position at all times Order in which the axes move Type of feedrate Auxiliary M functions The functions will be ex...

Страница 105: ...bottom t Boring operation level 2 This level is only available when using spindle orientation This level may be used after the quail has penetrated to orient the spindle retract the quail before the...

Страница 106: ...shows the tool position at all times Machining conditions in Z Zs Z P I t The machining conditions are defined one by one The Zs and Z values are defined as the coordinates of the machining point To d...

Страница 107: ...107 Reaming operation 3 10 Reaming operation Reaming operation The following data must be defined The machining point X Y the coordinate of the safety plane Zs the coordinate of the part surface Z the...

Страница 108: ...in the desired value and press ENTER Assign the current machine position Jog the axis with the handwheel or the JOG keys up to the desired point Press RECALL so the selected data assumes the value sho...

Страница 109: ...milling operation level 2 The following data must be defined The type of threading inside or outside the machining point X Y the coordinate of the safety plane Zs the part surface coordinate Z the to...

Страница 110: ...Machining conditions in Z Zs Z P I t The machining conditions are defined one by one The Zs and Z values are defined as the coordinates of the machining point To define the rest of the values P t go...

Страница 111: ...ter this the CNC will display the following message To end the cycle press START to skip to the next SKIPCYCL Finish the hole To finish the hole press the START key The hole is repeated from the start...

Страница 112: ...ate of the part surface P Machining depth Defines the total milling depth If programmed with a 0 value the CNC will display the corresponding error message Thread diameter Defines the nominal diameter...

Страница 113: ...ing with a cutter of n edges If not programmed or programmed with a 0 value the CNC will display the corresponding error message It defines the thread cutting direction It defines the thread cutting d...

Страница 114: ...the coordinate of the part surface Z the dwell at the bottom t and the type of center punching Drilling operation level 1 The following data must be defined The machining point X Y the coordinate of t...

Страница 115: ...point X Y the coordinate of the safety plane Zs the coordinate of the part surface Z the withdrawal coordinate Zr the total machining depth P the drilling peck I and the dwell at the bottom t Bore mil...

Страница 116: ...window key in the desired value and press ENTER Hole diameter Defines the diameter of the hole To set this value place the cursor in the corresponding window key in the desired value and press ENTER...

Страница 117: ...START to skip to the next SKIPCYCL Finish the hole To finish the hole press the START key It goes down in G0 with spindle running to 1 mm before the coordinate where the hole stopped From then on it...

Страница 118: ...2 Selection of the type of positioning to be associated with 3 Programming of the different points of the positioning The cycle assumes as first positioning point the starting point of the machining...

Страница 119: ...roughing and finishing operation with the same tool and it is not possible to program M functions between them The machining takes place point to point the whole cycle is executed at each point there...

Страница 120: ...point Press RECALL so the selected data assumes the value shown in the top right window and press ENTER The top right window shows the tool position at all times If a coordinate is left blank the cyc...

Страница 121: ...he corresponding window key in the desired value and press ENTER This key associates this positioning with the active operation The positioning may be defined in 5 ways To select the desired type plac...

Страница 122: ...int Angular distance between machining operations 2 Coordinates of the starting point X1 Y1 Radius R Angle of the starting point Angle of the last point Angular distance between machining operations 3...

Страница 123: ...achining operations Angle of the last point Data definition The coordinates are defined one by one After placing the cursor on the coordinates of the axes to be defined the value is entered in one of...

Страница 124: ...times To define the rest of the values Lx Ly Ix Iy Nx Ny go to the corresponding window key in the desired value and press ENTER This key associates this positioning with the active operation The pos...

Страница 125: ...es To define the rest of the values Lx Ly Ix Iy Nx Ny go to the corresponding window key in the desired value and press ENTER This key associates this positioning with the active operation The positio...

Страница 126: ...126 Operating manual CNC 8055 CNC 8055i 3 WORKING WITH OPERATIONS OR CYCLES MC OPTION SOFT V02 2X Multiple positioning...

Страница 127: ...e cycle data or the blocks have been edited press ESC The upper right side of the screen will show the start symbol From this moment one the edited blocks may be simulated executed or saved like any o...

Страница 128: ...l screen for editing up to 6 program blocks either in ISO code or in high level language After editing a block press ENTER to validate it Once the block or blocks have been edited press ESC The upper...

Страница 129: ...G59 G159N7 G159N20 or G92 Pressing the ZERO key accesses the zero offset table The icons may be used to defined the following options Select the work zone to act upon Up to five different zones may be...

Страница 130: ...axes This icon is not shown when selecting mirror image cancellation The cycle internally generates an ISO block that contains a combination of functions G10 G11 and G12 An icon is used to indicate w...

Страница 131: ...of the axes in the boxes as he wishes In this case the main drawing does not highlight any plane If there are only XYZ axes the selection icon does not show the option for free configuration G16 If a...

Страница 132: ...132 Operating manual CNC 8055 CNC 8055i 4 OPERATING IN ISO MODE MC OPTION SOFT V02 2X Programming assistance...

Страница 133: ...ing with operations or cycles describes how to edit or define those operations or cycles This chapter indicates how to operate with those part programs through the following sections and sub sections...

Страница 134: ...est previous one For example to find program number 123 press the keystroke sequence 1 2 and 3 The time interval between keystrokes must be shorter than 1 5 seconds A longer interval starts a new sequ...

Страница 135: ...ows the cycles that make up the part Once an operation has been selected the following is possible To see the operation in detail To delete the operation To move the operation to another position To m...

Страница 136: ...nt it is possible to Simulate the operation See chapter 6 Execution and simulation Execute the operation See chapter 6 Execution and simulation To modify the operation Save the operation Replacing the...

Страница 137: ...y The bottom of the screen will request the number to be assigned to the new part program and it will offer the first one available 4 Enter the number of the desired program and press ENTER It must be...

Страница 138: ...operation after which the block or cycle is to be saved and press ENTER Example To insert the Drilling 1 linear positioning operation once the operation has been defined place the pointer on the Circ...

Страница 139: ...e list of part programs stored 2 Select with the pointer the part program to be deleted from the left column The bottom of the screen will show a message requesting confirmation of the deleting operat...

Страница 140: ...number to be assigned to the copy 4 Enter the number of the desired program and press ENTER It must be a number between 1 and 899999 Both included 5 If there is already a part program with that numbe...

Страница 141: ...oceed as follows 1 Press P PROG to access the list of part programs stored 2 Select with the pointer the part program to be modified from the left column Once the program has been selected the followi...

Страница 142: ...1 Select with the pointer the operation to be deleted from the right column 2 Press CLEAR The bottom of the screen will show a message requesting confirmation of the deleting operation If ENTER is pr...

Страница 143: ...a new operation To add or insert an operation follow the same steps as for saving an operation 1 Define the desired block or cycle assigning the relevant data to it 2 Press P PROG to access the list o...

Страница 144: ...id pattern positioning operation and press ENTER 2 Press the two color key The CNC will highlight that operation 3 Place the cursor on the operation after which the operation is to be placed and press...

Страница 145: ...the pointer on the same operation To select another position use the keys the new operation will be inserted after the selected one 2 Press the ENTER key Toplacethemodifiedoperationinitspreviouslocati...

Страница 146: ...der where programs may be executed When returning from the explorer to the PPROG screen with a different device the CNC will display a message warning that the device has been changed and requesting c...

Страница 147: ...or execution When selecting a part program or operation saved as part of a part program for simulation or execution the CNC selects that part program and shows it highlighted next to the green start...

Страница 148: ...g Simulation Execution An operation or cycle can only be executed in the cycle execution mode The operation or cycle cannot be executed when the cycle editing mode is selected Press ESC to quit the ed...

Страница 149: ...imulated or executed Press GRAPHICS to simulate the part program and START to execute it When executing a program the CNC executes the initial subroutine 9998 and the final subroutine 9999 If an error...

Страница 150: ...to access the list of part programs stored 2 Select the program from the left column and the operation on the right column from which to begin executing or simulating the part program Press GRAPHICS t...

Страница 151: ...hat has been saved Proceed as follows to simulate or execute an operation that has been saved as a part of program 1 Press P PROG to access the list of part programs stored 2 Select the program that c...

Страница 152: ...ute an operation or part program the CNC shows the standard screen of the MC mode When pressing the two color key the CNC shows the special screen of the MC mode Once the operation or part has been se...

Страница 153: ...on There may be 2 cases either only one axis moved or several did Only one axis moved The CNC repositions it and resumes the execution Several axes moved The CNC will show a window with the following...

Страница 154: ...ound the softkeys ZOOM ZOOM to enlarge or shrink its size and press ENTER for those new values to be assumed When the GRAPHICS key is pressed the CNC displays the graphic representation page of the M...

Страница 155: ...the screen the type of path and use the keys to select the color to be applied Press ENTER for the CNC to assume those values Clear screen When selecting this option the CNC clears the screen and sho...

Страница 156: ...amfer G39 and path tangent to previous path G8 are resolved and generated only using G1 G2 and G3 blocks If the program already exists it will be deleted without requesting confirmation If the generat...

Страница 157: ...Operating manual CNC 8055 CNC 8055i 6 SOFT V02 2X 157...

Страница 158: ...158 Operating manual CNC 8055 CNC 8055i 6 SOFT V02 2X...

Страница 159: ......

Страница 160: ...or Automation S Coop B San Andr s 19 Apdo 144 E 20500 Arrasate Mondrag n Spain Tel 34 943 719 200 34 943 039 800 Fax 34 943 791 712 E mail info fagorautomation es www fagorautomation com FAGOR AUTOMAT...

Отзывы: