background image

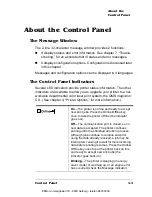
About the 

Control Panel

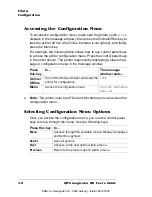
QMS magicolor WX User

s Guide

3-4

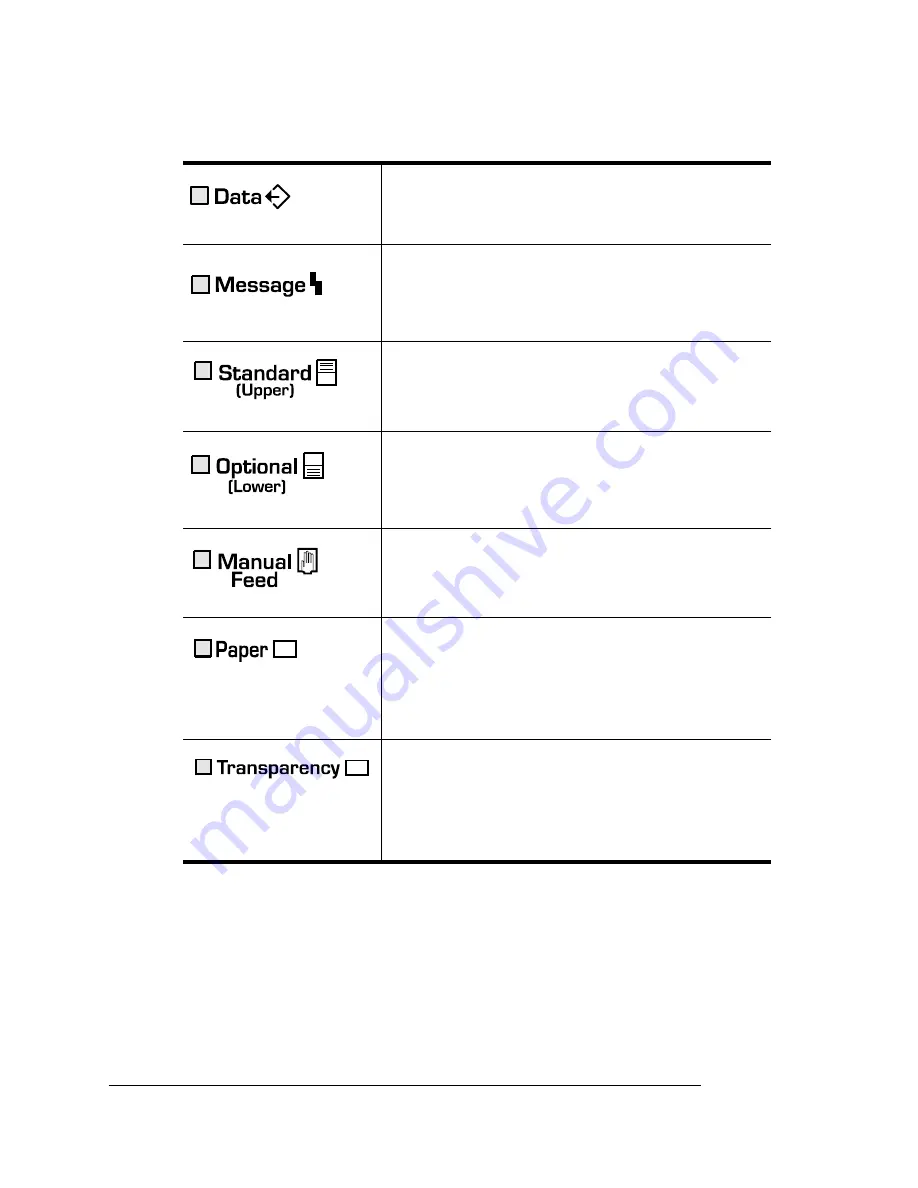
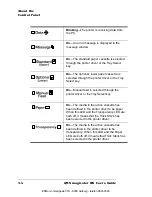
Blinking—The printer is receiving data from 
the PC.

On—An error message is displayed in the 
message window.

On—The standard paper cassette is selected 
through the printer driver or the Tray Select 
key.

On—The optional, lower paper cassette is 
selected through the printer driver or the Tray 
Select key.

On—Manual feed is selected through the 
printer driver or the Tray Select key.

On—The media in the active cassette has 
been defined in the printer driver to be paper . 
When this LED and the Transparency LED are 
both off, it means that the Thick Stock has 
been selected in the printer driver.

On—The media in the active cassette has 
been defined in the printer driver to be 
transparency. When this LED and the Paper 
LED are both off, it means that Thick Stock has 
been selected in the printer driver.

EDNord - Istedgade 37A - 9000 Aalborg - telefon 96333500

Содержание QMS magicolor WX

Страница 1: ...QMS magicolor WX User s Guide 1800444 001B EDNord Istedgade 37A 9000 Aalborg telefon 96333500 ...

Страница 2: ... permission of QMS Inc Copyright Notice This manual is Copyrighted 1997 by QMS Inc One Magnum Pass Mobile AL 36618 All Rights Reserved This manual may not be copied in whole or in part nor transferred to any other media or language without the express written permission of QMS Inc Manual Notice QMS Inc reserves the right to make changes to this manual and to the equipment described herein without ...

Страница 3: ...formed exactly as described in the manual ACHTUNG Bitte halten Sie sich exakt an die im Handbuch beschriebene Vorgehensweise da sonst Verletzungsgefahr bestehen könnte v Mixed Case Courier Text you type and messages and information displayed on the screen Mixed Case Italic Courier Variable text you type replace the italicized word s with information specific to your printer or computer UPPERCASE C...

Страница 4: ...EDNord Istedgade 37A 9000 Aalborg telefon 96333500 ...
Страница 5: ...ner Cartridges 1 7 Remove the Pressure Release Pieces 1 12 Install the Cleaning Pad and Oil Bottle 1 14 Install the Waste Toner Pack 1 18 Install the OPC Belt Cartridge 1 20 Fill the Paper Cassette 1 24 Connect the Printer to Your PC and Plug It In 1 26 Install the Printer Driver 1 26 Register the Printer 1 29 EDNord Istedgade 37A 9000 Aalborg telefon 96333500 ...
Страница 6: ...ng Device Settings 2 32 Halftone Setup 2 35 Printing on a Network 2 40 Sharing Your Printer with Others for Windows 95 Users 2 40 Sharing Your Printer with Others for Windows NT 4 0 Users 2 41 Sharing Someone Else s Printer 2 43 Refilling the Media Cassette 2 44 Using the Manual Feed Tray 2 47 Printing on Different Types of Print Media 2 49 Printing Transparencies 2 49 Printing Labels 2 49 Printin...

Страница 7: ...Setting Energy Conservation 3 10 Setting the Media Source 3 10 4 Printer Options Available Options and Accessories 4 2 Sheet Feeder 4 2 The Envelope Cassette 4 6 Installing the Envelope Cassette 4 6 Removing and Replacing the Controller Board 4 10 Removing the Controller Board 4 10 Replacing the Controller Board 4 11 Single In Line Memory Modules SIMMs 4 13 Updating System Software 4 16 Troublesho...

Страница 8: ...Bottle 5 18 Replacing the Waste Toner Pack 5 23 Cleaning the Printer 5 25 Guidelines for Cleaning the Printer 5 25 Cleaning the Charger Unit the Precharger Unit and the AC Charger Unit 5 26 Cleaning the Rollers 5 34 Cleaning the Exterior of Your Printer 5 41 6 Repacking the Printer Introduction 6 2 Remove Cables and Cassette s 6 2 Remove the Toner and Developer Cartridges 6 3 Remove the Fuser Unit...

Страница 9: ... 7 17 Clearing Media Jams 7 18 Clearing Misfeed Jams 7 18 Clearing Inner Jams 7 21 Clearing Outer Jams 7 27 If the Media Jam Message Stays On 7 32 Reseating the Drum 7 32 Installing the Printer Driver Manually 7 34 Placing a Service Call 7 36 A QMS Customer Support Sources of Support A 2 Your QMS Vendor A 2 Your Application Vendor A 2 Q FAX A 2 The QMS Corporate Bulletin Board System A 3 CompuServ...

Страница 10: ...s B 3 Print Media and Consumables B 4 Printer Options B 4 Centronics Parallel Cable Specifications B 4 Centronics 1284 Parallel Pinouts B 4 Notices B 6 Energy Star Compliance B 6 FCC Statement B 6 Laser Safety B 7 Canadian Users Notice B 7 International Notice B 8 Warranty Considerations B 8 Index EDNord Istedgade 37A 9000 Aalborg telefon 96333500 ...

Страница 11: ... Finding a good location for the printer n Unpacking the printer n Checking shipment contents n Setting up the printer n Installing the printer driver n Registering the printer EDNord Istedgade 37A 9000 Aalborg telefon 96333500 ...
Страница 12: ... lbs 48 kg By level we mean the surface should be so flat 1 of slant or less that you can lay a round pencil down on it and it doesn t roll in any direction n In an area with a moderate temperature and humidity 64 81 F 18 27 C 60 70 relative humidity n Away from cooling sources heating sources extreme tempera ture changes direct sunlight excessive dust corrosive chemi cals strong electromagnetic f...

Страница 13: ...Find a Good Location 1 3 Setup n In an area that allows plenty of space for ventilation and mainte nance access 16 40 cm 4 10 cm 36 90 cm 28 70 cm EDNord Istedgade 37A 9000 Aalborg telefon 96333500 ...
Страница 14: ...r alleine anzuheben oder zu transportieren Caution To prevent damaging your printer you must remove all packing materials explained below before turning it on 1 Remove everything except the printer from the shipping car ton leave the plastic and the straps on the printer then lift off the box Note Store all of the packing materials where you can easily access them if you ever need to relocate the ...

Страница 15: ...e printer to lift the printer from its carton and place it in a sturdy level surface 3 Remove the plastic wrap and all packing tape from the printer 4 Remove the top cover and remove the packing material from inside the printer Strap Handles Strap Handles Front View Packing EDNord Istedgade 37A 9000 Aalborg telefon 96333500 ...

Страница 16: ...a yellow and black n 4 developer cartridges one each cyan magenta yellow and black n Bags for used toner and developer n Waste toner pack n 1 oil bottle n 1 cleaning pad n Power cord n Printer driver disk for Windows 95 n Printer driver disk for Windows NT 4 0 n Warranty and registration card n Universal media cassette n OPC belt cartridge Caution The OPC belt cartridge is sensitive to direct sunl...

Страница 17: ...nd eye irritation ACHTUNG Bei Entwickler und Toner handelt es sich um gefährliche Pulver die leicht enzündlich sind sie dürfen deshalb niemals mit offenem Feuer in Beruhrüng kommen Einatmen oder Berührung mit Haut und Augen ist ebenfalls zu vermeiden da dieses zu Beeintràchtigungen der Atemwege Haut oder Augenreizungen führen könnte Caution It s important to load the developer and toner cartridges...

Страница 18: ... two green latches and lower the cartridge into the slot closest to the back of the printer It should snap into place 3 Close the developer cartridge latches Color Coded Tab Developer Cartridge Front View Rear View EDNord Istedgade 37A 9000 Aalborg telefon 96333500 ...

Страница 19: ...d out of the car tridge 5 Remove the black toner cartridge from its protective bag Toner cartridges are color coded on top 6 Hold the toner cartridge as shown and shake it horizontally This distributes toner evenly inside the cartridge and helps ensure quality printing Tab Rear View Tape EDNord Istedgade 37A 9000 Aalborg telefon 96333500 ...
Страница 20: ...ith the notches on the developer cartridge Orient the cartridge so that the words on top are readable from the front of the printer Caution Never force a toner cartridge onto a developer cartridge or you ll damage the cartridges and the printer If it doesn t fit easily make sure you re installing the correct color cartridge they re keyed to fit each other Toner Cartridge Rear View EDNord Istedgade...

Страница 21: ...pull the tab straight up to remove the attached tape from the cartridge 9 Repeat steps 1 8 to load the remaining developer and toner cartridges in this order from back to front cyan magenta and yellow Tab Rear View Black Cyan Magenta Yellow EDNord Istedgade 37A 9000 Aalborg telefon 96333500 ...

Страница 22: ...Pressure Release Pieces 1 Pull up on the paper exit unit latch and then tilt the paper exit unit back and down to open it 2 Use the two green separator latches to tilt the pawl unit back Rear View Latches Front View EDNord Istedgade 37A 9000 Aalborg telefon 96333500 ...
Страница 23: ... on each end of the fuser roller Note Store all of these pieces where you can easily access them if you ever need to relocate the printer or return it for service Pressure Release Lever Rear View Pressure Release Piece left Paper Exit Unit Front View Fuser Rollers Pressure Release Piece right EDNord Istedgade 37A 9000 Aalborg telefon 96333500 ...
Страница 24: ...er life will be shortened or the fuser permanently damaged if the cleaning pad is not installed properly or if proper care is not taken to change the cleaning pad and oil bottle when needed This type of damage is not covered under warranty or service contract The first oil bottle and cleaning pad will last approximately 1 500 pages After that they will last approximately 3 000 pages Refer to chapt...

Страница 25: ...ip 3 Keep the white side of the pad touching the orange roller closest to the green felt strip as you press the pad forward and down into the slot under the green felt strip It s in place when it clips securely into the slot with the white pad touching the orange roller Black Toner Cartridge Green Felt Strip White Pad Cleaning Pad Orange Rollers Line up Rib with Triangle Front View EDNord Istedgad...

Страница 26: ...n separator latches with your thumbs and forefingers and push down with your fingers while push ing back with your thumbs to snap the unit into place 5 Place a finger on the outer edge of the oil bottle retainer and push it in and up to open the spring latch Latches Front View Rear View EDNord Istedgade 37A 9000 Aalborg telefon 96333500 ...
Страница 27: ...in in the fuser slot The top of the bottle should be flush with the top of the fuser unit 7 Close the oil bottle retainer making sure the spring latch is securely in place 8 Close the paper exit unit If you have trouble closing it make sure the separator pawl unit is completely closed see step 4 9 Close the top cover Rear View Rear View EDNord Istedgade 37A 9000 Aalborg telefon 96333500 ...
Страница 28: ...move the waste toner pack from its protective bag and assemble it 2 Open the waste toner door on the left side of the printer by pushing the cover on the top right corner 3 Remove any tape inside the compartment Waste Toner Door Rear View EDNord Istedgade 37A 9000 Aalborg telefon 96333500 ...
Страница 29: ... Printer 1 19 Setup 4 Insert the pack into the printer until it fits securely Make sure the pack is level and centered 5 Close the waste toner door Tab Rear View EDNord Istedgade 37A 9000 Aalborg telefon 96333500 ...
Страница 30: ...the cartridge from its protective bag until you are ready to install it Also handle the belt cartridge carefully The belt is extremely sensitive to hand oils and scratches both of which will reduce print quality 2 Remove the OPC belt cartridge from its protective bag Save the protective bag to use during printer cleaning and main tenance when the OPC belt cartridge is out of the printer Manual Fee...

Страница 31: ... the right from the OPC belt cartridge The pressure release and tension release pins protect the belt and its cleaning blade by relieving tension during shipment Save these pins to reinstall them if you need to ship the printer later Pressure Release Pin Tension Release Pin EDNord Istedgade 37A 9000 Aalborg telefon 96333500 ...
Страница 32: ... the end of the OPC belt car tridge is turned up unlocked 5 Slide the cartridge three quarters of the way into the printer until the notches on each side of the bottom rest on the lip of the manual feed tray Front View Unlock the Handle EDNord Istedgade 37A 9000 Aalborg telefon 96333500 ...
Страница 33: ...e rest of the way into the printer until it snaps into place It is in place when you can see the green arrows inside the metal frame of the printer 8 Turn the green end handle on the cartridge down to close it and lock the cartridge in place 9 Close the manual feed tray Light Shield Paper Front View EDNord Istedgade 37A 9000 Aalborg telefon 96333500 ...
Страница 34: ...tructions are given here for loading and printing on letter or A4 size paper Chapter 2 Printing contains instructions for printing on other media types and sizes 2 Make sure the size key slide on the back end of the cassette is set for letter or A4 size media Front View EX LT A4 LG EDNord Istedgade 37A 9000 Aalborg telefon 96333500 ...
Страница 35: ...eets from sticking together For letterhead or preprinted media load the top end first Make sure the paper lies flat and does not exceed the upper limit mark on the cassette for paper Overloading the cassette can cause a jam 4 Adjust the paper guides on each side and on the trailing edge of the paper so that they rest lightly against the paper without causing it to buckle 5 Slide the filled cassett...

Страница 36: ... its attached devices work together automatically After you ve connected the printer to the PC and 1 Connect the parallel port on the printer to the parallel port on the PC If you re replacing a printer already con nected to a PC you probably already have a parallel cable If not contact your QMS ven dor or a local computer store Also see appendix B Technical Specifica tions for more information on...

Страница 37: ...4 5 minutes When warm up is complete IDLE displays in the message window 3 Turn on the PC 4 A message window informs you New Hardware Found and then you re prompted to insert the QMS magicolor WX printer driver disk 5 Insert the printer driver disk shipped with your printer in the PC s 3 5 disk drive and choose OK to continue 6 Follow the instructions on the screen to install the printer driver Af...

Страница 38: ... QMS magicolor WX printer Be sure to click the check box Then choose Next 9 If you re replacing an existing Windows NT 4 0 printer driver perform this step otherwise skip to step 10 a When prompted choose Replace Existing Driver and then choose Next b When prompted for a printer name either accept the displayed name or type in a new one Then choose Next Note If you re updating a currently installe...

Страница 39: ... QMS is committed to developing printers that offer you flexible effi cient solutions so we re interested in knowing how you plan to use your printer Please register now To register by mail fill out and send in your warranty card To register by telephone in the US call QMS toll free at 800 637 8049 In other countries refer to appendix A QMS Customer Support for the appropriate telephone number v E...

Страница 40: ...EDNord Istedgade 37A 9000 Aalborg telefon 96333500 ...

Страница 41: ...edia cassette n Using the manual feed tray n Printing on transparencies labels envelopes and other special media n Working with media sizes imageable regions and margins n Preventing media jams n Printer resolution and RAM n Cancelling print jobs EDNord Istedgade 37A 9000 Aalborg telefon 96333500 ...

Страница 42: ...n for color printing and 600x300 dpi resolution for monochrome printing It also allows you to set color printing options See Resolution on page 2 9 and Configuring Color Options on page 2 11 n QMS magicolor WX Monochrome provides 300x300 and 600x600 dpi resolution for monochrome printing It doesn t allow you to set color printing options See Resolution on page 2 9 3 From the File menu choose Prope...

Страница 43: ... QMS magicolor WX Monochrome printer driver n QMS magicolor WX Color provides 300x300 and 600x600 dpi resolution for color printing and 600x300 dpi resolution for monochrome printing It also allows you to set color printing options See Resolution on page 2 9 and Configuring Color Options on page 2 11 n QMS magicolor WX Monochrome provides 300x300 and 600x600 dpi resolution for monochrome printing ...

Страница 44: ...se the OK button to return to the Print or Print Setup dialog box Configuring Paper Options The Paper tab allows you to provide information about the type and location of the media you want to print on Each option and button is explained in detail in this section EDNord Istedgade 37A 9000 Aalborg telefon 96333500 ...
Страница 45: ...9 50 x 4 125 241 30 x 104 78 Default Letter Notes If a media size other than that chosen in the driver is installed in the cassette an error message displays but the job still prints on the currently installed media size Envelope is also known as DL 10 Envelope is also known as Com 10 Purpose Sets the orientation printing direction of the print media Choices Portrait Printing across the narrow wid...

Страница 46: ...e printed Choices Standard For printing on normal weight paper envelopes and labels Thick Stock For printing on 24 43 lb 90 163 g m2 stock Transparency For printing on overhead transparency film Default Standard Notes Your media choice must be set through the printer driver The Media key on the printer control panel is not used It is available to allow you to upgrade your printer to a fully networ...

Страница 47: ...and continue work ing in the Properties window while the OK button allows you to save your changes and exit from the Properties window Cancel Button The Cancel button allows you to cancel your changes and exit from the Properties window Purpose Sets the number of copies to be printed Choices 1 99 Default 1 Notes This scroll box is available only when you re setting the printer driver defaults If y...

Страница 48: ...User s Guide 2 8 Configuring Graphics Options The Graphics tab allows you to provide information how the text and images in your job will be printed Each option and button is explained in detail in this section EDNord Istedgade 37A 9000 Aalborg telefon 96333500 ...
Страница 49: ...e sharpest possible text and line art Purpose Sets the printing resolution Choices If QMS magicolor WX Color is the selected printer driver 300 dots per inch Color For printing color documents at 300x300 dpi 600 dots per inch Color For printing color documents at 600x600 dpi 600 dots per inch Monochrome For printing monochrome documents at 600x300 dpi If QMS magicolor WX Monochrome is the selected...

Страница 50: ...only if QMS magicolor WX Color is the selected printer driver Purpose Sets the dither pattern Choices None No dithering Fine For printing at resolutions less than 300 dpi not recommended for this printer Coarse For printing text and most graphics at 300 or 600 dpi Error Diffusion For printing photographs or pictures that don t have sharp well defined edges at 300 or 600 dpi Line Art For printing m...

Страница 51: ...tton allows you to save your changes and continue work ing in the Properties window while the OK button allows you to save your changes and exit from the Properties window Cancel Button The Cancel button allows you to cancel your changes and exit from the Properties window Configuring Color Options Use the Color button on the Graphics tab to display the Graphics Color window EDNord Istedgade 37A 9...

Страница 52: ... specially calibrated image color matching ICM software when more Windows 95 applications support it Contact your QMS vendor for availability and purchase information Due to driver limitations Print in color with image color matching on the host is identified as the default However since this option is not currently in effect the printer driver actually defaults to Print in color without image col...

Страница 53: ...all of the selections on the Graphics Color window to their default settings OK Button The OK button allows you to save your changes and exit from the Graphics Color window Cancel Button The Cancel button allows you to cancel your changes and exit from the Graphics Color window EDNord Istedgade 37A 9000 Aalborg telefon 96333500 ...

Страница 54: ...QMS magicolor WX 3 From the File menu choose Document Defaults The QMS magicolor WX Default Document Properties window displays This window contains the following tabs n Page Setup Allows you to provide information about paper size paper source copy count orientation and color appear ance For information on setting these options see Configur ing Page Setup Options on page 2 16 n Advanced In additi...

Страница 55: ...etting Device Settings see Con figuring Device Settings on page 2 32 4 Make your option selections and then choose OK to save your changes and return to the Printers window Configuring the Printer Driver through the Application 1 From the application s File menu choose Print or in some cases Print Setup 2 In the Print or Print Setup dialog box select the QMS magi color WX and choose the Properties...

Страница 56: ... to the Print or Print Setup dialog box Configuring Page Setup Options The Page Setup tab allows you to provide information about the paper size paper source copy count orientation and color appearance of the media you want to print on Each option and button is explained in this section Note The Page Setup and Advanced tabs display on both the QMS magicolor WX Default Document Properties and the Q...

Страница 57: ...Configuring the Windows NT 4 0 Printer Driver 2 17 Printing EDNord Istedgade 37A 9000 Aalborg telefon 96333500 ...

Страница 58: ...110 00 Executive 7 25 x 10 50 185 00 x 267 00 Legal 8 50 x 14 00 215 90 x 355 60 Letter 8 50 x 11 00 215 90 x 279 40 Letter Small 8 50 x 11 00 215 90 x 279 40 Note 8 50 x 11 00 215 90 x 279 40 Default Letter Notes If a media size other than that chosen in the driver is installed in the cassette an error message displays but the job still prints on the currently installed media More information abo...

Страница 59: ...ay Select key on the printer control panel Upper Tray The standard media cassette Default Upper Tray Purpose Sets the number of copies to be printed Choices 1 999 Default 1 Purpose Sets the orientation printing direction of the print media Choices Portrait Printing across the narrow width of the page Landscape Printing across the length of the page Default Portrait Purpose Selects between gray sca...

Страница 60: ...Count are listed n Under the Graphic branch Resolution and Color Appearance are listed n Under the Document Options branch Halftone Color Adjustment Media and Metafile Spooling are listed Beside each option is a word or phrase in angle brackets This is the option setting For example Letter is beside Paper Size Paper size is the option and Letter is the option setting To change an option setting se...

Страница 61: ...Configuring the Windows NT 4 0 Printer Driver 2 21 Printing EDNord Istedgade 37A 9000 Aalborg telefon 96333500 ...

Страница 62: ... 220 00 x 110 00 Executive 7 25 x 10 50 185 00 x 267 00 Legal 8 50 x 14 00 215 90 x 355 60 Letter 8 50 x 11 00 215 90 x 279 40 Letter Small 8 50 x 11 00 215 90 x 279 40 Note 8 50 x 11 00 215 90 x 279 40 Default Letter Notes If a media size other than that chosen in the driver is installed in the cassette an error message displays but the job still prints on the currently installed media More infor...

Страница 63: ...ut Purpose Sets the input source cassette tray bin from which print media is pulled into the printer Choices Lower Tray The optional lower media cassette Manual Feed The manual feed tray Printer Default The tray or cassette chosen through the Tray Select Key on the printer control panel Upper Tray The standard media cassette Default Upper Tray Branch Paper Output Purpose Sets the number of copies ...

Страница 64: ...of media to be printed Choices Standard For printing on normal weight paper envelopes and labels Thick Stock For printing on 24 43 lb 90 163 g m2 stock Transparency For printing on overhead transparency film Default Standard Notes Your media choice must be set through the printer driver The Media key on the printer control panel is not used It is available to allow you to upgrade your printer to a...

Страница 65: ...mation is stored while a print job is waiting Choices Off Turns off metafile spooling On Turns on metafile spooling Default On Notes Generally EMF Metafile Spooling on format frees up your program because it is smaller and doesn t depend on what kind of printing device you have RAW Metafile Spooling off format is specific to the printing device so extra time may be required to convert the printing...

Страница 66: ...djustments Halftone Color Adjustment is the first subbranch under the Document Options branch When Halftone Color Adjustment is selected the Halftone Color Adjustment window displays Each option and button on this window is explained in detail in this section EDNord Istedgade 37A 9000 Aalborg telefon 96333500 ...

Страница 67: ...fault 0 Purpose Sets the saturation of color in your picture Range 100 gray scaled to 100 full color Default 0 Purpose Sets the hue in your picture Range 100 to 100 Default 0 Notes Tint is used to correct flesh tones A negative adjustment corrects the hue counterclockwise on the color wheel example corrects red in the direction of blue A positive adjustment corrects the hue clockwise on the color ...

Страница 68: ...e or negative Choices Unchecked Does not adjust Image Checked Inverts the colors in the image Default Unchecked Notes Setting the image to negative inverts the colors in the image Purpose Sets the range between the darkest and lightest reference points in the image Range Black Ref 0 000 less black to 0 400 more black White Ref 0 600 more white to 1 000 less white Default Black Ref 0 000 White Ref ...

Страница 69: ... viewed Choices 1 Device s Default 2 Tungsten Lamp 3 Noon Sunlight 4 NTSC Daylight 5 Normal Print 6 Bond Paper Print 7 Standard Daylight 8 Northern Daylight 9 Cool White Lamp Default Device s Default Purpose Corrects for unbalanced brightness of the input image by adjusting input gamma Choices Unchecked or checked See Notes Defaults Unchecked Range 0 250 to 6 5 Default 1 000 EDNord Istedgade 37A 9...

Страница 70: ...independently If any two check boxes are checked the corresponding scroll bars adjust together If all three check boxes are checked all three scroll bars adjust together Checking the Linear 1 0 box disables the Red Green and Blue scroll boxes and sets each input RGB gamma correction to 1 000 brightness equal to input value Purpose Selects a predefined test picture Choices 1 Reference Colors 2 RGB ...

Страница 71: ...e Color Adjustment tab to the values in use when the tab was opened Purpose Set various attributes of the test picture Choices View When checked displays a test picture Maximize When checked maximizes the test picture to full screen Click the right mouse button to hide unhide the Halftone Color Adjustment dialog box Palette When checked displays a color palette based on the colors in the test pict...

Страница 72: ...s tree in the dia log s window has two branches Form To Tray Assignment and Half tone Setup n Form To Tray Assignment has four sub branches Upper Paper tray Manual Paper feed Lower Paper tray and Printer Default n Halftone Setup has no subbranches Selecting Halftone Setup displays a push button that will in turn display the Device Color Halftone Properties dialog box Each option and button on this...

Страница 73: ...Configuring the Windows NT 4 0 Printer Driver 2 33 Printing EDNord Istedgade 37A 9000 Aalborg telefon 96333500 ...

Страница 74: ...9 50 x 4 125 241 30 x 104 78 DL 8 66 x 4 33 220 00 x 110 00 Envelope 10 9 50 x 4 125 241 30 x 104 78 Envelope DL 8 66 x 4 33 220 00 x 110 00 Executive 7 25 x 10 50 185 00 x 267 00 Legal 8 50 x 14 00 215 90 x 355 60 Letter 8 50 x 11 00 215 90 x 279 40 Letter Small 8 50 x 11 00 215 90 x 279 40 Note 8 50 x 11 00 215 90 x 279 40 Default No defaults Notes Select an option subbranch to display the choic...

Страница 75: ...il in this section Using the Device Color Halftone Properties Dialog Box QMS has carefully set the default values of the parameters in the Device Color Halftone Properties dialog box to provide optimum color performance with the magicolor WX Unless you re an expert at handling these parameters QMS recommends that you use the Half tone Color Adjustment dialog box on page 2 26 to make color adjust E...

Страница 76: ...0x10 Enhanced Notes Halftone pattern is defined by the size of the cells used in the pattern Cells are measured in pixels A 4x4 cell contains 16 pixels Larger cells print a more coarsely grained picture however larger cells allow a greater range of grays or colors to be printed Enhanced cell patterns are optimized to produce greater resolution If your graphic prints with an unwanted pattern of lin...

Страница 77: ...hanges as you scroll In the inch mode you adjust the pixel diameter based on the real pixel size The displayed size is shown in fractions of an inch For example 1 100 equals 0 01 In relative percentage mode you adjust the pixel diameter based on final printing resolution The relative pixel size is shown as a percentage For example 200 00 specifies that the pixel diameter is 200 larger than the pri...

Страница 78: ...umination color system defines color in terms of luminance hue and saturation Use the associated controls to adjust the coordinates of primary colors based on their CIE x and y values Purpose Adjusts device white points using the CIE color system Range 25 00 400 00 Default 100 00 Notes The CIE International Commission on Illumination color system defines color in terms of luminance hue and saturat...

Страница 79: ...OK Button The OK button allows you to save your changes and exit from the Device Color Halftone Properties window Cancel Button The Cancel button allows you to cancel your changes and exit from the Device Color Halftone Properties window Purpose Corrects printing dye color Range 0 00 90 00 Defaults 0 Notes Use this to correct printing dye color cyan magenta yellow by correcting the percentage of o...

Страница 80: ...r the QMS magicolor WX Color or the QMS magicolor WX Monochrome printer driver 4 From the File menu choose Sharing Note If Sharing isn t available do the following to add File and Printer Sharing services a From the Windows 95 Start menu choose Settings b From the Settings menu choose Control Panel c Open the Network folder d On the Configuration tab choose the Add button e In the Select Network C...

Страница 81: ... Note This section explains how to configure the QMS magicolor WX printer driver in Windows NT 4 0 for sharing The previous section explains how to configure the QMS magicolor WX printer driver in Windows 95 for sharing Note Printer sharing can only be used with attached PCs that are running either Windows 95 or Windows NT 4 0 If your Windows NT 4 0 printer driver was not configured for sharing wh...

Страница 82: ...C does not have the magicolor WX printer driver for Windows 95 you will be prompted to install it Insert the magicolor WX printer driver disk for Windows 95 and choose OK The required files are copied to the appropriate directory Note When connected to a Windows 95 server the QMS magicolor WX printer driver must be installed on the server and on every client PC as illustrated below Server PC Windo...

Страница 83: ...t someone else has already set up as a shared printer 1 Browse through the Network Neighborhood until you find the printer icon 2 Use the right mouse button to select the printer icon 3 From the shortcut menu that displays choose Install to add the printer driver to your PC 4 Follow the instructions on the screen Server PC Windows NT 4 0 QMS magicolor WX Printer WX printer driver must be installed...

Страница 84: ...o this printer just as if it were connected directly to your PC Refilling the Media Cassette Use the following procedure to refill the standard or optional media trays 1 Pull the paper cassette out of the printer Front View EDNord Istedgade 37A 9000 Aalborg telefon 96333500 ...

Страница 85: ...t quality printouts before you load media in the cassette look at the packaging to determine which is the printing side of the an arrow points in the direction of the printing side on most packaging Also if you re printing on paper fan it to prevent the sheets from sticking together Don t fan transparencies or labels because this can cause jams EX LT A4 LG EDNord Istedgade 37A 9000 Aalborg telefon...

Страница 86: ... sure the paper lies flat and does not exceed the upper limit mark on the cassette for paper or foil transparencies 4 Adjust the paper guides on each side and on the trailing edge of the media so that they rest lightly against the media without causing it to buckle Paper Foil EDNord Istedgade 37A 9000 Aalborg telefon 96333500 ...

Страница 87: ...an feed a single sheet at a time to the printer using the man ual feed tray This allows you to print on a different media type without changing the media in the cassette or to print on media not sup ported by the standard cassette envelopes or thick stock 1 Use your application s print setup feature to select the man ual feed tray and the media type you plan to use paper or transparency 2 Use your...

Страница 88: ...Insert a single sheet of media printing side up with the top edge leading into the printer in the manual feed tray until it reaches the rear of the tray inside the printer and lies flat The media wrapping should indicate which is the printing side If you re printing envelopes load the envelope printing side up so that the flap side will be on the left when the envelope is pulled into the printer E...

Страница 89: ...ou want 3 Send your job Printing Labels For best results when printing labels format the labels through your application and then run a test print on plain paper to check format ting and avoid wasting label sheets 1 See Refilling the Media Cassette on page 2 44 or Using the Manual Feed Tray on page 2 47 for information on load ing labels Make sure you place the labels printing side up with the top...

Страница 90: ...al envelope cassette If you purchased the optional envelope cassette for your printer see chapter 4 Printer Options for informa tion on installing and using it To print envelopes from the manual feed tray see Using the Manual Feed Tray on page 2 47 Envelopes are loaded with the printing side up so that the top of the envelope the flap side is on the left as the envelope is pulled into the printer ...

Страница 91: ...sive curling of the paper You can use special paper such as bond paper often used for statio nery for special applications However textured paper may result in uneven toner placement and print quality may vary You may want to do a test run before printing a large quantity Colored paper may also be used but not paper with a colored coating applied Print Media Types Weights and Recommended Brands on...

Страница 92: ...lope 9 19 x 3 89 233 30 x 98 78 Margins Size Top Bottom Left Right A4 5 mm 5 mm 5 mm A4 small 5 mm 5 mm 5 mm Executive 5 mm 5 mm 5 mm Legal 1 Color 0 2 0 2 0 2 Legal 4 Color 0 2 2 1 0 2 Letter 0 2 0 2 0 2 Letter small 0 2 0 2 0 2 Note 0 2 0 2 0 2 Envelope 3 mm 3 mm 4 mm 10 Envelope 0 12 0 12 0 16 All measurements are accurate within 0 02 0 5 mm Envelope is also known as DL 10 Envelope is also know...

Страница 93: ...legal sized pages one for black and one for color The imageable region for black on legal sized pages is 8 11 x 13 61 205 90 mm x 345 60 mm The imageable region for color on legal sized pages is an 8 11 x 11 7 205 90 mm x 297 18 mm region at the top of the page We recommend that you compose color legal sized pages so that color images stay in this 8 11 x 11 7 area near the top of the page and use ...

Страница 94: ...0 relative humidity Media Type Weight in g m2 Weight in lb Brand Plain Paper 60 to 90 g m2 16 to 24 lb Xerox 4024 Laser Paper 60 to 90 g m2 16 to 24 lb Hammermill Laser Print White Thick Stock manual feed only up to 163 g m2 up to 43 lb N A Transparencies 138 to 146 g m2 36 7 to 38 8 lb 3M PP2500 Xerox 3R 2780 Xerox 3R 3117 Labels 156 to 170 g m2 41 5 to 45 2 lb Avery 5260 Envelopes 90 g m2 24 lb ...

Страница 95: ...er limit mark on the cassette Note If the printer is operating in a low humidity environment we recommend printing fewer than 20 consecutive transparencies to prevent jamming n If you have problems with double feeding remove the paper from the cassette and fan the edges The sheets may be sticking together However do not fan transparencies this can create electrostatic buildup that can cause jammin...

Страница 96: ...ional envelope cassette use it in the stan dard cassette slot not the optional feeder and don t place more than 30 envelopes in the cassette at once Cancelling a Print Job To cancel all pages currently received by the printer press the Cancel key on the printer control panel To cancel all pages of the print job not yet received by the printer can cel the job at your PC Note Since all pages of a mu...

Страница 97: ...3 Control Panel In This Chapter n About the message window n About the indicators n About the keys n About printer configuration EDNord Istedgade 37A 9000 Aalborg telefon 96333500 ...

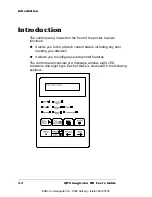
Страница 98: ...t alerts you to the printer s current status including any error needing your attention n It allows you to configure several printer features The control panel consists of a message window eight LED indicators and eight keys Each of these is discussed in the following sections PRINTING EDNord Istedgade 37A 9000 Aalborg telefon 96333500 ...

Страница 99: ...stem the QMS magicolor CX See chapter 4 Printer Options for more information On The printer is on line and ready to accept new print jobs Press the Online Offline key once to take the printer off line the indicator goes out Off The communication port is closed so no new data is accepted The printer continues printing until it has finished all jobs in process Although jobs continue to compile and p...

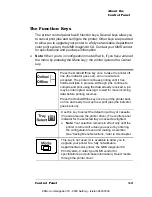
Страница 100: ...ect key On Manual feed is selected through the printer driver or the Tray Select key On The media in the active cassette has been defined in the printer driver to be paper When this LED and the Transparency LED are both off it means that the Thick Stock has been selected in the printer driver On The media in the active cassette has been defined in the printer driver to be transparency When this LE...

Страница 101: ...ing the data already received a job may be interrupted causing it to wait for more incoming data before printing resumes Press the Online Offline key once to put the printer back on line and ready to accept new print jobs the indicator goes back on Use this key to select the default input tray or cassette You can also use the printer driver The control panel indicator for the selected tray or cass...

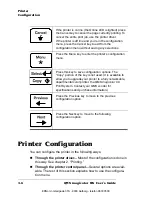
Страница 102: ...use the printer driver If the printer is off line and you re in the configuration menu press the Cancel key to exit from the configuration menu without saving any selections Press the Menu key to enter the printer s configuration menu Press this key to save configuration options The Copy portion of the key is not used It is available to allow you to upgrade your printer to a fully networkable depa...

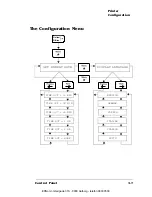
Страница 103: ...figuration Menu Online Offline DISPLAY LANGUAGE ENGLISH FRENCH ITALIAN SPANISH GERMAN DUTCH TIME OUT 15 MIN TIME OUT 30 MIN TIME OUT 45 MIN TIME OUT 1 HR TIME OUT 2 HR TIME OUT NONE SET ENERGY SAVE EDNord Istedgade 37A 9000 Aalborg telefon 96333500 ...

Страница 104: ...ration menu in the message window Note The printer must be off line and idle before you can access the configuration menu Selecting Configuration Menu Options Once you access the configuration menu you use the control panel keys to move through the menu Use the following keys Press this key to The message window reads Online Offline Turn off the Online indicator and ready the printer for configura...

Страница 105: ...without saving any selections press the Cancel key rather than the Select key Press this key to The message window reads Online Offline Turn off the Online indicator and ready the printer for configuration IDLE Menu Access the Display Language menu DISPLAY LANGUAGE ENGLISH Menu Advance to the Set Energy Save menu SET ENERGY SAVE TIME OUT 1 HR Previous Move to the Time Out 45 Min option SET ENERGY ...

Страница 106: ...inter returns to normal power with 90 seconds Setting the Media Source The Paper Tray menu allows you to select the default media source cassette or tray You can also do this through the printer driver see chapter 2 Printing v Menu Set Energy Save Choices TIme Out 15 Min Time Out 30 Min Time Out 45 Min Time Out 1 Hr Time Out 2 Hr None Default Time Out 1 Hr Menu Paper Tray Choices Upper Tray Manual...

Страница 107: ...s Chapter n Available options and accessories n Sheet feeder n Envelope cassette n Single In line memory modules SIMMs n Updating system software n Updating the printer driver EDNord Istedgade 37A 9000 Aalborg telefon 96333500 ...

Страница 108: ... sheet feeder magicolor CX Upgrade Upgrade to a fully networkable workgroup color print system Contact your QMS vendor for specifications purchase information Media Cassette 250 sheet media cassette interchangeable with the standard cassette and the media cassette in the sheet feeder RAM 4 8 and 16 MB DRAM SIMMs Additional information is in Q FAX document 6502 QMS tested SIMMs and Hard Disks This ...

Страница 109: ... niemals den Drucker alleine anzuheben oder zu transportieren Achtren Sie bitte darauf daß der Drucker mit eingebauten Tonerkartuschen nur waagerecht transportiert wird 1 Turn the printer off remove the power cord and disconnect all interface cables from the printer 2 With the help of another person pick up the printer by the four corners and align it above the sheet feeder Keeping the printer lev...

Страница 110: ...st and bracket are centered and that the flange on the bottom of the bracket goes into the slot on the post b Attach the bracket to the post using one of the two small metal screws that came with the sheet feeder c Align and attach the second metal bracket to the rear left sheet feeder post in the same way as you did the first bracket Metal Bracket Rear Left Metal Bracket Rear Left Metal Bracket F...

Страница 111: ...have small rims on the bottom that fit inside the edges of the sheet feeder The sheet feeder is now installed See chapter 2 Printing for infor mation on handling media and filling cassettes Note If you move the printer with the sheet feeder attached lift the unit by the four bottom corners not by the sheet feeder s cassette slot Top View Front Left Rear Left Front Right Rear Right EDNord Istedgade...

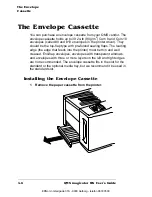
Страница 112: ...folded sealing flaps The leading edge the edge that feeds into the printer must be thin and well creased End flap envelopes envelopes with transparent windows and envelopes with three or more layers on the left and right edges are not recommended The envelope cassette fits in the slot for the standard or the optional media tray but we recommend it be used in the standard slot Installing the Envelo...

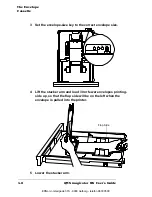
Страница 113: ...ssette open the stacker arm and set the side and rear envelope stackers to the correct envelope size Note DL is the same as Com 9 and 10 is the same as COM 10 Set the Side Stackers Stacker Arm Set the Rear Stacker EDNord Istedgade 37A 9000 Aalborg telefon 96333500 ...

Страница 114: ...ze key to the correct envelope size 4 Lift the stacker arm and load 30 or fewer envelopes printing side up so that the flap side will be on the left when the envelope is pulled into the printer 5 Lower the stacker arm Flap Side EDNord Istedgade 37A 9000 Aalborg telefon 96333500 ...

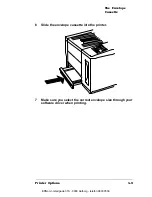
Страница 115: ...ssette 4 9 Printer Options 6 Slide the envelope cassette into the printer 7 Make sure you select the correct envelope size through your software driver when printing EDNord Istedgade 37A 9000 Aalborg telefon 96333500 ...

Страница 116: ... The printer isn t an acceptable grounding point either because it must be unplugged before you perform this task If you don t have an anti static wrist strap discharge your body s static electric charge by touching a grounded surface before you handle any printer boards or components and before removing the controller board cover Redischarge your body each time after walking around and before tou...

Страница 117: ...at sur face Replacing the Controller Board Caution The following instructions are written for advanced users Do not attempt this procedure if you have no experience working with circuit boards 1 Reinsert the controller board making sure it s properly seated in its connectors EDNord Istedgade 37A 9000 Aalborg telefon 96333500 ...

Страница 118: ...g the Controller Board QMS magicolor WX User s Guide 4 12 2 Tighten the two mounting screws 3 Reconnect all interface cables and the power cord and then turn on the printer EDNord Istedgade 37A 9000 Aalborg telefon 96333500 ...

Страница 119: ...the 2 SIMM connectors on the control ler board to upgrade the printer to 32 MB 1 Follow the instructions in Removing the Controller Board on page 4 10 being careful to discharge electrostatic buildup before you begin 2 Turn the controller board so that the side where the SIMMs are located is closest to you DRAM SIMM Bank 1 Bank 0 EDNord Istedgade 37A 9000 Aalborg telefon 96333500 ...

Страница 120: ... User s Guide 4 14 3 If necessary remove the currently installed SIMM s Pull the latch on each side of the SIMM connector outward using your thumbs Tilt the SIMM forward and lift it out of the connector EDNord Istedgade 37A 9000 Aalborg telefon 96333500 ...

Страница 121: ...he SIMM towards you to a 90 angle until you feel it fit into place behind the clips on either side of the connector You may need to use your fingers to open these clips When seated the SIMM stands upright firmly in place Caution If you cannot easily fit the SIMM into place do not force it Reposition it making sure that the bottom of the SIMM is seated completely in the connector 5 Follow the instr...

Страница 122: ...log box type the following command as appro priate n For Windows 95 type x updt_lpy bat n For Windows NT 4 0 type x firmware updt_lpy bat where x is the disk drive in which you inserted the system soft ware disk and y is the number of the parallel port on your PC to which you connected the printer cable in step 1 for example a updt_lp1 bat or a firmware updt_lpt1 bat The downloading process takes ...

Страница 123: ...n the printer 4 Continue to hold down the Cancel key until the message win dow displays IDLE 5 Follow the instructions in Updating System Software on page 1 16 to send the new system software to the printer 6 Follow the instructions in Updating System Software on page 1 16 a second time to write the new system software to flash memory Updating the Windows 95 Printer Driver Note This section explai...

Страница 124: ...or convenience on the front Only one switch has to be off to turn off the printer but both switches must be on to turn on the printer The printer goes through an initialization warm up and self testing that lasts about 4 5 minutes When warm up is complete IDLE displays in the message window 9 Turn on the PC 10 A message window will inform you New Hardware Found and then you ll be prompted to inser...

Страница 125: ...evious section explains how to update the QMS magicolor WX printer driver in Windows 95 1 From the Windows NT 4 0 Start menu choose Settings 2 Choose Printers 3 Select the QMS magicolor WX printer driver in the Printers window 4 From the File menu choose Delete 5 To install the new printer driver see Install the Windows NT 4 0 Printer Driver on page 1 27 v EDNord Istedgade 37A 9000 Aalborg telefon...

Страница 126: ...EDNord Istedgade 37A 9000 Aalborg telefon 96333500 ...

Страница 127: ...5 Maintenance In This Chapter n Preventive maintenance n About consumables n Replacing consumables EDNord Istedgade 37A 9000 Aalborg telefon 96333500 ...

Страница 128: ...iod of time unplug the power cord from the power source outlet and close the manual feed tray Preventive Maintenance Procedures The table below shows when preventive maintenance procedures described in this chapter should be performed At this time You should Whenever print quality diminishes Clean the Charger Units See Cleaning the Charger Unit the Precharger Unit and the AC Charger Unit on page 5...

Страница 129: ...nts per month A plane is a single pass of the OPC belt one toner color For example a one color print job makes one pass one plane and a two color job makes two passes two planes A page usually makes four passes of the OPC belt since most color jobs use all four toner colors OPC life is affected by usage coverage temperature humidity and exposure to light even minute amounts The fuser unit is an in...

Страница 130: ...inter guaranteeing maximum performance efficiency and long life Storing Consumables Storage Specifications Toner Developer and OPC Belt Cartridges Characteristic Normal Conditions Severe Conditions Temperature 32 to 95 F 0 to 35 C Low 14 to 32 F 10 to 0 C Humidity 10 80 RH 80 90 RH Period of Storage 2 years after production date includes operation life Storage Conditions Unopened in a well ventila...

Страница 131: ...g on hands or washable clothing with cool water to remove the rest M WARNING The toner is a highly combustible powder never burn it Also avoid inhaling loose toner or getting it around your eyes it can cause respiratory problems and eye irritation ACHTUNG Bei dem Toner handelt es sich um ein gefährliches und leicht entzündliches Pulver es darf deshalb niemals mit offenem Feuer in Berührung kommen ...

Страница 132: ...e notches Then lift the toner cartridge straight up and out of the printer Dispose of it according to laws in your area 3 Remove the new toner cartridge from its protective bag 4 Hold the toner cartridge as shown and shake it horizontally This distributes toner evenly inside the cartridge and helps assure quality printing Toner Cartridge Rear View EDNord Istedgade 37A 9000 Aalborg telefon 96333500...

Страница 133: ... notches on the developer cartridge Orient the cartridge so that the words on top are readable from the front of the printer Caution Never force a toner cartridge onto a developer cartridge or you ll damage the cartridges and the printer if it won t fit easily make sure you re installing the correct color cartridge they re keyed to fit each other Toner Cartridge Rear View EDNord Istedgade 37A 9000...

Страница 134: ...ith one hand while you pull the tab straight up to remove the attached tape from the cartridge 7 Make sure the print density dial for the changed toner car tridge is in the default center position 8 Replace the printer s top cover Tab Rear View EDNord Istedgade 37A 9000 Aalborg telefon 96333500 ...

Страница 135: ... that s on top of the developer cartridge you need to replace Hold it across the center squeezing the sides to loosen the pins on the back side from the developer cartridge notches Then lift the toner cartridge straight up and out of the printer Toner Cartridge Rear View EDNord Istedgade 37A 9000 Aalborg telefon 96333500 ...

Страница 136: ...e residue 4 Lift up the green latches at each end of the developer car tridge and release the cartridge from its pressing back on the latches behind the cartridge while pulling forward on the cartridge The securing latches are color coded black cyan magenta or yellow to the color of the developer cartridge EDNord Istedgade 37A 9000 Aalborg telefon 96333500 ...

Страница 137: ...enance 5 Remove the developer cartridge from the printer being care ful not to spill any of the developer material Dispose of it according to laws in your area Old Developer Cartridge EDNord Istedgade 37A 9000 Aalborg telefon 96333500 ...

Страница 138: ...12 6 Remove the new developer cartridge from its protective bag lift up the green latches and lower it into the appropriate slot It should snap into place Color Coded Tab New Developer Cartridge Front View EDNord Istedgade 37A 9000 Aalborg telefon 96333500 ...

Страница 139: ...e the developer cartridge latches 8 Grasp the tab on the top of the developer cartridge and pull the tab and attached clear tape straight up and out of the car tridge Rear View Tab Rear View Tape EDNord Istedgade 37A 9000 Aalborg telefon 96333500 ...

Страница 140: ...minutes If exposure exceeds this put the belt in a dark place to recover depending on exposure recovery may take up to 2 hours After it s installed only remove the top cover of the printer when necessary and replace it as soon as possible Also handle the belt cartridge carefully by its green end handle or the two green side handles only it s extremely sensitive to hand oils moisture solvents corro...

Страница 141: ...g the top right corner to release the spring latch 2 Lift the green handle of the old OPC belt cartridge up to unlock it and pull the cartridge straight out of the printer and discard it Manual Feed Tray Front View Wire Cleaner EDNord Istedgade 37A 9000 Aalborg telefon 96333500 ...

Страница 142: ...dge and slide the cartridge three quarters of the way into the printer until the notches on each side of the bottom rest on the lip of the manual feed tray Pressure Release Pin Note Save the protective bag to use if you take the cartridge out of the printer and save the pins to reinstall if you need to store or move the printer later Tension Release Pin Front View Unlock the Handle EDNord Istedgad...

Страница 143: ...de the cartridge the rest of the way into the printer until it snaps into place It is in place when you can see the green arrows inside the metal frame of the printer 7 Turn the green end handle on the cartridge down to close it and lock the cartridge in place Light Shield Paper Front View EDNord Istedgade 37A 9000 Aalborg telefon 96333500 ...

Страница 144: ...or if proper care is not taken to change the cleaning pad and oil bottle when needed This type of damage is not covered under warranty or service contract The first oil bottle and cleaning pad will last approximately 1 500 pages After that they will last approximately 3 000 pages 1 Turn off the main power switch on the back of the printer 2 Remove the top cover 3 Pull up on the paper exit unit lat...

Страница 145: ...its green tab towards the rear of the unit pull it out of the printer and discard it 6 Remove the cleaning pad and oil bottle from their protective bags Caution The fuser unit is an integral part of the color imaging process and is also very expensive to replace The fuser life will be shortened or the fuser permanently damaged if the cleaning pad is not installed properly or if proper care is not ...

Страница 146: ...reen felt strip 8 Keep the white side of the pad touching the orange roller closest to the green felt strip as you press the pad forward and down into the slot under the green felt strip It s in place when it clips securely into the slot with the white pad touching the orange roller Black Toner Cartridge Green Felt Strip White Pad Cleaning Pad Orange Rollers Line up Rib with Triangle Front View ED...

Страница 147: ...th your thumbs and forefingers and push down with your fingers while push ing back with your thumbs to snap the unit into place 10 Place a finger on the outer edge of the oil bottle retainer and push it in and up to open the spring latch 11 Remove the old oil bottle Latches Front View Rear View EDNord Istedgade 37A 9000 Aalborg telefon 96333500 ...

Страница 148: ...fuser slot The top of the bottle should be flush with the top of the fuser unit 13 Close the oil bottle retainer making sure the spring latch is securely in place then close the paper exit unit If you have trouble closing it make sure the separator pawl unit is completely closed see step 9 14 Replace the printer s top cover and turn on the main power switch Rear View Rear View EDNord Istedgade 37A...

Страница 149: ...Pack 1 Open the waste toner door on the left side of the printer by pushing the cover on the top right corner 2 Gently tap the old waste toner pack on its side to settle the toner down into the pack Waste Toner Door EDNord Istedgade 37A 9000 Aalborg telefon 96333500 ...

Страница 150: ...to seal the top Then place the old pack into the empty bag from the new waste toner pack and dispose of the old one following safety laws and regulations 4 Remove the new waste toner pack from its protective bag and assemble it 5 Insert the pack into the printer until it fits securely Make sure the pack is level and centered 6 Close the waste toner door Tab EDNord Istedgade 37A 9000 Aalborg telefo...

Страница 151: ...m n Use a lint free cloth dampened with a mild general cleaner on the exterior of the printer do not use any organic solvent such as thinner or benzene as these can cause discoloration alteration spots on the transfer drum or other problems n Use only lint free paper towels cloths or swabs n After cleaning allow all parts to dry before closing the printer reattaching the power cord and turning on ...

Страница 152: ...he belt in a dark place to recover depending on exposure recovery may take up to 2 hours Also handle the OPC belt carefully using either the two green side handles or using the green end handle when possible It is extremely sensitive to hand oils and scratches both of which reduce print quality When you must set it down gently lay it on a clean lint and dirt free surface such as on fresh paper for...

Страница 153: ...dges fold the green end handle back down and set the cartridge up on that end 5 Locate the three brass colored latches which hold the charger unit in place Then swing each latch to the side to free the charger unit Wire Cleaner Latches Brass Brass Latch Charger Unit EDNord Istedgade 37A 9000 Aalborg telefon 96333500 ...

Страница 154: ...rger unit by sliding the wire cleaner along the groove in the top of the unit several times then flip the unit over and run the wire cleaner several times across the grid plate a metal screen on the bottom 9 Turn the OPC belt cartridge up on the handle end again and place the charger unit back into its slot Place the OPC belt cartridge in its protective bag or in a dark area again to protect it fr...

Страница 155: ...yes it can cause respiratory problems and eye irritation ACHTUNG Bei dem Toner handelt es sich um ein gefährliches und leicht entzündliches Pulver es darf deshalb niemals mit offenem Feuer in Berührung kommen Einatmen oder Berührung mit Haut und Augen ist ebenfalls zu vermeiden da dies zu Beeinträchtigungen der Atemwege Haut oder Augenreizungen führen könnte 11 Grasp the end of the pre charger uni...

Страница 156: ... 13 Clean the inside corners of the pre charger unit with cotton swabs 14 Making sure the pre charger unit aligns on the runners inside the printer slide it back into the printer 15 Reinstall the waste toner pack and close the waste toner cover 16 Open the printer s back cover by pressing the top right corner EDNord Istedgade 37A 9000 Aalborg telefon 96333500 ...

Страница 157: ...e green latch handle in the center of the transfer unit door assembly toward you and down 18 Remove the AC charger Press the latch outwards and lift the AC charger The latch is on the right side of the charger Latch Handle Latch EDNord Istedgade 37A 9000 Aalborg telefon 96333500 ...

Страница 158: ... side of the charger into the slot before lowering the right side of the charger Press the release latch outwards while seating the right side then release the latch to secure the charger in place 22 Replace the wire cleaner in the OPC belt cartridge 23 Swing the three brass latches back over the charger unit to hold it in place 24 Make sure the green handle on the end of the OPC belt car tridge i...

Страница 159: ...o place It s in place when you can see the green arrows inside the metal frame of the printer 26 Turn the green end handle on the cartridge down to close it and lock the cartridge in place 27 Close the manual feed tray Front View Unlock the Handle EDNord Istedgade 37A 9000 Aalborg telefon 96333500 ...

Страница 160: ...2 minutes If exposure exceeds this put the belt in a dark place to recover depending on exposure recovery may take up to 2 hours Also handle the OPC belt carefully using either the two green side handles or using the green end handle when possible It is extremely sensitive to hand oils and scratches both of which reduce print quality When you must set it down gently lay it on a clean lint and dirt...

Страница 161: ...ter 5 35 Maintenance 4 Open the back cover by pressing the top right corner 5 Open the transfer unit by pulling the green latch handle toward you and down Latch Handle EDNord Istedgade 37A 9000 Aalborg telefon 96333500 ...

Страница 162: ...all sides with the cloth to remove paper dust toner buildup and other debris 7 Wipe the transfer roller located just below the transfer drum Rotate this roller to clean all sides with the cloth to remove paper dust toner buildup and other debris 8 Close the transfer unit Rubber Register Roller Metal Register Roller Transfer Drum Transfer Roller Transfer Unit EDNord Istedgade 37A 9000 Aalborg telef...

Страница 163: ...nit 11 Clean the paper exit rollers and plates Turn the coupling gear on the right end of the fuser unit to access all sides of the rollers 12 Close the paper exit unit 13 Remove the media cassette Rear View Coupling Gear Coupling Gear EDNord Istedgade 37A 9000 Aalborg telefon 96333500 ...

Страница 164: ...cassette slot 15 Remove the manual feed platform Lift it up and forward at the front of the platform until the lip of the platform drops over the metal guide rail then slide the manual feed platform out of the printer Paper Feed Roller Manual Feed Platform Manual Feed Belts Front Rear EDNord Istedgade 37A 9000 Aalborg telefon 96333500 ...

Страница 165: ...p of the slot at the rear 19 Use the damp cloth the wipe the roller Rotate the roller so that the entire surface is cleaned 20 Slide the manual feed platform back into place Push it back into the printer until it is secure 21 Replace the media cassette Note If you have the optional 250 sheet feeder installed perform the same procedure for that cassette 22 Make sure the green handle on the end of t...

Страница 166: ...place when you can see the green arrows inside the metal frame of the printer 24 Turn the green end handle on the cartridge down to close it and lock the cartridge in place 25 Close the manual feed tray 26 Plug in the power cord and turn on the printer Front View Unlock the Handle EDNord Istedgade 37A 9000 Aalborg telefon 96333500 ...

Страница 167: ...Use only mild household cleaning solutions that do not contain alcohol or solvents n Use only a dry or slightly damp lint free cloth Never use sharp or rough implements such as wire or plastic cleaning pads n Always spray the cleaning solution on a cloth not directly on the printer n Always test the solution on a small area of your printer to check the solution s performance n After doing any clea...

Страница 168: ...EDNord Istedgade 37A 9000 Aalborg telefon 96333500 ...

Страница 169: ...6 Repacking the Printer In This Chapter n Repacking the printer for relocating or shipping EDNord Istedgade 37A 9000 Aalborg telefon 96333500 ...

Страница 170: ... materials If you need replacement packaging in the US call QMS National Service at 1 334 633 4300 x 2530 If you need to return the printer for service in the US call QMS Customer Service at 1 334 633 1072 for an RMA Return Merchandise Authorization number before shipping the printer In other countries refer to appendix A QMS Customer Support Remove Cables and Cassette s 1 Turn off the printer 2 R...

Страница 171: ...the back side from the developer cartridge notches b Lift the toner cartridge straight up and out of the printer 3 Set the toner cartridge aside Place it on a level surface on a large sheet of paper to catch loose residue 4 Lift up the two green latches one at each end of the developer cartridge and release the cartridge by press ing back on the latches behind the car tridge while pulling forward ...

Страница 172: ...oner and developer cartridges in their original shipping bags If you don t have these bags wrap them in pieces of sturdy cloth or plastic that cannot be harmed by loose residue 7 Repeat steps 2 6 for the three remaining toner and developer cartridges 1 With the printer s top cover still off pull up on the paper exit unit latch and then tilt the paper exit unit back and down to open it Rear View ED...

Страница 173: ... the spring latch 3 Remove the oil bottle After removing the oil bottle the bottle may leak slightly so place it in an oil proof con tainer such as a plastic bag until you are ready to reinstall it after the move 4 Close the oil bottle retainer making sure the spring latch is securely in place Rear View EDNord Istedgade 37A 9000 Aalborg telefon 96333500 ...

Страница 174: ...te lassen Sie die Fixiereinheit einige Zeit abkühlen bevor Sie diese berühren 6 Pour the fuser oil into an appropriate waste container For example you could use an old jar Dispose of the oil following local safety laws and regula tions 7 Using a clean dry lint free cloth or some cotton swabs wipe any remaining oil out of the tray 8 Return the fuser unit to its slot and stuff a clean wadded paper t...

Страница 175: ...ing to relieve the tension on the roller They must be installed for the move and removed again before printing 1 With the printer s top cover off and paper exit unit still open pull back the two latches one on each side of the separator pawl unit to unlock it Then tilt the separator pawl unit toward the rear of the printer Latches Front View Cleaning Pad Tab EDNord Istedgade 37A 9000 Aalborg telef...

Страница 176: ... cause severe burns Make sure the unit is cool before handling it ACHTUNG Die Fixiereinheit kann sehr heiß werden so daß Verbrennungs gefahr besteht Bitte lassen Sie die Fixiereinheit einige Zeit abkühlen bevor Sie diese berühren 3 Holding one of the pieces down close to its base firmly slide the base between the fuser rollers on one end Rear View EDNord Istedgade 37A 9000 Aalborg telefon 96333500...

Страница 177: ... When correctly positioned the pieces fit snugly between the rollers 5 Close the pressure release lever on the end of the fuser unit 6 Close the separator pawl unit 7 Close the paper exit unit 8 Close the printer s top cover Pressure Release Piece Left Paper Exit Unit Front View Fuser Rollers Pressure Release Piece Right EDNord Istedgade 37A 9000 Aalborg telefon 96333500 ...

Страница 178: ...exceeds 2 minutes put the cartridge in a dark place to recover before using it again depending on exposure recovery may take up to 2 hours Also handle the OPC belt cartridge carefully by its green end handle or the two green side handles only the belt s extremely sensitive to hand oils moisture solvents corrosives dust and scratches all of which will reduce print quality 1 Open the manual feed tra...

Страница 179: ... heavy cloth and place it where it will not get scratched or damaged 3 Reinstall the pressure release and tension release pin sets one set on each side in the OPC belt cartridge The pressure release and tension release pins protect the belt and its cleaning blade by relieving tension during movement Pressure Release Pin Tension Release Pin EDNord Istedgade 37A 9000 Aalborg telefon 96333500 ...

Страница 180: ... Gewicht von ungefähr 48 kg Bitte versuchen Sie niemals den Drucker alleine anzuheben oder zu transportieren 1 Open the waste toner door on the left side of the printer by pushing the cover on the top right corner 2 Remove the waste toner pack from the printer 3 Install a new waste toner pack This ensures that no waste toner is shaken into the printer during relocation or shipment 4 Close the wast...

Страница 181: ...e repacking the printer in its original shipping box with the original packing materials If you need replacement packaging in the US call QMS National Service at 1 334 633 4300 x 2530 If you need to return the printer for service in the US call QMS Customer Service at 1 334 633 1072 for an RMA Return Merchandise Authorization number before shipping the printer In other countries refer to appendix ...

Страница 182: ...he four corners and separate it from the sheet feeder Caution Be sure to keep the printer level d Repack the sheet feeder in its original shipping box for storage If you re returning the printer for service you don t need to return the sheet feeder 2 Put the printer into the plastic bag Caution Be sure to keep the printer level EDNord Istedgade 37A 9000 Aalborg telefon 96333500 ...

Страница 183: ...lace the plastic strap handles two on each side of the printer 4 Get someone to help you with this step Using the strap han dles provided two on each side of the printer lift the printer onto its carton EDNord Istedgade 37A 9000 Aalborg telefon 96333500 ...

Страница 184: ... all of the packing material in the shipping carton Note If you re returning the printer for service you don t need to return the toner and developer cartridges oil bottle OPC belt cartridge paper cassette s sheet feeder power cable or interface cables v EDNord Istedgade 37A 9000 Aalborg telefon 96333500 ...

Страница 185: ...cellaneous problems n Mechanical problems n Print quality problems n Printer status and error messages n Clearing media jams n Installing the printer driver manually n Placing a service call EDNord Istedgade 37A 9000 Aalborg telefon 96333500 ...

Страница 186: ...wer requirements See appendix B Techni cal Specifications 2 Is the printer receiving data from the computer Try printing a Microsoft test page from the Start menu choose Settings and then Printers select the printer and from the File menu choose Properties and then on the General tab choose the Print Test Page button If the Data LED starts blinking the printer is receiving the data If not check th...

Страница 187: ...aintenance Only a Partial Page Prints n Check the imageable regions for the size media you re using see chapter 2 Printing Are you trying to print outside of the image able region of the page If so change to a larger size media or adjust the margin s through your application n The charger unit or various roller and plates may be dirty See chapter 5 Maintenance for instructions on how to clean thes...

Страница 188: ... the printer driver to tell the printer whether paper or transparencies have been loaded in the currently selected cassette See chapter 2 Print ing for information on using the printer driver n Make sure the media is in good shape and meets all the specifi cations in chapter 2 Printing n Remove the toner cartridges and shake them horizontally Toner can settle and this procedure redistributes the t...

Страница 189: ...nging Print Density on page 7 10 for details Remove each toner cartridge for a color used on that page and shake it as you do before installing a new cartridge Then rein stall the cartridge Install a new toner cartridge if necessary See Replacing a Toner Cartridge in chapter 5 Maintenance for details n Light Image on the Left or Right Side of the Page all colors Make sure the printer is level By l...

Страница 190: ...ize media or adjust the mar gin s through your application n Entire Page is Skewed If pages are coming out skewed it s probably because the trans fer unit was jarred open during installation and needs to be closed See Clearing Inner Jams on page 7 21 for information on accessing the transfer unit Open the transfer unit as shown in that section and then close it n Colors Not Registering Properly Th...

Страница 191: ... streaks in printouts usually indicate a problem with the OPC belt If you see vertical streaks try the following procedures see chapter 5 Maintenance for illustrations of these procedures Caution The OPC belt is extremely sensitive to bright lights and direct sunlight Limit exposure to light to under 2 minutes Also handle the belt carefully using either the two green side handles or using the gree...

Страница 192: ...ove the OPC belt from the printer set it on the handle end and tap the base of the cleaning blade several times to remove any debris Reinstall the OPC and print a page to see if this solved the streaking problem Cleaning Blade Cleaning Blade Base EDNord Istedgade 37A 9000 Aalborg telefon 96333500 ...

Страница 193: ...brush you would use to clean a camera lens to gently clean only the part of the blade that corresponds to the streaked area on printouts Reinstall the OPC and print a page to see if this solved the streaking problem d If you still see vertical streaks install a new OPC belt cartridge then clean the OPC Lens Quality If printouts are streaked EDNord Istedgade 37A 9000 Aalborg telefon 96333500 ...

Страница 194: ...ly notice a color is printing a bit light or dark In this case you may want to increase the print density or con trast setting for that color To change density settings use the follow ing procedure 1 Remove the top cover by lifting it up and out Then set the cover aside for now 2 Locate the adjustment dials inside the printer to the front left 3 Turn the density adjustment dial to the left counter...

Страница 195: ...ctly See chapter 5 Maintenance for information on replacing the OPC belt cartridge CANCELING JOBS The Cancel key has been pressed and all pages currently received by the printer are being cancelled CHECK WASTE TONER The waste toner pack is full and needs to be replaced or is not installed properly Make sure the pack is not full and that it sits loosely in its compartment not wedged under the top o...

Страница 196: ...e message still displays in the message window after you reseat the drum call for service ENGINE ERROR E9 The OPC belt cartridge may be installed incorrectly or the sensors on the belt the two black rectangles located on the left side of the belt may be dirty Remove the OPC belt cartridge wipe the sensors with a soft dry lint free cloth and then reinstall it If the message still displays in the me...

Страница 197: ...startup MEMORY INSTALLED x MEG VER x x This indicates the amount of memory installed in the printer and the system software version It displays immediately after WX BOARD TEST during printer startup MISFEED JAM Media has jammed leaving the media cassette Remove the jam see Clearing Misfeed Jams on page 7 18 NEED MORE MEMORY PAPER MISMATCH More memory is needed to print the job and the media in the...

Страница 198: ...on PLEASE WAIT BOOTING The printer is starting up PLEASE WAIT ERASING FLASH The old system software is being erased from flash memory PLEASE WAIT WARMING UP The printer is getting ready to go on line PLEASE WAIT WRITING FLASH The new system software is being written to flash memory PRINT JOB ACTIVE A print job is being received by the printer but it has not yet begun to print PRINTING The printer ...

Страница 199: ...g pad REPLACE x DEVELOPER A developer cartridge needs to be replaced The x is replaced by the color of the developer cartridge that needs attention See chapter 5 Maintenance for details SERVICE MODE The printer is being serviced SIDE PANEL MISINSTALLED The waste toner cover is not fully closed Close the cover SLEEPING Energy Save mode is currently in effect TOP PANEL MISINSTALLED The top cover of ...

Страница 200: ...ollowing table a The first menu and option that display will be the last ones that were previously accessed Press this key to The message window reads Online Offline Turn off the Online indicator so you can access the configuration menu IDLE Menu Access the Display Language menu a DISPLAY LANGUAGE ENGLISH Menu Advance to the Set Energy Save menu SET ENERGY SAVE TIME OUT 1 HR Menu Advance to the Se...

Страница 201: ... without the proper maintenance or part replacement print quality can deteriorate and the wear on the printer can shorten the printer s life n CALL FOR SERVICE x A mechanical error has occurred and a service call is required When a CALL FOR SERVICE x appears the printer stops until the required service is complete Note A service message sometimes occurs as a result of an unusual combination of eve...

Страница 202: ... contain procedures for clearing each type of jam Clearing Misfeed Jams When the control panel message window displays MISFEED JAM media has jammed while leaving the media cassette or the manual feed tray To clear this jam use the following procedure 1 Pull out the media cassette and check the media cassette slot If media is there skip to step 4 If not continue to step 2 EDNord Istedgade 37A 9000 ...

Страница 203: ...e manual feed platform It s a black plastic tray at the top of the media cassette slot 3 Remove the manual feed platform Lift it up and forward at the front until it drops out Manual Feed Platform Front EDNord Istedgade 37A 9000 Aalborg telefon 96333500 ...

Страница 204: ...into the printer until it is secure 6 Make sure the media in the cassette is in good condition lies flat and does not exceed the upper limit mark on the cas sette 7 Slide the cassette back into the printer until it s secure 8 Open and close the top cover to clear the jam message in the control panel window When the control panel message window displays IDLE the printer is ready to print EDNord Ist...

Страница 205: ...w displays INNER JAM media has jammed leaving the OPC belt cartridge and the leading edge has jammed around the transfer area To clear this jam use the following procedure 1 Open the back cover Press the top right corner to release the spring latch EDNord Istedgade 37A 9000 Aalborg telefon 96333500 ...

Страница 206: ...ich means toner is still loose Avoid getting toner on your hands and clothes while removing the jammed media If you accidentally get toner on your hands or clothes lightly dust off as much as possible If some toner remains use cool not hot water to rinse it off your hands or washable clothing 3 Remove the jammed media if the media is around the drum by using the following procedure Otherwise skip ...

Страница 207: ... 7 23 Troubleshooting a Open the manual feed tray b Open the green handle on the OPC belt cartridge and pull the cartridge out about 2 5 cm to relieve tension on the drum EDNord Istedgade 37A 9000 Aalborg telefon 96333500 ...

Страница 208: ...ver e Push the OPC belt cartridge back into the printer until it snaps into place The cartridge is in place when you can see the green arrows on the left and right inside metal frame of the printer Push down the green handle to lock the OPC cartridge in place and close the manual feed tray f Skip to step 5 EDNord Istedgade 37A 9000 Aalborg telefon 96333500 ...

Страница 209: ... M WARNING The fuser unit is hot Do not remove a jam in this area until the fuser unit cools ACHTUNG Die Fixiereinheit wird sehr heiß Bitte achten Sie darauf daß sie diese einige Zeit abkühlen lassen bevor Sie einen Papierstau beseitigen a Open the paper exit unit Rear View EDNord Istedgade 37A 9000 Aalborg telefon 96333500 ...

Страница 210: ...d media by pulling it straight out from above the transfer unit 5 Close the transfer unit and then the back cover 6 Close the paper exit unit When the control panel message window displays IDLE the printer is ready to print EDNord Istedgade 37A 9000 Aalborg telefon 96333500 ...

Страница 211: ...control panel message window displays OUTER JAM media has jammed leaving the paper exit unit To clear this jam use the following procedure 1 Open the back cover by pressing the top right corner to release the spring latch EDNord Istedgade 37A 9000 Aalborg telefon 96333500 ...

Страница 212: ...ulling it toward you and down M WARNING The fuser unit is hot Do not remove a jam in this area until the fuser unit cools ACHTUNG Die Fixiereinheit wird sehr heiß Bitte achten Sie darauf daß sie diese einige Zeit abkühlen lassen bevor Sie einen Papierstau beseitigen Latch Handle EDNord Istedgade 37A 9000 Aalborg telefon 96333500 ...

Страница 213: ...Clearing Media Jams 7 29 Troubleshooting 3 Open the paper exit unit Rear View EDNord Istedgade 37A 9000 Aalborg telefon 96333500 ...

Страница 214: ...ng off on the exit rollers and getting down into the printer Since toner images on the media aren t set avoid getting loose toner on your hands and clothes while removing the jammed media If you accidentally get toner on your hands or clothes lightly dust off as much as possible If some toner remains use cool not hot water to rinse it off your hands or washable clothing To avoid damage to the roll...

Страница 215: ...t from above the transfer unit 6 Close the transfer unit and then the back cover 7 Close the pressure release lever on the fuser unit 8 Close the paper exit unit When the control panel message window displays IDLE the printer is ready to print EDNord Istedgade 37A 9000 Aalborg telefon 96333500 ...

Страница 216: ...s set correctly and all cov ers and doors are completely closed n If the message displays when no jam is evident make sure the media size and type currently in the cassette are selected in the printer driver See chapter 2 Printing for information on using the printer driver n As a last resort try turning the printer off and on this will cause jobs to be lost Reseating the Drum If ENGINE ERROR E9 d...

Страница 217: ...t toward you and down M WARNING The fuser unit is hot Do not remove a jam in this area until the fuser unit cools ACHTUNG Die Fixiereinheit wird sehr heiß Bitte achten Sie darauf daß sie diese einige Zeit abkühlen lassen bevor Sie einen Papierstau beseitigen Latch Handle EDNord Istedgade 37A 9000 Aalborg telefon 96333500 ...

Страница 218: ...4 0 doesn t support Plug and Play technology therefore the original installation of the Windows NT 4 0 printer driver was performed manually See Install the Windows NT 4 0 Printer Driver on page 1 27 The following procedure explains the manual installation of the Windows 95 printer driver The QMS magicolor WX supports Plug and Play technology which lets your PC and its attached devices work togeth...

Страница 219: ...oose Browse 12 Select the disk drive in which you inserted the disk in the previous step and then select the appropriate language directory for example English QMSWX INF displays in the File Name list 13 Choose OK to return to the Install from Disk window 14 Choose OK again 15 In the displayed list of printers select the printer driver you want to install QMS magicolor WX Color or QMS magicolor WX...

Страница 220: ...nter needs to be examined by a QMS service technician contact QMS National Ser vice for work inside the US or one of the QMS international offices for work outside of the US National and international contacts are listed in appendix A QMS Customer Support Before calling be sure you have the answers to these questions handy to help our technicians serve you more quickly 1 What is your printer model...

Страница 221: ...A QMS Customer Support In This Chapter n Sources of customer support n QMS world wide offices EDNord Istedgade 37A 9000 Aalborg telefon 96333500 ...

Страница 222: ...source of help Q FAX Q FAX a QMS information retrieval service provides application notes technical support notes on common printing problems and information about printer specifications options accessories con sumables and prices In the United States and Canada call 800 633 7213 to reach Q FAX In all other countries call 334 633 3850 Have your fax number handy when you call or place the call from...

Страница 223: ...information about the bulletin board CompuServe Through CompuServe you ask general non technical questions share information with other users and access printing information and programs When you use CompuServe type go qmsprint to go directly to the forum where QMS is located The QMS library sec tion contains application notes printer drivers utilities technical infor mation and announcement files...

Страница 224: ... þ The printer model þ The type of host computer you are using þ The type and version of operating system you are using þ The interface you are using and if serial the protocol þ The application and version you are using þ The emulation you are using þ Your printer firmware version listed on the status start up pages n Fax You can fax questions to the CRC at 334 633 3716 US Provide the same inform...

Страница 225: ...formation Installation and Maintenance Pricing 1 800 762 8894 On Site Service and Depot Repair Information 1 800 858 1597 7 00 am 7 00 pm Central Time Spare Parts Ordering and Information 1 334 633 4300 x2530 8 00 am 5 00 pm Central Time QMS Canada General Contact 1 514 333 5940 or 1 800 361 3392 Fax 1 514 333 5949 National Service On Site Service and Depot Repair Information 1 800 268 4969 8 30 a...

Страница 226: ...42 Vélizy Cedex France 33 1 410 79 393 Fax 33 1 408 30 110 QMS GMBH Germany and Austria Willstätterstrasse 10 40549 Düsseldorf Germany 49 211 596 1333 Fax 49 211 596 1397 QMS Italy Via della Repubblica 56 43100 Parma Italy 39 52 1231 998 Fax 39 52 1232 902 QMS Nordic Sweden Finland Norway and Denmark Arenavägen 41 6th floor 121 77 Johanneshov Sweden 46 8 600 01 30 Fax 46 8 600 01 33 QMS South Afri...

Страница 227: ...n Josefa Valcárcel 8 28027 Madrid Spain 34 1 742 5013 Fax 34 1 742 3152 QMS UK United Kingdom and Ireland Old Bridge House The Hythe Staines Middlesex TW18 3JF United Kingdom 44 1784 442255 Fax 44 1784 461641 EDNord Istedgade 37A 9000 Aalborg telefon 96333500 ...

Страница 228: ...EDNord Istedgade 37A 9000 Aalborg telefon 96333500 ...

Страница 229: ...Technical Specifications In This Chapter n Print engine specifications n Controller specifications n Environmental requirements n Cable pinouts n Notices EDNord Istedgade 37A 9000 Aalborg telefon 96333500 ...

Страница 230: ...velopes 12 pages per minute monochrome 3 pages per minute color Note Paper transparency and thick stock speeds are based on 30 or less toner coverage Actual print speed depends on the host application Resolution 300x300 dpi monochrome 300x300 dpi color 600x300 dpi monochrome 600x600 dpi monochrome 600x600 dpi color Note Printing in 4 colors at 600 dpi on legal size media requires 8 MB of RAM See P...

Страница 231: ...0 W avg Operation 1000 W max 250 W avg Energy Saver Mode less than 45 W Interface Centronics bidirectional parallel in compatibility mode Memory 4 MB DRAM upgradable to 32 MB via 2 SIMM connectors FLASH EPROM system code Type i960SA processor operating at 16 MHz Relative Humidity Optimal 60 70 Acceptable 20 80 Temperature Range Optimal 63 5F 80 6F 17 5C 27C Acceptable 50F 90 5F 10C 32 5 EDNord Ist...

Страница 232: ...options Centronics Parallel Cable Specifications You may use either a Centronics parallel cable unmarked on cable or an IEEE 1284 bidirectional parallel cable IEEE 1284 is indicated on the cable However we recommend an IEEE 1284 cable This cable must be 6 5 feet 2 meters or less in length Centronics 1284 Parallel Pinouts Signal Pin No Signal Description Direction 1 Strobe In 2 Data 1 InOut 3 Data ...

Страница 233: ...y these cables should be shielded and connected to the chassis of the system unit and printer respectively n All interface conditions are based on Transistor Transistor Logic TTL level Both the rise and fall times of each signal must be less than 0 2 microseconds n Data transfer must be carried out by recognizing the ACKNLG or BUSY signal 10 Acnlg Out 11 Busy Out 12 Pe Out 13 Select Out 14 Autofee...

Страница 234: ... when the equipment is operated in a commercial environment This equipment generates uses and can radiate radio frequency energy and if not installed and used in accordance with the instructions may cause harmful interference to radio communica tions Operation of this equipment in a residential area is likely to cause harmful interference in which case the user will be required to correct the inte...

Страница 235: ...a Class 1 laser product under the U S Department of Health and Human Services DHHS Radiation Perfor mance Standard according to the Radiation Control for Health and Safety Act of 1968 This means that the printer does not produce haz ardous laser radiation Since radiation emitted inside the printer is completely confined within protective housings and external covers the laser beam cannot escape fr...

Страница 236: ... office Consumables and Your Printer Warranty The use of non QMS consumables and or accessories alone does not affect either your warranty or any maintenance contract you may have purchased However if QMS printer failure or damage is found to be directly attributable to the use of non QMS consumables and or accessories QMS will not repair the printer free of charge In this case standard time and m...

Страница 237: ...ugged before you remove you can access the printer s controller board If you don t have an anti static wrist strap discharge your body s static electric charge by touching a grounded surface before you han dle any printer boards or components and before removing the con troller board cover Redischarge your body each time after walking around and before touching the printer controller board again H...

Страница 238: ...EDNord Istedgade 37A 9000 Aalborg telefon 96333500 ...
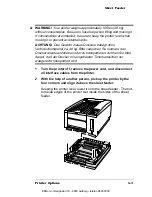
Страница 239: ...C BAT 7 4 B BACK PANEL MISINSTALLED 7 11 Belt cartridge See OPC belt cartridge BELT CARTRIDGE MISINSTALLED 7 11 BLACK DEVELOPER MISINSTALLED 7 11 BLACK TONER EMPTY 7 15 Blank pages 7 3 Buffers Enlarging 4 13 Bulletin board QMS A 3 Buttons About 2 7 Apply 2 7 2 11 Cancel 2 7 2 11 2 13 2 20 2 25 2 31 2 39 Color 2 10 Default 2 31 2 39 OK 2 7 2 11 2 13 2 20 2 25 2 31 EDNord Istedgade 37A 9000 Aalborg ...

Страница 240: ...ter roller unit 5 34 Cleaning pad Installing 1 14 Clearing Status messages 7 16 Color Choosing 2 12 Configuring 2 32 Registration 7 6 Uneven 7 4 Color control Setting 2 12 Color matching software 2 12 Color options Configuring Windows 95 2 11 Color rendering intent 2 12 Color button 2 10 Configuration Menu options selecting 3 8 Printer driver Windows 95 2 2 Printer driver Windows NT 2 14 Configura...

Страница 241: ...nter Configuring Windows 95 2 2 Configuring Windows NT 2 14 Installing manually 7 34 Installing Windows 95 1 26 Installing Windows NT 1 27 Drum Reseating 7 32 E ENGINE ERROR E0 7 12 ENGINE ERROR E3 7 12 ENGINE ERROR E9 7 12 7 32 ENGINE ERROR F5 7 12 ENGINE ERROR Hx 7 12 ENGINE ERROR xx 7 12 Envelopes Jams preventing 2 56 Environmental requirements B 3 Error diffusion 2 10 Exterior cleaning 5 41 F ...

Страница 242: ... MAGENTA DEVELPR MISINSTALLED 7 11 MAGENTA TONER EMPTY 7 15 MAGICOLOR WX BOARD TEST 7 13 Maintenance 5 2 Manual feed Choosing 2 6 2 23 Mechanical problems 7 3 Media 3 hold printing 2 50 Choosing 2 6 2 7 2 23 Copies printing number of 2 7 2 23 Labels printing 2 49 Letterhead printing 2 50 Orientation choosing 2 5 2 23 2 24 Output tray levels 5 2 Preprinted printing 2 50 Pre punched printing 2 50 So...

Страница 243: ...T 2 16 Paper Choosing 2 6 2 7 2 23 Copies printing number of 2 7 2 23 Kinds of 2 51 Orientation choosing 2 5 2 23 2 24 Paper jams 2 55 2 56 Recommended 2 51 Sizes 2 53 Source choosing 2 6 2 23 Weight 2 51 Paper cassette See Cassette Paper jams Message stays on 7 32 PAPER LOSS 7 13 Paper options Configuring Windows 95 2 4 PAPER OUT LOWER TRAY 7 13 PAPER OUT UPPER TRAY 7 13 PAPER OUT UPPER OR MANUAL...

Страница 244: ...ut button 2 7 Apply button 2 7 2 11 Cancel button 2 7 2 11 2 13 2 20 2 25 2 31 2 39 Color button 2 10 Configurating for current job Windows 95 2 3 Configurating through application Windows NT 2 15 Configurating through Start Menu Windows NT 2 15 Configuring Windows 95 2 2 Configuring Windows NT 2 14 Default button 2 31 2 39 Installing manually 7 34 Installing Windows 95 1 26 Installing Windows NT ...

Страница 245: ...r 6 2 Returning printer RMA number 6 2 Revert button 2 31 2 39 RMA number 6 2 S Save As button 2 32 Scratches 7 6 Service United States A 4 Service call Messages 7 17 Placing 7 36 Service messages 7 11 SERVICE MODE 7 15 Service printer RMA number 6 2 Setup printer 1 7 Shipment Contents 1 6 Shipping printer 6 2 Replacement packaging 6 2 RMA number 6 2 SIDE PANEL MISINSTALLED 7 15 Signal direction B...

Страница 246: ...7 14 Please Wait Warming Up 7 14 Please Wait Writing Flash 4 16 7 14 Print Job Active 7 14 Printing 7 14 Printing Need More Memory 7 14 Printing Paper Mismatch 7 14 Replace 100K Kit 7 17 Replace belt 7 14 Replace Fuser 7 15 Replace fuser 7 15 Replace Oil and Pad 7 15 Replace x Developer 7 15 Service Mode 7 15 Side panel misinstalled 7 15 Toner Empty 7 15 Top panel misinstalled 7 15 Troubleshooting...

Страница 247: ...d More Memory Paper Mismatch 7 13 Outer jam 7 13 7 27 Paper Loss 7 13 Paper Out Lower Tray 7 13 Paper Out Upper Tray 7 13 Paper Out Upper or Manual Feed Tray 7 14 Partial page 7 3 Please Close Manual Feed Tray 7 14 Please Open Manual Feed Tray 7 14 Please Set Media from Driver 7 14 Please Wait Booting 7 14 Please Wait Erasing Flash 7 14 Please Wait Warming Up 7 14 Please Wait Writing Flash 7 14 Pr...

Страница 248: ...aper options 2 4 Windows 95 printer driver Configuring 2 2 Installing 1 26 Installing manually 7 34 Windows NT Configuring Advanced options 2 20 Device settings 2 32 Halftone setup 2 35 Page setup options 2 16 Windows NT printer driver Configuring 2 14 Installing 1 27 Y YELLOW DEVELPR MISINSTALLED 7 11 YELLOW TONER EMPTY 7 15 v EDNord Istedgade 37A 9000 Aalborg telefon 96333500 ...
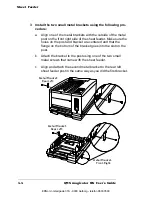
Отзывы: