


C h a p t e r 9 C o m m u n ic a t i o n
9 - 3
9_
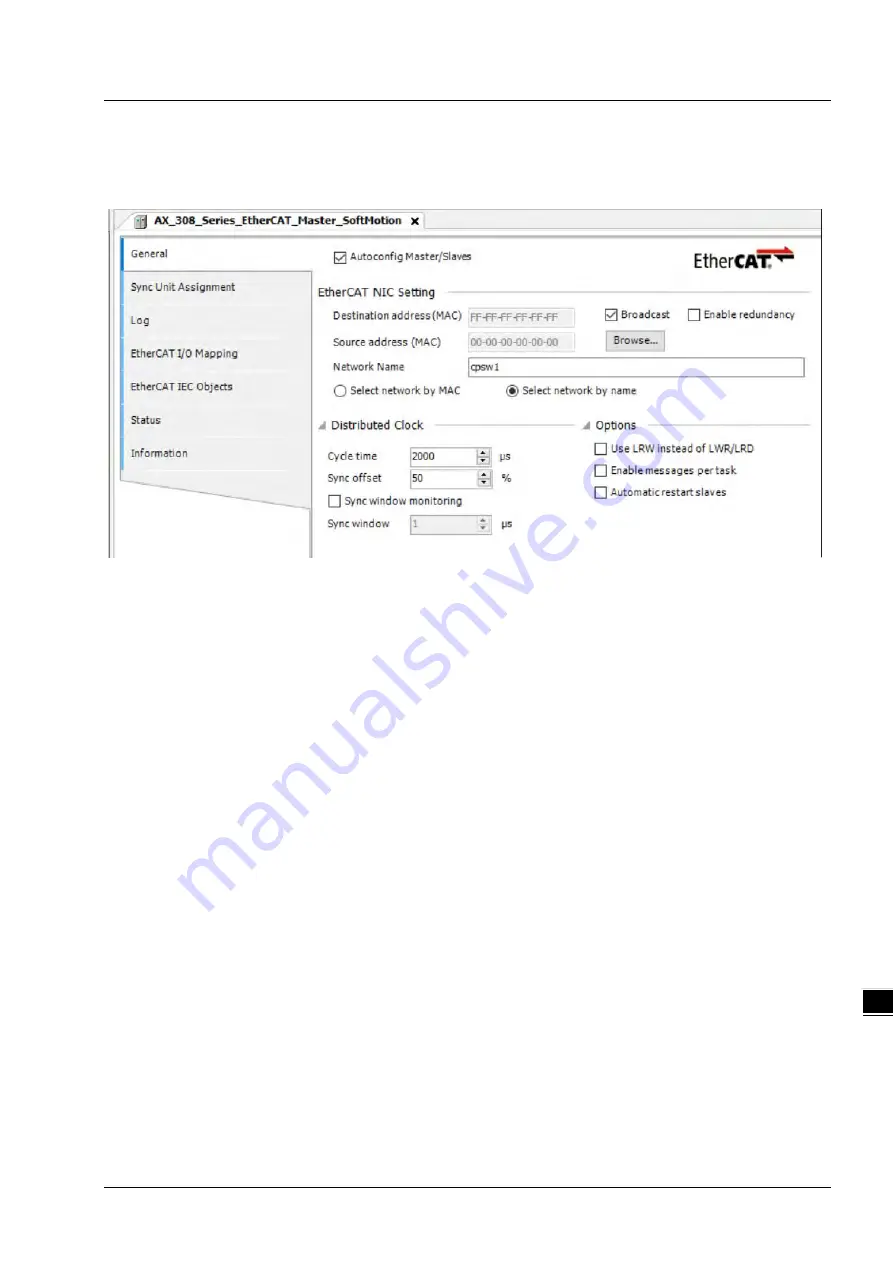
9.1.2 Settings up EtherCAT Master
This section introduces functions in the tab of AX_308_Series_EtherCAT_Master_SoftMotion. Refer to Chapter 6 for
Network Configuration and how to create an EtherCAT connection.
①
②
③
④
General
➀
Autoconfig Master/Slaves: Enable this option to have basic configurations done. Suggested to use this option.
➁
EtherCAT NIC Setting
Destination address (MAC):
MAC address of the device in the EtherCAT network that is to receive the
telegrams.
Source address (MAC): MAC address of the controller (Select CPSW1 when you use Broswe… to find
Slave)
Network Name:
Name or MAC of the network, depending on which of the following options is activated:
Select Network by MAC:
The network is specified by the MAC ID. (default:
CPSW*
1
)
Select network by Name:
Network is identified by the network name and the project is device-
independent.
➂
Distributed Clock
Cycle time: Master sends out corresponding data to the Slaves in a cycle time specified here.
Sync offset: Parameter for setting the delay time between the Distributed Clock time base of the
EtherCAT slave and the cycle start of the PLC. With the default value of 20%, the PLC cycle starts 20%
of the bus cycle time after the sync interrupt of the slave. For the controller program, 80% of the cycle is
always available. Here the Sync offset determines only when the EtherCAT data of the master is
exchanged to and from the slaves relative to the time base of the EtherCAT slave.
Sync window monitoring: Enabled to monitor the synchronization of the slaves.
Sync window: Time for Sync window monitoring.
➃
Options
Use LRW instead of LWR/LRD: Use combined read/write commands/PDO (LRW) instead of separating
read (LRD) and write commands (LWR).
Enabled messages per task: Read and write commands, i.e. the handling of the input and output
messages, can be controlled with various tasks.
Automatic restart slaves: In the case of a communication breakdown, the master immediately attempts
to restart the slaves.
Содержание AX-3 Series
Страница 17: ...AX 3 Series Operation Manual 1 10 _1 MEMO...
Страница 54: ...AX 3 Series Operation Manual 3 22 _3 MEMO...
Страница 98: ...AX 3 Series Operation Manual 4 44 _4 MEMO...
Страница 118: ...AX 3 Series Operation Manual 6 8 _6 MEMO...
Страница 148: ...AX 3 Series Operation Manual 7 30 _7 Scan PLC controller Add the newly scanned PLC controller and click OK...
Страница 241: ...Chapter 7 Motion Control Basic Settings Operation 7 123 7_ Click to enter Axis 0 tab on PoAxis Configuration page...
Страница 292: ...AX 3 Series Operation Manual 7 174 _7 Jerk Done MC_MoveSuperImposed_Done Busy CommandAborted Error ErrorID...
Страница 310: ...AX 3 Series Operation Manual 8 18 8_ MEMO...
Страница 355: ...Appendix A Troubleshooting A 5 _A...


