Angel
®
Concentrated Platelet Rich
Plasma (cPRP) System - Operator’s Manual
Software Version 1.21
966030107 Rev. E
CONCENTRATED PLATELET RICH
PLASMA (cPRP) SYSTEM
Страница 1: ...Angel Concentrated Platelet Rich Plasma cPRP System Operator s Manual Software Version 1 21 966030107 Rev E CONCENTRATED PLATELET RICH PLASMA cPRP SYSTEM ...
Страница 2: ... 2 Shipping and Storage 1 3 Installation 1 3 Special tools equipment and environmental requirements 1 3 Visual Inspection 1 4 Unpacking Assembly 1 4 Operational Checks 1 4 Setting the Date and Time 1 5 Chapter 2 Installing the Disposables Angel Concentrated Platelet Rich Plasma cPRP System 2 1 Description 2 1 Warnings and Precautions 2 3 Setup and Blood Bone Marrow Preparation 2 3 Blood Collection...
Страница 3: ...ol 4 3 Editing the Parameters of a Protocol 4 4 Restoring the Parameters of a Protocol 4 4 Renaming a Protocol 4 4 Changing the Wakeup Protocol 4 5 Deleting a Protocol 4 5 The Protocols Tab 4 5 1 Protocol Buttons 4 6 2 Protocol Parameters and Buttons 4 7 3 Protocol Pull Down Button 4 8 4 Close Button 4 8 5 6 Up and Down Arrow Buttons 4 8 7 Info Button 4 8 Chapter 5 Troubleshooting Alarms and Notif...
Страница 4: ...ot be effective 8 2 Warranty for replaced parts 8 2 Availability of spare parts 8 2 Technical documentation 8 2 Maintenance contracts 8 2 Limits to the warranty with regard to product use by the buyer and or user 8 3 Technical safety standards applicable for the purpose of the warranty 8 3 Absolute prohibition to amend the conditions of this warranty 8 4 Applicable law and jurisdiction 8 4 Identif...
Страница 5: ...Chamber 2 6 Figure 2 5 Valve Assembly 2 7 Chapter 3 Processing Figure 3 1 Load Screen 3 1 Figure 3 2 Start Screen 3 2 Figure 3 3 Run Screen 3 3 Figure 3 4 End of Cycle Screen 3 3 Figure 3 5 End of Case Screen 3 4 Figure 3 6 Tally tab of the Menu Screen 3 5 Figure 3 7 Keyboard Screen Text Entry 3 6 Figure 3 8 Past Cases Screen 3 8 Figure 3 9 Output Screen 3 9 Figure 3 10 Start Screen 3 13 Figure 3 ...
Страница 6: ...re 6 2 Software Validated Screen 6 3 Figure 6 3 Install Screen 6 3 Figure 6 4 New Software Screen 6 4 Figure 6 5 Removing the Centrifuge Adaptor Plate 6 6 Figure 6 6 Removing the Spring Plate and Springs 6 7 Figure 6 7 Cleaning On and Around the Adaptor Base 6 7 Figure 6 8 Removing the Pump Rotor 6 8 Figure 6 9 Reinstalling the Pump into the Rotor Housing 6 9 Figure 6 10 Fuse Replacement Pry Open ...
Страница 7: ... Platelet Rich Plasma cPRP System It is important that the operator thoroughly understand the information in this Operator s Manual before attempting to use the Angel Concentrated Platelet Rich Plasma cPRP System Introduction The Angel Concentrated Platelet Rich Plasma cPRP System is intended to be used in the clinical labaratory or interoperatively at the point of care for the safe and rapid prep...
Страница 8: ...upt the operation of nearby equipment It may be necessary to take mitigation measures such as re orienting or relocating the Angel Concentrated Platelet Rich Plasma cPRP System or shielding the location 2 The operator should never touch the data port on the Angel cPRP System while at the same time making contact with the patient as potential for electrical shock may result 3 Place the Angel Concen...
Страница 9: ...hree compartment reservoir bag 15 Failure to properly load the centrifuge plate prior to processing may lead to exposure to blood and blood borne pathogens 16 If centrifugation is discontinued before the completion of a processing cycle the variable volume separation chamber is pressurized and presents the risk for exposure to blood and blood borne pathogens if the variable volume separation chamb...
Страница 10: ... of the following conditions Do not use the Angel Concentrated Platelet Rich Plasma cPRP System until corrective action has been taken Damaged or worn power cord plug or receptacle Switches that are loose or do not operate with a positive action A system that has been subject to significant physical damage A system that has given anyone an electrical shock while in use A system that appears to be ...
Страница 11: ...es only with fuses of the same type and rating 19 There are no user serviceable parts inside this device To avoid the risk of electrical shock do not remove the cover Refer all servicing to qualified service personnel 20 Take care not to misplace the screws and springs when disassembling the centrifuge adaptor plate If springs or screws are misplaced you may order replacements by contacting Cytome...
Страница 12: ...the main power switch This symbol indicates the power ON position on the main power switch Manufacturer Caution Federal law USA restricts this device to sale by or on the order of a physician To reduce the risk of electrical shock do not remove cover There are no user serviceable parts inside Refer servicing to qualified service personnel This side up Fragile Keep dry Ship and store between these ...
Страница 13: ... goods authorization RGA number is required from Cytomedix Inc prior to shipping If the product has been in contact with blood or body fluids it must be thoroughly cleaned and disinfected before packing It should be shipped in either the original carton or an equivalent carton to prevent damage during shipment and it should be properly labeled with an RGA number and an indication of the biohazardo...
Страница 14: ...a 7 1 ratio 7 parts whole blood to 1 part citrate anticoagulant ACD A Processing The Angel cPRP Processing Set utilizes a variable volume separation chamber 40 ml 180 ml which allows the clinician to determine the amount of preoperative blood bone marrow volume to be processed The Angel cPRP Processing Set allows for up to three processing cycles per disposable Once the anticoagulated whole blood ...
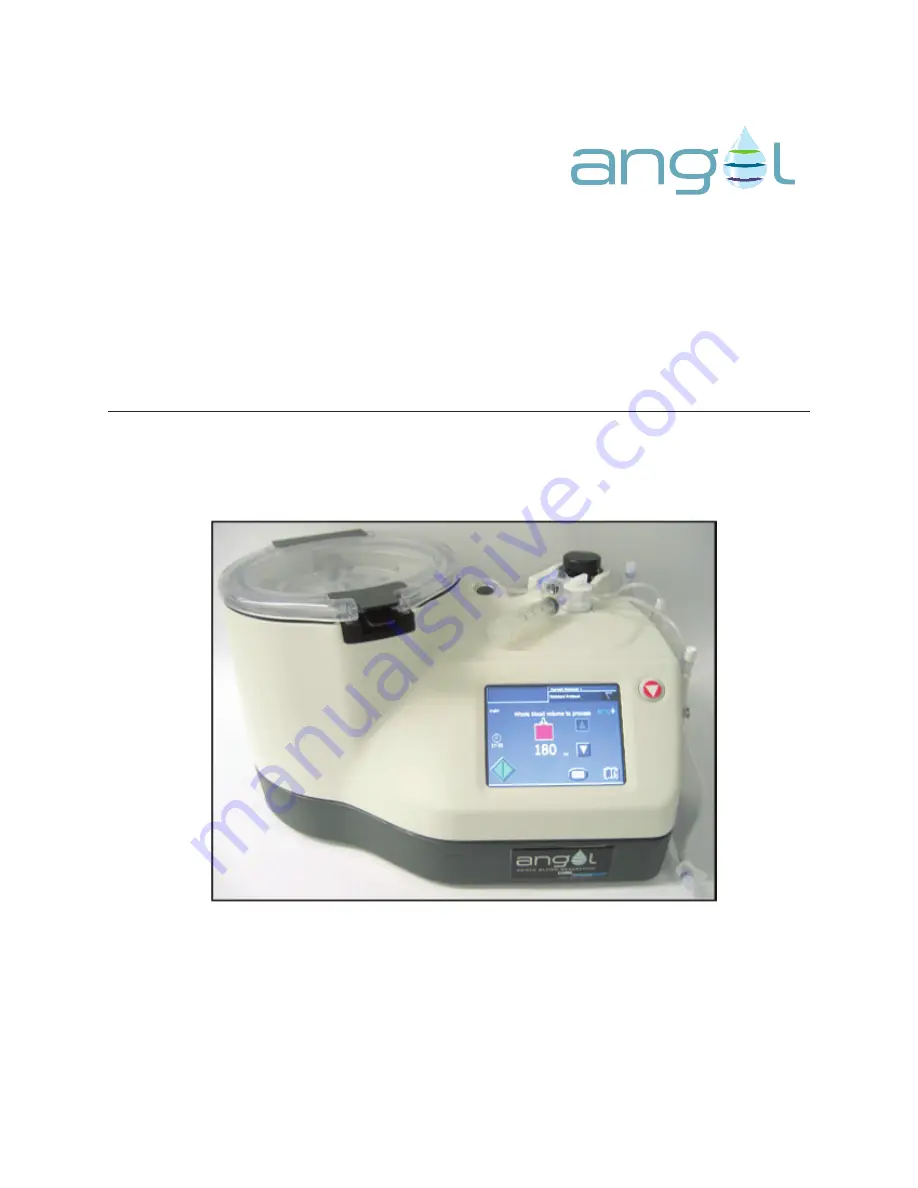
Страница 15: ...1 Front view of the Angel Concentrated Platelet Rich Plasma cPRP System 1 Centrifuge Well 2 Lid Latch Release Handle 3 Lid 4 Pump Rotor 5 Valve Assembly Driver 6 Stop Button 7 Touch Screen Display Figure 1 2 Rear view of Angel Concentrated Platelet Rich Plasma cPRP System 1 Power Cord 2 Power Switch 3 Ethernet 4 USB Port ...
Страница 16: ... Platelet Rich Plasma cPRP System The Angel Concentrated Platelet Rich Plasma cPRP System has been designed to be essentially a plug and play device and as such requires very little preparation to get started However before proceeding please note the following 1 Read the installation procedure in its entirety 2 Become familiar with any precautionary indications noted in this procedure Note If at a...
Страница 17: ...er all servicing to qualified service personnel Unpacking Assembly 1 Inspect the exterior of the shipping container and verify that no visual damage is present A If damage is present notify Cytomedix Inc Customer Service Response Center at 877 865 9927 to report the damage B If no damage is present proceed with the installation Visual Inspection Power up the Angel Concentrated Platelet Rich Plasma...
Страница 18: ...Hour Min for minute Sec for second and Time zone To adjust a field 1 Touch the field you wish to adjust For example if you wish to change the month click on the rectangular field labelled Month The field will become highlighted and the Up Arrow button and Down Arrow button will appear at the right side of the screen 2 Touch the Up Arrow button and Down Arrow button to increase or decrease respecti...
Страница 19: ...wo ways either touch the highlighted field a second time or touch another field which needs modifying When the highlighted field is touched to lock in its value it will become not highlighted and the Up Arrow button and Down Arrow button will disappear 4 Once the value of all fields have been set correctly and locked in touch the Close button to exit the Menu Screen ...
Страница 20: ...te The separation chamber plate is used to seat the variable volume separation chamber in the centrifuge Platelet Cuvette Valve Assembly The platelet cuvette valve assembly contains three major components 1 the platelet cuvette 2 the pump loop tubing and 3 the rotating valve The platelet cuvette is seated in the platelet sensor and is used to optimize the collection of the separated blood componen...
Страница 21: ...ents The whole blood compartment is used as a reservoir for collected anticoagulated whole blood from a patient The clinician may use syringes or whole blood bags to collect the anticoagulated whole blood or mixture of blood and bone marrow from a patient The RBC Compartment is used to collect the concentrated red cells at the end of the Figure 2 1 Angel cPRP Processing Set 1 Platelet Cuvette Valv...
Страница 22: ...rocedure to seal open luer lock connections Whole Blood Bag Spike Adapter The whole blood spike adapter is used to transfer the blood or mixture of blood and bone marrow from a whole blood bag to the whole blood compartment of the three compartment reservoir bag Labels Appropriate labels to label collected whole blood bone marrow and separated components Contents of this set have been sterilized b...
Страница 23: ... separation chamber plate with the aligning feature on the centrifuge adapter Once aligned press the separation chamber plate down near the location of the position indicator and turn clockwise until the position indicator snaps into place see Figure 2 3 Rotate the centrifuge to a position so that the interlock mechanism shown in Figure 2 3 item 2 does not interfere with the stator arm If the inte...
Страница 24: ...aration Chamber Plate Interlock Mechanism 3 Position Indicators 4 Place the tube leading from the variable volume separation chamber through the slot on the rim of the centrifuge well 5 Lower the centrifuge stator arm and align it with the mating feature on the top of the rotating seal of the variable volume separation chamber see Figure 2 4 ...
Страница 25: ...ed Seat the platelet cuvette valve assembly by aligning the platelet cuvette and the valve assembly with the platelet sensor body and the valve assembly driver Press down firmly on the back side of the platelet cuvette valve assembly at position A near the pump loop until the assembly is snapped in place see Figure 2 5 Note It is essential that the platelet cuvette valve assembly seats fully on th...
Страница 26: ...n the side of the Angel Concentrated Platelet Rich Plasma cPRP System 9 Remove breather cap from the PRP valve port located on the valve assembly If desired attach the Syringe activated Valve to the PRP valve port Attach the 20 ml luer lock syringe or alternate syringe if desired to the PRP valve port Note The luer on the PRP valve port will accommodate most luer lock syringes 10 After set up insp...
Страница 27: ...g table defines the appropriate mixture of whole blood and citrate anticoagulant ACD A i 40 ml anticoagulated whole blood or mixture of blood and bone marrow volumes require a patient hematocrit of 30 or greater The recommended minimum patient hematocrit for anticoagulated whole blood volumes of 50 ml or greater is 28 Whole Blood vs Citrate Anticoagulant Mixture 7 1 ratio seven parts blood to one ...
Страница 28: ...he bag 1 ml of blood weighs approximately 1 053 grams If a mixture of blood and bone marrow is to be processed using the Angel Concentrated Platelet Rich Plasma cPRP System samples of a patient s bone marrow should be obtained using the techniques and procedures as practiced at each individual hospital or health care setting Equal volumes of anti coagulated whole blood and bone marrow can be trans...
Страница 29: ...touch the Disposable set is loaded button Figure 3 1 Load Screen Collect the blood or mixture of blood and bone marrow according to Blood or Mixture of Blood and Bone Marrow Collection on page 2 8 Collecting the Blood or Mixture of Blood and Bone Marrow Chapter 3 Processing Running the Separation Process Once the Angel cPRP Processing Set is loaded and the Disposable set is loaded button has been ...
Страница 30: ... of anticoagulated whole blood or mixture of blood and bone marrow from the whole blood compartment of the three compartment reservoir bag into the variable volume separation chamber where it will undergo separation This process is monitored by the Run Screen see Figure 3 3 Note If after starting the cycle you need to change the selected volume of whole blood or mixture of blood and bone marrow to...
Страница 31: ...ch processing cycle the PRP may be diluted to increase total volume by drawing back the PRP syringe plunger This will draw PPP from the PPP Compartment of the three compartment reservoir bag into the PRP syringe At the end of the case the RBC Compartment of the three compartment reservoir bag will contain concentrated red blood cells while the PPP Compartment of the three compartment reservoir bag...
Страница 32: ...ge adapter within the centrifuge well Remove the variable volume separation chamber by twisting it counter clockwise and then lifting it out of the centrifuge adaptor Rotate the centrifuge to a position so that the interlock mechanism shown in Figure 2 3 item 2 does not interfere with the stator arm If the stator arm interferes with the interlock mechanism the separation chamber plate will not unl...
Страница 33: ...ich the case was started and the Angel cPRP System software version number The ID field as entered by the operator refer to Entering Optional Case Data Fields on page 3 6 The Operator field as entered by the operator refer to Entering Optional Case Data Fields on page 3 6 The tally table the volumes ml of the whole blood or mixture of blood or bone marrow volume processed by the case as well as vo...
Страница 34: ...se such as the volumes of collected RBC PPP and PRP the Angel Concentrated Platelet Rich Plasma cPRP System provides three optional data fields which may be entered by the operator in order to be saved with the standard case data ID field an identification tag for the case chosen by the operator may contain letters numbers or symbols Operator field the name of the person operating the Angel cPRP S...
Страница 35: ...ld Values The following applies to a current case only After entering values for the optional data fields as described in Entering Optional Case Data Fields on page 3 6 you may modify them before beginning a new case Once a new case is begun the values entered for the ID Operator and Notes fields may no longer be modified To modify a previously entered value for a field on the current case perform...
Страница 36: ...where you may save the selected case You may exit the Past Cases Screen without selecting a case by touching the Close button located at the upper right corner of the screen To return to the current case after viewing or saving a past case return to the Past Cases Screen and select the case at the very top of the list marked current 3 Once you are satisfied with the field s new value touch the Ent...
Страница 37: ...ally to USB storage device button will become enabled 4 Touch the Output Tally to USB storage device button A progress bar may briefly appear to monitor the progress of the saving process Once the entire tally table has been saved the text Output saved will be displayed beneath the Output Tally to USB storage device button and you will be returned to the Output Screen The Tally Table can be retrie...
Страница 38: ...ble such as both a USB storage device and a network server choose the appropriate destination by performing the following a Touch the Select destination for log file field The field will become highlighted and the Up Arrow button and Down Arrow button will appear at the right side of the screen b Touch the Up Arrow button and Down Arrow button to scroll through available destinations which the log...
Страница 39: ...p Arrow button and Down Arrow button are touched the processing time will interactively change to reflect the newly selected volumes In all screens other than the Start Screen the processing time displays and counts down the amount of time remaining in the current cycle before PRP is collected Processing 3 12 Angel Operator s Manual Touch Screen User Interface The following section offers a detail...
Страница 40: ...Protocol is locked in the computer s memory and cannot be altered or deleted Refer to Chapter 4 Programmability Option for additional information on protocols and creating custom protocols 6 7 Up and Down Arrow Buttons Touching the Up Arrow button and Down Arrow button will increase and decrease respectively the whole blood or mixture of blood and bone marrow volume to process The volume set to be...
Страница 41: ...ole blood bone marrow processed and the RBC PPP and PRP collected during a case may be viewed at any time by touching the Menu button and then touching the Tally tab from the Menu Screen see Figure 3 15 1 Pause Resume Button 2 Modify Volume Button Figure 3 13 Run Screen Pause Resume Button Processing may be paused at any time from the Run Screen by touching the Pause Resume button the yellow bars ...
Страница 42: ...e Angel Whole Blood Separation System The number is not displayed until the first volume of PRP is collected Angel Operator s Manual 3 15 Once the new volume has been selected touching the green Resume button will continue the processing cycle The Modify Volume button is only available during the fill stage of processing before the originally selected volume of whole blood to be processed has been p...
Страница 43: ...le button will be available Touching the New Cycle button begins a new cycle and displays the Start Screen see Start Screen on page 3 12 During and after each cycle the operator must pay attention to the PRP volume collected so that the syringe does not overfill after touching the New Cycle button the text Check PRP syringe will appear beneath the alarm area as a reminder End Case Button Touching t...
Страница 44: ...read Past Cases Screen on page 3 21 Output Button Touching the Output button will bring up the Output Screen From the Output Screen case data may be saved to an external storage device To learn how to save case data refer to Saving Case Data on page 3 5 For a detailed explanation of the Output Screen read Output Screen on page 3 22 Angel Operator s Manual 3 17 Screen the operator may save case dat...
Страница 45: ... page 3 6 Operator Button The Operator button is used to enter or modify the value of the Operator field which is saved along with the rest of the case data To learn how to enter the values of a case s optional fields refer to Entering Optional Case Data Fields on page 3 6 Notes Button The Notes button is used to enter or modify the value of the Notes field which is saved along with the rest of th...
Страница 46: ... on page 3 5 Protocols Tab The Protocols tab allows for the creation and management of custom protocols See Chapter 4 Programmability Option Settings Tab The Settings tab is used to change the volume of audible alarms set the date and time used internally by the Angel cPRP System and to check for new software versions see Figure 3 16 Figure 3 15 Tally Tab of the Menu Screen 1 Tabs Touching a Tab w...
Страница 47: ...he Angel and to check for new software versions see Figure 3 16 Figure 3 16 Settings tab of the Menu Screen Audio alarm volume To change the volume of the audio alarms sounded by the Angel touch the Audio alarm volume parameter box This will highlight the box and display the arrow buttons Touch the up and down arrow buttons to increase and decrease the volume of audio alarms Audio alarms cannot be...
Страница 48: ...e of this manual Info Screen The Info Screen is displayed by touching the Info button from any other screen The Info Screen displays the Angel cPRP System software version and serial number at the top of the screen as well as context sensitive help and or instructional animations below see Figure 3 17 Figure 3 17 Info Screen 1 Close Button 2 Back Button and Forward Button Processing Close Button T...
Страница 49: ... Screen lists the six most recent cases prior to the current case For each listed case the following information is displayed from left to right the sequential case number automatically assigned by the Angel cPRP System the date and time the case was started from the moment the Start button is touched the number of data lines the case consists of in parenthesis the current case also contains the t...
Страница 50: ...e already displayed Down Arrow Button Touching the Down Arrow button will display the next six older cases disabled if there are no cases older than those already displayed Output Screen The Output Screen is displayed by touching the Output button and is used to save either a case tally table or a case log to a connected USB storage device In addition the Output button allows the operator to save ...
Страница 51: ... device button will commence saving the tally table to a connected USB storage device Output log file to Button Touching the Output log file to button will commence saving case data to the USB storage device or a network server selected by the Select destination for log file field Select destination for log file Field Used to select a USB storage device connected to the Angel cPRP System s USB por...
Страница 52: ...ration chamber must be empty in order to remove the disposable set from the machine Figure 3 20 Empty Screen Continue processing Button Touching the Continue processing button continues processing the current cycle without emptying the variable volume separation chamber If the Stop button was pressed during the blood component collection phase this button is not active Empty the set Button Touchin...
Страница 53: ... handle on the valve assembly to the whole blood compartment port see Figure 3 21 2 Remove pump loop tubing from the pump rotor to release fluid pressure on the variable volume separation chamber which will allow the residual blood bone marrow to flow to the whole blood compartment of the three compartment reservoir bag 3 After the blood or mixture of blood and bone marrow has emptied from the var...
Страница 54: ... Time can be changed The first product that is collected after the two phase cycle is complete is the PPP The PPP is pumped from the spinning variable volume separation chamber into the PPP compartment When the sensor of the Angel Concentrated Platelet Rich Plasma cPRP System senses the presence of the PRP layer the Rotating Valve changes position and directs the PRP product to the PRP syringe plu...
Страница 55: ...stom protocols that have changes in RPM and Time should only be created by those knowledgeable in the methodology of blood component separation Figure 4 2 The Keyboard Screen Protocol Name Before attempting to create a new protocol you should familiarize yourself with the controls for making changes Generally if you need to change values such as the default volume to process you will use the Up ar...
Страница 56: ...When finished touch Enter to save the new name and return to the Protocols tab 6 Make any desired changes to the protocol parameters Note Any changes are automatically saved 7 It is recommended that most protocol changes concern only Default volume to process and Hematocrit of the PRP product the two topmost fields 8 However if the user needs to change more advanced values the user may a Touch the...
Страница 57: ...e recommended Standard Protocol algorithm settings at any time These are the values used for the Standard Protocol and are determined by the selected volume of whole blood or blood mixed with bone marrow to process As the volume is changed the RPM and Spin Time parameters are changed to optimize platelet collection To restore the parameters of a protocol follow these steps 1 From the Protocol pull...
Страница 58: ...ol pull down button 3 Touch the Close button to return to the previously displayed screen Deleting a Protocol The Protocols tab of the Menu Screen allows you to create a custom protocol based either on the Standard Protocol or an already existing custom protocol To access the Protocols tab touch the Menu button from the Start Screen and then touch the Protocols tab The Protocols tab is organized w...
Страница 59: ...t protocol This is the only way to create a new protocol The newly created protocol will have a number prefixed to its name Touch the Rename button to rename the copy of a protocol Rename Button Touching the rename button will display a keyboard on the touch screen display Please refer to the illustration in Figure 4 2 Type in the name you wish the protocol to have and then touch Enter to save and...
Страница 60: ...ingle cycle Hct of PRP product This protocol parameter sets the amount of Hematocrit contained in the PRP product of a case This value is based on a harvest of PRP including PPP dilution equivalent to 10 of the whole blood or mixture of blood and bone marrow volume processed Spin 1 RPM The separation process consists of two spin cycles in the centrifuge This protocol parameter sets the speed RPM o...
Страница 61: ...ll become disabled and the Modify RPM Time button will become enabled The name of the currently loaded protocol is displayed to the left of the Protocol pull down button Touching the Protocol pull down button will display a list of available protocols touching the Protocol pull down button a second time collapses the list Touch a protocol s name in the list to select it as the current protocol whi...
Страница 62: ...failure If it does not resolve itself contact the Cytomedix Inc Customer Service Response Center Alarms and Notifications Troubleshooting Angel Operator s Manual 5 1 Chapter 5 Troubleshooting The procedures outlined below are intended to help you identify and correct alarms and other conditions that may occur during operation of the Angel Whole Blood Separation System Alarms and Notifications Alarm...
Страница 63: ...s available in the whole blood compartment and you wish to continue filling to the desired volume check to make sure there are no breaks or occlusions in the line and then press the Continue Filling button to continue the cycle Lid latch If the latch is detected to be unlatched after the Start button is pressed the centrifuge is stopped and the Lid latch alarm is sounded This alarm indicates a har...
Страница 64: ...ich Plasma cPRP System s temperature is detected to be unacceptably high the Machine temp alarm is sounded Power down the Angel cPRP System for a short time before any further processing If this alarm does not resolve itself contact the Cytomedix Inc Customer Service Response Center Plate locking error If the separation chamber plate is improperly attached to the centrifuge adapter this alarm soun...
Страница 65: ...d The Angel cPRP System will automatically reposition the valve assembly driver to the correct position when you select the green resume button If that fails manually turn the valve assembly handle in the direction indicated by the alarm icon Troubleshooting Chapter 5 Troubleshooting The procedures outlined below are intended to help you identify and correct alarms and other conditions that may oc...
Страница 66: ...e or contact the Cytomedix Inc Customer Service Response Center Hardware does not support this version of software The operator has tried to install a software version which is not supported by the current hardware Select a previous version of software which is compatible with the current hardware for installation Hardware malfunction A hardware malfunction has occurred Cycle the machine power off...
Страница 67: ...e recreated before it can be used Power was lost before end of case The Angel cPRP System was shut down or lost power before the end of a processing case If power was lost in the middle of a cycle then the set must be emptied A new cycle or case may then be started Redo failed Undo redo history cleared An attempt to redo a change while creating a protocol has failed The undo redo history has been ...
Страница 68: ...oftware Screen try the following Ensure the USB storage device or the Ethernet cable is properly connected to the correct port on the left side of the machine If you are having difficulties locating the port see Angel Concentrated Platelet Rich Plasma cPRP System Components on page 1 2 If you are attempting to update software from a USB storage device ensure that the device has a valid version of ...
Страница 69: ...e Screen For a detailed explanation of the New Software Screen read New Software Screen on page 6 6 New versions of the system software may be downloaded from a USB storage device connected to the Angel cPRP System s USB port In addition to updating the system software it is possible to download and install an earlier system version Follow these steps to install new software on the Angel Concentra...
Страница 70: ...available sources then do not do anything at this step 4 Touch the Download software from this source button You will now be prompted to enter the unlock code for the selected software version see Figure 6 1 The software unlock code is available from the manufacturer Figure 6 1 Unlock Code Screen 5 Use the keypad on the touch screen display to enter the unlock code When the correct unlock code has...
Страница 71: ... you wish to install as well as the source it has been copied from in parenthesis and two buttons for final confirmation If you decide you do not wish to install a new software version touch No from the Install Screen and you will be returned to the current Angel cPRP System software without any changes to the system occurring If the installation is successful a Continue button is displayed on the...
Страница 72: ...ure 6 4 New Software Screen 1 Close button 2 Increment button 3 Decrement button The Angel cPRP System s serial number is displayed in the top right corner of the New Software Screen 1 Close Button Touching the Close button will close the New Software Screen and display the Menu Screen 2 3 Increment and Decrement Buttons Touching the Increment button and Decrement button scroll through the list of...
Страница 73: ... System should be inspected periodically for any problems such as bent or broken switches frayed or twisted power cords and loose or missing hardware Discontinue use of the Angel cPRP System if the device displays one or more of the above conditions until the problem is corrected and it has been verified that the device is operating correctly Verify that the connectors located on the exterior of t...
Страница 74: ...r a 15 1 water to bleach solution absorb and discard any excess fluids that have accumulated in the centrifuge well Once the bulk of the fluids have been removed follow the procedure below to remove disassemble clean reassemble and reinstall the centrifuge adapter plate PRECAUTION Takecarenottomisplacethescrewsandspringswhendisassembling the centrifuge adaptor plate If springs or screws are mispla...
Страница 75: ...e four cap screws that secure the centrifuge plate to the motor spindle 3 Using mild detergent disinfectant or a 15 1 water to bleach solution clean the top of the adapter base beneath the adapter base in the well the spring plate the adaptor top and rinse the springs and screws to remove any spilled fluids 1 Springs x8 2 Centrifuge Plate 3 Spindle Figure 6 7 Cleaning On and Around the Adaptor Bas...
Страница 76: ...ns each time until both screws are hand tight f Alternately install the remaining 4 screws in order until hand tight g Torque all screws to 20 inch pounds following the same alternating pattern h Press down on the spring plate It should immediately spring back 1 Remove the pump rotor from the rotor housing by pushing down and turning the rotor counter clockwise 2 Wipe and rinse the pump rotor to r...
Страница 77: ... 000 005 Centrifuge stator arm spare List of Operator Replaceable Parts P N Description 020243 MI1005 Baaske Medical Ethernet Isolator 020244 1 1 MED Baaske Medical USB Isolator List of Data Integrity Accessories Figure 6 9 Reinstalling the Pump into the Rotor Housing In the event that a fuse fails follow these steps to replace it If the replacement fuse fails there may be an electrical component ...
Страница 78: ...f identical specification 5X20mm size 5A 250VAC fast blow 4 Reverse the removal steps in order to re install Verify that the stator arm is not loose on its pivot pin It should only rotate up and down with hand pressure and have no side to side motion If the arm is loose lift it to the raised braking position and locate the cap screw near the base of the stator arm Using a 9 64 inch hex wrench tigh...
Страница 79: ... Maximum processing per disposable 180 ml Patient hematocrit requirements 40 ml anticoagulated whole blood or mixture of blood and bone marrow volumes require a patient hematocrit of 30 or greater The recommended minimum patient hematocrit for anticoagulated whole blood volumes of 50 ml or greater is 28 Performance Characteristics Specifications Physical Characteristics Characteristic Performance ...
Страница 80: ...gy only for its internal function Therefore its RF emissions are very low and are not likely to cause any interference in nearby equipment RF emissions CISPR 11 A The Angel Concentrated Platelet Rich Plasma cPRP System is suitable for use in all establishments other than domestic and those directly connected to the public low voltage power supply network that supplies buildings purposes Harmonic e...
Страница 81: ...cycles 70 UT 30 dip in UT For 25 cycles 5 UT 95 dip in UT For 5 sec A B A B Mains power quality should be that of a typical commercial or hospital environment If the user of the Angel Concentrated Platelet Rich Plasma cPRP System requires continued operation during power mains interruptions it is recommended that the Angel Concentrated Platelet Rich Plasma cPRP System be powered from an uninterrup...
Страница 82: ...o 2 5GHz where P is the maximum output power rating of the transmitter in Watts W according to the transmitter manufacturer and d is the recommended separation distance in meters m Field strengths from fixed RF transmitters as determined by an electromagnetic site surveyi should be less than the compliance level in each frequency rangeii Interference may occur in the vicinity of equipment marked w...
Страница 83: ...nsmitter where P is the maximum output power rating of the transmitter in watts W according to the transmitter manufacturer Note At 80MHz and 800MHz the separation distance for the higher frequency range applies Note These guidelines may not apply in all situations Electromagnetic propagation is affected by absorption and reflection from structures objects and people Rated maximum output power of ...
Страница 84: ...roducts under warranty shall not be considered an extension of the overall warranty period as agreed above Warranty Expiration a Any service rendered under this warranty shall be limited to the repair and or replacement in the Cytomedix Inc factory of materials with faults verified and ascertained by Cytomedix Cytomedix guarantees that the safety of the devices is in no way altered by maintenance ...
Страница 85: ...s devices for a period of 12 months 1 year from the date each model ceases production Availability of spare parts Cytomedix offers its customers customized maintenance contracts to meet specific requirements Interested customers may contact Cytomedix or the local representative distributor for further details and applicable contractual conditions Cytomedix guarantees that all maintenance work will...
Страница 86: ... of this warranty shall be those enforced in the Country where the device is addressed by the Manufacturer at the time of marketing of such device b In Europe safety as regards electrical and mechanical hazards explosions and fires with respect to medical electrical equipment is defined by the following harmonized standard EN 60601 1 Medical electrical equipment Part 1 general requirements for saf...
Страница 87: ...vice Response Center 209 Perry Parkway Suite 7 Gaithersburg MD 20877 USA Telephone 1 877 865 9927 Telephone 1 301 917 6860 Fax 1 240 499 2690 CustomerCare Cytomedix com www Cytomedix com Identification of manufacturer The above replaces all other warranties explicit or implicit written or verbal including warranties of merchantability and fitness for a particular purpose No person including any re...
Страница 88: ...uintiles Ltd Runnymede Malthouse Off Hummer Road Egham Surrey TW20 9BD United Kingdom Cytomedix Inc 209 Perry Parkway Suite 7 Gaithersburg MD 20877 USA Tel 1 877 865 9927 Tel 1 301 917 6860 Fax 1 240 499 2690 CustomerCare cytomedix com www cytomedix com Regenerative Biotherapies ...