80
Chapter 2
Printing
2
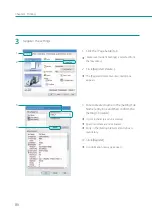
Adjust the cutting position.
2
1
1. Click the [Utility] tab.
2. Click [ Cutter Adjustment].
The [Cutter Adjustment] dialog box appears.
3
4
3. Adjust the cutting position.
Adjust the cutting position by moving the slide
bar.
The center of the slidebar is the default position
(0.0mm). The more you slide the slider to the
left (- (minus)), the more the cutting position
moves forward (Paper ejection side). The more
you slide the slider to the right (+ (plus)), the
more the cutting position moves backward
(Paper feed side).
The cutting position can be adjusted between
-10.0 mm and +10.0 mm in steps of 0.5 mm.
To restore the default setting of the cutting
position, click [Defaults].
4. Click [Send].
A confirmation message appears.
Содержание LX-P1300
Страница 1: ...User s Guide COLOR LABEL PRINTER LX P1300 LX D1300 CANON FINETECH NISCA INC 2018 4Y1 8615 030...
Страница 98: ...92 Chapter 2 Printing 4 Finish updating the special settings 1 1 Click Close...
Страница 138: ...132 Chapter 3 Maintenance...
Страница 155: ...Chapter 4 Troubleshooting For Troubleshooting Operations 150 List of Error Messages Warning Messages 164...
Страница 179: ...Chapter 5 Appendix Moving the Printer 174 Uninstall Printer Driver 184 About Network Utility 186...
Страница 189: ...183 Moving the Printer...
Страница 206: ...200 Chapter 5 Appendix 2 Configure Time Out Value Extension 1 2 1 Check the Extend Time Out value check box 2 Click OK...


