2
2
.
.
I
I
n
n
s
s
t
t
a
a
l
l
l
l
a
a
t
t
i
i
o
o
n
n
- 104 -
12.16 Tool Modes (/np mode)
1) Purpose
The tool modes (startup options) are used to launch the CXDI application on the control
PC by itself, however, the tool modes are not available for the CXDI-40G COMPACT
imaging unit.
2) Notes
The following operation must be performed before using the “/np” mode. Especially, be
sure to back up the exposure mode names and the customized settings before the
operation.
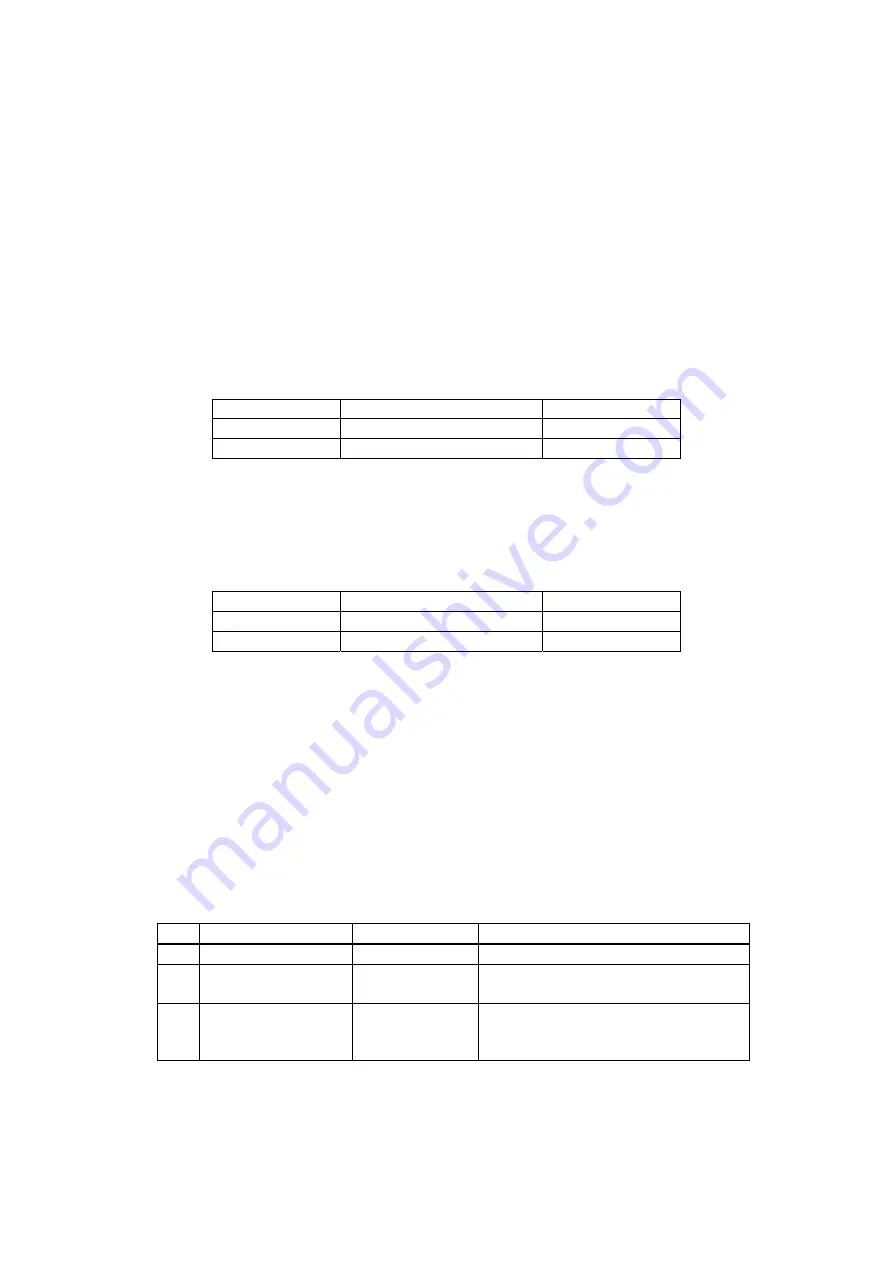
2-1) When using “/np” with the same settings as that of the connected sensor unit
“BodyPart**.ini” file can be used as it is.
Example:
Connection
/np
setting
Sensor1 Table
Table
Sensor2 Stand
Stand
2-2) In case of using “/np” with different settings from that of the connected sensor unit
Move the “BodyPart**.ini” file in the “BodyParts” folder to the desktop, etc.
However, do not move the Reference folder. If the “BodyPart**.ini” file is left in the
“BodyParts” folder, system will not be able to be started, as the sensor type of the
“BodyPart” and the settings do not match.
Example:
Connection
/np
setting
Sensor1 Table
Stand
Sensor2 Stand
Table
3) Preparation
3-1) Connect the keyboard and the mouse to the control PC.
3-2) Delete the “ccrstart.bat” file from startup.
3-3) Disconnect the imaging unit from the control PC.
4) Startup
method
4-1) Start up Windows XP.
4-2) Start the Command Prompt screen.
Start
⇒
Program
⇒
Accessories
⇒
Command Prompt
4-3) Command Prompt screen appears, type the commands following instruction below to
start the CXDI application. (Press the [Enter] key after typing the command.)
No. Command
Prompt
Command
Note.
1 C:\>
d:
2 D:\>
cd
ccr
“Space” delimiter is required between
“cd” and “ccr”.
3 D:\ccr>
ccrxxxxx
/np
“Space” delimiter is required between
“xxxxx” and “/”.
“xxxxx” is different in version.
4-4) If the message “Sensor not connected” appears at starting of the CXDI application,
click [OK] button, Change to the “Debugging mode” with the keys ([Alt] + [Tab])
using.
4-5) When Welcome to CCR appears, select “1. Set-Up...”.
Содержание CXDI-40G COMPACT
Страница 24: ...2 Installation 4 2 CXDI SYSTEM III Assembly Packaging Accessories Box Power Box ...
Страница 56: ...2 Installation 36 8 3 When Timeout due to RX_REQ not Negating ...
Страница 135: ...2 Installation 115 16 2 Power Box Mass 4 2 Kg not including cable Unit mm ...
Страница 136: ...2 Installation 116 16 3 Ready Lamp Unit Mass 0 5 Kg Unit mm ...
Страница 165: ...CXDI SYSTEM Rev 01 CONTENTS CXDI 40G COMPACT 1 IMAGING UNIT 2 POWER BOX 3 INDEX OF PARTS NUMBERS 4 ...
Страница 167: ...CXDI SYSTEM 1 2 Rev 01 Canon Inc Key No 5 Key No 6 Key No 7 Key No 8 Key No 9 Key No 10 Key No 11 ...


