background image

Application Wizards

Control Panel Labels

164

LabelMark 5.0 User’s Manual

Application Wizards

The following wizards can be found in LabelMark 5.0, Professional edition.

• Control Panel Labels

• Wire Harness Labels

• 110-Block Labels*

*The 110-Block label wizard can also be found in LableMark 5.0 Standard edition.

Control Panel Labels

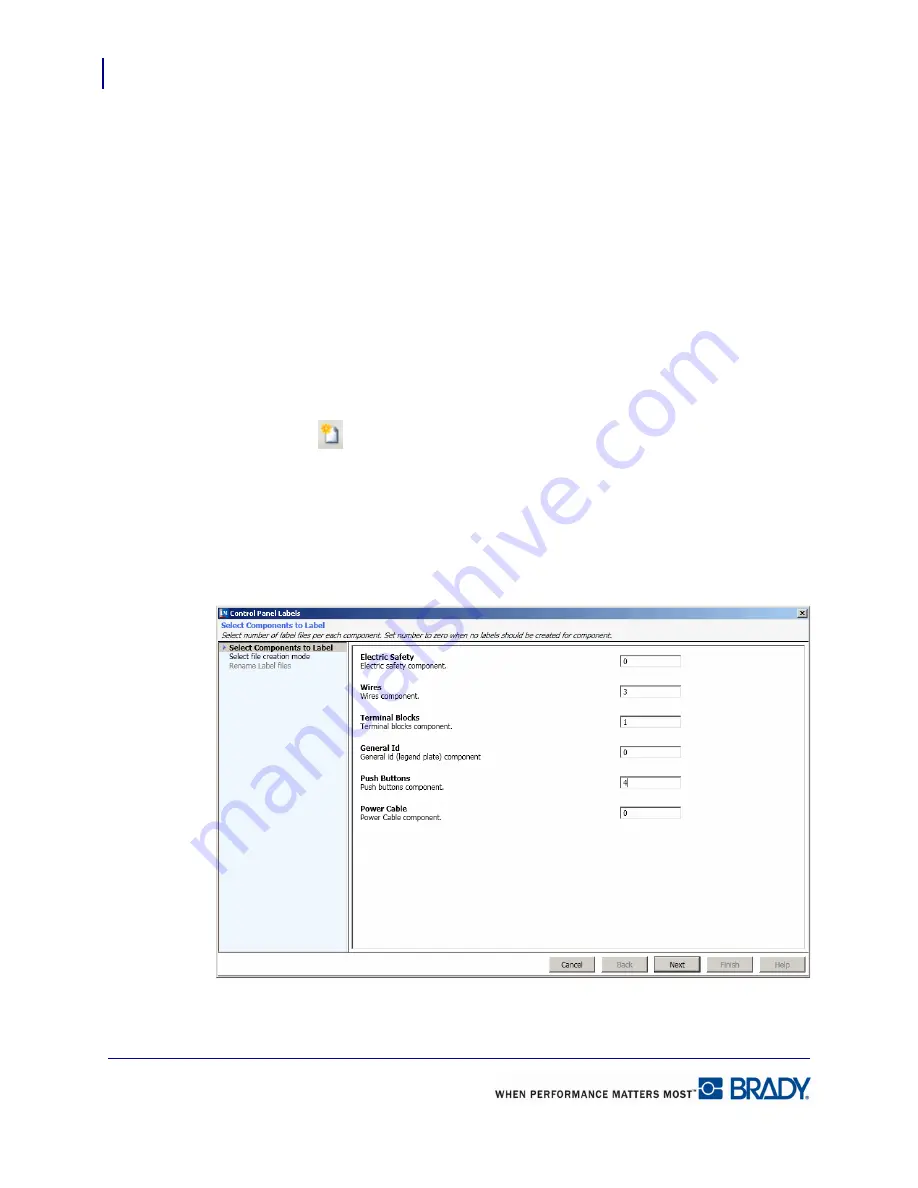
Use the Control Panel wizard to create labels used on various types of control panels, 
including wire, face plate, push button, and terminal block. To use the Control Panel wizard:

1.

Click New 

.

2.

On the Create New/Open dialog box, click 

Use a wizard to create labels

.

3.

Click Control Panel Label, then click OK.

4.

In the fields opposite the Control Panel types, enter the number of label files to create for 
each component type. 

Содержание LabelMark 5.0

Страница 1: ......

Страница 2: ......

Страница 3: ...ation or use of any product or system described herein nor any liability for incidental or consequential damages arising from the use of this document BRADY disclaims all warranties or merchantability...

Страница 4: ...tation and any copy made by you remain the property of Brady or its suppliers Unauthorized copying of the software or the accompanying documentation or failure to comply with the above restrictions sh...

Страница 5: ...ages so the above limitation may not apply to you 6 GENERAL This Agreement shall be governed by and interpreted under the laws of the State of Wisconsin USA You acknowledge that U S law and regulation...

Страница 6: ...nical Support Technical Support Numbers On line Help For repair or technical assistance find your regional Brady Tech Support office by going to In the Americas www bradyid com In Europe www bradyeuro...

Страница 7: ...ted 9 Graphical Label Design 9 Create New Label File 10 Searching the Master Parts List 11 By Printer Compatibility 12 By Width or Height 12 Editor 13 View 13 Two Sided Labels 14 Label Copies 14 Go To...

Страница 8: ...Text 44 Delete Text 44 Select Multiple Characters 45 Find Replace 46 Text Element Properties 49 Flip Flop 51 Image Element 56 Add an Image 56 Resize Image 57 Move the Image 57 Image Properties 58 Lin...

Страница 9: ...pening a File 95 Open Upon Launch 95 File Properties 97 Job Files 99 Create a Job File 99 Add Label Files 99 Save Job File 100 Open a Job File 100 Remove a Label File 102 Printing a Job File 103 Selec...

Страница 10: ...rosoft Visio 137 Selected Data 137 Export All Text Items 139 Microsoft Excel 145 AutoCAD 151 Export All Text Items 153 Export Current Selection 156 Manage Data Import Schemes 157 Edit a Scheme 157 Cre...

Страница 11: ...an open multiple label files The number of files that can be opened at any one time is constrained by system memory and resources Application Window Open files display as tabbed documents the name of...

Страница 12: ...window the status bar displays relevant information about the label and media on which you are working The status bar contains the selected label part number and total number of labels in the current...

Страница 13: ...Opens a previously saved label file template or job Saves label files templates or jobs Displays information about printers currently available to LabelMark Sends a label file or template to the prin...

Страница 14: ...cal Text Alignment used to vertically align elements on a label to each other top middle bottom Horizontal Text Alignment used to horizontally align elements on a label to each other left center right...

Страница 15: ...available when in Graphical Label Design mode Selects elements on a label placing handles around the element to indicate it is selected Used to enter text on a label Used to insert a graphic on a lab...

Страница 16: ...he following default options Printer Units of Measure Language Allow graphical label design Show label copies user interface Format Options The Format Options is used to set the following default opti...

Страница 17: ...with many of the features of the LabelMark 5 0 software You can access the Help files at any time while working with the LabelMark 5 0 software To access Help 1 Choose Help User Guide OR Press F1 The...

Страница 18: ...adcrumb trail 1 Click the specific topic Help Search To get Help on a particular word or topic 1 Click Search tab 2 Enter the word or topic for which you are searching Note Note The search string is n...

Страница 19: ...you must be in Graphical Label Design mode If you do not select Allow Graphical Label Design the label part number selected will display with lines available only for text When you select a part numbe...

Страница 20: ...n the process of designing a new label The Create New dialog box defaults to the master Parts List The Parts List is a list of media stock the part name being the identifying code given to the specifi...

Страница 21: ...arch field further filters those 100 results to a more narrow list It does not search the entire database again Likewise if the data from the second search field is removed the results returns to the...

Страница 22: ...he field This deletes the selected entry and immediately displays the Master list or abstracted list that existed before the Printer Compatibility field was selected By Part Family The Part Family ref...

Страница 23: ...located at the top and on the left side of the Editor are visible when a single label is viewed The ruler measurement units are based on the measurement units that you set in the Options function See...

Страница 24: ...s toggle button When viewing the toggle button displays next to each label indicating that you can set different number of copies for each label The summation of copies for each individual label displ...

Страница 25: ...ew you are in single or multiple labels you can move to different labels in the file using the Go To function To go to a specific label if the label is not visible on the screen 1 Choose Edit Go To La...

Страница 26: ...tatus Bar To go to the a specific label in the file 1 Highlight the current number in the Label Navigation numbered field 2 Enter the number of the label you want to go to 3 Press Enter To move to the...

Страница 27: ...the label so it will fit the current width of the Editor window The Editor supports horizontal and vertical scrolling when displayed elements do not fit the display area To zoom in or out of a label 1...

Страница 28: ...e 1 Drag the zoom control button to the right of the scale to increase the size 2 Drag the zoom control button to the left of the scale to decrease the size As you drag the zoom button the zoom percen...

Страница 29: ...label above If on a label element selects the element above the current element If on the last element moves to the label above selecting the bottom element on that label Move Down If a label is selec...

Страница 30: ...Element Up Nudges a selected element up by one grid unit Nudge Element Down Nudges a selected element down by one grid unit Nudge Element Left Nudges a selected element left by one grid unit Nudge El...

Страница 31: ...upports undo redo Clipboard Paste Pastes the contents from the clipboard onto a selected label This action s supports undo redo Undo Undo the last action Puts the element or label back to the state it...

Страница 32: ...d to select a range of contiguous labels Contiguous refers to labels next to each other This function does not apply to elements Scroll Up Down Scroll Wheel If vertical scrolling is enabled scrolls th...

Страница 33: ...displays around the label indicating that label is selected i e the focus is directed to that label 2 Type the text Graphical Label Design If using Graphical Label Design mode to add text 1 Click on t...

Страница 34: ...bel file displays at 100 as they will print on the selected printer 2 To view labels close up click Zoom In 3 Click Zoom Out to lower the zoom percentage 4 Click Fit to Width to display labels across...

Страница 35: ...default only one copy of labels containing data prints at a time Set the range of labels to print By default all labels with data print For 2 sided sleeve material select which side to print side one...

Страница 36: ...information prints correctly on the labels 3 Adjust the print position if needed by entering the horizontal and vertical position in the Print position adjustment field Note Note Use numbers to enter...

Страница 37: ...Sub Total cell determines how many labels will print based on the selected range and the number of copies of that range Click the Sub Total cell to refresh the screen If in the Label copies field of...

Страница 38: ...Print a Label File Print Dialog Box 28 LabelMark 5 0 User s Manual...

Страница 39: ...ements Note Note To use any of these elements you must be in Graphical Label Design This option is set in the Create New Open dialog box or in the Tools Options dialog box If this option is not select...

Страница 40: ...sing the text element Click the mouse on the label where the text should begin The line length automatically increases as you enter text Selecting an Object In order to format edit size or move an ele...

Страница 41: ...ou may not be able to resize you can still move the graphic to a different area on the label Green on graphic elements Green handles indicate the graphic can be resized by dragging the handle in the d...

Страница 42: ...asso See Figure 2 on page 33 1 Position the mouse on a corner of the label just above below left or right of the elements you want to select DO NOT PLACE THE MOUSE ON AN ELEMENT 2 Drag the mouse diago...

Страница 43: ...k the element to display the handles 2 Choose Edit Lock Unlock Lock To unlock an element thereby freeing up an element for editing 1 Click the locked element to display the handles 2 Choose Edit Lock...

Страница 44: ...on a handle The mouse turns into a cross 3 Drag the element to the desired location on the label 4 When finished click anywhere on the screen to remove the handles from the element Properties When a...

Страница 45: ...ically to each other Because you are aligning elements to each other at least two elements must be selected in order to use the align function Figure 4 Example of vertical and horizontal alignment If...

Страница 46: ...2 Choose Format Align 3 Choose the alignment desired Center on Label To place an element text or graphic directly in the middle of a label vertically and horizontally use the center objects command 1...

Страница 47: ...the label as a group Z Order Elements can be stacked one on top of the other such as text over a graphic to form what appears to be one element Z Order refers to the arrangement order of the elements...

Страница 48: ...appear to move off the label To rotate an element 1 To display handles click the element to rotate 2 Choose Format Rotate 3 Choose Rotate Right 90 OR Click to rotate the element clockwise OR 4 Choose...

Страница 49: ...ved from the label Undo Redo The Undo function undoes the last action taken whether editing an element adding information or deleting data It puts the element or label back to the state it was in befo...

Страница 50: ...abel 1 Click the label to copy 2 Choose Edit Command Multiplier 3 Click Copy Label radio button if not already selected 4 In the Apply to field click the down arrow and select the desired option 5 In...

Страница 51: ...apply the copied object 6 In the Number of times to repeat field enter how many times the object should be duplicated 7 Click OK Note Note Copying specific objects of a label adds those objects to th...

Страница 52: ...abel When you insert a new label the selected label and all following labels are pushed to the right and down the string of labels To insert a new label 1 Select the label in front of which the new la...

Страница 53: ...text entry press Enter to start a new line Adding Text To add text to a label when the Graphic Label Design function is turned on 1 Click the Text label object on the Action toolbar OR Choose Insert L...

Страница 54: ...er re displays and the cursor blinks at the beginning of the text string To add text to the text string 2 Click the mouse in the text string where the text should be added 3 Enter the text Delete Text...

Страница 55: ...e font and font size on all the selected characters at one time Action Procedure Drag Holding the left mouse button drag across the characters to highlight Shift Click 1 Click the left mouse button at...

Страница 56: ...If the data you are searching for occurs in upper or lower case exclusively enter the search string in the exact case you want to match then 3 Click Match case If you are searching from the middle or...

Страница 57: ...word in the Find what and Replace with field enter a space before and after the word That way you will avoid changing a word not meant to be changed For instance you want to change the phrase This is...

Страница 58: ...arch string and replacement text are correct you can replace the data on all the labels at one time After entering the search string and replacement text in the Find dialog box 9 Click Replace all All...

Страница 59: ...measured distance in the Left field Top Indicates the distance the top of the text element is from the top of the label For a more precise movement of the text element enter the measured distance in...

Страница 60: ...blank or enter 0 Expand Condense Expanding and condensing data affects the spacing between characters in a word giving the appearance of stretching or shrinking the word horizontally Data can be expan...

Страница 61: ...u do not need a flip character for top to bottom flip flop The system automatically transposes the top and bottom line of a multi line text string Figure 7 Vertical Flip Flop In a horizontal flip flop...

Страница 62: ...e word placing them at the beginning of the line You cannot put multiple flip characters in a line of text The Flip feature only acknowledges the first flip character it encounters ignoring the rest F...

Страница 63: ...l Top to Bottom Selected Object s On a label containing multiple text elements transposes only the element s selected Top to Bottom Selected Object s on New Label Duplicates all elements graphics and...

Страница 64: ...the label next to the original Left to Right Selected Object s On a label containing multiple text elements with flip characters transposes only the element s selected Left to Right Selected Object s...

Страница 65: ...er s Manual Remove Flip Character For horizontal left to right flipped elements after flipping remove the flip character 1 Click the flipped line of text to display handles 2 Choose Format Flip Flop R...

Страница 66: ...an change the height or width separately To get green handles on the entire image select Allow Stretching in the Image Properties box You can change the file from which the graphic is created once the...

Страница 67: ...to resize the image diagonally maintaining the aspect ratio changing the width and height of the image at the same time To resize 1 Position the mouse on one of the handles 2 Drag the mouse to enlarg...

Страница 68: ...d or resized Printable This option box is selected by default Remove the checkmark if you do not want the particular image to print on the label Height Use this field to indicate an exact height of th...

Страница 69: ...eft field Top Indicates the distance the top of the image element is from the top of the label For a more precise movement of the image element enter the measured distance in the Top field Allow Stret...

Страница 70: ...e When on the label the mouse displays as a cross 2 To draw a line hold the left mouse button and drag the mouse from the starting point of the line to the end point OR To draw a square or rectangle h...

Страница 71: ...resized Printable This option box is selected by default Remove the checkmark if you do not want the particular line element to print on the label Rotation Use this field to achieve a custom rotation...

Страница 72: ...edge of the label Decreasing the size of End Point X is the same as dragging the right handle of the line toward the left thereby shortening the line End Point Y Indicates the distance the bottom edge...

Страница 73: ...this option box to protect the rectangle element from being moved or resized Printable This option box is selected by default Remove the checkmark if you do not want the particular rectangle element t...

Страница 74: ...edge of the label For a more precise movement of the rectangle element enter the measured distance in the Left field Top Indicates the distance the top of the rectangle element is from the top of the...

Страница 75: ...ctual text that makes up the barcode display Barcode elements support vertical resizing height only The width of the barcode is based on data and symbology and cannot be changed Like any other element...

Страница 76: ...66 LabelMark 5 0 User s Manual Barcode Properties The following options are displayed in the Barcode properties box Note Note The barcode properties may vary depending on the barcode symbology type us...

Страница 77: ...ance in the Left field Top Indicates the distance the top of the barcode element is from the top of the label For a more precise movement of the barcode element enter the measured distance in the Top...

Страница 78: ...es i e number and thickness of bars and spaces The type of barcode to use depends on industry standards or specific need To change the barcode type 1 In the Barcode Type field click the down arrow 2 S...

Страница 79: ...ode Ratio Indicates the ratio of bar height to symbol length Not all barcode types allow you to change the ratio If you are using a Barcode Type that does not support this option the Ratio field will...

Страница 80: ...pplies to all labels containing that object To edit or change parameters of data bound objects 1 Select the bound object on one of the labels 2 In the Properties dialog box to the right click Edit Dat...

Страница 81: ...Objects A confirmation box displays 3 Click Yes to split the linked object The individual data element split out from the other linked data can now be repositioned or formatted individually from its...

Страница 82: ...dual labels 1 Select the data on the label that you want to delete 2 Press DELETE key OR Click X on the Standard toolbar OR Choose Edit Delete The following information box displays To delete all occu...

Страница 83: ...exception that you cannot edit the date by typing You must use the Date and Time function dialog box to set the date You can apply the date time stamp to the current label where the element is placed...

Страница 84: ...t want to create a Custom format proceed to Step 10 Otherwise to create a custom format 3 Click the Use custom format radio button 4 Click the Edit button Figure 16 Date Time custom format 5 On the Da...

Страница 85: ...0 Click Use computer date time value radio button then proceed to Step 18 To print a future or past date on the label 11 Click Use this value radio button 12 In the displayed date entry box double cli...

Страница 86: ...will display the date time is provided in the Date time will be applied to label s field 20 Click OK The Date Time element displays in the upper left corner of the labels to which it is applied If you...

Страница 87: ...te time element first displays in the upper left corner of the label Move this element to the desired location on the label Remove Date Time Element To remove a Date Time element 1 Click the date time...

Страница 88: ...is always on display at the bottom of the workspace Errors and Information Window Figure 17 Label Errors and Information window While you cannot remove the Errors and Information window from the works...

Страница 89: ...in the Errors and Information window 1 Click Check Label Errors OR Choose Edit Check Label Errors LabelMark determines which labels have errors and places them in a list The window header displays the...

Страница 90: ...and manually make the adjustments To access the individual label 3 Click the Go To link in the list 4 Make the adjustments 5 Repeat Steps 3 and 4 above to access and adjust other labels with errors 6...

Страница 91: ...label part To change the label part 1 Choose Edit Change Label Part 2 From the list provided select the label part to use 3 Click OK If the data elements do not fit properly on the new label part a m...

Страница 92: ...mark you can default the system to always apply the Wiremark format The default is set in Tools Options Format Options The label divides displaying a blue border around the original text being entered...

Страница 93: ...t of the sequence The Increment is the value that is added to the previous number in the sequence to produce the next sequence number You cannot have an increment value of 0 For instance a start value...

Страница 94: ...to as many labels as needed The serialization number or characters are placed at the top left corner of the label Once the serialization is completed you can move the serialized numbers characters to...

Страница 95: ...ype in the Custom Text field enter the unique text characters you want to use for the serialization Example Unique text Brady When serializing the B would display on one label the r on the next label...

Страница 96: ...he Prefix or Suffix checkbox The Data Preview field displays a sample of how the serialization is applied Figure 1 Simple serialization using a prefix 11 When finished click Finish The serialization d...

Страница 97: ...anced option to serialize data 3 Click Next To access Set Number of Components screen 4 Click Next again 5 Indicate if you want to serialize text or barcodes by clicking the appropriate radio button T...

Страница 98: ...eview composite string screen displays with the components set up in a grid Edit Components You can edit the component strings start value step value etc directly in the grid As you edit the strings t...

Страница 99: ...ring before other components begin to increment Priority 2 A component assigned the priority of 2 does not start incrementing until the priority 1 component reaches its end value Priority Where repres...

Страница 100: ...e dialog box will immediately bring up the blank component string screen where you can re enter data 3 In the Number of Labels field enter the number of labels to which the serialization should be app...

Страница 101: ...want to use the generic scheme name highlight SerializationScheme1 lms and enter a unique name You do not have to enter an extension The extension lms will automatically be applied to the name 12 For...

Страница 102: ...abels it makes no difference on which label you select the characters 2 Press Delete key OR Choose Edit Delete OR Click the delete button on the Standard toolbar 3 Follow the instructions on the pop u...

Страница 103: ...numbers spaces and some special characters When devising a name for the file try to code it in a way that will help you remember what the label contains Note Note When creating files saving label cont...

Страница 104: ...d file still being displayed To remove the saved file from the screen 7 Click the X on the Label Name tab OR Choose File Close Active Tab Save Changes If you have not yet saved a file or have edited i...

Страница 105: ...layed click the file to open Note Note Depending on where you have stored the file locate the directory containing the file according to normal Windows procedures 3 Click Open The label file displays...

Страница 106: ...New Open dialog box from the list of previously created documents click the desired file If the file you want is not in the list 3 Click Browse 4 Using normal Windows directory function procedures lo...

Страница 107: ...aved date if the file has been saved the label part number used for the particular file and the author of the file displayed as their login user id The Description field of the File Properties box is...

Страница 108: ...Description field and enter any descriptive data desired 3 Click OK To view or edit the File Properties for the active label file 1 Choose File File Properties When finished 2 Click OK If you are onl...

Страница 109: ...r ribbon colors This eliminates the need to constantly change parts or run the risk of having the wrong media or ribbon installed for the job at hand Create a Job File To create a job file 1 Choose Fi...

Страница 110: ...file for future use To save the job file 1 Choose File Save OR Click Save 2 In the File name field enter a name for the job file following normal Windows file naming standards and directory Browse fea...

Страница 111: ...ore subdirectories contained in that particular directory To list the subdirectories contained in a particular directory 3 Click the in front of the folder icon When you select the directory all job f...

Страница 112: ...file from a job file with the job file open 1 Click the label file to remove 2 Click Remove OR to clear all label files from the job file Click Remove All 3 Click OK to confirm the removal Note Note Y...

Страница 113: ...Manual Printing a Job File Each label file in the job file can be sent to a different printer if desired Select a Printer To select the printer that will print the specific label file 1 In the Printer...

Страница 114: ...Click the label file to print Note Note Use Ctrl Click to select multiple label files to print at one time 2 Click Print Note Note You can also click the Print icon in the standard toolbar to print th...

Страница 115: ...n to print File label copies or All labels If you select File label copies the number of copies is determined by the Label Copies toggle button next to each label in the file See Label Copies on page...

Страница 116: ...to a job file you may want to list specifics of the file for easy identification To enter details 1 In the Job File select the label file to which you want to add details 2 Click Details tab 3 In the...

Страница 117: ...alog box or from Windows Explorer To delete a job file from Manage Job Files 1 Choose Tools Manage Jobs 2 In the directory displayed on the left click the folder containing the job file to delete 3 In...

Страница 118: ...e Tools Manage Jobs 2 In the directory tree on the left side click the directory name containing the files that you want to open 3 With the list of Job Files displayed on the right click the job file...

Страница 119: ...ick the Favorites tab in the Manage Jobs window Search for Job Files If you have many job files stored in different directories it may be difficult to locate all of them Use the Search feature in the...

Страница 120: ...esults Matching any criteria is considered an Or operator meaning that only one of the specified conditions criteria supplied in the various criteria sections has to be met in order for the record to...

Страница 121: ...arch 5 In the To field click the button to the right 6 Using the calendar displayed click the End date for the search When the search is launched LabelMark will search for those files that were create...

Страница 122: ...Job Files Favorite Job Files 112 LabelMark 5 0 User s Manual...

Страница 123: ...generic name then enter a unique name for your custom part 6 The Printer Compatibility field lists the printer most often associated with the particular label Click the up down toggle button to acces...

Страница 124: ...You can add or subtract columns and rows to the label by clicking the Add Column Delete Column buttons or Add Row Delete Row buttons 13 Adjust the Vertical Gap to provide more or less space between r...

Страница 125: ...m part number 1 Click Zones tab 2 Click Add Zone The zone displays with handles green circles around arrows pointing in four different directions This indicates that the zone is selected 3 If multiple...

Страница 126: ...rea the Check Errors feature will indicate that the data does not fit 6 In the Zone Shape field click the down arrow and select the shape of the zone If using a Rounded Rectangle shape you can adjust...

Страница 127: ...folder click Save The Custom part is now available for other users to import Import Custom Parts To use custom parts created by other users you must import it To Import a custom part 1 Choose Tools M...

Страница 128: ...list 1 Choose Tools Manage Custom Parts 2 In the Custom Parts list click the part to remove 3 Click Delete button OR Press Delete key 4 Click Yes in the delete confirmation box The custom part is rem...

Страница 129: ...tes To create a Favorites list 1 Choose Tools Manage Favorite Parts 2 In the Master Parts List click the part number you want to add to your favorites list 3 Click Add 4 Repeat as necessary to add the...

Страница 130: ...as been designed If data remains in the By Part Name field when you select Printer Compatibility the returned part numbers will be narrowed further first by what is in the By Part Name field then with...

Страница 131: ...es LabelMark5 0 User s Manual Using Favorites To use parts from your Favorites when creating a new label file on the Create New dialog box 1 Click the Favorites tab From the list of favorites click th...

Страница 132: ......

Страница 133: ...ber s of the part number for which you are searching As you add letters or numbers in the filter the list automatically displays only those part numbers containing the sequence of letters or numbers 3...

Страница 134: ...0 User s Manual If custom part numbers have been added to LabelMark see Managing Custom Parts on page 102 to pair a custom part with a printer 9 On the Manage Printer Part Pairings screen click Custo...

Страница 135: ...ted from a spreadsheet or a database the data will be placed at the top left of the label If only one field is added each record is placed on a different label at the top left corner of the label If a...

Страница 136: ...e select the Delimiter character that is used to separate the fields 5 Click Select File 6 Using standard Windows Explorer procedures locate and select the external file to import then click Open 7 Cl...

Страница 137: ...umns of data that you want to import then click the right pointing arrow The wizard automatically selects all fields on a worksheet To limit the columns of data to just a few in the Selected Columns s...

Страница 138: ...port the Advanced Options lets you limit the number of records brought over by querying the database You can also sort the imported data To use the Advanced Options 1 Choose Insert External Data 2 On...

Страница 139: ...ow button This presents a larger screen to view the element changes To exit out of this larger display click the Close at the bottom of the screen You are returned to the wizard 8 Repeat for each colu...

Страница 140: ...ional operators are mathematical symbols that help state the argument by indicating an operation on a range of data The relational operators are Equal to Must match criteria exactly Not equal to Finds...

Страница 141: ...In the Value field enter the data or partial data on which you want to filter Note Note This is the actual data that exists in that field 4 Click Add You can create a complex query by adding the logic...

Страница 142: ...AND or OR again and repeat Steps 1 through 4 above If you are done supplying conditional data you do not have to select AND or OR in the last element of the conditional statement 9 When finished enter...

Страница 143: ...econdary or tertiary sort 3 In the Then By field click the down arrow and select the second or third field on which to sort Note Note You do not have to sort at all Likewise you can sort on only one f...

Страница 144: ...el data in the Label copies field indicate how many copies you would like Note Note Copies means exactly that If indicating copies you will get the number of copies specified plus the original For ins...

Страница 145: ...ck the Yes radio button if not already selected The File Name field contains a temporary file name and the default data scheme file directory You can use this temporary name or enter a unique name To...

Страница 146: ...import scheme 4 Click Finish Refresh Data The data scheme displays the source data that was current when the data scheme was saved If the source data file has been updated since the last time the data...

Страница 147: ...nside the Visio program Selected Data To export selected data from a Visio drawing 1 Open the Visio drawing containing the items to export 2 Using the lasso technique select the items to be exported 3...

Страница 148: ...ion was not as accurate as you would like click Deselect OR click some other part of the drawing that was not in the selection 9 To place the image back to its original selection click Reset Note Note...

Страница 149: ...only the text on all drawings on every page of the Visio document will be exported You will not be able to send shapes or connector lines To export just the text items with the Visio drawing open 1 Cl...

Страница 150: ...st To view the contents of each added field click the Field tab in the Selected Fields section 9 To remove an added field click the Field tab to display the data that you want to remove 10 Click Remov...

Страница 151: ...numbers but the field is blank You can now add data following previous Steps 3 and 4 14 Click Next 15 Select the label part number to use then click Next If you added more fields the fields are displa...

Страница 152: ...ot fit on the Check for Errors window click Autofit All 22 If Autofit All does not clear the error click Back then reposition the offending item 23 Click Next to advance Note Note Rather than clicking...

Страница 153: ...reen to save the file with a name other than the generic name highlight the generic file name and type the unique name directly over it Use Browse to locate the directory in which you want to save the...

Страница 154: ...Microsoft Visio 144 LabelMark 5 0 User s Manual...

Страница 155: ...Excel program To export data to LabelMark from Excel 1 Open the Excel spreadsheet containing the data you want to export 2 Click Export to LabelMark 5 tab 3 Click the in front of Sheet in the Source...

Страница 156: ...appearance of each individual data object text or barcode and or reposition it on the label To move to the different added fields click above the field list To view the contents of each added field cl...

Страница 157: ...to remove 12 On the field tab click the data to be removed 13 Click OR if you want to remove all the data on the field tab click The added field remains maintaining the sequence numbers but the field...

Страница 158: ...utofit All does not clear the error click Back then reposition the offending item 22 Click Next to advance Note Note Rather than clicking Next or Back a number of times to advance or move back in the...

Страница 159: ...ded will determine how many labels will generate For instance if you have three data items in Field 1 two data items on Field 2 and four data items on Field 3 you will get a total of four labels with...

Страница 160: ...Microsoft Excel 150 LabelMark 5 0 User s Manual...

Страница 161: ...drawing you are importing has a black background i e the drawing displays as a negative white lines on black background click Yes on the Mode Selection information box to display the drawing as black...

Страница 162: ...ck Next 12 Click the drop down arrow and indicated on which labels the items should be displayed 13 Indicate on which label the data should start and on which label the data should end 14 Click Next 1...

Страница 163: ...data on all pages 1 Click the LM button 2 Click All text items You can select which items to export and place them in different fields 3 Click the in front of the AutoCAD Export Root Node This display...

Страница 164: ...n the page lists to be added to that field and click 6 To move to the different fields click above the field list 7 When finished setting up fields and data click Next 8 Select the label part number t...

Страница 165: ...label Repeat for each field To display the field as a barcode rather than text 12 Click the field object to change 13 Click Barcode 14 When ready click Next 15 If the data does not fit on the label th...

Страница 166: ...within the lines in order to select then click Crop This takes just the selected portion of the image 7 If you selected the wrong part or the selection wasn t as accurate as you would like click Desel...

Страница 167: ...k the scheme you want to edit The layout specifics of that particular scheme is displayed on the right side of the screen 3 Click Edit The Select Fields screen displays The following screens in the wi...

Страница 168: ...hemes 2 Click Create new 3 Complete the wizard as you would when inserting External Data Be sure to give the file a name before exiting the wizard Apply to Label File You can apply the scheme to the s...

Страница 169: ...el file You can change the parameters of existing serialization schemes or create new ones Edit a Scheme To edit the scheme 1 Choose Tools Manage Data Serialization Schemes 2 Click the scheme you want...

Страница 170: ...he wizard as you would when creating an advanced serialization routine see page 87 Be sure to give the file a name before exiting the wizard Apply to Label File You can apply the scheme to the same fi...

Страница 171: ...new Template File 3 Click a Part Name Number to use for the template 4 Click OK Note Note You may want to check Allow Graphical Label Design if it is not already selected With free form text entry you...

Страница 172: ...late Note Note The template will automatically be saved in the Templates folder of LabelMark 9 Click Save Use a Template To use a template to create labels 1 Choose File New OR Click New 2 In the Crea...

Страница 173: ...en 4 Make the desired changes to the template If updating a template when finished 5 Choose File Save OR Click Save If creating another template from the established template when finished making the...

Страница 174: ...n LableMark 5 0 Standard edition Control Panel Labels Use the Control Panel wizard to create labels used on various types of control panels including wire face plate push button and terminal block To...

Страница 175: ...k the desired part number from the specific list presented OR Select a template on which to base the file 7 Repeat for each component listed 8 When ready click Next On the Rename Label files screen yo...

Страница 176: ...ot add label files to any job file To create a new job file proceed to Step 15 If you do not want to add label files to any job file proceed to Step 18 To add to an existing job file 12 In the list of...

Страница 177: ...job file 17 Click Finish The labels are displayed in the job file AND as individual label files 18 If you do not want to add the new label files to any job file deselect all the label files then click...

Страница 178: ...els 3 Click Wire Harness Labels then click OK 4 There is only one Wire Harness label type In the fields opposite the Wires component enter the number of label files to create for the Wire Harness You...

Страница 179: ...file or not add label files to any job file To create a new job file proceed to Step 15 If you do not want to add label files to any job file proceed to Step 18 To add to an existing job file 12 In th...

Страница 180: ...k 5 0 User s Manual A message displays indicating that no job file will be created and or no labels added to a job file 19 Click Yes to proceed with the creation of the label files but no job file The...

Страница 181: ...as created is based on the pair configuration selected Vertical and horizontal separator lines are automatically added The following example displays the areas based on the wire pairs selected i e 2 p...

Страница 182: ...se the 110 Block Wizard 1 On the Create New Open dialog box click Use a wizard to create labels 2 In the list of wizards click 110 Block Labels then click OK A list of applicable label part numbers di...

Страница 183: ...down arrow and select the block type desired i e Horizontal or Backbone Horizontal increments one number per area based on the start value 8 In the Start field indicate the number with which to start...

Страница 184: ...eate a new job file or not add label files to any job file To create a new job file proceed to Step 17 If you do not want to add label files to any job file proceed to Step 20 To add to an existing jo...

Страница 185: ...idual label files If you do not want to add the new label file to any job file 20 Click Select Deselect All option box to remove the checkmark If the checkmark remains the new label file will be added...

Страница 186: ...d To access the wizard 1 On the label click one of the label objects containing the 110 block serialization 2 In the Properties box click Edit Data Bound Objects OR Choose Edit Edit Data Bound Objects...

Отзывы: