86
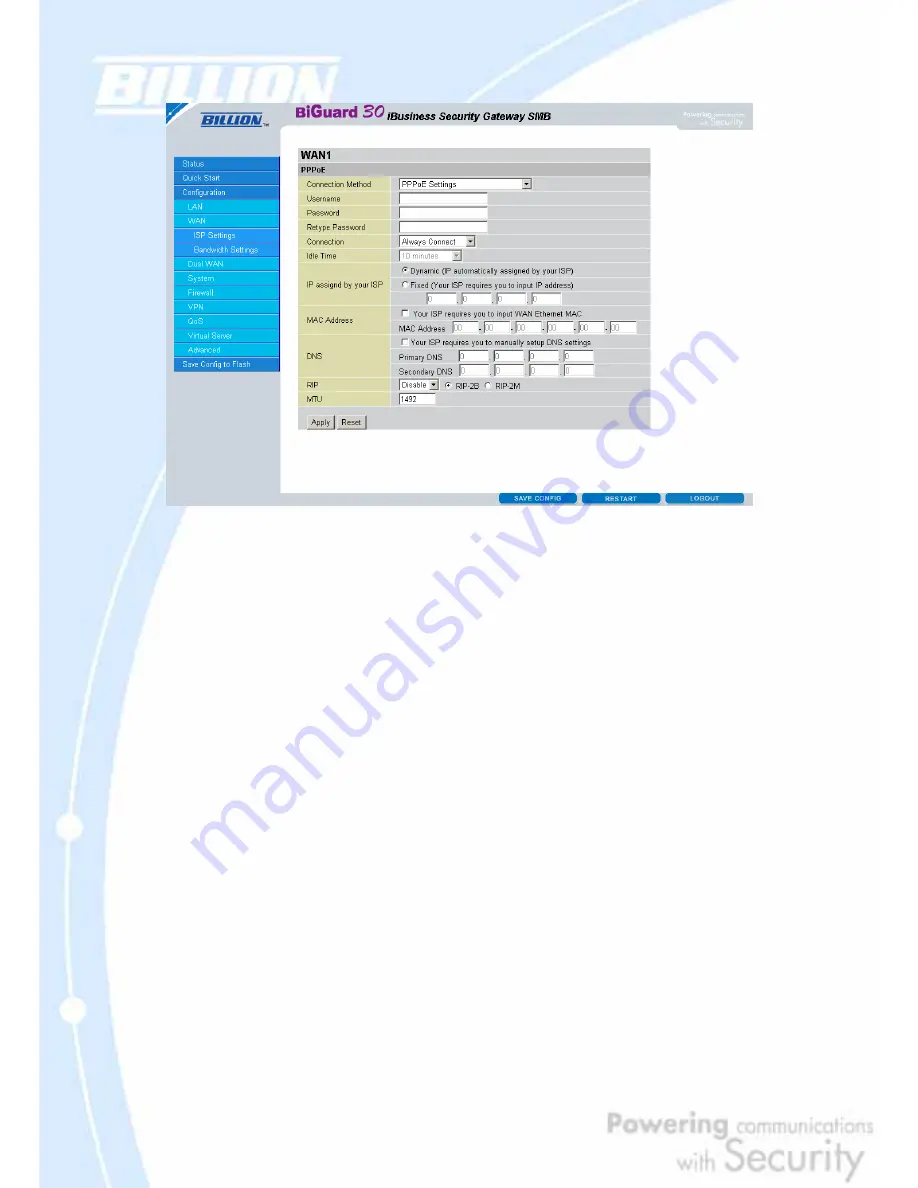
Username: Enter your user name.
Password: Enter your password.
Retype Password: Retype your password.
Connection: Select whether the connection should
Always Connect
or
Trigger on
Demand
. If you want the router to establish a PPPoE session when starting up and
to automatically re-establish the PPPoE session when disconnected by the ISP,
select
Always Connect
. If you want to establish a PPPoE session only when there
is a packet requesting access to the Internet (i.e. when a program on your computer
attempts to access the Internet), select
Trigger on Demand
.
Idle Time: Auto-disconnect the router when there is no activity on the line for a
predetermined period of time. Select the idle time from the drop down menu. Active
if
Trigger on Demand
is selected.
IP Assigned by your ISP: If your IP is dynamically assigned by your ISP, select the
Dynamic
radio button. If your IP assigns a static IP address, select the
Static
radio
button, and input your IP address in the blank provided.
MAC Address: If your ISP requires you to input a WAN Ethernet MAC, check the
checkbox and enter your MAC address in the blanks below.
DNS: If your ISP requires you to manually setup DNS settings, check the checkbox
and enter your primary and secondary DNS.
RIP: To activate RIP, select
Send
,
Receive
, or
Both
from the drop down menu. To
disable RIP, select
Disable
from the drop down menu.
MTU: Enter the Maximum Transmission Unit (MTU) for your network.
Содержание BiGuard 30
Страница 1: ...BiGuard 30 iBusiness Security Gateway SMB User s Manual Version Release 5 00 FW 1 03...
Страница 46: ...46 2 Double click the Network icon The Network window displays a list of installed components...
Страница 48: ...48 c Select the manufacturer and model of your Ethernet adapter then click OK If you need TCP IP a Click Add...
Страница 51: ...51 2 In the Control Panel double click Network and choose the Configuration tab...
Страница 171: ...171 Main Aggressive mode peer ID is identifier string ISAKMP SA Established IPsec SA Established...
Страница 182: ...182 Step 4 From the same menu set the WAN2 DDNS settings Step 5 Click Save Config to save all changes to flash memory...
Страница 190: ...190 Step 4 Go to Configuration Advanced Dynamic DNS and input the dynamic DNS settings for WAN1 and WAN2 WAN1...
Страница 191: ...191 WAN 2 Step 5 Go to Configuration Virtual Server and set up a virtual server for both FTP and HTTP...
Страница 207: ...207 Step10 Input PPTP Server Address and press Next Step11 Please press Finish...
Страница 211: ...211 Step5 In another BiGuard as Client Go to Configuration WAN ISP Settings Step6 Click Apply and Save CONFIG...


