


182
Camera Setup
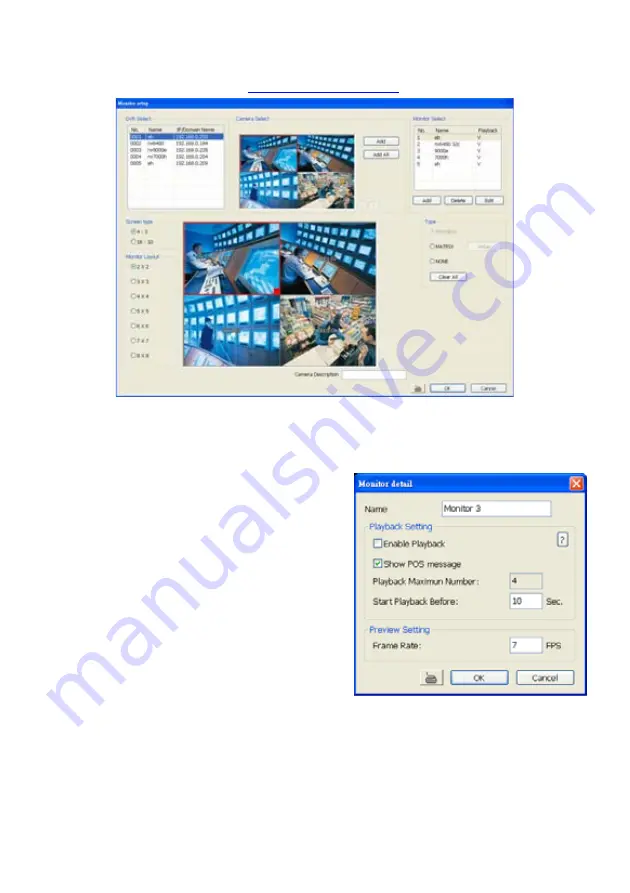
Select the camera from different DVR servers in order to monitor in one group. The selected cameras
will be played on
Monitor
screen (see
Using the iMatrix Application
).
1. Click
Setup
.
2.
In the Authorization dialog box, enter the administrator User ID and Password.
3. Click
Camera
.
4. Click
Add
to create a monitor set. The monitor set can be added up to 1000 monitor set. Click
OK
to save the setting.
Name:
Enter a name for the monitor set (12
characters only).
Playback Setting
-
Enable Playback:
Enable/disable to
allow playback on monitor screen.
-
Show POS message:
Enable/disable
display POS information on monitor
screen.
-
Start Playback Before:
Enter the time
(sec.) when start playback will start from
the present time backward the time user
has setup.
Preview Setting
-
Frame Rate:
User can set the camera
transmitting
Frame Rate
for preview, but
the real transmitting frame rate depends
on camera setting.
5.
After the Monitor set has been created, select the DVR server. And then the camera channels of
the DVR server will display on the
Camera Select
window. User can combines different cameras
from different DVR servers as a monitor set. And all camera channels can be selected by
different Monitor set raptly. Click
<
and
>
to go back previous and go to next camera screen.
6.
User can depend on the monitor size to select the screen type –
4:3
(regular screen monitor) or
16:10
(width screen monitor). The 4:3 and 16:10 screen type support different monitor layout.
7.
Select the camera that user wants to add, and then click
Add
button. To add all the cameras,
click
Add All
. The selected camera channel will be added to
Monitor Layout
window. User can
add up to 64 cameras in 4:3 screen type and 80 cameras in 16:10 screen type. To remove the
camera from the
Monitor Layout
window, select the camera and right-click to select
Recover
.
Содержание NX 8000 series
Страница 1: ...AVerMedia NX8000 NXU8000 series User Manual April 2009...
Страница 10: ...2 1 2 NX8000 Series Card Parts I O connector Reset pin Watchdog pin TV OUT Audio OUT Relay Sensor Port...
Страница 24: ......
Страница 34: ...26 9 User can select the Date Camera and Cycle to view the report of object counts In Out...
Страница 58: ...50 i The UPS application must meet Windows XP or Windows Vista system requirements...
Страница 78: ...70 Region 1 Object size frame Region 2 Object counting information display...
Страница 81: ...73...
Страница 96: ...88 13 To view the all I O devices information click I O Map...
Страница 199: ...191 4 Mark the UPnP Framework check box and click OK...


