User Manual – Rev J
CS Series
California Instruments
94
4. Adjust the calibration value so the output phase angle is calibrated. Press the ENTER
key to save the calibration.
Repeat step 1) through 4) for the Phase C output.
6.7
Non-Routine Output Gain Calibration
If the Current Limit board assembly (P/N 7004-703-3) is replaced in the field or one of the
amplifiers has been replaced, it is necessary to check the gain of each phase and adjust as
needed.
WARNING:
This requires the top cover to be removed and should be done by qualified
service personnel only. Dangerous Voltages are present inside the AC power
source.
6.7.1
Output Signal Gain Adjustment
Note: For multi-box power systems, eg. 9000CS/2, the output signal gain adjustment
should be done with only the Master power source. Remove all auxiliary power
sources and disconnect the system interface cable to the Master power source.
To adjust internal output gains, proceed as follows:
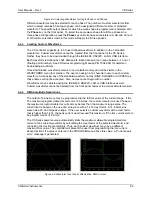
1. Loosen the top cover and slide back until the Current Limit board assembly (P/N 7004-
703-3) is uncovered. This is the vertical board directly behind the CPU/Controller board.
Refer to Figure 6-1.
Figure 6-1: Location of Gain pot adjustments
2. Go to the Output Calibration screen by repeatedly pressing the MENU key until OUTP
CAL is displayed.
Содержание 13500CS/3
Страница 5: ...User Manual Rev J CS Series California Instruments 5 SAFETY SYMBOLS ...
Страница 34: ...User Manual Rev J CS Series California Instruments 34 Figure 3 3 9000CS 2 Wiring diagram 3 Phase mode ...
Страница 35: ...User Manual Rev J CS Series California Instruments 35 Figure 3 4 13500CS 3 Wiring diagram 3 Phase mode ...
Страница 36: ...User Manual Rev J CS Series California Instruments 36 Figure 3 5 18000CS 4 Wiring diagram 3 Phase mode ...
Страница 56: ...User Manual Rev J CS Series California Instruments 56 The power source is now ready to be used ...
Страница 73: ...User Manual Rev J CS Series California Instruments 73 ...
Страница 111: ...User Manual Rev J CS Series CS Series 111 voltage rating 28 W Weight 22 Wiring AC input 30 ...

