Getting Started
P846/EN GS/D
MiCOM P846
(GS) 3-5
18
16
A
B
1
C
1
18
18
18
18
16
17
18
18
18
17
19
2
3
1
18
18
3
2
D
1
19
E
F
1
G
1
H
1
J
1
K
1
L
1
M
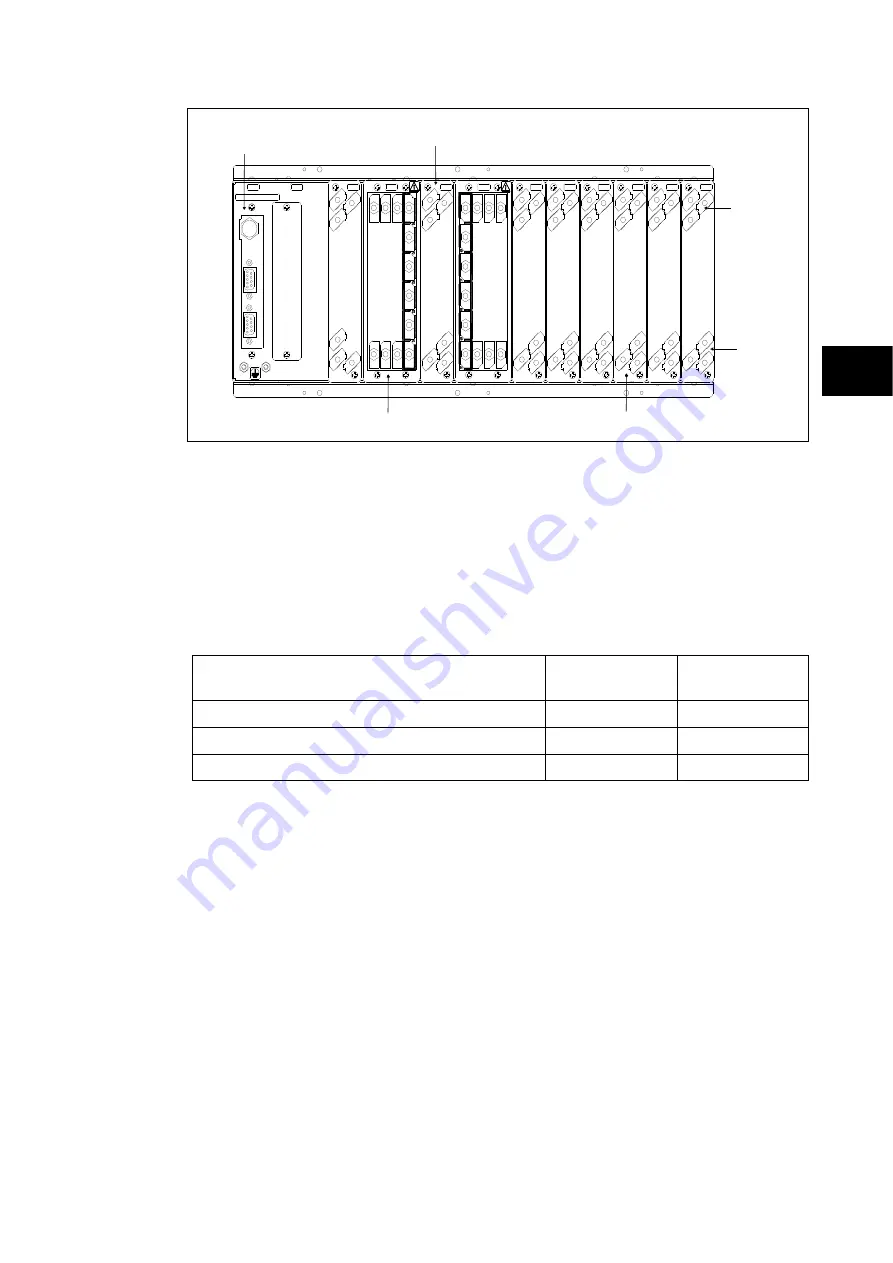
Current and Voltage
Input Terminal
Power Supply
Connection
Rear Comms
Port (EIA485)
Digital Input Connection
Digital Input Connection
IRIG-B and 2nd Rear
Comms Board
Digital Output Connection
GS
Figure 2: Relay rear view
Refer to the wiring diagram in the Installation section for complete connection details.
1.3
Relay connection and power-up
Before powering-up the relay, confirm that the relay power supply voltage and nominal ac
signal magnitudes are appropriate for your application. The relay serial number, and the
relay’s current and voltage rating, power rating information can be viewed under the top
hinged cover. The relay is available in the following auxiliary voltage versions and these are
specified in the table below:
Nominal Ranges
Operative dc
Range
Operative ac
Range
24 - 48V dc
19 to 65V
-
48 - 110V dc (30 - 100V ac rms) **
37 to 150V
24 to 110V
110 - 250V dc (100 - 240V ac rms) **
87 to 300V
80 to 265V
** rated for ac or dc operation
Please note that the label does not specify the logic input ratings. The P846 relay is fitted
with universal opto isolated logic inputs that can be programmed for the nominal battery
voltage of the circuit of which they are a part. See ‘Universal Opto input’ in the Firmware
section for more information on logic input specifications. Please note that the opto inputs
have a maximum input voltage rating of 300V dc at any setting.
Once the ratings have been verified for the application, connect external power capable of
delivering the power requirements specified on the label to perform the relay familiarization
procedures. Figure 2 indicates the location of the power supply terminals but please refer to
the wiring diagrams in the Installation section for complete installation details ensuring that
the correct polarities are observed in the case of dc supply.
1.4
Introduction to the user interfaces and settings options
The relay has three user interfaces:
−
The front panel user interface via the LCD and keypad
−
The front port which supports Courier communication
−
The rear port which supports one protocol of either Courier or DNP3.0. The protocol
for the rear port must be specified when the relay is ordered
−
2
nd
rear port
Содержание MiCOM P846
Страница 2: ......
Страница 4: ......
Страница 5: ...Safety Section P846 EN SS H11 SS SAFETY SECTION...
Страница 6: ...P846 EN SS H11 Safety Section SS...
Страница 8: ...P846 EN SS H11 Safety Section SS 2 SS...
Страница 16: ...P846 EN IT D Introduction MiCOM P846 IT...
Страница 18: ...P846 EN IT D Introduction IT 1 2 MiCOM P846 IT...
Страница 26: ...P846 EN TD D Technical Data MiCOM P846 TD...
Страница 38: ...P846 EN GS D Getting Started MiCOM P846 GS...
Страница 58: ...P846 EN ST D Getting Started MiCOM P846 ST...
Страница 60: ...P846 EN ST D Settings ST 4 2 MiCOM P846 ST...
Страница 78: ...P846 EN OP D Operation MiCOM P846 OP...
Страница 104: ...P846 EN OP D Operation OP 5 26 MiCOM P846 OP...
Страница 106: ...P846 EN AP D Application Notes MiCOM P846 AP...
Страница 108: ...P846 EN AP D Application Notes AP 6 2 MiCOM P846 AP...
Страница 122: ...P846 EN AP D Application Notes AP 6 16 MiCOM P846 AP...
Страница 124: ...P846 EN PL D Programmable Logic MiCOM P846 PL...
Страница 126: ...P846 EN PL D Programmable Logic PL 7 2 MiCOM P846 PL...
Страница 144: ...P846 EN MR D Measurements and Recording MiCOM P846 MR...
Страница 146: ...P846 EN MR D Measurements and Recording MR 8 2 MiCOM P846 MR...
Страница 160: ...P846 EN FD D Firmware Design MiCOM P846 FD...
Страница 182: ...P846 EN CM D Commissioning MiCOM P846 CM...
Страница 228: ...P846 EN CM D Commissioning CM 10 46 MiCOM P846 CM...
Страница 230: ...P846 EN MT D Maintenance MiCOM P846 MT...
Страница 232: ...P846 EN MT D Maintenance MT 11 2 MiCOM P846 MT...
Страница 238: ...P846 EN TS D Troubleshooting MiCOM P846 TS...
Страница 240: ...P846 EN TS D Troubleshooting TS 12 2 MiCOM P846 TS...
Страница 252: ...P846 EN SC D SCADA Communications MiCOM P846 SC...
Страница 272: ...P846 EN SG D Symbols and Glossary MiCOM P846 SG...
Страница 280: ...P846 EN SG D Symbols and Glossary SG 14 8 MiCOM P846 SG...
Страница 282: ...P846 EN IN D Installation MiCOM P846 IN...
Страница 284: ...P846 EN IN D Installation IN 15 2 MiCOM P846 IN...
Страница 293: ...Installation P846 EN IN D MiCOM P846 IN 15 11 7 P846 CASE DIMENSIONS Figure 3 Case dimensions IN...
Страница 295: ...Installation P846 EN IN D MiCOM P846 IN 15 13 P1756ENa IN Figure 5 Model B with 32 output contacts and 24 digital inputs...
Страница 296: ...P846 EN IN D Installation IN 15 14 MiCOM P846 IN...
Страница 297: ......


