


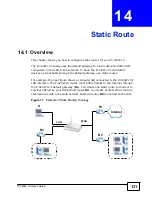


Chapter 14 Static Route
P-320W v3 User’s Guide
133
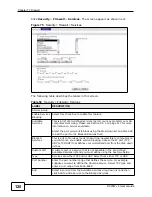
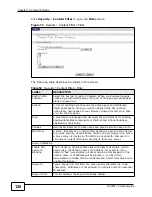
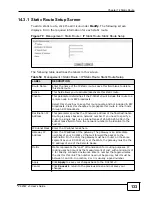
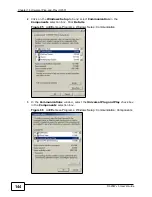
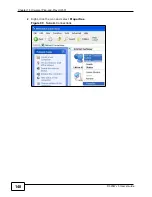
14.3.1 Static Route Setup Screen
To edit a static route, click the edit icon under
Modify
. The following screen
displays. Fill in the required information for each static route.
Figure 79
Management > Static Route > IP Static Route: Static Route Setup
The following table describes the labels in this screen.
Table 54
Management > Static Route > IP Static Route: Static Route Setup
LABEL
DESCRIPTION
Route Name
Enter the name of the IP static route. Leave this field blank to delete
this static route.
Active
This field allows you to activate/deactivate this static route.
Private
This parameter determines if the P-320W v3 will include this route to a
remote node in its RIP broadcasts.
Select this check box to keep this route private and not included in RIP
broadcasts. Clear this checkbox to propagate this route to other hosts
through RIP broadcasts.
Destination IP
Address
This parameter specifies the IP network address of the final destination.
Routing is always based on network number. If you need to specify a
route to a single host, use a subnet mask of 255.255.255.255 in the
subnet mask field to force the network number to be identical to the
host ID.
IP Subnet Mask Enter the IP subnet mask here.
Gateway IP
Address
Enter the IP address of the gateway. The gateway is an immediate
neighbor of your P-320W v3 that will forward the packet to the
destination. On the LAN, the gateway must be a router on the same
segment as your P-320W v3; over the WAN, the gateway must be the
IP address of one of the Remote Nodes.
Metric
Metric represents the “cost” of transmission for routing purposes. IP
routing uses hop count as the measurement of cost, with a minimum of
1 for directly connected networks. Enter a number that approximates
the cost for this link. The number need not be precise, but it must be
between 1 and 15. In practice, 2 or 3 is usually a good number.
Apply
Click
Apply
to save your changes back to the P-320W v3.
Cancel
Click
Cancel
to return to the previous screen and not save your
changes.
Summary of Contents for P-320W v3
Page 2: ......
Page 8: ...Safety Warnings P 320W v3 User s Guide 8 ...
Page 10: ...Contents Overview P 320W v3 User s Guide 10 ...
Page 18: ...Table of Contents P 320W v3 User s Guide 18 ...
Page 20: ...20 ...
Page 24: ...Chapter 1 Getting to Know Your P 320W v3 P 320W v3 User s Guide 24 ...
Page 36: ...Chapter 2 Introducing the Web Configurator P 320W v3 User s Guide 36 ...
Page 54: ...54 ...
Page 72: ...Chapter 4 Wireless LAN P 320W v3 User s Guide 72 ...
Page 76: ...Chapter 5 Wireless Client Mode P 320W v3 User s Guide 76 ...
Page 88: ...Chapter 7 LAN P 320W v3 User s Guide 88 ...
Page 104: ...Chapter 10 VLAN P 320W v3 User s Guide 104 ...
Page 105: ...105 PART III Security Firewall 117 Content Filtering 125 ...
Page 106: ...106 ...
Page 116: ...Chapter 11 WAN P 320W v3 User s Guide 116 ...
Page 124: ...Chapter 12 Firewall P 320W v3 User s Guide 124 ...
Page 130: ...130 ...
Page 134: ...Chapter 14 Static Route P 320W v3 User s Guide 134 ...
Page 140: ...Chapter 15 Remote Management P 320W v3 User s Guide 140 ...
Page 154: ...Chapter 16 Universal Plug and Play UPnP P 320W v3 User s Guide 154 ...
Page 155: ...155 PART V Maintenance and Troubleshooting System 157 Logs 163 Product Specifications 193 ...
Page 156: ...156 ...
Page 178: ...Chapter 18 Logs P 320W v3 User s Guide 178 ...
Page 184: ...Chapter 19 Tools P 320W v3 User s Guide 184 ...
Page 192: ...Chapter 20 Troubleshooting P 320W v3 User s Guide 192 ...
Page 196: ...Chapter 21 Product Specifications P 320W v3 User s Guide 196 ...
Page 198: ...198 ...
Page 260: ...Index P 320W v3 User s Guide 260 ...
Page 261: ......
Page 262: ......


