Site Preparation / Installation
03-914642-00:6
2-21
Water Transfer Line Installation
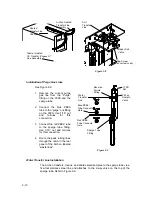
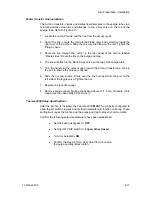
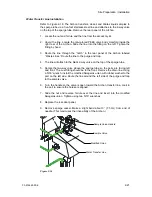
Refer to Figure 2-16. The Archon transfers, cleans and dilutes liquid samples to
the sparge tube via a five-foot stainless steel line and attaches to the 2-way valve
on the top of the sparge tube. Remove the rear panel of the Archon.
1. Locate the nut and ferrule and the line from the accessory kit.
2. Uncoil the line. Locate the tan-colored PEEK valve body manifold inside the
right rear of the Archon. Slide the line into the fitting on the left. Tighten the
fitting by hand.
3. Route the line through the “notch” in the rear panel of the Archon labeled
“Waste Lines.” Route the line to the purge and trap.
4. The line will attach to the black 2-way valve on the top of the sparge tube.
5. Rotate the two-way valve above the sparge tube so the ports are facing left
and front. The Luer fitting should be to the front. Remove the drain line. Using
a 5/16” wrench, install the modified Swagelok union with rubber washer to the
port on the left side. Route the line around the left side of the purge and trap
to the sample valve.
6. Turn the handle so the valve is open toward the Archon transfer line. Look in
the port to ensure the holes are aligned.
7. Slide the nut and reverse ferrule over the line and insert into the modified
Swagelok union. Tighten using two 5/16” wrenches.
8. Replace the rear door panel.
9. Remove sparge vessel. Make a slight bend about 3” (7.5 cm) from end of
needle. (This maximizes the rinse ability of the Archon.)
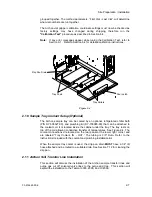
Figure 2-16
Sample Valve Handle
Modified Union
Sample Valve
Water Transfer Line

