


32
1.BEFORE USING EQUIPMENT
1.Description of Each Component (Cont.)
1
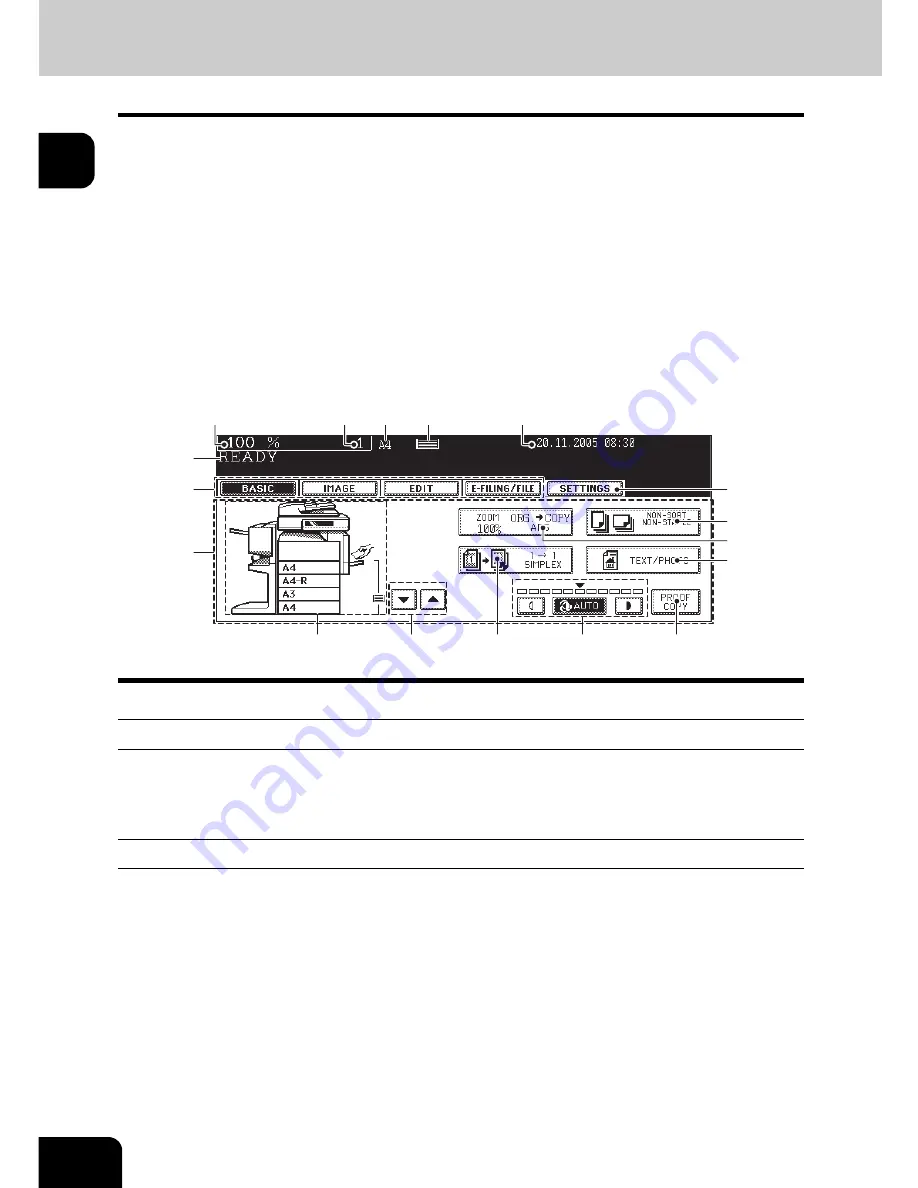
Touch panel
When the power is turned on, the basic menu for the copier function appears on this touch panel. The sta-
tus of the equipment is also displayed on the touch panel with messages and illustrations.
*
APS: Automatic paper selection, AMS: Automatic magnification selection
Message display
The following information appears at the top of the touch panel:
Equipment status, operational instructions, cautionary messages, reproduction ratios, number of copy
sets, paper size of a selected drawer, amount of paper in a selected drawer and date and time.
Touch-buttons
Press these buttons on the touch panel lightly to set various functions.
Index buttons
Press these buttons to switch menus. The type and number of the index buttons vary depending on the
function of the copier, scanner and e-Filing.
Function setting area
This area includes buttons for selecting and setting each function.
1.
Message
10. Original mode button
2.
Reproduction ratio
11. [PROOF COPY] button
3.
Number of copy sets
12. Density adjustment buttons
4.
APS/AMS* or currently selected paper size
13. Simplex / duplex button
5.
Remaining paper level
14. Paper source selection buttons
6.
Date and time
15. Equipment status indication area
7.
[SETTINGS] button
16. Function setting area
8.
Finisher button
17. Index buttons
9.
Enlargement/Reduction ([Zoom...]) button
1
17
16
15
14
12
11
13
2
3
6
7
8
10
9
5
4
Summary of Contents for E-STUDIO 232
Page 1: ...MULTIFUNCTIONAL DIGITAL SYSTEMS Operator s Manual for Basic Function ...
Page 2: ......
Page 6: ...4 CONTENTS Cont ...
Page 10: ...8 Toshiba Quality is Second to None Cont For e STUDIO233 283 ...
Page 24: ...22 Environmental Information Cont ...
Page 92: ...90 2 HOW TO MAKE COPIES 4 Proof Copy Cont 2 ...
Page 107: ...105 3 Names of each Inner Finisher optional 1 Trays 2 Paper stopper MJ 5004 MJ 5005 1 2 1 ...
Page 130: ...128 3 SETTING OF BASIC COPY MODES 6 Copy Density Adjustment Cont 3 ...
Page 131: ...129 4 4 IMAGE ADJUSTMENT 1 Background Adjustment 130 2 Sharpness 131 ...
Page 134: ...132 4 IMAGE ADJUSTMENT 2 Sharpness Cont 4 ...
Page 139: ...137 5 6 Press the ENTER button Select other copy modes as required 7 Press the START button ...
Page 175: ...173 5 5 Press the ENTER button Select other copy modes as required 6 Press the START button ...
Page 180: ...178 5 USING THE EDITING FUNCTIONS 16 ADF SADF Cont 5 ...
Page 206: ...204 6 e FILING 8 Appendix Cont 6 ...
Page 276: ...274 8 JOB STATUS 6 Error Code Cont 8 ...
Page 285: ...283 9 13Close the front cover ...
Page 304: ...302 9 BLINKING GRAPHIC SYMBOLS 5 Call Service Symbol Cont 9 ...
Page 328: ...326 10 WHEN THIS MESSAGE APPEARS 8 Reboot the machine Cont 10 ...
Page 329: ...327 11 11 MAINTENANCE 1 Daily Inspection 328 2 Simple Troubleshooting 330 ...
Page 336: ...334 11 MAINTENANCE 2 Simple Troubleshooting Cont 11 ...
Page 353: ...DP 2340 2840 OME050120E0 ...


