


28
1.BEFORE USING EQUIPMENT
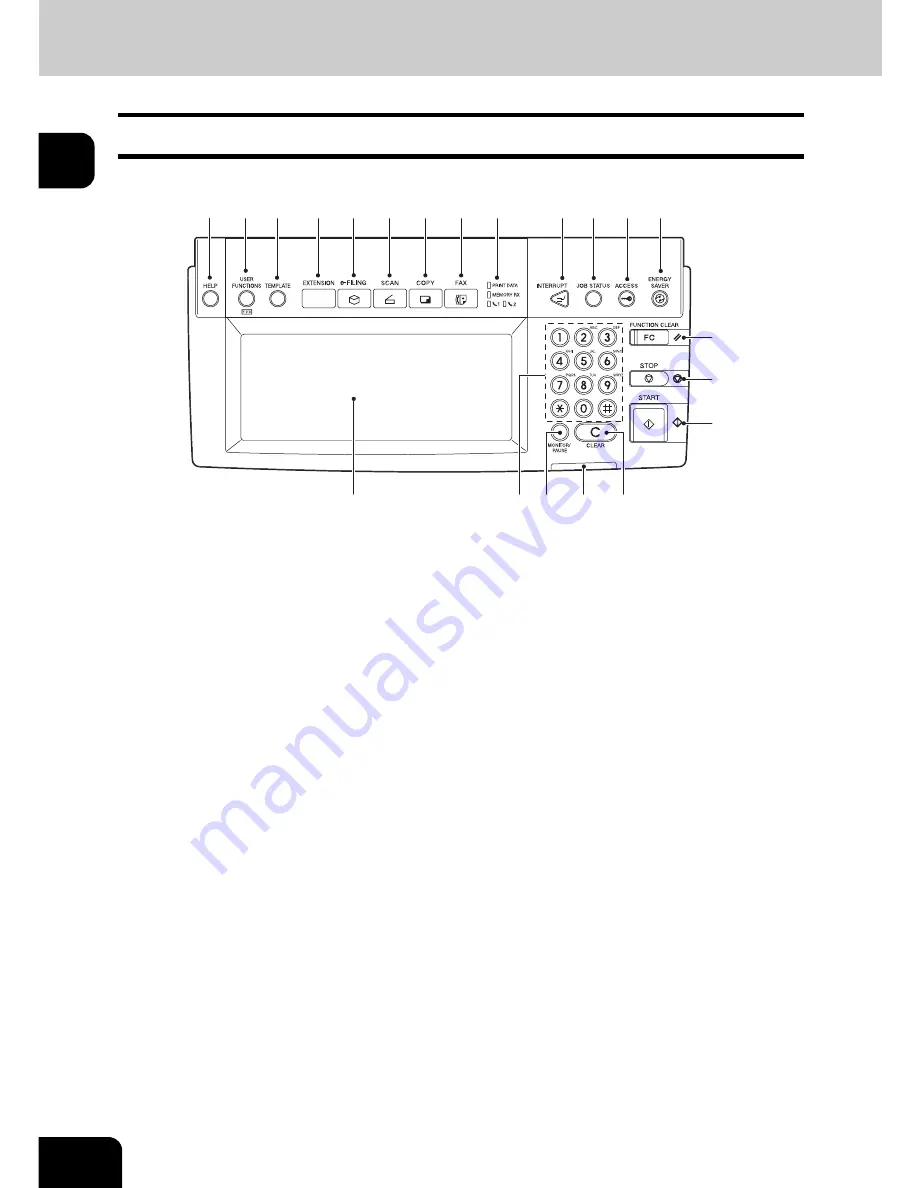
1.Description of Each Component (Cont.)
1
Control panel
Use the buttons on the control panel for various operations and settings through the equipment.
1.
[HELP] button
Use this button to display the description of the functions and the buttons on the touch panel.
2.
[USER FUNCTIONS] button
Use this button for paper size or media type setting of drawers, and registration of the copy, scan and
FAX settings (including a default setting change.) See the User Functions Guide for the functions
enabled by this button.
3.
[TEMPLATE] button
Use this button to register and recall frequently used copy, scan, and Fax settings as a template.
4.
[EXTENSION] button
Any operation with this button is invalid at present. This button is to extend functions in the future.
5.
[e-FILING] button
Use this button to access saved image data.
6.
[SCAN] button
Use this button to use the scanning function.
7.
[COPY] button
Use this button to use the copier function.
8.
[FAX] button
Use this button to use the FAX / Internet FAX function.
9.
PRINT DATA / MEMORY RX / FAX communication lamps
These lamps show the status of FAX data reception and FAX communication. The equipment can be
operated even while these lamps are lit.
17
1
2
3
4
6
7
8
9
10
11
12
13
14
15
16
19
18
20
21
5
Summary of Contents for E-STUDIO 232
Page 1: ...MULTIFUNCTIONAL DIGITAL SYSTEMS Operator s Manual for Basic Function ...
Page 2: ......
Page 6: ...4 CONTENTS Cont ...
Page 10: ...8 Toshiba Quality is Second to None Cont For e STUDIO233 283 ...
Page 24: ...22 Environmental Information Cont ...
Page 92: ...90 2 HOW TO MAKE COPIES 4 Proof Copy Cont 2 ...
Page 107: ...105 3 Names of each Inner Finisher optional 1 Trays 2 Paper stopper MJ 5004 MJ 5005 1 2 1 ...
Page 130: ...128 3 SETTING OF BASIC COPY MODES 6 Copy Density Adjustment Cont 3 ...
Page 131: ...129 4 4 IMAGE ADJUSTMENT 1 Background Adjustment 130 2 Sharpness 131 ...
Page 134: ...132 4 IMAGE ADJUSTMENT 2 Sharpness Cont 4 ...
Page 139: ...137 5 6 Press the ENTER button Select other copy modes as required 7 Press the START button ...
Page 175: ...173 5 5 Press the ENTER button Select other copy modes as required 6 Press the START button ...
Page 180: ...178 5 USING THE EDITING FUNCTIONS 16 ADF SADF Cont 5 ...
Page 206: ...204 6 e FILING 8 Appendix Cont 6 ...
Page 276: ...274 8 JOB STATUS 6 Error Code Cont 8 ...
Page 285: ...283 9 13Close the front cover ...
Page 304: ...302 9 BLINKING GRAPHIC SYMBOLS 5 Call Service Symbol Cont 9 ...
Page 328: ...326 10 WHEN THIS MESSAGE APPEARS 8 Reboot the machine Cont 10 ...
Page 329: ...327 11 11 MAINTENANCE 1 Daily Inspection 328 2 Simple Troubleshooting 330 ...
Page 336: ...334 11 MAINTENANCE 2 Simple Troubleshooting Cont 11 ...
Page 353: ...DP 2340 2840 OME050120E0 ...


