Groomer
Reelmaster 5500−D
Groomer (Rev. C)
Page 8.1 − 7
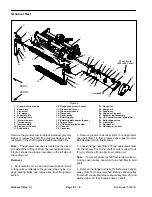
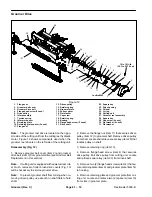
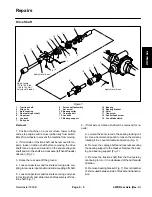
5. Slide pulley spacer (item 19) from shaft.
6. Remove two (2) cap screws (item 26) that secure
height of cut assembly (non−drive side) to the cutting
unit side plates (Fig. 6). Support groomer to prevent it
from falling. Slide height of cut assembly from groomer.
Locate and retrieve two (2) flat washers (item 32).
7. Carefully pull the groomer reel from the height of cut
assembly (drive side).
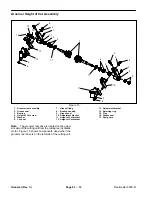
8. Inspect seals, bushings and bearings in height of cut
assemblies for wear or damage (see Groomer Height of
Cut Assembly in this section). Replace components as
needed.
Installation
1. Park machine on a clean and level surface, lower
cutting units completely to the ground, stop engine, en-
gage parking brake and remove key from the ignition
switch.
2. Apply a light coating of grease to seal lips in height
of cut assemblies. Make sure that seals, bushings and
bearings in height of cut assemblies are properly posi-
tioned.
3. Make sure that seal guards (item 24) are positioned
correctly on groomer shaft (see Groomer Reel Service
in this section). The seal lip should be toward the end of
the groomer shaft. Apply a film of grease onto seal lip.
4. Carefully slide drive end of the groomer reel into the
height of cut assembly (drive side) taking care not to
damage seals in height of cut assembly.
5. Carefully position height of cut assembly (non−drive
side) onto groomer shaft taking care not to damage
seals in height of cut assembly. Position two (2) flat
washers (item 32) and then height of cut assembly to the
cutting unit frame. Secure with two (2) cap screws (item
26).
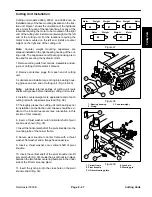
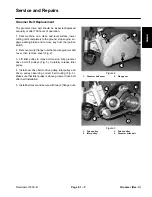
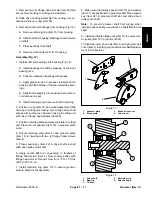
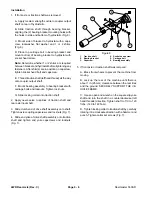
6. Install front roller into roller support rods. Center front
roller and secure roller with flange nuts (item 23) and cap
screws (item 22).
7. Slide pulley spacer (item 19) and washer (item 31)
onto groomer shaft.
8. Place square key (item 25) in shaft key slot and then
slide driven pulley onto groomer shaft.
Note: To prevent groomer shaft from turning when se-
curing driven pulley, use wrench on shaft flats to hold
shaft.
9. Secure driven pulley to groomer shaft with flange nut
(item 15).
10.Install groomer drive belt and belt cover to side of cut-
ting unit (see Groomer Belt Replacement in this sec-
tion).
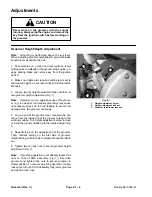
11. Check that seal guards just touch height of cut as-
sembly (Fig. 6). Reposition seal guard(s) if necessary.
12.Lubricate groomer bearings (see Groomer Reel Kit
Installation Instructions).
Note: After greasing groomer bearings, operate
groomer for 30 seconds, stop machine and wipe excess
grease from groomer shaft and seals.
13.Check groomer reel height and mower height−of−cut
settings. Adjust as needed.
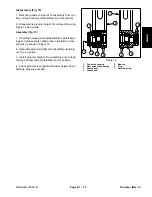
1. Cap
screw
2. Flange
nut
3. Front
roller
Figure 5
3
1
2
1. Cap
screw
2. Height of cut assembly
3. Seal
guard
Figure 6
3
2
1
Summary of Contents for 00075SL
Page 2: ...Reelmaster 5500 D ...
Page 4: ...Reelmaster 5500 D ...
Page 6: ...Reelmaster 5500 D ...
Page 64: ...Reelmaster 5500 D Hydraulic System Rev C Page 4 26 This page is intentionally blank ...
Page 170: ...Reelmaster 5500 D Page 5 40 Electrical System Rev C ...
Page 192: ...Reelmaster 5500 D Differential Axle Page 6 22 ...
Page 254: ...Reelmaster 5500 D Groomer Rev C Page 8 1 14 ...
Page 278: ...Reelmaster 5500 D Page 10 2 Electrical Diagrams Rev C ...
Page 284: ...Rev C Page 10 8 Harness Drawing Reelmaster 5500 D Serial Number 210000401 to 210999999 ...
Page 285: ...Rev C Page 10 9 Harness Diagram Reelmaster 5500 D Serial Number 210000401 to 210999999 ...
Page 286: ...Rev C Page 10 10 Harness Drawing Reelmaster 5500 D Serial Number 220000001 to 220999999 ...
Page 287: ...Rev C Page 10 11 Harness Diagram Reelmaster 5500 D Serial Number 220000001 to 220999999 ...
Page 288: ...Rev C Page 10 12 Harness Drawing Reelmaster 5500 D Serial Number Above 230000000 ...
Page 289: ...Rev C Page 10 13 Harness Diagram Reelmaster 5500 D Serial Number Above 230000000 ...
Page 290: ...Reelmaster 5500 D ...

