Reelmaster 5500-D
Differential Axle
Page 6 - 20
Ring to Pinion Gear Engagement
Final position of pinion is verified by using the gear con-
tact pattern method as described in the following proce-
dure.
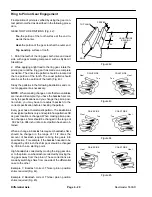
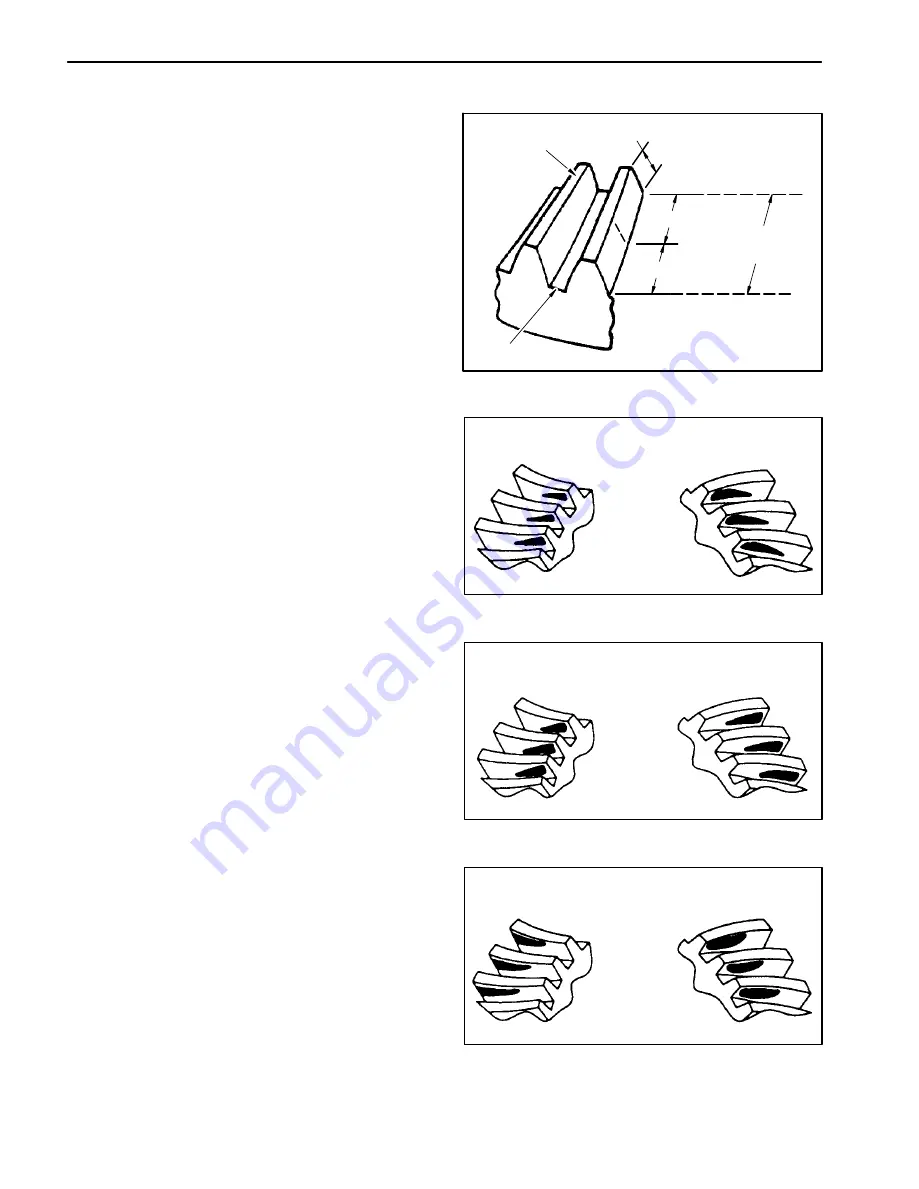
GEAR TOOTH DEFINITIONS (Fig. 42):
Toe-the portion of the tooth surface at the end to-
wards the center.
Heel-the portion of the gear tooth at the outer end.
Top Land-top surface of tooth.
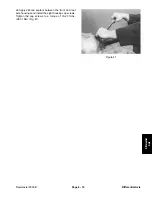
1. Paint the teeth of the ring gear, both drive and coast
side, with a gear marking compound, such as DyKem
Steel Blue.
2. While applying a light load to the ring gear, rotate the
pinion gear until the ring gear has made one complete
revolution. The drive side pattern should be located at
the toe portion of the tooth. The coast pattern should
also be at the toe portion of the tooth (Fig. 43).
Study the patterns in the following illustrations and cor-
rect engagement as necessary.
NOTE: When making changes, note that two variables
are involved. Example: If you have the backlash set cor-
rectly to specifications and you change the pinion posi-
tion shim, you may have to readjust backlash to the
correct specification before checking the pattern.
Every gear has a characteristic pattern. The illustrations
show typical patterns only and explain how patterns shift
as gear location is changed. When making pinion posi-
tion changes, shims should be changed in the range of
.002 inch to .004 inch until a correct pattern has been ob-
tained.
When a change in backlash is required, backlash shims
should be changed in the range of 1-1/2 times the
amount of backlash required to bring the gears into
specification. For example, if the backlash needed to be
changed by .004 inch, the shim pack should be changed
by .006 inch as a starting point.
High backlash is corrected by moving the ring gear clos-
er to the pinion. Low backlash is corrected by moving the
ring gear away from the pinion. These corrections are
made by switching shims from one side of the differential
case to the other.
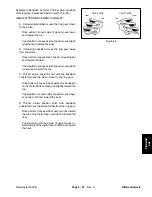
Example 1: Backlash correct. Thicker pinion position
shims required (Fig. 44).
Example 2: Backlash correct. Thinner pinion position
shims required (Fig. 45).
Figure 42
TOE
HEEL
PROFILE
TOP LAND
ROOT
LENGTHWISE
BEARING
ARC
Figure 43
DRIVE SIDE
COAST SIDE
Heel
Toe
Heel
Toe
Figure 44
DRIVE SIDE
COAST SIDE
Heel
Toe
Heel
Toe
Figure 45
DRIVE SIDE
COAST SIDE
Heel
Toe
Heel
Toe
Summary of Contents for 00075SL
Page 2: ...Reelmaster 5500 D ...
Page 4: ...Reelmaster 5500 D ...
Page 6: ...Reelmaster 5500 D ...
Page 64: ...Reelmaster 5500 D Hydraulic System Rev C Page 4 26 This page is intentionally blank ...
Page 170: ...Reelmaster 5500 D Page 5 40 Electrical System Rev C ...
Page 192: ...Reelmaster 5500 D Differential Axle Page 6 22 ...
Page 254: ...Reelmaster 5500 D Groomer Rev C Page 8 1 14 ...
Page 278: ...Reelmaster 5500 D Page 10 2 Electrical Diagrams Rev C ...
Page 284: ...Rev C Page 10 8 Harness Drawing Reelmaster 5500 D Serial Number 210000401 to 210999999 ...
Page 285: ...Rev C Page 10 9 Harness Diagram Reelmaster 5500 D Serial Number 210000401 to 210999999 ...
Page 286: ...Rev C Page 10 10 Harness Drawing Reelmaster 5500 D Serial Number 220000001 to 220999999 ...
Page 287: ...Rev C Page 10 11 Harness Diagram Reelmaster 5500 D Serial Number 220000001 to 220999999 ...
Page 288: ...Rev C Page 10 12 Harness Drawing Reelmaster 5500 D Serial Number Above 230000000 ...
Page 289: ...Rev C Page 10 13 Harness Diagram Reelmaster 5500 D Serial Number Above 230000000 ...
Page 290: ...Reelmaster 5500 D ...

