Kubota
Diesel Engine
Reelmaster 5500-D
Page 3 - 19
Kubota Diesel Engine
Removal
1. Park machine on a level surface, lower cutting units,
stop engine, engage parking brake, and remove key
from the ignition switch.
2. Open engine hood.
3. Disconnect both battery cables at the battery (see
Battery Service in Chapter 5 - Electrical system).
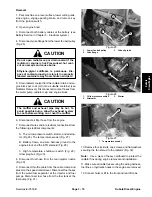
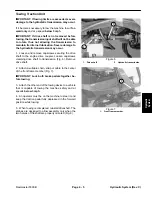
4. Disconnect yoke flange from the lower fan belt pulley
(Fig. 25).
CAUTION
Do not open radiator cap or drain coolant if the
radiator or engine is hot. Pressurized, hot cool-
ant can escape and cause burns.
Ethylene-glycol antifreeze is poisonous. Dis-
pose of coolant properly, or store it in a properly
labeled container away from children and pets.
5. Drain radiator coolant from the radiator drain and en-
gine block pet cock (LH) into a suitable container (see
Radiator Removal). Disconnect all coolant hoses from
the water pump, radiator cap, and engine block.
CAUTION
The muffler and exhaust pipe may be hot. To
avoid possible burns, allow the exhaust system
to cool before working on or near the muffler.
6. Disconnect air filter hose from the engine.
7. Disconnect wires and/or electrical connections from
the following electrical components:
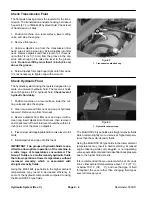
A. The oil low pressure switch, starter, and alterna-
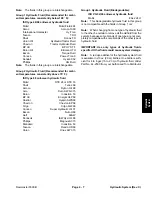
tor (Fig 26). The temperature sender (Fig. 27).
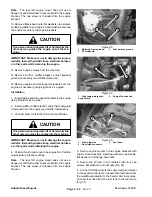
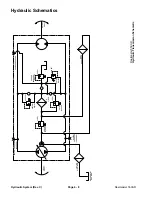
B. Battery, frame, and wire harness ground to the
engine block and the ETR solenoid (Fig. 28).
C. High temperature shutdown switch (Fig. 29).
Glow plug bus (Fig. 30).
8. Disconnect fuel hose from the rear injector nozzle
(Fig. 30).
9. Disconnect throttle cable from the cable clamp and
swivel on the speed control lever. Disconnect fuel hoses
from the water/fuel separator at the injector and fuel
pumps. Disconnect fuel hose from the fuel tank at the
fuel pump (Fig. 31).
Figure 25
1. Lower fan belt pulley
2. Yoke
flange
3. Yoke slip tube
1
2
3
Figure 26
1. Oil low pressure switch
2. Alternator
3. Starter
1
2
3
Figure 27
1. Temperature
sender
1
10.Remove four locknuts, cap screws, and flat washers
securing the fan shroud to the radiator (Fig. 32).
Note:
Use a piece of heavy cardboard to protect the
radiator fins during engine removal and installation.
11. Make sure all cable ties securing the wiring harness,
fuel lines, or hydraulic hoses to the engine are removed.
12.Connect hoist or lift to the front and rear lift tabs.
Summary of Contents for 00075SL
Page 2: ...Reelmaster 5500 D ...
Page 4: ...Reelmaster 5500 D ...
Page 6: ...Reelmaster 5500 D ...
Page 64: ...Reelmaster 5500 D Hydraulic System Rev C Page 4 26 This page is intentionally blank ...
Page 170: ...Reelmaster 5500 D Page 5 40 Electrical System Rev C ...
Page 192: ...Reelmaster 5500 D Differential Axle Page 6 22 ...
Page 254: ...Reelmaster 5500 D Groomer Rev C Page 8 1 14 ...
Page 278: ...Reelmaster 5500 D Page 10 2 Electrical Diagrams Rev C ...
Page 284: ...Rev C Page 10 8 Harness Drawing Reelmaster 5500 D Serial Number 210000401 to 210999999 ...
Page 285: ...Rev C Page 10 9 Harness Diagram Reelmaster 5500 D Serial Number 210000401 to 210999999 ...
Page 286: ...Rev C Page 10 10 Harness Drawing Reelmaster 5500 D Serial Number 220000001 to 220999999 ...
Page 287: ...Rev C Page 10 11 Harness Diagram Reelmaster 5500 D Serial Number 220000001 to 220999999 ...
Page 288: ...Rev C Page 10 12 Harness Drawing Reelmaster 5500 D Serial Number Above 230000000 ...
Page 289: ...Rev C Page 10 13 Harness Diagram Reelmaster 5500 D Serial Number Above 230000000 ...
Page 290: ...Reelmaster 5500 D ...

