Reelmaster 5500-D
Page 5 - 6
Electrical System (Rev. C)
Check Interlock Switches
The purpose of the interlock switches is to prevent the
engine from cranking or starting unless the traction ped-
al is in NEUTRAL, the Enable / Disable switch is in DIS-
ABLE and the Lower Mow / Raise control is in the neutral
position. The engine will stop when the traction pedal is
depressed with operator off the seat. In addition, the en-
gine will stop if the traction pedal is depressed and the
parking brake is engaged.
CAUTION
The interlock switches are for the protection of
the operator and bystanders and to ensure cor-
rect operation of the machine. Do not bypass or
disconnect switches. Check operation of the
switches daily to make sure the interlock system
is operating properly. If a switch is defective, re-
place it before operating. Do not rely on safety
switches entirely - use common sense!
Verify Interlock Switch Function
1. Park machine on a level surface, lower the cutting
units, stop the engine, and engage the parking brake.
2. Open control panel cover. Locate wire harness and
connectors near controller. Carefully unplug loop back
connector from harness connector.
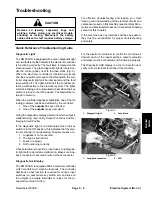
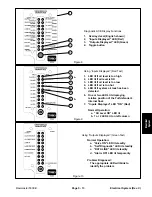
3. Connect the Diagnostic ACE display connector to
the harness connector. Make sure correct overlay decal
is positioned on Diagnostic ACE display.
4. Turn the key switch to the ON position, but do not
start machine.
Note: The red text on the overlay decal refers to input
switches and the green text refers to outputs.
5. The “inputs displayed” LED, on lower right column of
the Diagnostic ACE, should be illuminated. If “outputs
displayed” LED is illuminated, press the toggle button on
Diagnostic ACE to change to “inputs displayed” LED.
6. The Diagnostic ACE will illuminate the LED
associated with each of the inputs when that input switch
is closed. Individually, change each of the switches from
open to closed (i.e., sit on seat, engage traction pedal,
etc.), and note that the appropriate LED on Diagnostic
ACE will blink on and off when corresponding switch is
closed. Repeat on each switch that is possible to be
changed by hand.
7. If switch is closed and appropriate LED does not turn
on, check all wiring and connections to switch and/or
check switches with an ohm meter. Replace any defec-
tive switches and repair any defective wiring.
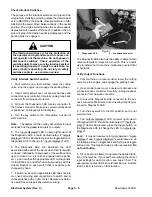
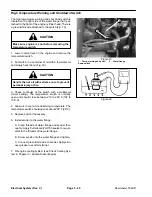
1. Diagnostic
ACE
2. Loopback
connector
Figure 7
1
2
The Diagnostic ACE also has the ability to detect which
output solenoids or relays are turned on. This is a quick
way to determine if a machine malfunction is electrical
or hydraulic.
Verify Output Functions
1. Park machine on a level surface, lower the cutting
units, stop the engine, and engage the parking brake.
2. Open control panel cover. Locate wire harness and
connectors near controller. Carefully unplug loopback
connector from harness connector.
3. Connect the Diagnostic ACE connector to the har-
ness connector. Make sure correct overlay decal is posi-
tioned on Diagnostic ACE.
4. Turn the key switch to the ON position, but do not
start machine.
5. The “outputs displayed” LED, on lower right column
of Diagnostic ACE, should be illuminated. If “inputs dis-
played” LED is illuminated, press the toggle button on
the Diagnostic ACE to change the LED to “outputs dis-
played”.
Note: It may be necessary to toggle between “inputs
displayed” and “outputs displayed” several times to do
the following step. To toggle back and forth, press toggle
button once. This may be done as often as required. Do
not hold button.
6. Sit on seat and attempt to operate the desired func-
tion of the machine. If you need help verifying the correct
input settings for each function, see Logic Chart. The
appropriate output LED’s should illuminate to indicate
that the ECU is turning on that function.
Summary of Contents for 00075SL
Page 2: ...Reelmaster 5500 D ...
Page 4: ...Reelmaster 5500 D ...
Page 6: ...Reelmaster 5500 D ...
Page 64: ...Reelmaster 5500 D Hydraulic System Rev C Page 4 26 This page is intentionally blank ...
Page 170: ...Reelmaster 5500 D Page 5 40 Electrical System Rev C ...
Page 192: ...Reelmaster 5500 D Differential Axle Page 6 22 ...
Page 254: ...Reelmaster 5500 D Groomer Rev C Page 8 1 14 ...
Page 278: ...Reelmaster 5500 D Page 10 2 Electrical Diagrams Rev C ...
Page 284: ...Rev C Page 10 8 Harness Drawing Reelmaster 5500 D Serial Number 210000401 to 210999999 ...
Page 285: ...Rev C Page 10 9 Harness Diagram Reelmaster 5500 D Serial Number 210000401 to 210999999 ...
Page 286: ...Rev C Page 10 10 Harness Drawing Reelmaster 5500 D Serial Number 220000001 to 220999999 ...
Page 287: ...Rev C Page 10 11 Harness Diagram Reelmaster 5500 D Serial Number 220000001 to 220999999 ...
Page 288: ...Rev C Page 10 12 Harness Drawing Reelmaster 5500 D Serial Number Above 230000000 ...
Page 289: ...Rev C Page 10 13 Harness Diagram Reelmaster 5500 D Serial Number Above 230000000 ...
Page 290: ...Reelmaster 5500 D ...

