background image

3. Wiring

1. 

How to wire

3-9

TSC


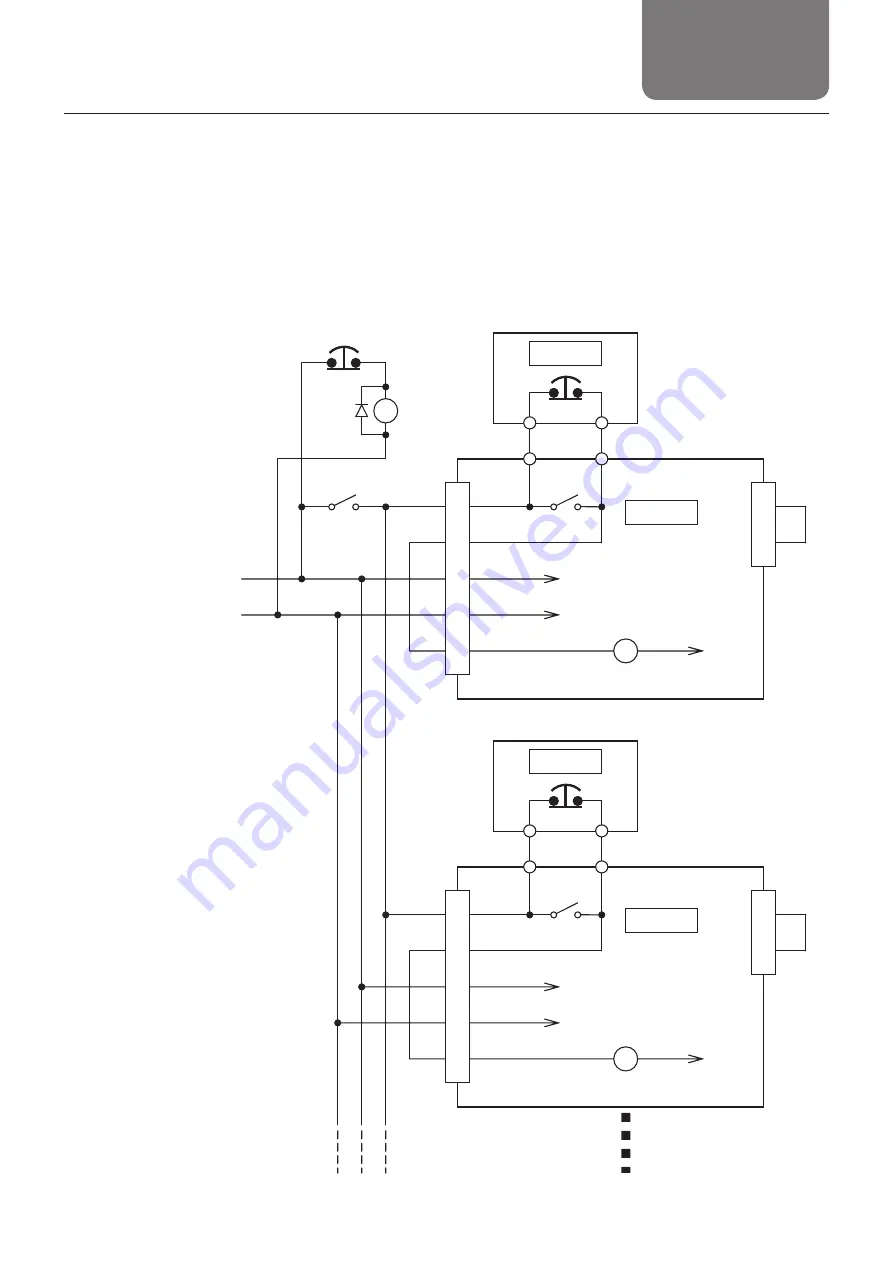
Solo emergency stop of TSC (TDO uses)


 One emergency stop switch can stop all the TSCs urgently.


 When TDO is connected to any TSC, the emergency stop by TDO stops only the TSC 

urgently.


 Use the external relay CR with the surge absorption diode at 0.1 A or less coil current.


   When connecting TSC to the network unit TNU, do not wire the CN5 pin number 

 (S1). 

(Doing so may cause fault.)

24V

S1

S2

24V

0V

EMG-

0V

Emergency

stop switch

CN4

CN3

K1

TSC

MPO

MPI

CN4

X

TDO

0V

S1

S2

24V

0V

EMG-

0V

CN4

CN3

K1

TSC

MPO

MPI

CN4

X

CR

CR

TDO

Summary of Contents for TSC Series

Page 1: ...INSTRUCTION MANUAL THK Electrical Actuator Controller Series Stepper Driver Controller TSC No 6120 2 0 E ...

Page 2: ...s 1 5 3 System configuration 1 6 3 1 System configuration diagram 1 6 4 Flow until using the product 1 7 1 Check products 2 2 1 1 Check the package contents of TSC 2 3 1 2 Options 2 5 1 3 Names of individual parts and functions 2 6 1 4 Store and dispose of products 2 7 2 How to install 2 8 2 1 Installation environment 2 8 2 2 Install TSC 2 9 1 How to wire 3 2 1 1 Entire wiring 3 3 1 2 Connect peri...

Page 3: ... Timing chart 4 6 3 Function mode 1 4 7 3 1 Manual operation 4 7 3 2 Position instruction 4 7 3 3 Methods of position instruction 4 8 3 4 Specify and execute STEP No 4 8 3 5 How to obtain STEP No whose operation has been completed 4 8 3 6 Timing chart Normal mode 4 8 3 7 Timing chart Instruction mode 4 9 4 Function mode 4 4 10 4 1 Specify and execute STEP No 4 10 4 2 Move command method 4 10 4 3 H...

Page 4: ... Servo ON 5 8 4 Zero return 5 9 4 1 Zero return method 5 9 4 2 Positive negative of moving direction 5 9 5 Pause 5 10 5 1 Pause 5 10 6 Manual operation 5 11 6 1 Manual operation 5 11 7 Positioning operation 5 12 7 1 Positioning operation 5 12 8 Pressing operation 5 13 8 1 Pressing operation 5 13 9 Torque determination 5 14 9 1 Torque determination 5 14 10 Area determination 5 15 10 1 Area determin...

Page 5: ...e status of the servo when an alarm sounds 6 3 2 Alarm code 6 4 2 1 Alarm code 6 4 3 Causes and counter measures of alarms 6 5 3 1 Causes and counter measures of alarms 6 5 1 Maintenance and inspection 7 2 1 1 Standard of durability of consumables in the driver controller TSC 7 2 2 Product warranty 7 3 2 1 Free warranty period 7 3 2 2 Usage conditions range 7 3 2 3 Warranty scope 7 3 2 4 Exclusion...

Page 6: ...use About this chapter This chapter describes the overview of the product This chapter includes information that we want you to check and understand before working with the product 1 Introduction 1 1 1 1 Acknowledgment 1 2 1 2 About this manual 1 2 1 3 How to use this product 1 3 1 4 About product support 1 3 1 5 About related instruction manuals 1 3 1 6 Product and company information 1 3 2 Safet...

Page 7: ...ed in this manual Do not reproduce reprint or lend the whole contents or a part of this manual without permission Please note that description in this manual is subject to change without prior notice in the future due to improvements of the product or other reasons We have made all possible efforts to make the content of this manual accurate However if you find any mistake or uncertainty in this m...

Page 8: ...of this product install safety devices or backup devices that prevent such serious accidents or loss 1 4 About product support For the following information please contact our Customer Support refer to back cover Technical support for this product 1 5 About related instruction manuals When you use the driver controller TSC read the following instruction manuals as necessary Controller series Setup...

Page 9: ...f the action This mark indicates instruction for the action This mark indicates caution about the action Prohibited Do not disassemble Obligatory Provide grounding connection Caution Caution Electrical shock Caution Flammable Caution High temperature Caution Getting caught DANGER Erroneous handling may urgently cause death or serious injury to a person WARNING Erroneous handling may cause death or...

Page 10: ...hould be hot Doing so may cause burns Prohibited Obligatory Caution Electrical shock Do not disassemble Caution High temperature Do not impact the product and do avoid rough handling such as throwing it Doing so may cause the fault or dam age that leads to injury Do not frequently switch the power between on and off Doing so may generate heat from the internal parts of the driver controller TSC wh...

Page 11: ...TSC The actuator cable is provided with the actuator unit 3 To use a 10m actuator cable please insert a noise filter Recommended noise filter is RSAN 2003 made by TDK Lambda Corporation 24V DC power Power supply should be pre pared by yourself Power con nector is provided with TSC P 3 4 CN1 CN2 CN4 CN3 CN5 Actuator PC communication cables are provid ed as an option P 2 5 I O connector for CN1 is p...

Page 12: ... to 2 4 3 Installation Installation environment check P 2 8 Installation P 2 9 to 2 11 4 Wiring Connection between each device and cable P 3 2 to 3 25 5 Trial run and adjustment Preparation of setup tool D STEP see the separate Instruction Manual of D STEP Trial run P 5 4 to 5 18 Parameter setting P 5 19 to 5 23 6 Setup tool setting Setup tool setting see the separate Instruction Manual of D STEP ...

Page 13: ...nstallation environment 2 8 2 2 Install TSC 2 9 This section describes the installation procedures of this product About this chapter This chapter describes how to check the package contents and to install it to the machine and facilities This section is primarily intended for those in charge of installation of this product to a machine and facilities This section describes the precautions on use ...

Page 14: ...ue to use it Using a fractured product may cause malfunction that leads to injury or fault When you find any failures please con tact our Customer Support refer to the back cover Prohibited CAUTION 1 Check products WARNING For the combination of the driver controller TSC and actuator do not use actuators with models other than TSC Doing so may cause unexpected mo tions accidents or failures Prohib...

Page 15: ... Design symbol B Type MOD Mode switching type Applicable actuator ES3 ES4 ES5 ES6 ES3R ES4R ES5R ES6R EC3 EC4 Select EC3 for EC3H and EC4 for EC4H EC3R EC4R KRF4 KRF5 CKRF4 CKRF5 Applicable actuator Ball screw lead 06 6 mm 10 10 mm 12 12 mm Zero point D Motor side R Reverse motor side Brake No symbol No brake B With brake Note Refer to the respective actuator catalogs for the model configuration o...

Page 16: ... packaging box until the start of installation work Type of parts Model number Qty Driver controller See the product label 1 Power connector Current product Conventional product 1 FK MCP 1 5 7 ST 3 81 PHOENIX CONTACT MPC300 38107 DECA I O connector Current product Conventional product 1 Plug HD 44SP MISUMI Plug DBH44MCA NSXD Cover RDA 25H UNC MISUMI Cover DT44PB NSXD 1 For any special type check a...

Page 17: ...D STEP Instruction Manual 1 2 2 TDO The digital operator for driver controller TSC TLC and THC Model TDO N For details see the separate TDO Instruction Manual 1 2 3 I O cable A cable with a soldered I O connector for external input and output signals CN1 Model CBL TSC IO 03 3 m 05 5 m 10 10 m For details see P 3 14 P 3 25 Cable length A PC communication cable for use with D STEP Model CBL COM 03 F...

Page 18: ...CN2 Actuator s encoder connector is connected CN4 Actuator s motor connector is connected ID The ID identification number is selected CN3 Communication cable for PC and TDO is connected CN5 Power supply and emergency stop SW are connected SV ALM It lights in green when the servo is turned ON In the alarm state it lights in red BRK OFF When the brake is turned OFF released it lights in yellow MOT W...

Page 19: ... substance exists in the vicinity Place where no strong electric field nor strong magnetic field develops Place where a vibration or shock does not transmit to the product Place where liquid containing impurities such as conductive iron dust powder such as solid abrasive dust oil mist cutting oil water content salt content organic solvent or corrosive flam mable gas is not generated or does not fl...

Page 20: ...inity Place where a vibration or shock does not transmit to the product Place where liquid containing impurities such as conductive iron dust powder such as solid abrasive dust oil mist cutting oil water content salt content organic solvent or corrosive flam mable gas is not generated or does not float 2 1 2 Water drop oil drop and dust proof This product does not have a water drop oil drop and du...

Page 21: ...op circuit that stops the operations of the product and disconnects the main circuit power supply in the event of emergency Failure to do so may cause the damage of the product that leads to injury Obligatory Install a safety device such as a breaker for wiring to prepare against short circuit of the wiring connected to the driver controller TSC Failure to do so may cause electric shocks or fault ...

Page 22: ...faces to the operator The space between TSC and TSC must be 10 mm or more To allow for cooling by the fan or natural convection the space between TSC and the right left wall must be 30 mm or more To allow for cooling by the fan or natural convection the space the above below TSC must be 50 mm or more If the temperature in the control panel exceeds 40 C install cooling fan s 50 mm or more Control p...

Page 23: ...wn installation which disturbs heat discharge To prevent effects of the PWM switching noise and external noise be sure to perform single point D type ground for the TSC frame ground FG Prepare bolts and tools to be used separately Fixing bolt Cross recessed pan head screws or hexagonal socket head type bolts M4 x 8 2 pcs Tools to use According to bolt types Installation to the front Control panel ...

Page 24: ... describes how to connect to and wire TSC 1 How to wire 3 2 1 1 Entire wiring 3 3 1 2 Connect peripheral devices to power supply 3 4 1 3 Connect to PC 3 11 1 4 Connect to TDO 3 11 1 5 Peripheral devices 3 12 2 External input and output CN1 3 13 2 1 Electrical specification 3 13 2 2 Signal name 3 15 2 3 Pin assignment 3 19 2 4 Optional I O cable 3 25 ...

Page 25: ... nectors while the devices are ener gized Doing so may cause abnormal opera tion fault and electric shocks Do not disassemble Provide grounding connection Do not damage tuck place a heavy object on or apply excessive stress on the cable Doing so may cause electric shocks Do not touch the energized parts within TSC Doing so may cause electric shocks The wiring works must be per formed by electric w...

Page 26: ...river controller TSC The actuator cable is provided with the actuator unit 3 To use a 10m actuator cable please insert a noise filter Recommended noise filter is RSAN 2003 made by TDK Lambda Corporation I O connector for CN1 is provided with TSC I O cables are provided as an option P 2 5 The power supply should be prepared by yourself Power connector is provided with TSC P 3 4 CN1 CN2 CN4 CN3 CN5 ...

Page 27: ...an one wire together doing so may cause a fall Wiring and routing Twist the electric wires of 24 V and 0 V to exclude noise Separate the electric wires from strong electric lines do not bind them together or place them in the same duct Connect to the connector Insert the electric wires pressing the release button of the connector by a tapering screwdriver Insert the electric wires to the bottom an...

Page 28: ... is energized as soon as the emergency stop switch is released Connecting TDO will open the internal relay K1 and the TDO emergency stop switch is activated While TDO is not connected the internal relay K1 is closed When connecting TSC to the network unit TNU do not wire the CN5 pin number S1 Doing so may cause fault FG wire GND terminal Control power supply 24V 0V S1 S2 MPO MPI 24V 0V EMG TDO 0V ...

Page 29: ... Use the external relay CR with the surge absorption diode at 0 1 A or less coil current Connecting TDO will open the internal relay K1 and the TDO emergency stop switch is activated When TDO is not connected the internal relay K1 will be closed When connecting TSC to the network unit TNU do not wire the CN5 pin number S1 Doing so may cause fault 24V 0V S1 S2 MPO MPI 24V 0V EMG TDO 0V Emergency st...

Page 30: ...onnected to any TSC the emergency stop by TDO also stops all the TSCs urgently When connecting TSC to the network unit TNU do not wire the CN5 pin number S1 Doing so may cause fault 24V 0V S1 S2 24V 0V EMG 0V Emergency stop switch CN4 CN3 K1 TSC MPO MPI CN4 X S1 S2 24V 0V EMG 0V CN4 CN3 K1 TSC MPO MPI CN4 X S1 S2 24V 0V EMG 0V CN4 CN3 K1 TSC MPO MPI CN4 X ...

Page 31: ...ops all the TSCs urgently Use the external relay CR with the surge absorption diode at 0 1 A or less coil current When connecting TSC to the network unit TNU do not wire the CN5 pin number S1 Doing so may cause fault 24CV 0PV S1 S2 24V 0V EMG 0V Emergency stop switch CN4 CN3 K1 TSC MPO MPI CN4 X S1 S2 24V 0V EMG 0V CN4 CN3 K1 TSC MPO MPI CN4 X S1 S2 24V 0V EMG 0V CN4 CN3 K1 TSC MPO MPI CN4 X 24PV ...

Page 32: ... stop by TDO stops only the TSC urgently Use the external relay CR with the surge absorption diode at 0 1 A or less coil current When connecting TSC to the network unit TNU do not wire the CN5 pin number S1 Doing so may cause fault 24V S1 S2 24V 0V EMG 0V Emergency stop switch CN4 CN3 K1 TSC MPO MPI CN4 X TDO 0V S1 S2 24V 0V EMG 0V CN4 CN3 K1 TSC MPO MPI CN4 X CR CR TDO ...

Page 33: ... connector black to the CN4 of TSC If it is connected properly it should be locked and cannot be fallen off even by pulling it lightly Do not pull it strongly 3 Connect the encoder connector white to the CN2 of TSC If it is connected properly it should be locked and cannot be fallen off even by pulling it lightly Do not pull it strongly ...

Page 34: ...nect with the separately sold communication cable CBL COM 03 P 2 5 If the PC has only the USB port instead of the RS 485 port use the provided conversion cable Operations with other than this conversion cable cannot be guaranteed P 2 5 1 4 Connect to TDO 1 4 1 How to connect 1 Insert the cable to the CN3 of TSC aligning the arrow of the plug with the one of TSC If you insert the plug while rotatin...

Page 35: ...such as contact duplexing according to the requirements on the safety category All the wiring examples in this document do not guarantee the achievement of the safety cat egories in particular 1 5 3 Emergency stop switch Be sure to install an emergency stop switch to forcibly terminate the device in case of emergen cy Select an emergency stop switch with the contact closed at normal times b contac...

Page 36: ...l cause electric shocks Caution Electrical shock Do not damage tuck place a heavy object on or apply excessive stress on the cable Doing so causes disconnection of the cable short circuits or electric shocks Caution Electrical shock WARNING Items Specifications Input voltage 24 VDC 10 Input current 6 mA 1 circuit Insulation method Photo coupler TSC Internal circuit External power supply 24 VDC 3 9...

Page 37: ...n the same state continues for 6 ms or longer ON OFF and OFF ON Items Specifications Rated load voltage 24 VDC 10 Maximum current 50 mA 1 circuit Residual voltage 0 3 V or less Insulation method Photo coupler RL Internal circuit External power supply 24 VDC 0 01μF Each output TSC 1 2 19 to 34 In case of relay load be sure to connect a diode for surge killer 43 44 2 1 4 Connector pin number 1 15 16...

Page 38: ... STRT PWRT STRT STRT 14 MANU MANU MANU MANU MANU MANU 15 HOME HOME HOME HOME HOME HOME 16 PAUSE PAUSE PAUSE PAUSE PAUSE PAUSE 17 REST REST REST REST REST REST 18 SV ON SV ON SV ON SV ON SV ON SV ON 19 Output PO 0 PO 0 PO 0 PO 0 PE 0 LS 0 20 PO 1 PO 1 PO 1 PO 1 PE 1 LS 1 21 PO 2 PO 2 PO 2 PO 2 PE 2 LS 2 22 PO 3 PO 3 PO 3 PO 3 PE 3 23 PO 4 PO 4 PO 4 PO 4 PE 4 24 PO 5 PO 5 PO 5 PO 5 PE 5 25 MOVE MOVE...

Page 39: ...ted to the frame ground Signal name Pin Number Function mode Functions and use application Reference Page 0 1 2 3 4 5 PI 0 3 20 1 Specify the STEP No to be executed by binary The specification must be com pleted before the STRT turns ON prior to 10 ms P 4 5 P 4 6 P 4 8 P 4 9 PI 1 4 21 2 PI 2 5 22 4 PI 3 6 23 8 PI 4 7 24 16 PI 5 8 25 32 PI 6 9 26 64 PI 7 10 27 128 PI 8 11 28 256 ST 0 3 Directly spe...

Page 40: ...not switch when the parameter No 38 is Valid P 5 5 HOME 15 Execute the zero return operation P 5 9 PAUSE 16 With OFF pause P 5 10 REST 17 Reset the alarm During pause the remaining movement distance is canceled P 5 10 SV ON 18 Turn the servo ON This can be changed to Always ON by the parameter No 35 P 5 8 Output Signal name Pin Number Function mode Functions and use application Reference Page 0 1 ...

Page 41: ...ns ON when it is within the range set by the pa rameters No 1 and 2 P 5 15 MODE S 26 ON Instruction mode OFF Normal mode P 4 8 P AREA 27 Turns ON when it is within the P area A B set by the running STEP No P 5 15 MANU S 28 ON MANUAL mode OFF AUTO mode Interlocks with not only the MANU input but also the mode change switches of the panel P 5 5 HEND 29 Turns ON when the zero return is completed P 5 ...

Page 42: ... 2 bit End position 3 bit End position 4 bit End position 5 bit Moving Upper Lower area limit Position area Operation mode status Zero return completed Positioning completed Load output determination Torque level Operation preparations completed Emergency stop status ON status Alarm ON status Output signal Encoder input RS 485 communication Motor Brake output 24VDC 24VDC 0V 0V External power suppl...

Page 43: ...pply input External input instruction mode Jog Inching External input moving P positive direction PO 5 CN2 CN3 CN5 Encoder input RS 485 communication Motor Brake output S1 S2 MPO MPI 24V 0V EMG 24V DC power supply CN4 Instruction position 0 bit Instruction position 1 bit Instruction position 2 bit Instruction position 3 bit Instruction position 4 bit Instruction position 5 bit End position 0 bit E...

Page 44: ...rake output S1 S2 MPO MPI 24V 0V EMG 24V DC power supply CN4 Instruction position 0 bit Instruction position 1 bit Instruction position 2 bit Instruction position 3 bit Instruction position 4 bit Instruction position 5 bit Instruction position 6 bit Instruction position 7 bit Pause OFF stop End position 0 bit End position 1 bit End position 2 bit End position 3 bit End position 4 bit End position ...

Page 45: ...CN4 Instruction position 0 bit Instruction position 1 bit Instruction position 2 bit Instruction position 3 bit Instruction position 4 bit Instruction position 5 bit Instruction position 6 bit Instruction position 7 bit Instruction position 8 bit Operation mode ON MANU Pause OFF stop End position 0 bit End position 1 bit End position 2 bit End position 3 bit End position 4 bit End position 5 bit E...

Page 46: ...ernal power supply input Cylinder type START 1 Cylinder type START 2 Cylinder type START 3 Cylinder type START 4 Cylinder type START 5 Cylinder type START 6 Cylinder type arrival completed 1 Cylinder type arrival completed 2 Cylinder type arrival completed 3 Cylinder type arrival completed 4 Cylinder type arrival completed 5 Cylinder type arrival completed 6 CN2 CN3 CN5 Encoder input RS 485 Commun...

Page 47: ... External power supply input Cylinder type START 1 Cylinder type START 2 Cylinder type position detection 1 Cylinder type position detection 2 AREA Upper Lower area limit MANU S Operation mode status CN2 CN3 CN5 Encoder input RS 485 communication Motor Brake output S1 S2 MPO MPI 24V 0V EMG 24V CN4 Pause OFF stop 2 1 3 4 5 6 7 8 9 10 11 12 13 14 15 16 17 18 19 case Note Do not use reserved pins for...

Page 48: ...3 Purple CN1 31 Yellow Black dot CN1 14 Purple White dot CN1 32 Yellow Green dot CN1 15 Gray CN1 33 Green Black dot CN1 16 Gray White dot CN1 34 Light gray Green dot Conventional product I O cable CBL TSC IO Cable length of 03 3 m 05 5 m 07 7 m and 10 10 m Pin number Wire color Wire type Pin number Wire color Wire type P24O Gray Black 1 0 3mm2 AWG22 CN1 17 Yellow Black 4 0 3mm2 AWG22 P24O Gray Red...

Page 49: ... 3 How to obtain STEP No whose operation has been completed 4 5 2 4 Timing chart 4 6 3 Function mode 1 4 7 3 1 Manual operation 4 7 3 2 Position instruction 4 7 3 3 Methods of position instruction 4 8 3 4 Specify and execute STEP No 4 8 3 5 How to obtain STEP No whose operation has been completed 4 8 3 6 Timing chart Normal mode 4 8 3 7 Timing chart Instruction mode 4 9 4 Function mode 4 4 10 4 1 ...

Page 50: ...is chapter describes the driver controller TSC s functions 5 Function mode 5 4 12 5 1 Specify and execute STEP No 4 12 5 2 Move command method 4 12 5 3 Position detection signal 4 12 5 4 Timing chart 4 13 This section describes the function mode 5 ...

Page 51: ...al instruction mode by I O Without area output with P area output 64 2 Position 256 type Multi point positioning operation with 256 points Without area output with P area output 256 3 Position 512 type Multi point positioning operation with 512 points Without area output without P area output 512 Electromagnetic valve type 4 Solenoid mode 1 type Multi point positioning operation with 7 points Dire...

Page 52: ...ng chart ON OFF ON OFF ON OFF ON OFF ON OFF End position PO Instruction position number input PI Start input STRT Moving MOVE Positioning completed output INPS 10 ms or more 10 ms or more 10 ms or more 10 ms or more Note 1 Note2 Note2 Note2 Pos Range Note 1 If input is made before INPS turns ON multi step transmission operation is activated after INPS turns ON Note 2 The delay time is up to severa...

Page 53: ...ng PI s ON Example To specify STEP No 22 22 16 4 2 so turn PI 4 16 PI 2 4 and PI 1 2 ON Example To specify STEP No 101 101 64 32 4 1 so turn PI 6 64 PI 5 32 PI 2 4 and PI 0 1 ON PI 0 1 2 3 4 5 6 7 8 Binary number digits 20 21 22 23 24 25 26 27 28 Decimal number 1 2 4 8 16 32 64 128 256 2 3 How to obtain STEP No whose operation has been completed Assuming the PO is equivalent to each binary number ...

Page 54: ... HOME and start input STRT detect the rising edge from signal OFF to ON The moving signal MOVE is output only in function mode 0 OFF OFF OFF OFF OFF ON ON ON ON ON TSC power supply Servo on input SV ON Zero return input HOME Instruction position number input PI 0 to PI 8 Start input STRT OFF ON Operation preparations completed output SVRDY OFF ON Zero return completed output HEND Moving completed ...

Page 55: ...ing speed is common to that of the inching operation described below Inching operation Once turned ON the actuator in moves for certain distance in positive direction with JOG P pin 11 or in negative direction with JOG N pin 12 For definitions of positive and negative directions see 4 2 Positive negative of moving di rection P 5 9 The moving speed is set by the parameter No 21 I O jog speed P 5 20...

Page 56: ...d instead of instruction normal po sition mode Check that the MODE S pin 26 is OFF Execution in the function mode 1 follows the function mode 0 See 2 1 Specify and execute STEP No P 4 5 However STRT PWRT pin 13 is used instead of STRT pin 13 which is used in the function mode 0 pin number is the same 3 5 How to obtain STEP No whose operation has been completed The method to obtain in the Function ...

Page 57: ...the writing completion signal WEND pin 31 turns ON for 30 ms External input instruction mode input MODE External instruction mode selection Position number selection JOG INCHING selection During JOG INCHING operation Moving direction Moving direction Instruction position number input P10 to P15 Manual switching input JOG INCHING during external input instruction Moving direction input JOG P during...

Page 58: ...ect the method in the parameter No 13 Move command system P 5 20 Level The movement is started when turning the input signal ON and is stopped when turning it OFF on the way Edge The movement is started at the rising edge of the input signal and is not stopped even when turning it OFF on the way If PAUSE is valid parameter No 33 is valid turn it OFF to pause it The following illustrates the case w...

Page 59: ... the corresponding start signal will operate the actuator according to the program set to each STEP No The zero return input HOME pin 15 detects the rising edge from signal OFF to ON Move command input for ST 0 to ST 6 is either level or edge For details see 4 2 Move command method P 4 10 During servo on TSC power supply Servo on input SV ON Zero return input HOME Operation preparations completed ...

Page 60: ...the rising edge of the input signal and is not stopped even when turning it OFF on the way If PAUSE is valid parameter No 33 is valid turn it OFF to pause it 5 3 Position detection signal Regardless of the selected and executed STEP No entering the positioning range set to each STEP No will turn the relevant LS pin 19 to 21 ON STEP Position Speed ACC DCC Push Pos Range No mm mm s m s2 m s2 mm 0 0 ...

Page 61: ...nput HOME and ST 0 to ST 2 detect the rising edge from signal OFF to ON TSC power supply Servo on input SV ON Zero return input HOME Cylinder type START input ST0 to ST2 Operation preparations completed output SVRDY Zero return completed output HEND Cylinder type position detection output LS0 Cylinder type position detection output LS1 Cylinder type position detection output LS2 Target position Po...

Page 62: ...Invalid 5 6 2 2 Auto servo OFF 1 ASO 1 5 6 2 3 Auto servo OFF 2 ASO 2 5 6 2 4 Auto servo OFF 3 ASO 3 5 6 2 5 Full servo control SERVO 5 7 3 Servo ON 5 8 3 1 Servo ON 5 8 4 Zero return 5 9 4 1 Zero return method 5 9 4 2 Positive negative of moving direction 5 9 5 Pause 5 10 5 1 Pause 5 10 This section describes the operation mode details This section describes the servo ON details This section desc...

Page 63: ...Speed switching 5 16 11 1 Speed switching 5 16 12 Brake release 5 17 12 1 Release with switch 5 17 12 2 Release with external input and output 5 17 13 General precautions 5 18 13 1 General precautions 5 18 This section describes the positioning details This section describes the pressing operation details This section describes the torque determination de tails This section describes the area dete...

Page 64: ...ent TSC This section describes the parameter details 14 Parameters 5 19 14 1 Parameter Actuator information 5 19 14 2 Parameter Actuator operation settings 5 19 14 3 Parameter External interface 5 22 14 4 Parameter Servo gain 5 23 ...

Page 65: ...NING To prevent unexpected accidents make sure to install the emergency stop switch and have the machine ready to be shut down at any time before performing operation Failure to do so may cause damage or injury If any abnormal heating odor smoke or fire is observed in TSC and the actuator shut the power off immediately since there is a risk of fire etc Failure to do so may cause burns due to high ...

Page 66: ... mode Operations are performed with the mode change switch set to AUTO in this mode MANU S output pin 28 is turned OFF This manual primarily describes the operation method and operations using the external input and output signals in AUTO mode Operations must be programmed beforehand See the separate setup tool D STEP Instruction Manual In the descriptions on and ON means the external input and ou...

Page 67: ...OFF If the position deviation caused by external force difference between the command value and the current value exceeds the parameter No 30 Position deviation P 5 21 the alarm of the alarm code No 32 Excessive position error deviation will be generated P 6 5 Note that the alarm will be generated only when the next move command is executed If the position deviation is within the permissible posit...

Page 68: ...f position deviation is caused due to external force a torque to correct it will be generated the current will increase If the external force exceeds the torque generated at the maximum current the position deviation occurs Otherwise position deviation never occurs Vibration or abnormal noise may occur depending on the status at stop Do not use the controller if vibration or abnormal noise affects...

Page 69: ... However jog and inching operations of the Function mode 1 can be performed For an actuator with a brake the brake will be released at the same time as the servo ON Note that the actuator may fall in using it in the vertical direction if the torque is insufficient When you turn the servo OFF while the actuator is running the motor current will be interrupted and the actuator will stop Leave it ON ...

Page 70: ...inching operations in the Function mode 1 necessary for instruction though You cannot change the returning direction and speed Position for starting the zero return Initial moving direction Reverse direction of the stroke end Stroke end Zero point Home position signal First time Zero point With offset Offset This example assumes the slider type and the zero return method toward the motor Position ...

Page 71: ...ore turning the PAUSE input pin 16 OFF In this case turning ON the PAUSE again will not resume the operations and the unit remains in the position so enter the operation command for the next STEP No The operation command of the next STEP No should be the STEP No other than the one that was active before turning the PAUSE input pin 16 OFF The same STEP No was canceled with the REST input so its ope...

Page 72: ...erates in positive direction with JOG P pin 11 or in negative direction with JOG N pin 12 For definitions of positive and negative directions see 4 2 Positive negative of moving direction P 5 9 The moving speed is set by the parameter No 21 I O jog speed This moving speed is common to that of the inching operation described below Inching operation Once turned ON the actuator in moves for certain d...

Page 73: ... is turned ON when the current position enters into the IN POSI of the target POSI For more information on settings see the separate D STEP or TDO Instruction Manual STEP No ABS INC Position Speed ACC DCC JUMP Comment mm mm s mm s2 mm s2 No 0 ABS 70 00 80 3 3 1 Positioning operation 1 1 ABS 100 00 30 3 3 E Positioning operation 2 Speed 30mm s Position 100mm Target position 1 80mm s 70mm Target pos...

Page 74: ...en when the amount of impressing is not constant you can perform pressing by controlling the torque For more information on settings see the separate D STEP or TDO Instruction Manual STEP No ABS INC Position Speed Push Pos Range JUMP Comment mm mm s mm No 0 ABS 70 00 80 70 50 00 E Pressing operation Speed 20mm s 100mm 80mm s 70mm Position Push speed 120mm Target position Target position Positionin...

Page 75: ...e Valid or Invalid of the torque determination range setting can be selected For more information on settings see the separate D STEP or TDO Instruction Manual When the range setting is valid When the range setting is invalid Distance to the target Target position Maximum amount of pressing Positioning width During pressing operation set Push between 1 and 70 Start pressing Pressing maximum travel...

Page 76: ...onfigured in the P area A mm and P area B mm of the program table the P AREA output pin 27 turns ON which is executable in operation modes 0 1 2 4 and 5 The P area set for the running STEP No is valid The P area for other STEP No is invalid For more information on settings see the separate D STEP or TDO Instruction Manual No Parameter name Set value 1 Max area 100 00 2 Min area 40 00 Area output s...

Page 77: ...you will perform speed switching set E to JUMP NO You can switch speed only in the operation mode 0 2 and 3 This function is not available for operations from D STEP The machine always pauses STEP No ABS INC Position Speed P area A P area B JUMP Comment mm mm s mm mm No 0 ABS 60 00 80 50 00 70 00 E STEP No 0 operation green 1 ABS 120 00 30 90 00 110 00 E STEP No 1 operation blue STEP No ABS INC Po...

Page 78: ...ilure to do so may cause damage or injury If it is manually released return it to the valid status manually The brake remains released until it is returned to the valid status and it does not interlock with the servo ON OFF Also note that if the brake is stopped with the emergency stop switch it is released when the switch is back Obligatory The brake of the actuator with brake can be released man...

Page 79: ...n of movement INPS pin 30 and LS pin 19 to 21 signals ON the intervals of more than 10 ms are necessary 2 In the function modes 0 and 1 the MOVE output pin 25 turns ON until the movement comple tion program Especially when the MOVE output pin 25 turns OFF without the INPS output pin 30 ON for the pressing operation please determine that pressing failed missed ...

Page 80: ...ted 8 Default speed mm s 1 to 1000 100 Description Inputs the default value of Speed entered when double clicking an arbitrary row of the program table 9 Default ACCEL DECEL m s2 1 to 100 3 Description Inputs the default value of ACC and DCC entered when double clicking an arbitrary row of the program table 10 IN POSI range mm 0 00 to 999 99 0 02 Description Inputs the default value of Positioning...

Page 81: ...ailored to the actuator characteristics is set before shipment 16 Jog speed mm s 1 to 250 10 Description D STEP Sets the jog speed on the PROGRAM screen For the speed setting by I O input see No 21 17 Auto servo OFF 1 s 0 to 9999 9999 Description Sets the time after completing the positioning until the servo turns OFF when Stop mode of the program table is ASO1 18 Auto servo OFF 2 s 0 to 9999 9999...

Page 82: ...ll screw lead mm 0 0 to 99 9 Depends on models Description Sets the length of ball screw lead A value tailored to the actuator is set before shipment 28 Cur select at miss Select Current limit on stop status Limit for pressing Current limit on stop status Description Sets the current limit after the pressing operation being in vain Current limit on stop status Current set in No 11 Limit for pressi...

Page 83: ...nction mode of the driver controller 37 IN POSI signal type Select PEND INP INP Description Selects the output method of signal for positioning completion INPS pin 30 When the servo is OFF this is unconditionally turned OFF regardless of the current position PEND Servo ON Once INPS is turned ON this remains ON even when the position is out of IN POSI No 10 INP Servo ON Turns ON only when the posit...

Page 84: ...ed Increasing the value improves the follow up performance to the speed command the servo rigidity is enhanced but is likely to cause the overshoot and oscillation resulting in mechanical vibration 42 Speed loop I gain 0 01ms 1 to 65536 Depends on models Description This is a parameter to determine the responsiveness of speed control loop Increasing the value reduces the responsiveness to the spee...

Page 85: ...cribes the causes and counter measures when an alarm is displayed or other failure occurs on the driver controller TSC 1 Alarm lists 6 2 1 1 Alarm lists 6 2 1 2 About the status of the servo when an alarm sounds 6 3 2 Alarm code 6 4 2 1 Alarm code 6 4 3 Causes and counter measures of alarms 6 5 3 1 Causes and counter measures of alarms 6 5 This section describes the alarm list ...

Page 86: ...error Actual speed has exceeded the preset maximum value 32 Excessive position error deviation The deviation between commanded position and current position has exceeded the parameter No 30 Note When the Standstill mode is ASO1 to 3 alarm generates when the following move command is executed usually generates immediately after exceeding the parameter 33 Soft limit over The current position has exc...

Page 87: ...us 23 ORG time out The servo changes to OFF status 24 Writing error on move The servo keeps ON status 25 Position data anomaly The servo keeps ON status 31 Position comm error The servo keeps ON status 32 Excessive position error deviation The servo changes to OFF status 33 Soft limit over The servo keeps ON status 34 Push hold operation range over error The servo changes to OFF status 51 EEPROM e...

Page 88: ...modes 0 through 3 See 2 3 How to obtain STEP No whose operation has been completed P 4 5 Assuming the AC is equivalent to each binary number digit convert them into decimal numbers to obtain an alarm code Obtain the decimal numbers of the AC being ON from the table above and add all the numbers up to determine the current alarm code Example When AO 5 32 AO 4 16 AO 1 2 and AO 0 1 are ON 32 16 2 1 5...

Page 89: ... ORG When starting the normal operation Operation starting procedures are not appropriate Issue directive to move after zero return 23 ORG time out When in zero return Actuator has a fault Replace the actuator with new one Motor has a fault Replace the actuator with new one Encoder has a fault Replace the actuator with new one Actuator connection cable has a fault Replace the cable with new one Dr...

Page 90: ...oning operation Inhibition of operation by external force Remove the inhibitor Actuator has a fault Replace the actuator with new one Motor has a fault Replace the actuator with new one Brake has a fault when a brake is provided Replace the actuator with new one Actuator connection cable has a fault Replace the cable with new one Driver controller board has a fault Replace the driver controller wi...

Page 91: ...2 2 Usage conditions range 7 3 2 3 Warranty scope 7 3 2 4 Exclusion of warranty liability 7 4 2 5 Delivery conditions 7 4 Warranty Perform correct mainte nance works regularly as it could minimize the inci dence of troubles This chapter describes the warranty of this product About this chapter This chapter describes the maintenance repair and replacement procedures of this product and warranty ...

Page 92: ...dard of durability of consumables in the driver controller TSC 1 1 1 Standard of durability of consumables Parts listed in the table below are also subject to aged deterioration so use the following only for reference Consumables Location Durability Contact relay Power supply circuit power ON OFF 100 000 cycles Contact relay TDO connection circuit with TDO connected 100 000 cycles We do not provid...

Page 93: ...re diagnosis Please inform our Customer Support refer to back cover of the trouble description content and model and serial number indicated on the product label Then we will perform the initial diagnosis of the product failure When we recognize that the failure occurred within the free warranty period set forth above and the responsibility of the cause rests on us the warranty is applied without ...

Page 94: ...ase of any paid repair work the warranty period of the repaired section shall be 6 months from the repair work regardless of the warranty period of the product itself Repair works are performed in our plant Whether free or paid repair work cost of returning the product to our site shall be customer s responsibility The cost of delivering the repaired or replacing product to customer s site is our ...

Page 95: ...izes the technical information including specifications and dimensional diagrams of this product When using this product refer to this chapter for any details you want to know 1 Driver controller TSC 8 2 1 1 Specifications and dimensional drawing 8 2 2 Cables 8 3 2 1 Connection cable 8 3 This section describes cables ...

Page 96: ...6 points Start Zero return Pause Reset Servo ON Step No specification etc Input point count 16 points Zero return completed In position Servo ready Alarm Emergency stop status etc Output point count 24 VDC 10 This should be prepared by yourself External power supply for input output Communication Serial communication PC setup tool D STEP or digital operator TDO RS 485 Connected device Communicatio...

Page 97: ...8 3 8 Technical Materials TSC 2 1 Connection cable 2 1 1 Actuator cable for TSC Actuator cable for TSC CBL TSC AC B Standard indicates the cable length 03 3 m 05 5 m 10 10 m Driver controller side Actuator side ...

Page 98: ...MEMO ...

Page 99: ...13 No 6120 1 0 E First edition February 2014 No 6120 1 1 E Correction of erroneous description June 2014 No 6120 1 2 E Correction of erroneous description November 2016 No 6120 1 3 E Added compatible model numbers Changed accessories and optional parts April 2018 No 6120 2 0 E Errors corrected notes added Revision history ...

Page 100: ...TSC INSTRUCTION MANUAL No 6120 2 0 E 201804 THK Electric Actuator Controller Series Stepper Driver Controller ...

Reviews: