


2-3
COPIER
Contents
This section provides information that you should know before using the machine as a copier.
BASE SCREEN OF COPY MODE
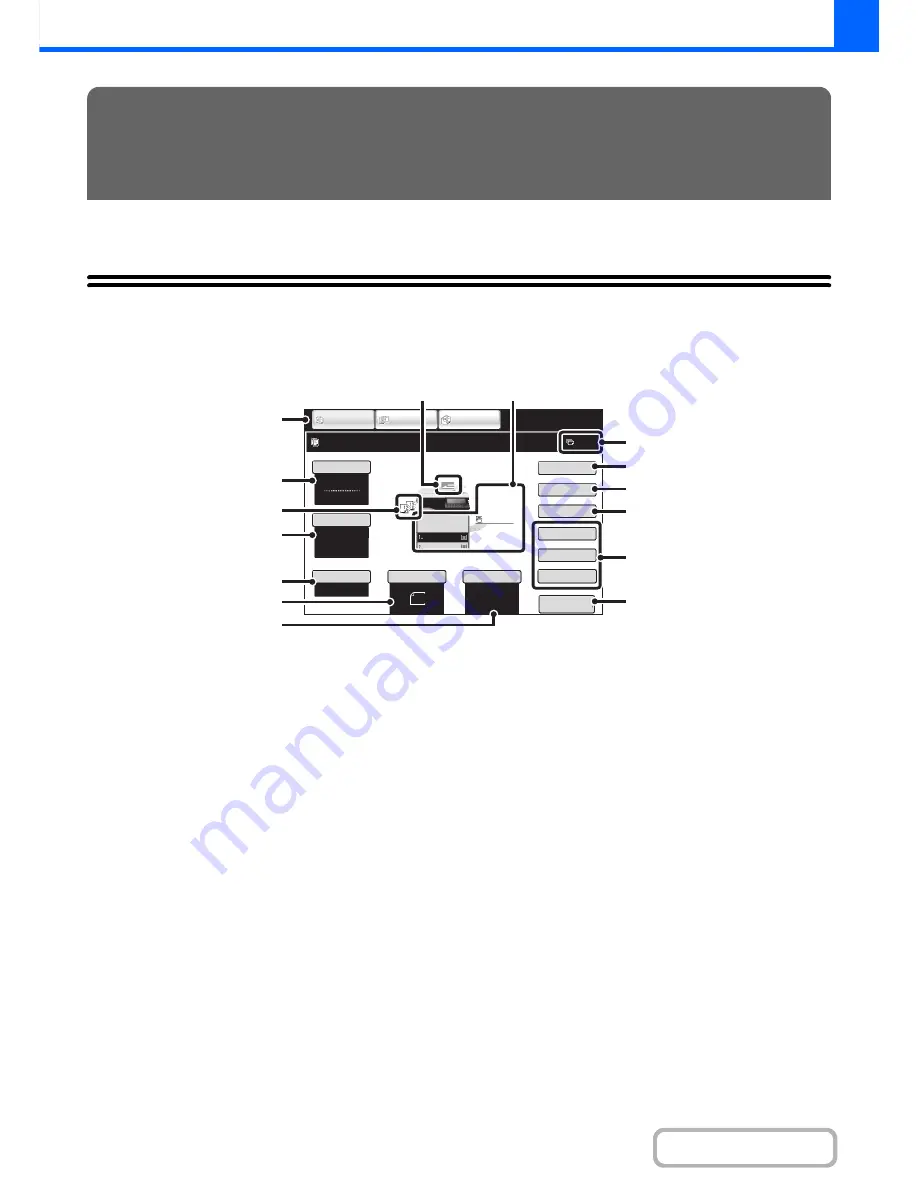
Touch the [COPY] key in the touch panel to open the base screen of copy mode.
The base screen shows messages and keys necessary for copying, and settings that have been selected.
(1)
Mode Select keys
Use these keys to switch between copy, image send, and
document filing modes.
If you wish to switch to copy mode, touch the [COPY]
key.
(2)
[Color Mode] key
Touch this to change the color mode.
☞
COPY COLOR MODES
(page 2-20)
(3)
Output display
When one or more output functions such as sort or group
have been selected, this shows the icons of the selected
functions.
☞
OUTPUT
(page 2-32)
(4)
[Exposure] key
This shows the current copy exposure and original type
settings. Touch this key to change the exposure or
original type setting.
☞
CHANGING THE EXPOSURE AND ORIGINAL
IMAGE TYPE
(page 2-22)
(5)
[Copy Ratio] key
This shows the current copy ratio. Touch this key to
adjust the copy ratio.
☞
REDUCTION/ENLARGEMENT/ZOOM
(page 2-24)
(6)
[Original] key
Touch this key to enter the original size manually.
If the original size is set manually, the set size appears.
☞
ORIGINAL SIZES
(page 2-28)
(7)
[Paper Select] key
Touch this key to change the paper (tray) that is used.
The tray, paper size, and paper type will appear. Trays 1
to 2 can also be touched in the paper size display to open
the same screen.
☞
PAPER TRAYS
(page 2-10)
(8)
Original feed display
This appears when an original is inserted in the
automatic document feeder.
BEFORE USING THE MACHINE AS A
COPIER
Auto
8½x11
Plain
8½x11
Color Mode
Special Modes
2-Sided Copy
Output
File
Quick File
ID Card Copy
Preview
Ready to scan for copy.
Copy Ratio
100%
0
1
Original
Paper Select
Full Color
Exposure
Auto
IMAGE SEND
DOCUMENT
FILING
COPY
Plain
8½x11
8½x11
8½x11
(9)
(
8
)
(7)
(1)
(2)
(4)
(5)
(6)
(10)
(14)
(11)
(12)
(13)
(15)
(3)
Summary of Contents for MX-C301W
Page 6: ...Make a copy on this type of paper Envelopes and other special media Transparency film ...
Page 8: ...Assemble output into a pamphlet Create a pamphlet Create a blank margin for punching ...
Page 11: ...Conserve Print on both sides of the paper Print multiple pages on one side of the paper ...
Page 35: ...Organize my files Delete a file Delete all files Periodically delete files Change the folder ...
Page 159: ...2 63 COPIER Contents To cancel Stamp Touch the Cancel key in the screen of step 3 ...
Page 230: ...3 19 PRINTER Contents 4 Click the Print button Printing begins ...


