


U.4.29
Date Code 20020501
User’s Guide
SEL-421/SEL-421-1 Relay
Basic Relay Operations
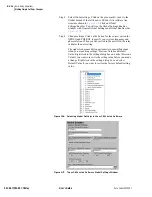
Making Simple Settings Changes
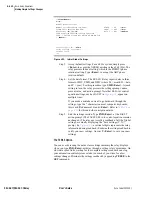
Changing a Relay Setting From the Front Panel
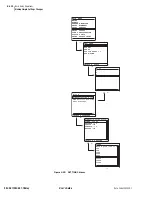
The purpose of the procedure in the following steps is to provide additional
practice at entering relay settings from the front panel. In this example, you
change the PORT F front-panel communications port settings.
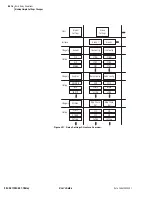
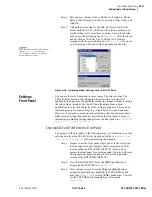
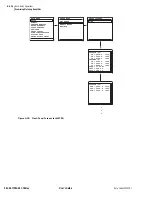
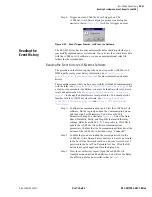
Step 1. View the MAIN MENU. If you have been using the front panel
(as in the previous example), press the
{ESC}
key repeatedly
until you see the MAIN MENU. If the relay is displaying the
ROTATING DISPLAY, press the
{ENT}
pushbutton to display
the MAIN MENU. The first screen of
shows the
MAIN MENU at the beginning of the front-panel settings
process.
Step 2. View the settings screens. Press the
{Up}
and
{Down}
arrow
navigation pushbuttons to highlight the SET/SHOW action
item (See
). Press the
{ENT}
pushbutton. You will
see the SET/SHOW submenu (the second screen in
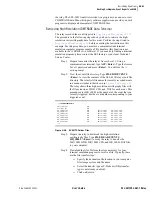
Step 3. Select PORT F. Highlight PORT and press the
{ENT}
pushbutton. Next, the relay displays the PORT instances (the
third screen of
). Choose the port you want to
configure by using the
{Up}
and
{Down}
arrow navigation
pushbuttons to move the screen arrow. For this example, select
PORT F and press
{ENT}
.
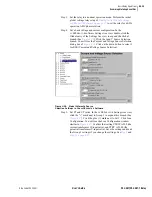
Step 4. View the Communications Settings category screen. The relay
shows the fourth screen of
, the PORT F category
screen. Use the
{Up}
and
{Down}
arrow navigation
pushbuttons to select the settings category. For this example,
highlight Communications Settings and press
{ENT}
. The
relay displays the fifth screen of
, the
Communications Settings screen.
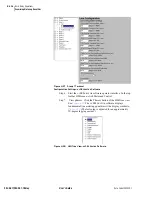
Step 5. Change settings. Highlight the SPEED setting. Press
{ENT}
.
(The relay possibly requires a password here; see
and
Section 5: Front-Panel Operations in the User’s
.) The LCD displays the SPEED selection submenu that
has all the possible choices for serial data speeds. The highlight
in the sixth screen of
indicates the default setting of
9600 (bps). Use the
{Up}
and
{Down}
arrow navigation
pushbuttons to select a different speed. Once you have selected
a data speed, press the {
ENT}
pushbutton.
NOTE:
Once you have changed
communications parameters, you
must change the corresponding
parameters in your terminal
emulation program to communicate
with the relay via a communications
port.
Step 6. End the settings session. The relay returns to the previous
category settings list screen. Press
{ESC}
to return to the
categories screen where you see the Save Settings item at the
bottom of the screen. Use the
{Up}
and
{Down}
arrow
pushbuttons to highlight Save Settings and press
{ENT}
.
Highlight YES, and then press
{ENT}
. The relay validates the
setting and returns you to the PORT screen (the third screen of
Step 7. Normalize the front-panel display. Press
{ESC}
repeatedly to
return to the MAIN MENU.
Summary of Contents for SEL-421
Page 8: ...This page intentionally left blank ...
Page 30: ...This page intentionally left blank ...
Page 110: ...This page intentionally left blank ...
Page 204: ...This page intentionally left blank ...
Page 284: ...This page intentionally left blank ...


