


Page 252
STAT
IM 2000/2000S
Service Guide
96-106775 Rev 5.0
12. Printer and Data Logger
• Units that were manufactured with Revision 2.x/5.x/6.x controller boards DO NOT
have a cut-out in the chassis and CANNOT be upgraded for data logger use.
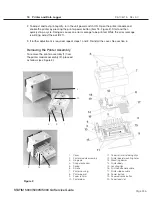
For this operation the
Null Modem Serial Cable DB9F – DB25M
is required
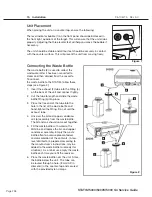
Locate the printer port on the rear of the unit and proceed as follows:
1. Ensure the STAT
im
is powered OFF
2. Press and hold the STOP button and power ON the STAT
im
unit to access the USER menu.
3. The following menu is now available and the display on the LCD
screen should be as highlighted.
4. Using the UNWRAPPED and WRAPPED buttons, scroll until the
cursor is next to “RS232” and select it by pressing the RUBBER &
PLASTICS button.
5. You should now have the option of “N/A”, “USB/Flash MSD”
or “Serial Printer” which can be scrolled through by using the
UNWRAPPED and WRAPPED buttons.
6. Scroll to “USB/Flash MSD” and press the RUBBER & PLASTICS
button to select and return to the user menu.
7. Using the UNWRAPPED and WRAPPED buttons, scroll until the cursor is next to “Serial Port
Bitrate” and press the RUBBER & PLASTICS button to access the options.
8. Using the UNWRAPPED and WRAPPED buttons, scroll (if required) to the Bitrate value of
9600
appears in the display and then press the RUBBER & PLASTICS button to select and return to
the user menu.
9. Using the UNWRAPPED and WRAPPED buttons, scroll until the cursor is next to “Printer uses º
char” and press the RUBBER & PLASTICS button to access the options.
10. Using the UNWRAPPED and WRAPPED buttons, scroll (if required) to the Hex value of
32 [0x20]
appears in the display and then press the RUBBER & PLASTICS button to select
and return to the user menu.
Important note: the UNWRAPPED button will increase the
displayed value by 1, and the WRAPPED button will increase that displayed value by ten.
11. Using the UNWRAPPED and WRAPPED buttons, scroll until the cursor is next to “Save and
Exit” and press the RUBBER & PLASTICS button, which will now take you out of the user
menu and back to the operating menu and will save your changes.
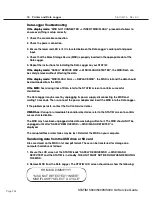
12. The LCD display should now show the following:
Messages “MSD NOT DETECTED”, “INSERT MSD/FLASH” and “SELECT A CYCLE” will rotate in
sequence and not all appear at the same time.
STAT
IM
5000/5000S/5000 G4 Service Guide
User Mode
Time/Date Setup
Language Setup
Unit ID Setup
Last Printout
RS232
End Of Line CR/LF
Serial Port Bitrate
Printer user ° char
Save and Exit
Exit
RS232
USB/Flash MSD
HH:MM DD/MM/YYYY
“MSD NOT DETECTED”/”INSERT
MSD/FLASH”/”SELECT A CYCLE”
HH:MM DD/MM/YYYY
USB/FLASH DETECTED/SAFELY
REMOVE MSD/SELECT A CYCLE


