


Page 186
STAT
IM 2000/2000S
Service Guide
96-106775 Rev 5.0
8. Water Pumps, Reservoir, and Compressor
Removing and Reinstalling the Medo compressor
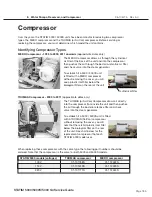
Removing the Medo Compressor
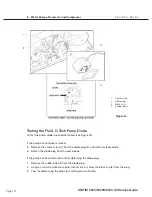
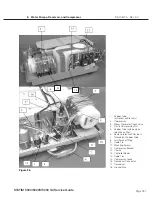
To remove the compressor, follow these steps (see Figure 26):
1. Turn the power switch OFF, and unplug the unit.
With the cylindrical air filter only:
2A. Locate the silicone rubber tube (5) which extends from the compressor (2) to the steam
generator check valve (3). Disconnect the compression nut (4) securing the tube to the
compressor and remove the tube from the fitting.
With the additional bacteria-retentive filter:
2B. Locate the rubber tube (5) which extends from the compressor (2) to the input side of the
bacteria-retentive filter (6). Disconnect the compression nut (4) securing the tube to the
compressor and remove the tube from the fitting.
3. Remove the transparent rubber tube (7) which extends from the compressor intake fitting to the
air fitting (8). Cut the cable tie (9) securing the tube to the compressor and remove the tube from
the fitting.
4. Remove the four screws (10) that attach the compressor bracket (11) to the chassis (12). Retain
the screws. Some compressor brackets may appear slightly different then the bracket you are
servicing. Use the bracket that accompanies the replacement compressor.
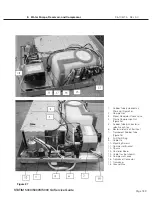
5. Disconnect the leads from controller board (13) terminal block positions J1-9 LINE and J1-10
NEUTRAL, and carefully cut the cable ties (14) securing the compressor leads (15).
6. If present, remove the pressure transducer. See Chapter 9, Pressure Transducer.
7. Disconnect the ground wire (18) from the compressor body and remove the compressor from
the unit.
Reinstalling the Medo Compressor
SciCan recommends that the check valve be replaced when the compressor is replaced.
See Chapter 11, Steam Generator Removal, Cleaning and Replacement, the Steam Generator
Check Valve.
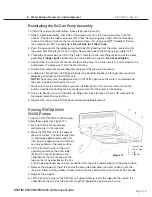
To replace the compressor, follow these steps (see Figure 26):
1. Connect the ground wire (18) to the compressor body.
2. Position the compressor / bracket assembly (11) in the chassis (12). Route the compressor
leads (15) with the bundle of wires leading to the controller board (13). Connect the lead to
controller board terminal block position J1 - 9 LINE and the wire to terminal block position
J1-10 NEUTRAL.
3. Bundle the wires together and secure them using nylon cable ties (14) every 2 - 3 inches.
4. Reinstall the four screws (10) retained during disassembly. Do not crush wires or tubes.
5. Reinstall the pressure transducer (17), if present. See, Pressure Transducer.
6. Connect the transparent rubber tube (7) which extends from the compressor intake fitting to the
air filter fitting (8). Secure the tube using a nylon cable tie (9).
With the cylindrical air filter only:
7A. Connect the rubber tube (5) which extends from the top of the compressor (2) to the steam
generator check valve (3). Secure the tube using the plastic compression nut (4).
STAT
IM
5000/5000S/5000 G4 Service Guide


