15
AB Guidance Utilities and Nudge Features:
153
AB GUIDANCE UTILITIES AND NUDGE FEATURES
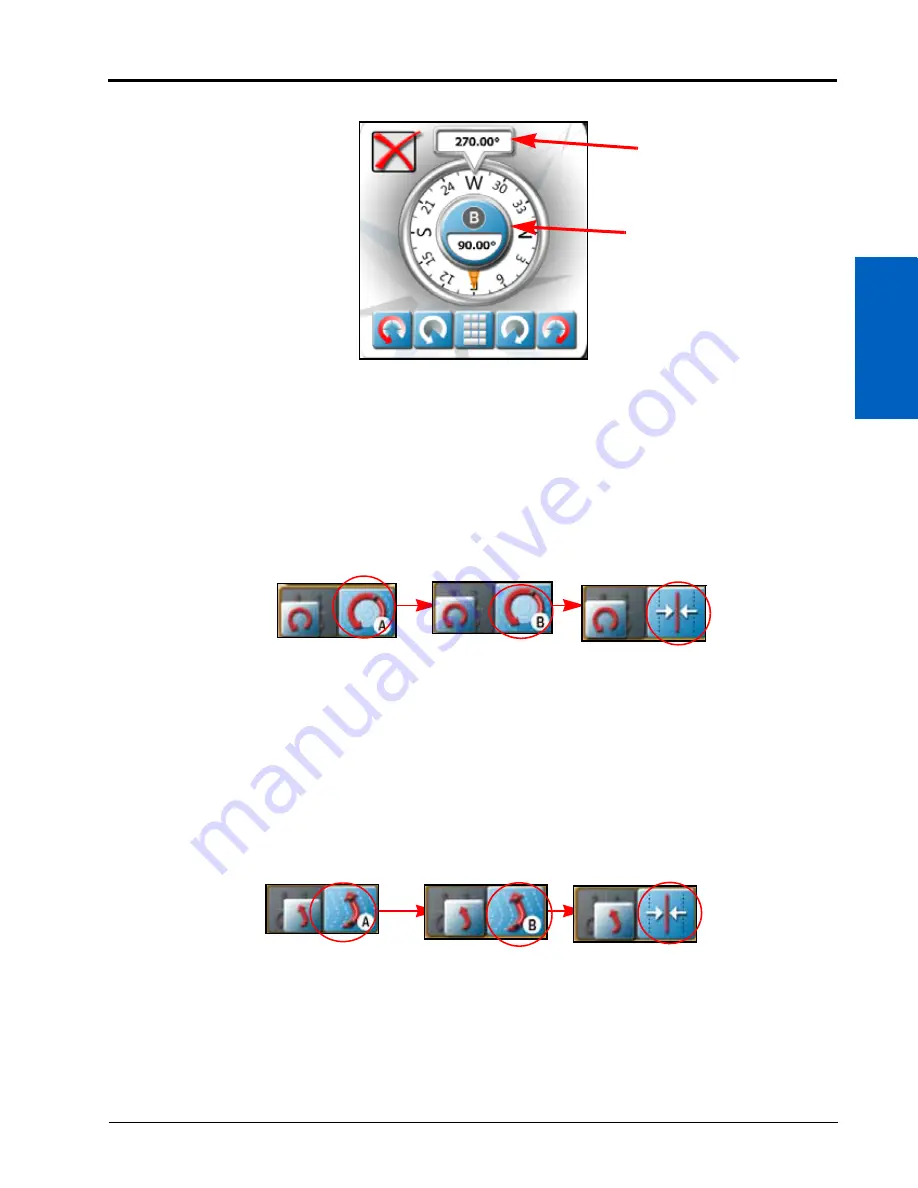
4. Touch the Set B by Heading button to display the Set B by Heading prompt.
5. Use the course setting options along the bottom of the prompt to adjust the value displayed as the selected
heading.
6. Touch the Set B button in the middle of the compass display to set the guidance path using the selected
heading.
SET A PIVOT LINE
To set a new pivot guidance path:
1. Touch the Set A button on the AB Utilities widget.
2. Begin driving the first swath. While ROS may allow the second point to be set before driving the full swath, best
results are generally achieved by driving further along the initial swath before setting the B point.
3. Touch the Wet B button.
4. If needed, press the Recalibrate button to move the guidance line to the current position.
SET A FIXED CONTOUR LINE
To set a new fixed contour guidance path:
1. Touch the Set A button on the AB Utilities widget.
2. Begin driving the first swath. When creating a fixed contour path, ROS will require that the full swath length be
driven to plot points along the swath.
3. At the end of the swath, touch the Set B button.
4. If needed, press the Recalibrate button to move to the current position.
Current
Vehicle
Heading
Selected
Heading and
Set B Button
Manual
Heading
-90°
-1°
+1°
+90°
Set A
Set B
Recalibrate
Set A
Set B
Recalibrate
Summary of Contents for viper
Page 16: ...CHAPTER 2 8 Viper Viper 4 Installation Operation Manual ...
Page 48: ...CHAPTER 6 40 Viper Viper 4 Installation Operation Manual ...
Page 67: ...File Manager 59 FILE MANAGER ...
Page 68: ...CHAPTER 7 60 Viper Viper 4 Installation Operation Manual ...
Page 112: ...CHAPTER 9 104 Viper Viper 4 Installation Operation Manual ...
Page 174: ...CHAPTER 16 166 Viper Viper 4 Installation Operation Manual ...
Page 176: ...CHAPTER 17 168 Viper Viper 4 Installation Operation Manual ...


