background image

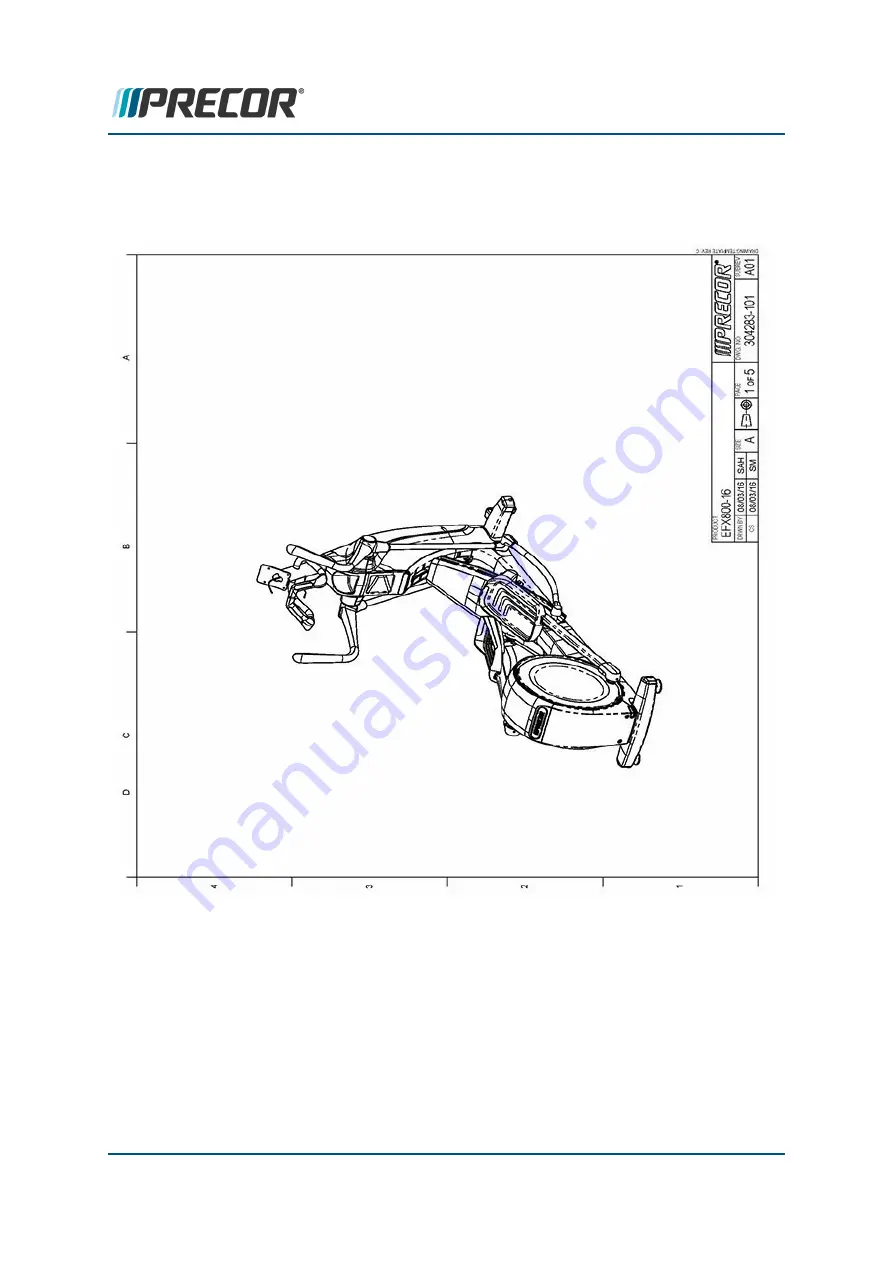
Exploded View - Moving Arm Models

Page 1 of 5

Contact Precor Customer Support at [email protected] or 800.786.8404 with
any questions.

Page 214

10 Parts

Exploded View - Moving Arm Models

Summary of Contents for Experience EFX800-16 Base

Page 1: ...Service Manual Experience Series Elliptical Fitness Crosstrainer EFX800 16 18 Base Fixed and Moving Arms...

Page 2: ...ions 10 Fastener Torque Specification 10 Belt Tension Specification 11 Bolt Grade Identification 11 Parts 11 Lubricants 12 Cleaning Procedure 12 Approved Cleaning Products 13 Cleaning Procedure 13 Pow...

Page 3: ...P31 LED consoles 23 P10 P30 and P31 consoles 23 P30i consoles 23 P80 and P82 touchscreen consoles 24 P62 touchscreen consoles 24 LED Console Standard Service Menus 25 Hardware Validation Diagnostics...

Page 4: ...Battery Replacement 58 About 58 Determining the battery condition 58 Battery Fuse 58 Replacement Procedure 59 Covers and Panels Replacement 61 About 61 Cover Replacement Procedures 63 Front Lift Cove...

Page 5: ...out 104 Step up Pulley Tensioner Assembly Exploded View 105 Procedure 105 Drive Components assembly Replacement 109 About 109 Procedure 109 Input Drive Assembly Replacement 117 About 117 Procedure 117...

Page 6: ...rive Assembly 148 Stairarm Replacement Machines with original Input Drive Assembly 152 Linkarm Replacement 157 About 157 Procedure 157 Wheel Truck Replacement 162 About 162 Procedure 162 Ramp Replacem...

Page 7: ...ubleshooting with Error Codes 184 Error Log CPA Event Log 185 About 185 LED Console P10 P30 P30i and P31 Error Log 186 Touchscreen Console P62 P80 and P82 CPA Event Log 187 Active Status Light ASL 190...

Page 8: ...F version 208 Exploded View Diagram Fixed Arm Models 209 Exploded View Moving Arm Models 214 Parts List Fixed Arm Models 219 Parts List Moving Arm Models 223 Appendix A Edition Information i Edition i...

Page 9: ...s This service manual applies to the Experience Series 800 Line EFX1 models with the EFX800 16 18 Bases Model EFX800 16 Base Configuration EFX833 Fixed Arms Moving CrossRamp and P30 console EFX835 Mov...

Page 10: ...ion and adjust ment procedures Troubleshooting procedures replacement procedures and system block and wiring diagrams Additional Documentation There is also an online web version if you have internet...

Page 11: ...accessory attachments that are not recommended by the manufacturer Non OEM accessories can cause injuries l Do not stand or climb on the handlebars display enclosure or cover l On a self powered unit...

Page 12: ...During service operations you will be very close to moving machinery and voltage bear ing components o Remove jewelry especially from ears and neck o Tie up long hair o Remove neck ties and o Do not...

Page 13: ...ance Dual stage 3 phase hybrid generator eddy brake current system to con trol the applied resistance levels Levels 1 20 Resistance min max specification min 18 W level 1 at 40 SPM max 720 W level 20...

Page 14: ...ons PRODUCT TYPE PRODUCT LINE CONSOLE FEATURE LEVEL TRM treadmill EFX2 elliptical AMT3 AMT UBK4 Upright RBK5 Recumbent 8 Experience Premium 7 Experience 6 Assurance Stand ard 4 Precision Con sumer 2 E...

Page 15: ...consecutive daily build number Serial Number Label Location The serial number label is located on the hood and frame Note Always use the frame serial number label to verify the machine serial number D...

Page 16: ...manual is referenced to a user stand ing on the equipment facing the console Covers and Panels Equipment cover and access panel locations Contact Precor Customer Support at support precor com or 800 7...

Page 17: ...r removal and installation see Covers and Panels Replacement on page 61 Contact Precor Customer Support at support precor com or 800 786 8404 with any questions Page 9 2 General Information Covers and...

Page 18: ...Specifications Fastener Torque Specification System component fastener torque specification System Component Specification RF2 coax connector 2 4 in lbs 0 271 Nm Display fasteners 180 in lbs 20 Nm Se...

Page 19: ...Stage Drive Belt Tension Used Belt 1 125 135 lbs 56 7 61 Kgs Second Stage Drive Belt Tension New Belt 1 110 120 lbs 50 54 4 kgs Second Stage Drive Belt Tension Used Belt 1 92 105 lbs 43 47 6 kgs 1 Ne...

Page 20: ...ended brands or equivalent Mobil 1 synthetic grease Super Lube with Teflon CAUTION Do not use petroleum based lubricants on mechanical components such as the lift as this may result in degradation of...

Page 21: ...equipment surface to avoid equipment damage due to excessive moisture CAUTION Do not use acidic cleaners and do not spray directly onto the equipment surfaces 2 Rinse surfaces using a clean lint free...

Page 22: ...og CPA Event Log on page 185 Press and hold the PAUSE RESET key for 6 seconds minimum to access the Error Log If there are no logged error codes the Stuck Key message will show To remove an error code...

Page 23: ...maximum range while verifying the machine operation l Make sure that the console RESISTANCE paddle control operation is smooth and working correctly l Vary the RESISTANCE from minimum to maximum and b...

Page 24: ...d verify that the console heart rate icon is flashing and the HR indicator is showing the heart rate beats per minute bpm Return to service 1 Make sure that the machine is setting level and stable mac...

Page 25: ...age and error log data On touchscreen consoles there are two service menus the Service Settings menu intended for service technicians and the Club Settings intended for club operators The Service Sett...

Page 26: ...n the equipment including the legacy Information Display Club Settings and Hardware Validation Diagnostic Tests menus 5651565 Club Settings Club Settings access code is a sub set of service menus dire...

Page 27: ...teps l On P10 P30 P31 consoles Press the PAUSE hardkey and immediately use the keypad to type in the access code Contact Precor Customer Support at support precor com or 800 786 8404 with any question...

Page 28: ...e P80 is set to the Welcome home page 2 Press and hold the Pause key while pressing CH up VOL down VOL up CH down 3 Use the touch keypad to type in the service access code P62 and P82 touchscreen cons...

Page 29: ...up CH down CH down CH up 3 At the Sign In screen type in the service access code Touchscreen Calibration shortcut Console shortcut to access the Touchscreen Calibration test Steps Contact Precor Cust...

Page 30: ...Press and hold the VOL Up hardkey while pressing CH up CH Dwn CH Dwn CH up 4 Wait for the download to finish and then remove the USB drive IMPORTANT Do not remove the USB drive until the Report was s...

Page 31: ...Key mes sage when there are no logged errors Numeric Keypad Use to type in numeric inputs e g access codes P30i consoles Available exclusively on the 700 Line Treadmill the P30i Interval Console is an...

Page 32: ...the BACK softkey to exit the service software PAUSE hardkey Stop a running diagnostic test P62 touchscreen consoles The P62 console uses a combination of touchscreen softkeys icons and keypad hardkey...

Page 33: ...u Access code 51765761 Hardware Validation Tests The Hardware Validation menu provides a set of automated diagnostic tests and hardware cal ibration routines used to troubleshoot calibrate and verify...

Page 34: ...strides per minute is equal to 2 X RPM CROSSRAMP TEST menu MACHINE TEST CROSSRAMP TEST EFX AMT4 Only Allows lift command operation during an active lift error condition E40 E42 E45 E46 even if the li...

Page 35: ...guage for all workouts on this machine Lan guage for single use workouts can also be set by the user from the workout options Default English SET UNITS Sets units of measure to US standard or Metric R...

Page 36: ...OGRAMS 2 Either enabled or disabled the setting allows the unit to access specialized fitness tests designed for police fire fighters and the military Default disabled MAINT CONFIG 1 ASL models only S...

Page 37: ...re is a problem with the running belt deck and requires servicing or replacement Important Reset the Belt Rating after replacing with a new running belt and deck hold down QuickStart MAINT COUNTER 1 P...

Page 38: ...isplays the model and serial number of the machine The base serial number can be set using the WinCSAFE com puter software The factory default is NONE USAGE LOG Displays the type of workout programs t...

Page 39: ...4 menu Settings Equipment Usage Machine workout usage information total workout time dis tance last work start stop times on page 34 1 menu Settings Maintenance ASL equipped products only Provides the...

Page 40: ...ble Updates to view select and upload the software see How to Update the console operating system software 1 Not included on elliptical or treadmill products that do not have the maintenance and ASL f...

Page 41: ...em Operating software version Select to show the component system software versions including the CPA Software LPCA Qt App Boot Kernel and File System software versions Heartbeat Interval menu About H...

Page 42: ...orkout Distance Machine total workout distance Cumulative Workout Sessions menu Equipment Usage Cumulative Workout Sessions Machine total number of workout sessions Last Workout Start Timestamp menu E...

Page 43: ...A belt rating of 0 or 1 will cause a blue pulsing ASL light indicating that there is a problem with the running belt deck and requires ser vicing or replacement Important Reset the Belt Rating after r...

Page 44: ...ss level Maintenance Reminder 1 menu Maintenance Maintenance Reminder Range OFF ON default Switch the maintenance reminder function ON or OFF 1 Not included on elliptical or treadmill products that do...

Page 45: ...ection status IP Address menu System Settings Connectivity IP Address Specifies console internet IP address Preva Server menu System Settings Connectivity Preva Server Specifies Precor Preva server UR...

Page 46: ...Settings TV Source Default Internal Tuner TV input signal source Region menu System Settings TV Settings Region Specifies the TV input signal modulation format for a particular geographical region De...

Page 47: ...Volume Range 1 to 15 Default 6 Sets the default wired headphone jack volume level Default Bluetooth1 Head phone Volume menu System Settings Audio Settings Default Bluetooth Headphone Volume Range 1 to...

Page 48: ...ettings Register Equipment Register console and equipment with Precor Preva Business Suite PBS Required information to register the equipment l Location code l Precor technician account name and passw...

Page 49: ...X is the measured DC battery voltage nominal 12 6 14 6 Vdc There can be an additional Y suffix indicating the following con dition C an external AC charger is connected L the battery is low less than...

Page 50: ...ls LCD numeric displays backlight brightness level Numeric Display Test menu System Tests Numeric Display Test Tests the movement controls LCD numeric displays Heart Rate Test menu System Tests Heart...

Page 51: ...d on EFX600 or TRM600 product lines Information Display 65 Information Display 65 Not supported The Information Display 65 service menu found on LED consoles P10 P30 P30i and P31 is NOT supported on t...

Page 52: ...points to a particular component and after a major component is removed re placed Available Adjustment Procedures First Stage Drive Belt Tension Adjustment on the facing page Second Stage Drive Belt T...

Page 53: ...adjusting the second stage drive belt tension Specifications System Component Specification First Stage Belt Drive Tension New 1 140 150 lbs 63 5 68 kgs First Stage Belt Drive Tension Used 1 125 135 l...

Page 54: ...AUTION Make sure that the two Drive Components assembly bolts are loosened before adjusting the first stage belt tensioner The tensioner hardware can be dam aged and the belt cannot be tensioned if th...

Page 55: ...nt steps to bring the tension within specification a Remove the belt tension gauge IMPORTANT The belt tension gauge must be removed while making ten sion adjustments or the measurement will be invalid...

Page 56: ...ure and verify that the second stage drive belt is within specification retention the belt as needed see Second Stage Drive Belt Tension Adjustment on the facing page 9 Reinstall the left Drive Disk c...

Page 57: ...o adjusting the second stage drive belt tension Specifications System Component Specification Second Stage Belt Drive Tension New 1 110 120 lbs 50 54 4 kgs Second Stage Belt Drive Tension Used 1 92 10...

Page 58: ...side just enough to allow assembly movement Do not remove the carriage bolt nuts CAUTION Make sure that the two Generator Brake Assembly carriage bolts are loosened before adjusting the second stage b...

Page 59: ...ing the tension within specification a Remove the belt tension gauge IMPORTANT The belt tension gauge must be removed while making ten sion adjustments or the measurement will be invalid b Make a smal...

Page 60: ...ghten the two Generator Eddy Brake Assembly carriage bolts left side torque bolts to 180 in lbs 20 3 Nm 9 Reinstall the left Drive Disk cove see on page 74 10 Reinstall the Drive Access Panel see on p...

Page 61: ...23 cm 0 6 cm Yoke Ramp Fasteners 330 in lbs 27 5 ft lbs or 37 2 Nm Note Calibration distance is set at incline level 10 Procedure Review entire procedure before starting TIP To help keep your hands cl...

Page 62: ...power control cable or it is possible for the crossramp to automatically lower to level 1 if either the pedals or arms are moved This unexpected action could cause personal injury 4 Measure and verif...

Page 63: ...front tower weldment Then use one hand hold the jackscrew fixed and the other hand to rotate the yoke nut around the jackscrew to raise or lower as needed to adjust the calibration distance to 9 1 4...

Page 64: ...maximum levels a On LED P10 P30 P30i and P31 consoles Access diagnostic test menu 51765761 and select MACHINE TEST CROSSRAMP TEST b On Touchscreen P62 P80 and P82 consoles Access the Service menu 517...

Page 65: ...Step up Pulley Tensioner Assembly Replacement on page 104 Drive Components assembly Replacement on page 109 Input Drive Assembly Replacement on page 117 Lift Motor Replacement on page 124 LPCA Lower...

Page 66: ...nnected L Battery is low less than 11 4 volts CL Charger is connected and battery is low Battery Fuse The battery inline fuse holder is part of the battery assembly cable attached to the battery pos i...

Page 67: ...dule cover Retain part s and or fastener s for installation 1Lower printed circuit assembly generally this refers to the lower board On treadmills this is the motor controller unit MCU and on self pow...

Page 68: ...he battery red terminal Make sure the positive cable remains securely connected thru the inline fuse to the LPCA board 4 Connect the negative cable to the battery black terminal Make sure the negative...

Page 69: ...and install the EFX1 covers and panels Cover Remove lnstall Procedure Goose Neck Cover on page 63 1Elliptical Fitness Crosstrainer Contact Precor Customer Support at support precor com or 800 786 840...

Page 70: ...ift Interface Plate on page 65 Ramp Cover on page 69 Ramp to Drive Transition Cover on page 78 Drive Access Panel on page 73 Drive Disk Covers on page 74 Drive Top Covers on page 78 Drive Housing Cove...

Page 71: ...uires first removing the goose neck gasket and cover and the top lift cover ID Description Goose Neck Gasket Goose Neck Cover Top Lift Cover Contact Precor Customer Support at support precor com or 80...

Page 72: ...er from the top of the front lift cover and accessory tray cover tabs 3 Use your fingers to unsnap and lift the front lift cover from the side cover tabs to remove Installation Instructions 1 Set the...

Page 73: ...the goose neck gasket goose neck cover top lift cover and front lift cover see on page 63 2 Remove the two 2 Phillips screw fasteners and remove the lift interface plate cover Retain part s and or fa...

Page 74: ...abs in place and align the two fastener bolt holes Secure with two 3 Phillips screws 2 Reinstall the lift front cover see on page 63 Contact Precor Customer Support at support precor com or 800 786 84...

Page 75: ...he accessory tray cover Retain part s and or fastener s for installation Installation Instructions 1 Reinstall the accessory tray press to snap the top two left and right tabs in place and secure with...

Page 76: ...snap the mounting clips Installation Instructions Reinstall the ramp to drive transition cover by positioning the cover over the ramp and drive housing covers and pressing down to snap the mounting ta...

Page 77: ...NG Make sure to disconnect either the negative battery terminal or the Lift Motor input power control cable to prevent accidental ramp movement This unex pected action could cause personal injury 3 Re...

Page 78: ...clips Retain part s and or fastener s for installation Installation Instructions 1 Use an approved cleaner see on page 12 to clean the left and right Stairarm wheels and ramp tracks Dry with a clean...

Page 79: ...attempting to move and lift the ramp off the platform 3 Secure ramp by reinstalling the 3 Phillips screw fastener and fully tighten 4 Reinstall the left and right Stairarm wheel trucks onto the Ramp...

Page 80: ...wix UR10 Yellow Bio Racing ski wax or equivalent to the wheel contact area of the ramp tracks Rub the wax back and forth across the track several times b Repeat the prior QUICKSTART workout conditions...

Page 81: ...e drive top cover to remove Retain part s and or fastener s for installation Installation Instructions 1 Slide the top of the Drive Access panel under the lip of the drive top cover and then press the...

Page 82: ...the drive cover fastener cutout Then use a 2 Phillips screwdriver to remove the screw Then slowly move the Input Crank upward until the second screw can be seen and remove if installed there may only...

Page 83: ...housing area If this happens the drive covers will need to be removed to retrieve the screw 3 Use your hand to lightly strike the inside of the drive disk to unsnap the disk from the three latch catc...

Page 84: ...crank aligning the three latch catch receivers over the latch catch pins Then lightly strike the Drive Disk cove at each latch catch pin loc ation to snap in place Make sure all three latch catch pin...

Page 85: ...screw and install two fastener screws two per side are required see Parts on page 205 bubble 155 Note Some early production units were shipped with only one disk cover attachment screw Two cover cran...

Page 86: ...Housing Cover Left Ramp to Drive Transition Cover Removal Instructions Repeat this procedure for both the right and left drive housing covers Contact Precor Customer Support at support precor com or...

Page 87: ...ver 3 Phillips screw fasteners Retain part s and or fastener s for installation b Straddle the rear housing and reach into the underside of the top cover to unsnap the left and right front clip fasten...

Page 88: ...r over the crank and remove Retain part s and or fastener s for installation Note The left drive housing cover must be removed prior to removing the right cover Contact Precor Customer Support at supp...

Page 89: ...cable Carefully slide the cover over the crank and remove Retain part s and or fastener s for installation 1Active Status Light Service and maintenance status light Contact Precor Customer Support at...

Page 90: ...crank Reconnect the ASL light input cable Place the cover into position and use a 5 16 socket to reinstall the four screw fasteners Contact Precor Customer Support at support precor com or 800 786 840...

Page 91: ...the crank Place the cover into pos ition and use a 5 16 socket to reinstall the five screw fasteners Contact Precor Customer Support at support precor com or 800 786 8404 with any questions Page 83 6...

Page 92: ...inserting the top cover front tabs into the front housing mounts and inserting the front clips into the front housing brackets Make sure the top cover clips are secure and install the two 3 Phillips s...

Page 93: ...arms onto the Input Drive Cranks see Stairarm Replacement on page 147 6 Reinstall the left and right Drive Disk coves see on page 74 7 Reinstall the Drive Access panel see on page 73 8 Verify the mach...

Page 94: ...drive belt Specifications System Component Specification First Stage Belt Drive Tension New 1 140 150 lbs 63 5 68 kgs First Stage Belt Drive Tension Used 1 125 135 lbs 56 7 61 Kgs Drive Component Assy...

Page 95: ...left side just enough to allow movement Do not remove the fastener nuts 5 Use a 1 2 socket to loosen first stage belt tensioner and walk the first stage drive belt off the input drive and smaller Step...

Page 96: ...Drive Belt Ten sion Adjustment on page 45 3 Use a 1 2 socket to fully tighten the two Drive Components assembly bolts Torque1 bolts to 180 in lbs 54 20 3 _ 4 5 Nm 1Torque is a measure of the force tha...

Page 97: ...ight Stairarm see Stairarm Replacement on page 147 6 Reinstall the right and left Drive Disk coves see on page 74 7 Reinstall the Drive Access panel see on page 73 8 Verify machine operation and retur...

Page 98: ...mponent Assy Carriage Bolts 180 in lbs 20 3 Nm 1 New belt tension applies to new belt first time installations Used belt tension applies to reinstalling an existing belt or re tensioning an existing u...

Page 99: ...the carriage bolt heads inserted into the adjustment slots Do not remove the fastener nuts 5 Use a 1 2 socket to loosen the first stage belt tensioner and walk the first stage drive belt off the inpu...

Page 100: ...lt by walking the belt onto the Generator Brake assembly and larger second stage Step up Pulley Tensioner assembly pulleys Rotate the crank and make sure that the belt is properly aligned and seated o...

Page 101: ...and make sure that the belt is properly aligned and seated in the pulley grooves Adjust the first stage tensioner just enough to hold the tensioner mechanism and belt in place Contact Precor Customer...

Page 102: ...assembly and the two Drive Components assembly carriage bolts Torque both bolts to 180 in lbs 54 20 3 _ 4 5 Nm 7 Reinstall the right Stairarm see Stairarm Replacement on page 147 1Torque is a measure...

Page 103: ...the Drive Access panel see on page 73 10 Verify machine operation and return to service see Operation Verification Contact Precor Customer Support at support precor com or 800 786 8404 with any quest...

Page 104: ...ess cover see on page 73 2 Remove the left and right Drive Disk covers see on page 74 3 Remove the left and right Stairarms from the Input Crank see Stairarm Input Drive Crank Removal on page 148 4 Re...

Page 105: ...ly carriage bolt nuts and the two Drive Components assembly carriage bolt nuts left side Do not remove the fastener nuts 1Lower printed circuit assembly generally this refers to the lower board On tre...

Page 106: ...e 8 Use a 1 2 socket to loosen the second stage belt tensioner and walk the second stage drive belt off the Generator Eddy Brake assembly pulley and larger second stage Step up Pulley Tensioner assemb...

Page 107: ...e assembly from the Step up Pul ley Tensioner assembly Retain part s and or fastener s for installation TIP Remove the lower carriage bolt fastener first and then the upper The upper bolt cannot be re...

Page 108: ...riage bolt Tighten the bolt just enough to keep the carriage bolt head inserted into the mounting slot but do not fully tighten TIP Install the upper carriage bolt fastener first and then the lower Th...

Page 109: ...t Drive assembly pulleys and tension the belt to 140 150 lbs 63 5 68 kgs see First Stage Drive Belt Tension Adjustment on page 45 Contact Precor Customer Support at support precor com or 800 786 8404...

Page 110: ...o 180 in lbs 20 3 Nm 7 Route and reconnect the Generator cable and Eddy Brake cable to the LPCA Gen erator input J1 and Eddy Brake load J7 I O1 connectors Reinstall the LPCA Battery module cover and s...

Page 111: ...Installation on page 151 10 Reinstall the left and right Drive Disk covers on page 74 11 Reinstall the Drive Access cover see on page 73 12 Verify machine operation and return to service see Operatio...

Page 112: ...up Pulley Tensioner Assembly The Step up Pulley Tensioner Assembly contain the step up pulleys and the first and second stage drive belt tensioners Contact Precor Customer Support at support precor c...

Page 113: ...e Housing covers see on page 78 5 Remove the Drive Components assembly see Drive Components assembly Replace ment on page 109 TIP For machines with mfg dates prior to 01 02 2019 the Step up Pulley Ten...

Page 114: ...and walk the second stage drive belt off the pulleys Remove the second stage drive belt Contact Precor Customer Support at support precor com or 800 786 8404 with any questions Page 106 6 Replacement...

Page 115: ...on hardware the tensioner adjust ment bolt washer and tug plate Tighten the tensioner bolt just enough to keep the ten sioner hardware in place 3 Reinstall the second stage drive belt by walking the b...

Page 116: ...arms onto the Input Drive Crank see Stairarm Input Drive Crank Installation on page 151 9 Reinstall the left and right Drive Disk covers on page 74 10 Reinstall the Drive Access cover see on page 73 1...

Page 117: ...re starting Removal Instructions 1 Remove the Drive Access cover see on page 73 2 Remove the left and right Drive Disk covers see on page 74 3 Remove the left and right Stairarms from the Input Crank...

Page 118: ...ssembly and the two Drive Com ponents assembly carriage bolt nuts left side Do not remove the carriage bolt nuts 1Lower printed circuit assembly generally this refers to the lower board On treadmills...

Page 119: ...ensioner and walk the first stage drive belt off the Input Drive pulley and smaller first stage Step up Pulley assembly pulley Remove the first stage drive belt Retain belt for installation Contact Pr...

Page 120: ...justment bolt 1x washer 1x bolt isolator 1x and tug plate 1x Retain part s and or fastener s for installation Contact Precor Customer Support at support precor com or 800 786 8404 with any questions P...

Page 121: ...Instructions 1 If the Drive Components assembly is disassembled reassemble as follows a Install the Generator Brake assembly onto the Step up Pulley Tensioner assembly and secure using the two 1 2 Car...

Page 122: ...inserted into the mounting slot but do not fully tighten 4 Use a 1 2 socket to install the First Stage Tensioner hardware the adjustment bolt 1x washer 1x bolt isolator 1x and tug plate 1x Tighten th...

Page 123: ...assembly and two Drive Components assembly carriage bolt fasteners torque to 180 in lbs 20 3 Nm 9 Reconnect the Generator input cable J1 and Eddy Brake load cable J7 on the LPCA board Reinstall the LP...

Page 124: ...ht Drive Disk covers on page 74 13 Reinstall the Drive Access cover see on page 73 14 Verify machine operation and return to service see Operation Verification See Also Second Stage Drive Belt Tension...

Page 125: ...sembly Specifications System Component Specification Input Drive Assembly Nylock Bolts 300 90 in lbs 34 10 Nm Procedure Review entire procedure before starting Contact Precor Customer Support at suppo...

Page 126: ...overs see on page 78 5 Use a 1 2 socket to loosen the two Drive Components assembly fastener nuts left side Do not remove the fastener nuts 6 Use a 1 2 socket to loosen first stage belt tensioner and...

Page 127: ...installation Retain washers for installation CAUTION Do not reuse the Input Assy Nylock patch bolt fasteners for installation Discard the used bolts and order new bolts for installation see Parts on p...

Page 128: ...fasten ers for installation Discard the bolts and order new bolts for installation see Parts on page 205 bubble 296 1Torque is a measure of the force that can cause an object to rotate about an axis B...

Page 129: ...drive and smaller first stage drive pulleys Rotate the crank and make sure that the belt is properly aligned and seated in the pulley grooves Contact Precor Customer Support at support precor com or 8...

Page 130: ...tension 110 120 lbs 50 54 4 kgs see Second Stage Drive Belt Tension Adjustment on page 49 Retention belt if not within specification 5 Tighten the two Drive Components assembly carriage bolt fastener...

Page 131: ...the Input Drive Crank see Stairarm Replacement on page 147 8 Reinstall the left and right Drive Disk covers on page 74 9 Reinstall the Drive Access cover on page 73 10 Verify machine operation and ret...

Page 132: ...cifications System Component Specification Lift Motor Calibration Distance 9 1 4 23 cm 0 6 cm Yoke Ramp Fasteners 330 in lbs 27 5 ft lbs or 37 2 Nm Note Calibration distance is set at incline level 10...

Page 133: ...ver the top of the Front Frame Cover underneath the Ramp to protect the cover surface while doing this procedure 3 If the lift motor is working access the CrossRamp Test diagnostic test and raise the...

Page 134: ...sible for the ramp to automatically lower to level 1 under certain circumstances such as if the CrossRamp Test is exited or the console powers down and then the pedals are moved This unexpected action...

Page 135: ...kscrew to clear the inside of the frame tower weldment and then lift to remove Do not fully remove the clevis pin to remove the Lift Motor Assembly Retain part s and or fastener s for install ation 8...

Page 136: ...ST CROSSRAMP TEST b On touchscreen P62 P80 and P82 consoles Access the Service menu 51765761 and select System Settings Systems Test CrossRamp Test 4 Disconnect the input power control cable 5 Install...

Page 137: ...6 Install the lift motor a Insert the clevis pin from the left side of the lift motor mount until it is flush with the right side of the mount do not allow the clevis pin to exit the right side of th...

Page 138: ...ossRamp Test and operate the ramp incline level through the full range of motion from minimum to maximum levels and verify oper ation l P10 P30 P30i and P31 Service menu 51765761 MACHINE TEST CROSSRAM...

Page 139: ...NCLINE to 1 and operate the machine from 50 to 150 SPM l Repeat this test at incline levels 10 and 20 13 Reinstall the Ramp cover the Lift Interface Plate cover and the Front Lift cover see on page 63...

Page 140: ...roller unit MCU and on self powered units it is the main board in the lower section 2Lower printed circuit assembly generally this refers to the lower board On treadmills this is the motor controller...

Page 141: ...LPCA System Block Diagram Contact Precor Customer Support at support precor com or 800 786 8404 with any questions Page 133 6 Replacement Procedures LPCA Lower PCA Board Replacement...

Page 142: ...terface Connections ID Interface Lift J3 Battery J9 Contact Precor Customer Support at support precor com or 800 786 8404 with any questions Page 134 6 Replacement Procedures LPCA Lower PCA Board Repl...

Page 143: ...ocated on the LPCA board l 2 Amp LPCA power supply l 6 3 Amp lift motor fuse 1Alternating Current electric current which periodically reverses direction between positive and negative polarity Contact...

Page 144: ...see on page 74 2 Remove the one 2 Phillips screw fastener and remove the LPCA Battery Module cover Retain part s and or fastener s for installation Contact Precor Customer Support at support precor c...

Page 145: ...cable b Disconnect the Eddy Brake J7 cable c Disconnect the Lift J3 cable d Disconnect the Battery J9 cable e Disconnect the Comm Serial J2 cable f Disconnect the Active Status Light J12 cable Contact...

Page 146: ...A board Retain part s and or fastener s for installation 6 If attached disconnect the AC Adapter J4 cable Contact Precor Customer Support at support precor com or 800 786 8404 with any questions Page...

Page 147: ...ht J12 cable e Reconnect the Generator J1 cable f Reconnect the Eddy Brake J7 cable 4 Reconnect the Positive Red and Negative Black battery terminal cables 5 Reinstall the LPCA Battery module cover us...

Page 148: ...Bar Nylock Set Screw 300 in lbs 34 Nm Handlebar Mount Clamp Fastener 144 in lbs 16 3 Nm Procedure Review entire procedure before starting Removal Instructions Repeat this procedure for both the right...

Page 149: ...the Nylock patch Discard and order new set screws for installation see Parts on page 205 bubble 252 2 Remove the two 5 32 hex key Handlebar Mounting Clamp fasteners located at the front top of the con...

Page 150: ...nner or outer Nylock patch set screws for installation Either removing or loosening the Nylock set screw will compromise the integrity of the Nylock patch Discard and order new set screws for installa...

Page 151: ...cification Moving Arm Link Arm Bolt 300 90 in lbs 34 10 Nm Procedure Review entire procedure before starting Removal Instructions Repeat this procedure for both the right and left Moving Arms Contact...

Page 152: ...ew Do not loosen and then retighten the set screw this will damage the Nylock patch Discard and do not reuse the Nylock set screw b Then remove the 3 16 hex key pivot shaft inner set screw and gently...

Page 153: ...or loosening the Nylock set screw will compromise the integrity of the Nylock patch Discard and order new set screws for installation see Parts on page 205 bubble 252 1 Reattach the Linkarm to the Mo...

Page 154: ...ver and secure using the 2 Phillips screw 2 Verify machine operation and return to service see Operation Verification Contact Precor Customer Support at support precor com or 800 786 8404 with any que...

Page 155: ...ed Arm model Stairarms Specifications System Component Specification Link Arm Fastener 300 90 in lbs 34 10 Nm Crank Retention Plate Screw 30 9 in lbs 3 4 1 Nm Contact Precor Customer Support at suppor...

Page 156: ...ified to accept addi tional stairarm fastener hardware including a Crank Pin Retention Plate to secure the stairarm to the crank Review entire procedure before starting Removal Instructions Repeat thi...

Page 157: ...nstallation see Parts on page 205 bubble 283 c Use external 0 047 retaining ring pliers to remove the Stairarm Pivot Block retain ing ring Retain part s and or fastener s for installation d Remove the...

Page 158: ...ener s for installation b Remove the 9 16 hex head cap screw and remove the Linkarm from the Stair arm weldment Linkarm bracket and carefully lay onto the floor c Remove the Inner Linkarm cover from t...

Page 159: ...ad cap screw and torque to 300 90 in lbs 34 10 Nm c Reinstall the Outer Linkarm Cover and secure using the 2 Phillips screw 2 Reinstall the Stairarm wheels onto the ramp Carefully place the wheels ont...

Page 160: ...page 205 bubble 283 CAUTION Do not reuse the removed Retention Plate Nylock patch screw fastener for installation Discard the removed bolts and order new bolts for installation see Parts on page 205...

Page 161: ...ward and away from the frame to remove Retain part s and or fastener s for installation b Remove the two 5 16 hex head bolts Retain part s and or fastener s for install ation c Use external 0 047 ret...

Page 162: ...ew fastener and remove the Outer Linkarm Cover Retain part s and or fastener s for installation b Remove the 9 16 hex head screw and remove the Linkarm from the Stairarm weldment Linkarm bracket and c...

Page 163: ...ex head screw and torque to 300 90 in lbs 34 10 Nm c Reinstall the Outer Linkarm Cover and secure using the 2 Phillips screw 2 Reinstall the Stairarm wheels onto the ramp Carefully place the wheels on...

Page 164: ...k Spindle c Then slide the Stairarm Pivot Block onto the Crank Spindle Use the external 0 047 retaining ring pliers to reinstall the Stairarm Retaining Ring onto the Crank Spindle d Fully tighten the...

Page 165: ...ication Moving Arm Link Arm Bolt 300 90 in lbs 34 10 Nm Procedure Review entire procedure before starting Removal Instructions Repeat this procedure for both the right and left Moving Arm removal Cont...

Page 166: ...part s and or fastener s for installation b Remove the 9 16 hex head screw and remove the Linkarm from the Stairarm weldment Linkarm bracket and carefully lay onto the floor c Remove the Inner Linkar...

Page 167: ...aft into the weldment moving arm pivot mount bar 2 Then reinstall the 3 16 hex key pivot shaft inner set screw 3 If the 3 16 hex key pivot shaft outer set screw was removed reinstall the outer set scr...

Page 168: ...ner Linkarm cover onto the Moving Arm Linkarm mount b Then attach the Linkarm to the Moving Arm and secure using the 9 16 bolt torque to 300 90 in lbs 34 10 Nm c Reinstall the Outer Linkarm cover and...

Page 169: ...Tray see on page 67 and Lift Front Cover see on page 63 9 Verify machine operation and return to service see Standard Service Menus on page 17 Contact Precor Customer Support at support precor com or...

Page 170: ...cation Wheel Truck Assy Fastener 300 90 in lbs 34 10 Nm Wheel Truck Assy Wheel Fastener 300 90 in lbs 34 10 Nm Procedure Removal Instructions Repeat this procedure for both the right and left wheel tr...

Page 171: ...d cause personal injury 3 Remove the Stairarm wheel truck assemble from the ramp track and lay the Stairarm on the floor To remove grasp the bottom of the wheel truck assembly and lift up and outward...

Page 172: ...spindle sleeve for installation Wheel Removal Do this step only if you need to remove the wheels from the wheel truck assembly 6 Remove the 9 16 bolt flat washer and wheel truck wheel Repeat step for...

Page 173: ...astener to 300 90 in lbs 34 10 Nm Repeat step for each wheel 1Torque is a measure of the force that can cause an object to rotate about an axis Bolt nut example 5 NM torque is equivalent to 5 newton s...

Page 174: ...e to the inside and out side of the spindle sleeve and install onto the Stairarm spindle c Reinstall the wheel truck assembly over the spindle sleeve onto the Stair arm spindle Secure using a new 9 16...

Page 175: ...ft and right Stairarm wheel trucks onto the CrossRamp tracks To install insert the top of the wheels underneath the Ramp cover while lifting the bottom of the wheels over and into the Ramp track You m...

Page 176: ...wax back and forth across the track several times b Operate the elliptical at INCLINE level 1 and RESISTANCE level 1 at 130 strides per minute for two minutes or more to break in the wax c Verify tha...

Page 177: ...amp Pivot Hinge Bolts 1080 in lbs 90 ft lbs or 122 Nm Ramp Yoke Fasteners 330 in lbs 27 5 ft lbs or 37 2 Nm Ramp Cover Mounting Clip Screws 30 in lbs 3 4 Nm Procedure Review entire procedure before st...

Page 178: ...t and raise the INCLINE level to 15 CAUTION If there is an active lift error code E40 E42 E45 or E46 be careful to not jam the ramp when raising or lowering the ramp in CROSSRAMP TEST There are no sof...

Page 179: ...nd lay the Stairarm on the floor To remove grasp the bottom of the wheel truck assembly and lift up and outward from the track No tools or fastener removal is required It may help to lift the outer ed...

Page 180: ...art s and or fastener s for installation b Remove the two 2 Phillips screws that secure the back ramp cover mounting clip to the ramp pivot hinge Retain part s and or fastener s for installation Conta...

Page 181: ...7 Remove the left and right 3 4 19 mm ramp pivot hinge Nylock bolts 2x flat washers 2x spacers 2x and remove the Ramp Pivot Hinge Discard the pivot hinge Nylock bolts and retain the flat washers CAUTI...

Page 182: ...ck patch bolts for installation Discard the used bolts and order new bolts for installation see Parts on page 205 bubble 361 1Torque is a measure of the force that can cause an object to rotate about...

Page 183: ...gn the two ramp yoke bolt holes and secure using two 9 16 hex head bolts 2x and washers 2x Torque bolts to 330 in lbs 27 5 ft lbs or 37 2 Nm Contact Precor Customer Support at support precor com or 80...

Page 184: ...clean rag and approved cleaner see on page 12 to clean both wheel tracks Clean any hard to remove grime using a Scotch Bright pad or fine steel wool Dry ramp track surfaces with a clean rag b Apply a...

Page 185: ...h 8 Reinstall the left and right Stairarm wheel trucks onto the Ramp tracks To install insert the top of the wheels underneath the outer edge of the Ramp cover while lifting the bot tom of the wheels...

Page 186: ...eel squeak or other unusual noises a If there were wheel squeaking or unusual noises visually inspect the Ramp tracks to confirm wax coverage across the entire wheel contact path If not reapply the wa...

Page 187: ...ing Procedures topic for possible related issue fixes or repairs see System Troubleshooting Procedures on page 196 Introduction To Troubleshooting Troubleshooting issues is an investigative process be...

Page 188: ...ion For failed console key problems the machine failure is not caused by a problem with the LPCA or the machine base In these types of console failures no error codes will be triggered and logged Revi...

Page 189: ...workout limit settings are not causing a failure see Club Settings LED consoles or System Settings Workout Limits Touchscreen consoles If a failure is observed while using the machine but passes the h...

Page 190: ...of machine service bulletins and tech tips and verify that there are no current bulletins that may fix the issue Contact Precor Customer Support at support precor com or 800 786 8404 with any question...

Page 191: ...Error code numbers range from 01 to 99 There are also a small number of alpha and alpha numeric codes Most but not all error codes are grouped into numeric ranges to help easily identify common syste...

Page 192: ...escription l The affected system components l The Issues and Symptoms associated with the fault condition l Troubleshooting steps and repair instructions Troubleshooting with Error Codes Getting Start...

Page 193: ...down one position When the memory is full the next code is stored pushing the oldest error code from the stack removing it from memory Repeating Error Codes When an error event is detected the error c...

Page 194: ...nsole P10 P30 P30i and P31 Error Log menu Information Display 65 scroll to Error Log select OK hardkey On LED consoles P10 P30 P30i and P31 error codes are stored in the Error Log Error codes are sequ...

Page 195: ...Touchscreen Console P62 P80 and P82 CPA Event Log menu Service menu 51765761 About CPA Event Log About On touchscreen consoles P62 P80 and P82 you will use the CPA Event Log to view the service mainte...

Page 196: ...Odometer o Hours o Motor Current o Input Line Current o Input line voltage o Buss Voltage o OEM Factory only data Note machine dependent parameter Function Softkeys The CPA Event Log provides the fol...

Page 197: ...A Event Log l Insert a USB flash drive into the USB chin port l Then wait for the SAVE button to highlight and select SAVE l Follow prompts to complete the save process l Remove the USB flash drive an...

Page 198: ...iewing the maintenance due remaining mileage or hours see on page 192 ASL Light Equipment Location On Ellipticals the ASL light is located at the rear of the unit on the lower right side of the right...

Page 199: ...imes The console cannot control power on or power off The LPCA powers ON when the user pedals above the minimum RPM and for one minute after stopping and powers ON for 90 seconds when the Wakeup switc...

Page 200: ...maintenance counter starts at 1000 hours and counts down the active use hours to 0 When the counter reaches zero hours the ASL will begin pulsing blue indicating preventative maintenance is due Yello...

Page 201: ...e ASL Maintenance Reminder counter is ignored and the ASL state is not changed to pulsing blue l The OFF setting effectively disables the ASL blue pulsing state without affecting the yellow or pulsing...

Page 202: ...als reset to 250 Hrs P10 P30 P30i and P31 consoles 1 Access Information Display 65 2 Scroll to MAINT COUNTER OK 3 Press and hold down the QUICKSTART key on the P30i press down the START key for 3 secs...

Page 203: ...he error code from the Error Log resets the ASL state from solid yellow to the solid blue state P62 P80 and P82 consoles 1 On P62 P80 and P82 consoles the Maintenance Operating Condition parameter mus...

Page 204: ...ou troubleshoot and repair elliptical issues Available Troubleshooting Procedures l Blown Battery Fuse Troubleshooting on the facing page See Also Troubleshooting Contact Precor Customer Support at su...

Page 205: ...b If the fuse is bad replace the fuse 2 Make sure the battery is charged and properly connected see Battery Replacement on page 58 3 Make sure that the battery positive and negative cables are instal...

Page 206: ...e Also System Troubleshooting Procedures on page 196 Contact Precor Customer Support at support precor com or 800 786 8404 with any questions Page 198 7 Troubleshooting System Troubleshooting Procedur...

Page 207: ...de see Spinner Rally Shift and Ride Maintenance Guide l Consoles and PVS1 displays Console and PVS Maintenance Guide TIP You can also download the Preventative Maintenance Guide from the Pre cor com e...

Page 208: ...system enters Pending Shutdown state Banner Default State When the user begins pedaling at speed greater than minimum 40 strides per minute the lower circuit LPCA powers up and delivers power to the c...

Page 209: ...rizontal vertical strides revolutions equivalent dis tances etc l Session total calories l Average speed l Average heart rate max heart rate and total time spent in a heart rate zone l Weight age gend...

Page 210: ...lso controls and sends the ASL4 status state based on the received error codes to the base The LPCA makes use of two main processors the Master also referred to interchangeably as Major and Slave also...

Page 211: ...onsole UPCA2 to base LPCA communication interface cable wiring diagram Generator Brake system The EFX800 16 base generator brake system has changed from previous generation EFXs and now uses a generat...

Page 212: ...utton near the light is used to wake up the entire system tem porarily to check its color and to clear the status color if pressed long enough Active Status Light processor receives simple commands fr...

Page 213: ...the part bubble number to obtain the Precor part num ber Precor Connect Partner s website If you have online web access it is always recommended that you go to the servicer Precor Connect Partner s w...

Page 214: ...CODE b Open the Exploded View Diagram click the Exploded View link and find the part bubble number c Then go to the Parts Identification Table locate the bubble number in the BUBBLE column and the as...

Page 215: ...s List These documents are primarily intended to be used as a quick reference when servicing the equipment However the service manual may not reflect the latest equipment part updates So always refer...

Page 216: ...iew Diagram Fixed Arm Models o Exploded View Diagram Moving Arms Option l Parts List 1 o Parts List Fixed Arm Models o Parts List Moving Arm Models Note 1 Not supported on all web browsers the link ma...

Page 217: ...Exploded View Diagram Fixed Arm Models Page 1 of 5 Contact Precor Customer Support at support precor com or 800 786 8404 with any questions Page 209 10 Parts Exploded View Diagram Fixed Arm Models...

Page 218: ...Exploded View Diagram Fixed Arm Models Page 2 of 5 Contact Precor Customer Support at support precor com or 800 786 8404 with any questions Page 210 10 Parts Exploded View Diagram Fixed Arm Models...

Page 219: ...Exploded View Diagram Fixed Arm Models Page 3 of 5 Contact Precor Customer Support at support precor com or 800 786 8404 with any questions Page 211 10 Parts Exploded View Diagram Fixed Arm Models...

Page 220: ...Exploded View Diagram Fixed Arm Models Page 4 of 5 Contact Precor Customer Support at support precor com or 800 786 8404 with any questions Page 212 10 Parts Exploded View Diagram Fixed Arm Models...

Page 221: ...Exploded View Diagram Fixed Arm Models Page 5 of 5 Contact Precor Customer Support at support precor com or 800 786 8404 with any questions Page 213 10 Parts Exploded View Diagram Fixed Arm Models...

Page 222: ...Exploded View Moving Arm Models Page 1 of 5 Contact Precor Customer Support at support precor com or 800 786 8404 with any questions Page 214 10 Parts Exploded View Moving Arm Models...

Page 223: ...Exploded View Moving Arm Models Page 2 of 5 Contact Precor Customer Support at support precor com or 800 786 8404 with any questions Page 215 10 Parts Exploded View Moving Arm Models...

Page 224: ...Exploded View Moving Arm Models Page 3 of 5 Contact Precor Customer Support at support precor com or 800 786 8404 with any questions Page 216 10 Parts Exploded View Moving Arm Models...

Page 225: ...Exploded View Moving Arm Models Page 4 of 5 Contact Precor Customer Support at support precor com or 800 786 8404 with any questions Page 217 10 Parts Exploded View Moving Arm Models...

Page 226: ...Exploded View Moving Arm Models Page 5 of 5 Contact Precor Customer Support at support precor com or 800 786 8404 with any questions Page 218 10 Parts Exploded View Moving Arm Models...

Page 227: ...Parts List Fixed Arm Models Page 1 of 4 Contact Precor Customer Support at support precor com or 800 786 8404 with any questions Page 219 10 Parts Parts List Fixed Arm Models...

Page 228: ...Parts List Fixed Arm Models Page 2 of 4 Contact Precor Customer Support at support precor com or 800 786 8404 with any questions Page 220 10 Parts Parts List Fixed Arm Models...

Page 229: ...Parts List Fixed Arm Models Page 3 of 4 Contact Precor Customer Support at support precor com or 800 786 8404 with any questions Page 221 10 Parts Parts List Fixed Arm Models...

Page 230: ...Parts List Fixed Arm Models Page 4 of 4 Contact Precor Customer Support at support precor com or 800 786 8404 with any questions Page 222 10 Parts Parts List Fixed Arm Models...

Page 231: ...Parts List Moving Arm Models Page 1 of 5 Contact Precor Customer Support at support precor com or 800 786 8404 with any questions Page 223 10 Parts Parts List Moving Arm Models...

Page 232: ...Parts List Moving Arm Models Page 2 of 5 Contact Precor Customer Support at support precor com or 800 786 8404 with any questions Page 224 10 Parts Parts List Moving Arm Models...

Page 233: ...Parts List Moving Arm Models Page 3 of 5 Contact Precor Customer Support at support precor com or 800 786 8404 with any questions Page 225 10 Parts Parts List Moving Arm Models...

Page 234: ...Parts List Moving Arm Models Page 4 of 5 Contact Precor Customer Support at support precor com or 800 786 8404 with any questions Page 226 10 Parts Parts List Moving Arm Models...

Page 235: ...Parts List Moving Arm Models Page 5 of 5 Contact Precor Customer Support at support precor com or 800 786 8404 with any questions Page 227 10 Parts Parts List Moving Arm Models...

Page 236: ...eproduced in any form or by any means including electronic storage and retrieval or translation into a foreign language without prior agreement and writ ten consent from Precor Incorporated as governe...

Page 237: ...a very serious matter Precor will vigorously pursue all unauthorized appro priation of its proprietary rights Warranty The material contained in this document is provided as is and is subject to being...

Page 238: ...on to an operating procedure practice or the like that if not correctly performed or adhered to could result in dam age to the product or loss of important data Do not proceed beyond a CAUTION notice...

Reviews: