background image

Installing Adobe Premiere  

13

Installing Adobe Premiere

The following chapter describes the procedure to install Adobe Premiere

.

You must install Adobe Premiere before installing the miroVIDEO DC30
series board in your computer, because the miroVIDEO DC30 series presets
must be copied to the appropriate Adobe Premiere folder during the installation
of the miroVIDEO DC30 series software, and software installation starts
immediately after the hardware installation.

Proceed as follows to install Adobe Premiere:

1. Place the Adobe Premiere CD-ROM in your CD-ROM drive.

2.


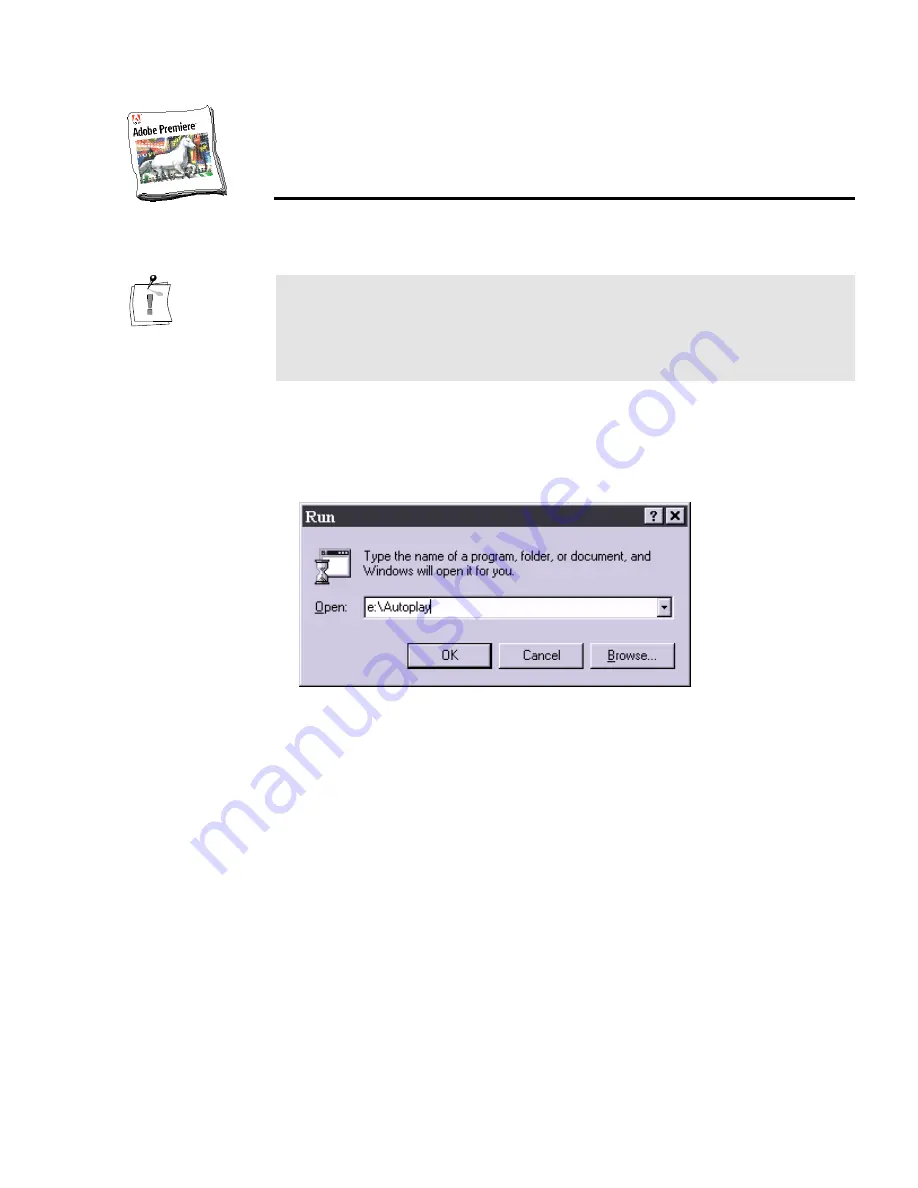
If the installation program is not started automatically, select Run… from the
Start menu.

3. Depending on your drive, enter, for example: e:\Autoplay.

If your CD-ROM drive has a different drive designation, change the path
accordingly.


or —

Summary of Contents for miroVIDEO DC30 Series

Page 1: ...miroVIDEO DC30 Series USER S GUIDE ...

Page 2: ...siness Machines Corp Windows is a registered trademark of Microsoft Corp All other brand or product names are trademarks or registered trademarks of their respective holders This manual is printed on chlorine free paper using environmentally safe ink Pinnacle Systems Inc has written this manual to the best of its knowledge but does not guarantee that the programs systems will fulfill the desires o...

Page 3: ...G THE HARDWARE 15 CONNECTING THE VIDEO AND AUDIO DEVICES 17 CONNECTING VIDEO DEVICES 18 CONNECTING AUDIO DEVICES 19 INSTALLING THE SOFTWARE FOR WINDOWS 95 98 20 INSTALLING THE DRIVERS FOR WINDOWS 95 21 INSTALLING THE DRIVERS FOR WINDOWS 98 25 INSTALLING THE SOFTWARE FOR WINDOWS 95 WINDOWS 98 26 INSTALLING THE SOFTWARE FOR WINDOWS NT 4 0 33 THE INSTALLATION PROGRAM 34 QUICK START GUIDE FOR DC30 PRO...

Page 4: ... IT WORK 92 miroINSTANT VIDEO 5 WINDOW 92 MODES OF OPERATION 95 LIMITATIONS 98 miroVIDEO DC30 series AND miroINSTANT VIDEO 5 98 CHANGES FROM PREVIOUS VERSIONS 99 TITLEDEKO 100 WELCOME TO TITLEDEKO 100 INSTALLING TITLEDEKO 101 LAUNCHING TITLEDEKO 101 THE TITLEDEKO USER INTERFACE 102 SELECTING TEXT AND OBJECTS 106 FORMATTING TEXT AND OBJECTS 107 TOOLS AND SELECTION HANDLES 109 TRANSFORMING TEXT AND ...

Page 5: ... TECHNICAL DATA 151 GENERAL 151 CONNECTORS 152 APPENDIX A HARDWARE CONFIGURATIONS 154 DIGITIZING WITH THE miroVIDEO DC30 series 154 DIGITIZING AND RECORDING WITH THE miroVIDEO DC30 series 156 DIGITIZING WITH THE miroVIDEO DC30 series AND A SOUND BOARD 158 DIGITIZING AND RECORDING WITH THE miroVIDEO DC30 series AND A SOUND BOARD 159 APPENDIX B GLOSSARY 161 APPENDIX C SUPPORT QUESTIONNAIRE 168 APPEN...

Page 6: ...e s on the CD ROM supplied with your system About the User s Guide This manual explains how to install and use the hardware and software of your miroVIDEO DC30 series product It also contains many tips and tricks to make optimal use of it In the margins are subheadings to help you quickly find your way through this manual Important text passages are marked with the notepad and this format Numbers ...

Page 7: ...bundled additional software packages Differences to note miroVIDEO DC30 has a data rate limit of 6 MB sec the others can do up to 7 MB sec All miroVIDEO DC30 series products except miroVIDEO DC30 support miroINSTANT Video Only the Productivity Pack allows for device control and batch capture with the Pinnacle capture application and Windows 95 98 The miroVIDEO DC30 series is a system of hardware a...

Page 8: ...udio plus cutting table on your desktop The miroVIDEO DC30 series capabilities result from optimally integrated hardware and software System components Hardware The miroVIDEO DC30 series hardware is a state of the art PCI video digitizer The miroVIDEO DC30 series includes a JPEG processor to compress video as well as a video encoder and an audio codec to digitize and decode audio signals For captu...

Page 9: ...mposite video input S Video input Composite video output S Video output Audio output of the video source microphone tape recorder CD player TV loudspeakers Audio input of the VCR Outputs Video inputs The miroVIDEO DC30 series connects to any video source VCR video camera TV tuner laserdisk still video camera that generates a composite video signal or an S Video signal such as VHS S VHS Hi8 Video 8...

Page 10: ...tion in accordance with the YUV model Full Screen Full Motion Video The performance of a video digitizer is defined on the frame size frame rate and color depth miroVIDEO DC30 series can digitize full size full motion video with 16 7 million colors 24 bits color depth in real time Adobe Premiere The miroVIDEO DC30 series package includes Adobe Premiere Adobe Premiere is a software for capturing ed...

Page 11: ...d disk Hard disk with a sufficiently high data transfer rate and enough capacity For more details read the following Data transfer rate The higher the desired video quality the higher the required data transfer rate of the hard disk For S Video quality 2 MB sec of data has to be transferred for high S Video quality approximately 3 4 MB sec The miroVIDEO DC30 is capable of digitizing a maximum data...

Page 12: ... Windows resolution The following graphics cards have been tested by Pinnacle for Microsoft Direct X Surface Overlay Windows 98 Windows NT 3DFX Voodoo 3 3000 ATI Expert Play ATI Expert Play AGP PCI ATI Expert Work ATI Expert Work AGP PCI ATI Expert XLATI XL ATI Expert 98 99 ATI Rage chip set ATI Rage chip set ATI Rage 128 Fury ATI Rage 128 Fury ATI Rage Pro chip set ATI Rage Pro chip set ATI Rage ...

Page 13: ... generating a composite video or S Video signal in PAL NTSC or SECAM quality Video output The miroVIDEO DC30 series video output connects to any video device television set VCR camcorder that supports a composite video or an S Video signal in NTSC or PAL Audio input output The miroVIDEO DC30 series package contents includes a Y adapter you can use to connect the audio inputs outputs of your audio ...

Page 14: ...INSTANT Video on CD Adobe Premiere miroVIDEO Capture on CD Documentation If any parts are missing please contact your retailer Additional peripherals such as the Breakout Box are available from your retailer Computer components are sensitive to electrostatic charge Do not take the miroVIDEO DC30 series board out of its antistatic package until you install it Depending on the delivery scope the pac...

Page 15: ...enu select Control Panel and System Device Manager and Sound video and game controller Click on your video board and on Remove DEFRAGMENTING THE HARD DISK Before installing and configuring the miroVIDEO DC30 series defragment your hard disk s You find the Windows 95 Windows 98 defragmentation utility under Start Programs Accessories System Tools Disk Defragmenter If you use miroVIDEO DC30 series u...

Page 16: ...y select Run from the Start menu Depending on your drive enter for example e premiere setup then click OK Follow the installation instructions on the screen Install the miroVIDEO DC30 series board Turn your computer and all peripherals off Remove the necessary cables Open the computer s housing Remove the slot cover Insert the board into bus master PCI slot Reassemble your computer Reconnect all c...

Page 17: ...VIDEO Capture Start miroVIDEO Capture from the miroVIDEO DC30 series program group or directly from the Desktop if you have selected this option during the installation Specify the user type Select the Standard user type Make the necessary adjustments for your video Select the Projects tab Specify the Video standard and the Quality Check audio settings Check if you want to capture the clip with or...

Page 18: ...ICK START WINDOWS 95 98 ONLY Proceed as follows to capture single frames rather than a video sequence Start miroVIDEO Capture Start the miroVIDEO Capture application from the miroVIDEO DC30 series program group or directly from the Desktop Select Record tab Select the Record tab and click on the Start Record button The video sequence is display in the overlay window Click left Click the left mouse...

Page 19: ...riate Adobe Premiere folder during the installation of the miroVIDEO DC30 series software and software installation starts immediately after the hardware installation Proceed as follows to install Adobe Premiere 1 Place the Adobe Premiere CD ROM in your CD ROM drive 2 If the installation program is not started automatically select Run from the Start menu 3 Depending on your drive enter for example...

Page 20: ...w the program installation instructions on the screen After you have installed Adobe Premiere on your computer you can install the miroVIDEO DC30 series board If you ever need to reinstall Adobe Premiere please remember to run the DC30 series installation again selecting at a minimum the Presets and Plug ins DC30 series will not work correctly if these components are missing ...

Page 21: ...tart menu select System Device Manager and Sound video and game controller Click on your video board and click on Remove To insert the miroVIDEO DC30 series into your computer proceed as follows 1 Discharge yourself Discharge yourself charge by touching the metal case of your computer 2 Switch off the computer disconnect the cables Switch off the computer and all peripheral devices Pull out the po...

Page 22: ...hat the board is firmly seated in the slot If the board cannot be inserted without problems do not force the board into place The contacts at the connector could bend Instead pull the board out carefully and try again 7 Reconnect the cables Tighten the screws and reassemble the computer s casing Reconnect the cables The miroVIDEO DC30 series hardware installation is completed Connect the video aud...

Page 23: ...For detailed sample configurations refer to the Appendix A beginning on page 154 The following diagram shows the miroVIDEO DC30 series board and its connectors Your board may look different but the connectors are the same Combined audio input output Composite video input S Video input Composite video output S Video output ST8 ST9 ST10 ST12 Internal connectors ST8 Composite video input ST9 Composit...

Page 24: ...omposite RCA female connector and an S Video output 4 pin Mini DIN female connector to connect a VCR and or TV or monitor CONNECTING VIDEO DEVICES Video input s If you have a video source with S Video output connect it to the miroVIDEO DC30 series S Video input with a suitable cable If you have a video source with Composite video output connect it to the miroVIDEO DC30 series Composite video input...

Page 25: ... Connect the Breakout Box cable ends to the corresponding sockets on the miroVIDEO DC30 series board Place the Breakout Box in a convenient location Connect your external video and audio source devices to the panel Composite video input red Composite video output yellow Combined audio input output black 8 pin S video input black 4 pin S video output gray Inputs Outputs S video Composite video Left...

Page 26: ...Windows 95 on page 21 Installing the software for Windows 95 Windows 98 on page 26 Windows 98 If you use Windows 98 please proceed with the Installing the drivers for Windows 98 section on page 25 The complete installation consists of the following steps Installing drivers for Windows 98 on page 25 Installing the software for Windows 95 Windows 98 on page 26 Windows NT If you use Windows NT please...

Page 27: ... on computer Switch on your computer Windows 95 is started automatically If your computer is configured in such a way that Windows 95 is not started automatically please start Windows 95 now After Windows 95 starts the New hardware component found dialog box appears followed by the Update Device Driver Wizard dialog box 2 Click Next Click on the Next button 3 Insert the CD ROM Insert the miroVIDEO...

Page 28: ... Browse Click on the Browse button 6 Switch into the SETUP directory click OK Switch to your CD ROM drive and go into the SETUP directory Click OK 7 Click Next Click on the Next button 8 Click OK and Browse again When your system requests you to insert the CD ROM again click on OK and once again on Browse ...

Page 29: ...rs have been copied the installation program starts automatically Proceed with the Installing the software for Windows 95 Windows 98 section on page 26 Be sure you have the latest driver 1 Go to the Pinnacle Systems Website at www pinnaclesys com and click on Support Click on the DC30plus or DC30pro links to navigate to the download site 2 Click on the download icon to download the new driver to y...

Page 30: ...24 miroVIDEO DC30 Series User s Guide 3 Double click on the driver updater icon on your desktop to launch the installation program ...

Page 31: ...rd dialog box appears 2 Click Next Click on the Next button 3 Select Search for the best driver for your device Recommended click Next Chose the Select Search for the best driver for your device Recommended option and click on the Next button 4 Enter Specify a location click Browse Activate the check box Specify a location and click on Browse 5 Change on the CD ROM drive and into the SETUP directo...

Page 32: ...tion carried out 1 If necessary change the language click Next If necessary select the language in which you wish the installation carried out If you have activated the German English or French Regional Settings and nevertheless want to change the language of the installation program click the button Back first and then select the language Click on the Next button This installation step is not req...

Page 33: ...ng on Details you open the window Select Sub components Here you can determine the components even more precisely System Software Drivers for Windows 95 Windows 98 miroVIDEO series utilities The capture application miroVIDEO Capture for capturing clips tools helps and ReadMe file Adobe Premiere AddOns Including miroINSTANT Video miroINSTANT Video allows to save valuable computing time when creatin...

Page 34: ...e Start copying files window all components you chose are listed If you wish to change the settings you chose click on Back Click Next to start copying 8 Click Finish In the Complete Setup window you are asked to restart Windows Please carry out this prompt and click on Finish to complete the installation of the miroVIDEO DC30 series Hardware Test Windows 95 98 Only After the restart the miroVIDEO...

Page 35: ...utomatically appears in front of the option DDraw primary Surface supported If currently the primary surface is not supported there will be no overlay representation with the function primary surface at the moment DDraw overlay surface supported If your computer supports Overlay Surface in the current graphic mode the DDraw overlay surface supported check box will be activated automatically Here t...

Page 36: ... function contains detailed information about all miroVIDEO EXPERT s options 10 Select hard disk click Start test Select the hard disk whose performance you wish to test then click Start test In order to provide realistic values be sure you have defragmented the disk before testing it The program indicates that you have installed a miroVIDEO DC30 series board miroVIDEO Expert also works together w...

Page 37: ...ll exhibit a lower data rate on its inner tracks When recording hard disk tracks are written to starting at the outer edge and working inwards 11 Enable Audio recording check box To determine the attainable video data rate in conjunction with audio data activate the Audio recording check box Specify the quality with which you want sound to be recorded 12 Test additional hard disks If necessary tes...

Page 38: ... to select another language version receive information about the driver version or to test the hardware 1 By using the Start menu and the commands Programs miroVIDEO DC30 series Tools and miroVIDEO DC30 series Hardware Test 2 By using the Start menu and the commands Settings Control Panel Multimedia Advanced Windows 98 Devices Video Recording Device miroVIDEO DC30 series Properties Settings ...

Page 39: ...e complete installation consists of the following steps Installing drivers for Windows 98 on page 25 Installing the software for Windows 95 Windows 98 on page 26 Windows 95 If you have Windows 95 installed on your computer please proceed with the section Installing the drivers for Windows 95 on page 21 The complete installation consists of the following steps Installing drivers for Windows 95 on p...

Page 40: ...nglish German or French select the language in which you wish the installation carried out 3 If necessary change the language click Next If necessary select the language in which you wish the installation carried out If you have activated the German English or French Regional Settings and nevertheless want to change the language of the installation program click the button Back first and then sele...

Page 41: ...those components in the dialog box Select Components which you want to install By clicking on Details you open the window Select Sub components Here you can determine the components even more precisely System Software Drivers for Windows NT miroVIDEO DC30 series utilities The capture application miroVIDEO Capture for capturing clips tools helps and ReadMe file Adobe Premiere AddOns Including miroI...

Page 42: ...er has not already been installed on your computer use the Documentation option to install it 6 Select video standard click Next Select the video standard you use and click on Next 7 Click Next In the Start copying files window all components you chose are listed If you wish to change the settings you chose click on Back Click Next to start copying 8 Click Finish In the Complete Setup window you a...

Page 43: ...f your miroVIDEO DC30 Pro installation Before beginning be sure you have installed Premiere the DC30 board the Breakout Box the drivers and software AUDIO LOOPTHROUGH TEST 1 Open miro VIDEO Capture Go to Start Programs DC30 Series miro VIDEO Capture NEW PROJECT BUTTON 2 Start a new project Press the New Project Button on the Projects tab ...

Page 44: ...k the settings for correct input selection and audio level 3 Click on the Record tab Start your VCR or video source 4 Do you hear audio from your TV monitor speakers YES Go on to the Video Loopthrough Test NO Go to the Breakout Box setup section and check your connections ...

Page 45: ...TEST 1 Open miro VIDEO Capture Go to Start Programs DC30 Series miro VIDEO Capture NEW PROJECT BUTTON 2 Start a new project Press the New Project Button on the Projects tab 3 Click on the Settings tab Check the settings for correct input selection and audio level ...

Page 46: ...eries User s Guide 4 Click on the Record tab Start your VCR or video source 5 Do you see video on your TV monitor YES Go on to the Video Capture Test NO Go back to the Breakout Box setup section and check your connections ...

Page 47: ...ST 1 Open miro VIDEO Capture Go to Start Programs DC30 Series miro VIDEO Capture NEW PROJECT BUTTON 2 Start a new project Press the New Project Button on the Projects tab 3 Click on the Settings tab Check the settings for correct input selection and audio level ...

Page 48: ...re drive RECORD BUTTON 5 Click on the Record tab 6 Start your VCR or video source 7 Click on the Record Button 8 Are dropped frames are reported on the Record tab below the Preview window YES Go on to Step 9 NO This test is done Go on to the Video Edit Test ...

Page 49: ...re dropped frames are reported on the Record tab YES Go on to Step 13 NO This test is done Go on to the Video Edit Test 13 Click on the Settings tab 14 Move the slider more left to further reduce the data rate 15 Repeat the Video Capture Test Steps 1 thru 7 16 Are dropped frames are reported on the Record tab YES Call Pinnacle Tech Support NO This test is done Go on to the Video Edit Test ...

Page 50: ...s the clips you captured in the previous Video Capture Test 1 Launch Adobe Premiere 2 From the pulldown menu select Project Settings General In the New Project Settings dialog box click the Load button 3 Choose the NTSC DC30 640x480 4MB setting and click the OK button ...

Page 51: ...the clip from the Project Window to the beginning of the Video 1A track in the timeline 7 Hold the Alt key and click on the work area bar to lengthen it 8 Save this project in the same folder as the original clip as shown in the miroVIDEO Settings tab 9 Press the Enter key on your keyboard to play the clip from Premiere 10 Are dropped frames are reported on the Record tab YES This test is done Go ...

Page 52: ...es the clips you captured in the previous Video Capture Test 1 Launch Adobe Premiere 2 From the pulldown menu select Project Settings General In the New Project Settings dialog box click the Load button 3 Choose the NTSC DC30 640x480 4MB setting and click the OK button ...

Page 53: ...t Window to the beginning of the Video 1A track in the timeline 7 Hold the Alt key and click on the work area bar to lengthen it 8 Press the Record button on your VCR 9 Press the Enter key on your keyboard to play the clip from Premiere 10 When the clip is done playing stop and rewind your VCR Press the Play button on your VCR 11 Do the video and audio from your clip play back from the VCR YES The...

Page 54: ...e images some will of them will be dropped not recorded and the video playback will look jerky and stuttering Solution Select a lower data rate If your system contains a graphics board that supports DirectDraw the miroVIDEO DC30 series board can add a real time overlay Check whether displaying an overlay while simultaneously recording weakens the recording This may be due to a lower transfer rate ...

Page 55: ...Click the icon in the System tray to open the DC30 series Control 2 Make the desired changes Standard Allows you to manually determine the video standard for the outputs of the miroVIDEO DC30 series PAL NTSC PAL M Brazil PAL N Argentina NTSC 4 43 MHz With miroVIDEO DC30 series no standard conversion is possible That is clips digitized and edited PAL video only be output in PAL format The same appl...

Page 56: ...tandard will be set correctly So why using this setting at all If you have not captured or created AVIs at very unusual resolutions the automatic detection might not function and you might not be satisfied with the image In that case you can improve the result by choosing Square pixels or ITU R 601 studio standard Video output preview Default setting Using this setting any video played by your DC3...

Page 57: ... back on the computer monitor in high image quality Therefore also the option Activate overlay must be activated As playback mode overlay surface must be chosen and your graphics board together with the installed drivers must be able to produce an overlay surface in the current resolution and color depth For playback in overlay mode several MBs of image data must be transmitted per second by miroV...

Page 58: ...plicitly under Device Use always This is the default setting In some Video for Windows applications the option Use always may cause problems during playback In this case deactivate the check box Synchronized start If the Synchronized start check box is activated and you start playing back a video sequence with miroAVI Cache a dialog box will appear as soon as the cache is filled and prepared for i...

Page 59: ...n displays the video in high quality in the PC window For this purpose Overlay Surface must be selected as representation mode and your graphics board together with the installed drivers must be able to produce an Overlay Surface in the current resolution and color depth For displaying in overlay mode several MBs of image data must be transmitted per second to your graphics board by miroVIDEO DC30...

Page 60: ...ing video editing and playback Low resolution If the described image interference continue to appear at Medium resolution choose the option Low resolution instead Obviously your computer system is immensely overcharged Probably it does not meet the requirements of miroVIDEO DC30 series Pinnacle logo If you activate the Pinnacle logo check box the logo will appear during recording But only if the f...

Page 61: ...controllers in the Playback column to regulate the sound output of all devices connected to the miroVIDEO DC30 series board Internal Lets you adjust the input level and the balance for the device you connected to the internal miroVIDEO DC30 series audio input such as the audio cable of a CD ROM drive or a sound board External Lets you adjust the input level and the balance of the connected device ...

Page 62: ...the Options menu Set Default Values The Set Default Values option sets all sliders to default settings The default settings are the ones that were enabled after you first installed the miroVIDEO DC30 series software Audio Loopthrough If you activate the check box Audio loopthrough the audio signal that is present at the audio input of the miroVIDEO DC30 series will also be looped through to the au...

Page 63: ... balance sliders of these inputs The level slider have an adjustment range from 0dB to 22 dB Normally place the controller on its lowest setting see figure above However you can increase the setting to amplify particularly quiet sounds Internal Lets you adjust the input level and the balance for the device you connected to the internal miroVIDEO DC30 series audio input such as the audio cable of a...

Page 64: ...fault Values option sets all sliders to default settings The default settings are the ones that were enabled after you first installed the miroVIDEO DC30 series software Advanced External The Advanced buttons let you make further settings If these buttons are not visible select Advanced Controls from the Options menu Mic Boost On The Mic Boost On button lets you enable an additional amplification ...

Page 65: ...in the File menu you can put Adobe Premiere in the capture mode The Movie capture menu item and Video Source command allow you to select the video source and contain options for setting the video quality In VidCap you open the Video source dialog box via the Options menu and the Video Source command Input Here you can select the miroVIDEO DC 30 plus Video input to which the video source connects c...

Page 66: ...tput of the miroVIDEO DC30 series deactivate the Video loopthrough check box in order to avoid video feedback VCR stability Please activate the VCR stability check box when using as a player a VCR instead of a camera Display Allows you to modify the Brightness the Contrast the Saturation and the Sharpness This will have an impact on the video signal during digitalization If you want to edit the un...

Page 67: ...box Under Premiere 5 1 select the File menu and the commands Capture and Movie Capture The Movie Capture menu appears Select the Recording Options command and in the following window click the VfW Settings button Click on the Video Format button To open the Video Format window use the Capture setup and Video format commands in the Movie Capture menu item In VidCap you open the Video source dialog ...

Page 68: ...e not been digitized are interpolated from the digitized pixels Vertical If you enabled Both fields Both fields are recorded when enabling One field only one field is digitized Frame ratio You can select between the 4 3 and the 16 9 kinescope aspect ratio Cropping When clicking Cropping the Cropping field is added to the window Here you can view the compression factor with reference to the data ra...

Page 69: ...ta rate is reached the maximum quality is reached as well no visible difference compared to the input signal a further increasing of the quality is impossible If the determined data rate is getting too high for your computer system a warning message will appear To find a suitable data rate measure the performance of your hard disk with miroVIDEO EXPERT Then try the quality procedure again Pixel ra...

Page 70: ...on restores all default settings Expert The Expert button opens miroVIDEO EXPERT the test program for the hard disk transfer This program measures the attainable data rate of your PC system and your hard disk s CAUTION there is only one board and only one driver In other words any settings you specify in a program that accesses the miroVIDEO DC30 series will automatically apply to all other progra...

Page 71: ...EO DC30 SPEED plus Control while a movie is running This change only takes effect after you restart the playback procedure Select the Start menu the miroVIDEO DC30 series program group and the DC30 series Control command to start the control application Make the desired settings Video format Select the desired video standard PAL Video standard in Germany many other European countries and Australia...

Page 72: ...aptation check box the video standard and pixel format PAL or NTSC will be detected automatically Select this option if you frequently want to playback PAL clips as well as NTSC clips from your computer Video output Select the video output via which you want to output the clip in maximum quality S Video or Composite Video Switching from S Video to Composite Video and vice versa activates correspon...

Page 73: ...resolution high resolution medium resolution low resolution for overlay surface only When you enable the Logo check box the logo appears during recording for overlay surface only Audio output Using the slider you control the audio volume during playback If you enable the Mute check box you will have no audio during playing back a clip PCI bus adaptation With some PC configurations picture interfer...

Page 74: ...u use Windows NT you must use miroVIDEO Capture in order to capture video with a miroVIDEO DC30 series product as other capture applications are not supported STARTING miroVIDEO CAPTURE To start miroVIDEO Capture select the Start menu the Programs command the miroVIDEO DC30 series program group and the miroVIDEO Capture The miroVIDEO Capture has five tabs Mode Projects Settings Record Clips Right ...

Page 75: ...mfp extension the individual video clips are saved with the avi extension Create new project To create a new project click the Create new project button or use the right mouse button The project list will show the new project Rename project To rename a project select the project and click on the Rename project button or use the right mouse button Enter a new name Delete project To delete a project...

Page 76: ...s tabs and make the desired settings Video Under Video you can select the settings for your captured video clips Video standard Here you can select the video standard PAL NTSC SECAM NTSC 4 43 NTSC video signal PAL color carrier PAL M Brazil or PAL N Argentina Depending on the installed Windows version one video standard has been pre selected Quality Here you can select the quality of your video by...

Page 77: ...he audio settings depend on the quality you chose Right mouse button If you click on the project list with the right mouse button the commands Create new project Rename project Delete project are available The Rename project and Delete project commands are only if a project name is selected in the project list PROJECTS ADVANCED A project consists of a compilation of video clips which have the same...

Page 78: ...button or use the right mouse button The project will be removed from the project list All settings you select in the Projects tab are saved automatically and cannot be changed after you have captured the first clip The settings apply to all clips of this project After you have captured a video clip do not change the settings for subsequent clips This will help you avoid problems when editing the ...

Page 79: ...0 x 480 NTSC NTSC 4 43 PAL M Half Select Half if you want to reduce the amount of data when capturing video As the Half option skips every second horizontal line the capture quality is lower Half results in a 384 x 576 PAL PAL N SECAM or a 320 x 480 NTSC NTSC 4 43 PAL M resolution Quarter Select Quarter if you want to reduce the amount of data considerably when capturing video As the Quarter optio...

Page 80: ...alf 352 x 576 16 x 24 336 x 552 Quarter 352 x 288 16 x 12 336 x 276 NTSC NTSC 4 43 PAL M Format TV cropping Visible image Full 704 x 480 32 x 24 672 x 456 Half 352 x 480 16 x 24 336 x 456 Quarter 352 x 240 16 x 12 336 x 228 Resolution Shows the selected resolution Pixel ratio A square pixel ratio refers to a 4 3 relationship between horizontal and vertical resolution and is commonly used in a comp...

Page 81: ...e is lower the clip appears to be jerky As every person perceives missing images in a different way you have to decide for yourself when selecting the number of frames Audio Capture audio If the Capture audio check box is enabled you can record audio If necessary enable the check box Audio is capture in Stereo quality Specify the quality for recording audio the higher the sampling rate kHz the bet...

Page 82: ...oggle between the possible connections Audio Click on the Audio button to specify whether you connected your video capture board to your sound board within the computer Intern or you connected your video capture board directly to the speakers Extern The button icon changes with the option you chose Video input Click the Video input button repeatedly to specify whether an S Video device a composite...

Page 83: ...ve and the quality When choosing a hard drive to be your capture drive for the first time miroVIDEO Expert automatically informs you about the maximum data rate for this drive that is miroVIDEO Expert determines the maximum speed at which data can be written to your hard drive The result will be shown in the file list under Data rate In front of the list entry a camera icon is displayed Right mous...

Page 84: ...the buttons repeatedly allows you to toggle between the possible connections Audio Click on the Audio button to specify whether you connected your video capture board to your sound board within the computer Intern or you connected your video capture board directly to the speakers Extern The button icon changes with the option you chose Video input Click the Video input button repeatedly to specify...

Page 85: ... slider to adjust the hue Audio level Here you can select the audio input level Move the left slider to adjust the left channel Move the right slider to adjust the right channel Enable the Linked together check box if you want to adjust both channel at the same time Move one slider the second one moves automatically 20 dB input gain If the 20 dB input gain check box has been enabled the audio inpu...

Page 86: ...ee space on the hard drive and the quality When choosing a hard drive to be your capture drive for the first time miroVIDEO Expert automatically informs you about the maximum data rate for this drive that is miroVIDEO Expert determines the maximum speed at which data can be written to your hard drive The result will be shown in the file list under Data rate In front of the list entry a camera icon...

Page 87: ...u are able to view the video clip as overlay in the video window the current position on the tape is displayed in hours minutes seconds and number of frames Click the Stop recording button to stop recording The recorded clips will be listed under the project name and will be numbered sequentially The file names of the clip which was recorded last and the current clip will be displayed A video over...

Page 88: ...delete the clip you recorded last Capturing single frames Windows 95 98 only Start your video source During capture you are able to view the video clip in the video window Click left into the video windows to capture a single frame The frame is copied into the Windows Clipboard and can be pasted into any picture editing application RECORD ADVANCED The Record tab lets you record and playback video ...

Page 89: ...he recorded clips will be listed under the project name and will be numbered sequentially The file names of the last clip recorded last and the current clip will be displayed Playing back video clips Click the Play button to playback the last recorded video clip It appears in the video window The Play button turns into the Stop button Click Stop to stop the playback Use the Delete button to delete...

Page 90: ...orward rewind operations This feature is only available if you own and have installed the miroVIDEO Productivity Pack together with your DC30 series board and drivers and if you use Windows 95 or 98 Player control The VCR control buttons and the jog shuttle slider allow you to search for individual video clips on the tape inserted in your VCR camcorder The button Starts the playback Stops the play...

Page 91: ... to the batch list Repeat the above steps for all sequences you want to digitize for your movie It makes no difference if you first select the beginning and then the end of a clip or vice versa A video clip is defined by setting an in point and an out point Only then will the video clip be included in the batch list Batch list If you specified an in and an out point for a clip the clip will be aut...

Page 92: ...ands will be available Play capture list Plays back all selected clips from the capture list in the best order possible avoiding rewinding and forwarding the tape Record capture list Records all selected clips from the capture list in the best order possible avoiding rewinding and forwarding the tape Select for capturing Creates a capture list from all selected clips Add to capture list The select...

Page 93: ...he symbol appears in front of the clip names Select all recorded Selects all recorded clips the symbol appears in front of the clip names Rename item Renames the selected clip When entering a new name this will appear in the list Delete item Deletes the selected clip s from the list CLIPS The Clips tab lets you play back rename or delete digitized clips ...

Page 94: ...ected project is displayed in the file list the name duration number of clips and file size Rename clip To rename a clip select it and click Rename clip or use the right mouse button Enter a new file name Delete clip To delete a clip select it and click on the Delete clip button or use the right mouse button The clip will be removed from the list Right mouse button When you click on the list using...

Page 95: ...lects all files in the list Deselect all Deselects the files Select invalid Deletes all files from the list which have been removed or which are empty Rename Renames the selected file Delete Deletes the selected files from the hard disk ...

Page 96: ...C30 without the miroVIDEO Productivity Pack This does not apply to other DC30 versions plus SPEED or pro WHAT IS IT GOOD FOR When editing video tape with Premiere 5 1 using miroINSTANT Video 5 gives you three major advantages The duration of the rendering process that happens after you have done the editing and before you can watch your production or print it to tape is substantially reduced This ...

Page 97: ... have installed three things in your PC A Pinnacle video editing board that supports INSTANT Video 5 like the miroVIDEO DC30 series Adobe Premiere 5 1 Driver software for the video editing board that supports and includes INSTANT Video 5 Please see the detailed install information that comes with your video editing board and drivers in the release notes and this User s Guide There you will learn a...

Page 98: ...clips or parts of the timeline in the Premiere 5 1 monitor window miroINSTANT Video 5 does two things It plays back the video using the miroVIDEO editing board so that it can be watched on a TV in addition to the usual display on your computer screen It makes sure that all source clips and rendered effects play back smoothly without interruptions between the single AVI files This way the playback ...

Page 99: ...rmine the audio play mode go to the section Modes of Operation Audio Output page 96 of this Guide Film strip Below the Pinnacle Systems logo there is a horizontal film strip This acts as an indicator for the INSTANT Video 5 playability of the whole project If all images in the strip are black then the whole project from the beginning to the end of the timeline can currently be played by miroINSTAN...

Page 100: ... Dropped frames Indicator If you are currently playing parts of the timeline meaning that video plays in the right video window within the Premiere 5 1 monitor window the status line shows the number of video frames that have been dropped during the current playback For smooth playback this number must be zero If the number of dropped frames is not zero see the troubleshooting section below This m...

Page 101: ...ible If the window is at minimized size the menu item is named Restore and will bring back the window to normal size You may keep the miroINSTANT Video 5 window minimized during editing to have the maximum space available for other windows and restore it to normal size for printing your production to tape in order to see the dropped frames information MODES OF OPERATION Video output In Premiere 5 ...

Page 102: ...have already been rendered will be played on the PC screen and on TV out When the source and program monitors are linked the content of the active monitor will be shown on the PC screen and on TV out the other monitor will display on the PC screen only Audio output The audio parts of the clips and projects you play back with miroINSTANT Video 5 are being output using two different devices Under Wi...

Page 103: ... highest quality What to do to have the audio output through the miroVIDEO editing board Set the work area to the timeline area you want to play and hit the Enter key to make Premiere render everything necessary and automatically start playback If the speaker is STILL crossed out there are one or more sections within the work area that contain no audio for a duration of ten seconds or more so that...

Page 104: ...ncompatible clips will not be shown on TV out All video clips in a project must have the same video resolution the same frame rate the same compression format and the same audio format same sampling rate same sample size and same number of channels in order to be played by miroINSTANT Video 5 without previous rendering miroVIDEO DC30 series AND miroINSTANT VIDEO 5 Required driver version for runni...

Page 105: ...deo 2 0 for Premiere 4 2 and 4 2LE The new version does not work with any version of Adobe Premiere before 5 1 There is no longer an item in the Premiere menu to call miroINSTANT Video 5 nor a special miroINSTANT Video play window Instead miroINSTANT Video 5 is now fully integrated into the Premiere 5 1 user interface It is always active when selected as Editing Mode ...

Page 106: ...ll in vertically or crawl horizontally You can also adjust the duration the title appears in your movie This guide begins with a brief explanation of how titles are created details the more advanced features and then guides you through several examples of making and modifying titles How Titles Are Created TitleDeko appears in a separate window with its own user interface It creates titles that are...

Page 107: ...tions Follow the instructions of the installation program LAUNCHING TITLEDEKO You can launch TitleDeko from the Main Menu Bar of Adobe Premiere or in two ways from an existing Adobe Premiere project You can also start TitleDeko directly from Windows Launching from the Adobe Premiere Main Menu Bar Choose Project Create then click TitleDeko Launching from the Adobe Premiere Timeline On the Timeline ...

Page 108: ...ld Italic Underlined Undo Redo TitleDeko Windows TitleDeko windows follow standard Windows conventions you can open close move and resize them Menu Bar The Menu Bar provides menus of commands and other choices not shown in illustration Frequently used commands have Toolbar buttons Toolbars Toolbars contain Tool Groups that can be torn off or rearranged Preview Area A Preview Area shows a what you ...

Page 109: ...ars on the screen remains for a set duration and disappears Choosing Roll creates a title that rises onto the screen moving from the bottom edge to the top Choosing Crawl creates a title that moves onto the screen from the right and progresses to the left Rolls and Crawls are rendered in Adobe Premiere Cut Copy and Paste These are standard Windows functions Typographical Characteristics Before you...

Page 110: ...kern it like text by spreading out the words and letters Grid Click the Grid button for a browser that gives you a fast way to align objects Horizontal and Vertical To change the horizontal or vertical alignment and or justification of text characters click the respective button and choose the type of alignment you wish Note that some alignments also work on objects Undo Redo Click Undo to undo th...

Page 111: ...enu bar select Layer Bring to Front or Send to Back to place the selection on the top or bottom layer Bring Forward One Layer Send Back One Layer From the main menu bar select Layer Bring Forward One Layer or Send Back One Layer to move the selection one layer toward the top or bottom Find Find Next and Replace Search and Replace From the main menu bar select Edit Find Find Next or Replace to perf...

Page 112: ... deal of graphical flexibility unlike a word processor For example you can select a single character and resize it skew it or even rotate it To select all text characters or objects Type several lines of text then try the following selection methods until text selection seems comfortable To select all text and objects choose Select All from the Edit menu To select all text click anywhere on the te...

Page 113: ...ted by a series of fine parallel black lines as shown in the following illustration A selection box with handles surrounds the entire box Deselection To deselect text or objects click anywhere outside the selected area FORMATTING TEXT AND OBJECTS You can format text and objects by choosing a style with preset attributes or manually by adjusting attributes such as boldness size typeface and spacing...

Page 114: ... metallic To select and change looks click the Looks button The Looks browser graphically displays the looks you can pick Just double click the look you want Justifying Text Justification operates differently in a video character generator than in a word processor TitleDeko uses justification controls to position all objects including rectangles and ellipses as well as text You can Justify objects...

Page 115: ... addition these buttons also contain Full and Spread functions that apply only to text Select the text or object click the button that indicates how you want the text justified or where you want the object positioned The choices are obvious except for Full and Spread Full Horizontal Full Vertical and Spread Justification Full horizontal justification makes the text flush or even with both the left...

Page 116: ...ent of the space between words and letters Kerning is typically used for very large letters Some characters in combination produce spacing that is visually unpleasant To kern text click the Kerning Leading button select the characters to kern hold down Alt and press the right left arrows to increase reduce the space between selected characters Or use the cursor to drag the handle at either side of...

Page 117: ...ve cursor indicates moving is enabled It appears anywhere on the selection box except at the handles Resizing Corner handles control height and width together middle handles on the right or left control width only and middle handles on the top or bottom control height only Hold down Ctrl while dragging a corner handle to constrain the aspect ratio during scaling In the following example the word i...

Page 118: ...and Styles As you have seen applying a look changes the appearance of text and objects A look consists of a face edge and shadow Each of those has a variety of parameters you can also adjust A style includes a look plus any other formatting or transformations that can be applied to text or objects For example styles can include typeface size and rotation in addition to a look Applying Looks to Tex...

Page 119: ...indow appears with a tab for each of the three details The Details and Attributes Most of the Attribute controls are obvious so the following does not explain those in depth In addition a small preview window in the lower left corner shows your adjustments which makes it easy for you to experiment Face Edge Shadow Face edge and shadow details have several items in common Choice of solid or gradien...

Page 120: ...cessing the Style Window Styles are accessed in the Style window To display the Style window select View Preset Styles or Window Styles from the menu bar The Style window contains graphic representations of 24 Preset Styles To select a style double click on it Creating your own Styles You can replace any of the 24 Preset Styles with a style of your own Create text or an object with the attributes ...

Page 121: ... to use as the background Replace Background Window You control all aspects of the background with the Replace Background window Transparent Backgrounds Select Background is transparent to create a transparent title with no background This is the default choice for Background For a transparent or semitransparent title you must also select Alpha Channel as your Key Type from the Adobe Premiere Tran...

Page 122: ...e color for both the top and bottom sets of Color buttons Picture Backgrounds To use a picture as the background select Background is a picture Type in the path name or click the Browse button navigate to the directory that contains the file and choose the file Selecting Colors and Opacity Colors To select color and opacity for a solid or gradient background click on the corresponding Color button...

Page 123: ...Example 2 enhances the text in a number of ways including resizing rotating and skewing This example also adds a shape behind the text to which a style is applied Example 3 creates a roll This allows the title to roll vertically from the bottom of the screen to the top It also trims the title from the Adobe Premiere Timeline Example 4 creates a scrollable crawl This allows the more than one frame ...

Page 124: ...m the Main Menu Bar of Adobe Premiere Choose Project Create then click TitleDeko 2 Enter the title text TitleDeko launches and a text I Beam cursor awaits text entry Type the words Happy Birthday You will change the type size and apply a new style to it but you must first select the text 3 Select the text Press Ctrl A to select the text A selection box with handles on its sides now surrounds the t...

Page 125: ...A sampling of styles is displayed in the window to the right of the Preview Area If the Style window is not visible select View Preset Styles Scroll down to number 5 and click it 5 Check your progress The style characteristics are applied to the text ...

Page 126: ...ect it then position the cursor on the lower right handle while pressing the Ctrl key to proportionally shrink the text 7 Center the text horizontally To center the text click the Horizontal Justify button to display its pop up choices Click the center button 8 Check your progress Your title is centered and appears as follows 9 Save the title Click the Save button to save the Still ...

Page 127: ...places the title in the Project window From here drag the title to the Timeline and place it on Video 2 or the top video channel On the Timeline place the cursor on the title icon Right click the icon Select Video Transparency to view the Transparency Settings window From the Key Type drop down list choose Alpha Channel Click OK Click the Player buttons to preview your work ...

Page 128: ...sting Premiere project Double click the title on the Timeline or in the Project window 2 Move the title text Click the Move Resize button Select the text and position the cursor anywhere within the text or on the border except on the handles so the cursor is a Move symbol that looks like a cross Experiment with moving the text 3 Rotate the text Click the Rotate Skew button Rotate the text ...

Page 129: ...ck the Rectangle button A white rectangle appears Click the Move Resize button and resize the rectangle Click the Rotate Skew button grab the upper right handle and skew the rectangle Position the Rotate Skew cursor over the shape and rotate it to match the text angle Click the Style 8 icon Move the shape over the text and select Layer Send to Back from the menu bar 6 Save the title Click the Save...

Page 130: ... window to the right of the Preview Area If the Style window is not visible select View Preset Styles Scroll down to number 2and click it 5 Center the text horizontally To center the text click the Horizontal Justify button to display its pop up choices Click the center button 6 Fully Justify the Text Vertically Click the Vertical Justify button to display its pop up choices Click the Full button ...

Page 131: ...th handles on its sides 4 Apply a Preset Style to the text A sampling of styles is displayed in the window to the right of the Preview Area If the Style window is not visible select View Preset Styles Scroll down to number 3 and click it 5 Make this title a Crawl Click the File Type drop down arrow Select Crawl 6 Allow more than one frame of text to crawl Click File Scrollable 7 Save the title Cli...

Page 132: ...an those for a large amount of image data using a high compression rate Image material with a high noise level as occurs when video materials are repeatedly copied presents a particular problem Even if the material itself does not have a high level of detail the noise must still be compressed The amount of data represented by the noise may actually be greater than the amount of data of the image i...

Page 133: ...eos use an appropriate utility to defragment your hard disk After this we recommend the following procedure for digitizing videos To ensure the fastest possible playback defragment your hard disk again after editing all the digitized sequences IDE or SCSI We recommend fast enhanced IDE hard disks as most economical video storage solution To make such a drive work fast make sure the following setti...

Page 134: ...5 Windows 98 performance optimization To improve system performance under Windows 95 98 you can make the following modifications Hard disk setting Set read ahead optimization for your hard disk to zero To do this select the Start menu Settings Control Panel System then Performance and File System Set the Read ahead optimization sliding scale to zero While you are in File System area also select Tr...

Page 135: ...river open at all times Opening media playback is enough to open the driver Deactivate the network driver and applications Because network operations often cause interruptions during recording and playback we recommend not working in a network DIGITIZING Improving image quality The image quality depends on the quality of the video source S VHS provides higher quality video material than do composi...

Page 136: ...Movie capture video format beginning on page 59 VIDEO EDITING Text Titles created using the TitleDeko preset styles will always look very good when applied to video and recorded to tape If you select the font size colors and smoothing for titles on your own you may end up with bad looking results on your TV set Possible reasons are too small text too thin fonts colors which do not look good on a T...

Page 137: ...orders and VCRs will hide image problems such as defects incomplete or flickering lines in these normally invisible areas If you change the position of an image with Premiere during a dissolve of fade with Wipe or Zoom for example these problems will become visible In the miroVIDEO DC30 series Video format dialog box see Video capture video format click the Clipping button and select the TV option...

Page 138: ...ce To find the video sequence resolution go to the Project window 2 Specify the compression method If you want to record the completed video sequence back to a VCR select the miroDC30 MJPG CODEC If you want the video sequence to run as a hardware independent computer clip select a suitable software CODEC such as Cinepak 3 Define the audio options 4 Keep in mind that sound also takes up disk space ...

Page 139: ...the Always option is active each frame is recompressed while the original video is being created If you only want to recompress the video sequence when the data rate deviates from the previous data rate by a certain percentage select Maintain data rate and enter a percentage under Tolerance To increase the quality of the video always activate the interleave function when saving see Video Editing T...

Page 140: ...miere as easy as possible we have prepared a number of project default settings for Premiere projects with the miroVIDEO DC30 series These defaults cover the most important miroVIDEO DC30 series operating modes When setting up a new project select the project default that best suits your video material format resolution cropping video standard If necessary adjust the audio settings to meet your ne...

Page 141: ...These can then be watched on TV or recorded to tape without further steps To achieve this you must set the export AVI settings properly in your animation software such as 3D Studio MAX or AfterEffects See the ReadMe file for details Or render to an intermediate format If you want to do further image compositing with your animations it may be a better option to first create the animation in a diffe...

Page 142: ...ollowing message should appear during startup New hardware component detected Insert data medium If this message does not appear during startup install the miroVIDEO DC30 series in a different PCI slot If this still does not solve the problem either the miroVIDEO DC30 series is defective or the video board is having problems with your system s motherboard 5 Confirm with OK 6 Place the miroVIDEO DC...

Page 143: ...or itself while actually accessing 64 MB The system maps the miroVIDEO DC30 series directly behind the graphics boards so that the graphics driver is reaching into the miroVIDEO DC30 series area You must change the graphics board mapping manually If the miroVIDEO DC30 series memory area is located directly after one of the graphics board s memory areas you must use the device manager to move the g...

Page 144: ...ump when an AVI file is played back at higher data rates This can be traced back to the fact that the hard disk carries out a recalibration while reading the file thus interrupting playback This problem is not caused by the miroVIDEO DC30 series but is the result of the manner in which the hard disk operates and interacts with other system components There are several solutions you can use to incr...

Page 145: ...te a new movie from it Under Output Options select Sound after every frame In some cases it may also be necessary to deactivate the Optimize still frame option in the Compress command of the Make Movie menu No frames were dropped during digitizing with sound but the video sequence jerks after editing with video processing software Adobe Premiere Note the number of recorded frames after capture Use...

Page 146: ...s only a rectangle on the video track then the AVI file does not contain a soundtrack In this case you probably switched off audio recording during digitizing Activate audio recording in Adobe Premiere or in the miroVIDEO Capture application See the Premiere User Guide or this Guide starting on page 68 2 If the AVI file contains an audio track then set Adobe Premiere so that the waveform of the so...

Page 147: ...ould not be activated at the left or right Slide the right volume control for the external input all the way to the top Center the external input balance control 7 Audio problems can be caused by so called audio codecs that are not suitable for video processing but are nonetheless installed on your computer In the control panel Menu Start Preferences Multimedia Advanced tab or Devices for Windows ...

Page 148: ...t the audio recording is made at 44 1 kHz in 16 bit stereo miroVIDEO Capture Adobe Premiere and that none of the problems described under Video is digitized but not audio is present 3 If the recorded audio is still distorted look at the waveform in Adobe Premiere in the soundtrack If the wave form constantly collides with the top and bottom edges of the window then the initial signal of your audio...

Page 149: ...t via another sound card Make certain that the audio output is really connected to the miroVIDEO DC30 series Make certain that the miroVIDEO DC30 series is selected as preferred device in the Control Panel Start menu Preferences Multimedia Audio tab 4 Use the one of the included miroVIDEO DC30 series project settings for Premiere without modification Always use the 44 1 kHz 16 bit stereo format fo...

Page 150: ... program starts 3 In the Language window specify the language in which you have installed Adobe Premiere If you installed the English version of Adobe Premiere select English Click Continue 4 In the Select Components window activate Project defaults for Adobe Premiere 5 1 4 2LE and click Continue The installation copies the project default settings to the following directories The installation pro...

Page 151: ... it exists PCI Multimedia Video device miroVIDEO DC30 series Motion JPEG Capture CODEC board 4 Restart Windows 95 98 The following message should appear during startup New hardware component detected Insert data medium If this message does not appear during startup install the miroVIDEO DC30 series in a different PCI slot If this still does not solve the problem either the miroVIDEO DC30 series is...

Page 152: ...the memory of your computer The memory has to have at least 32 MB Use the Device Manager to remove drivers you do not need Go to Start Settings System Settings System Device Manager DC30 series resource allocation failed 0x0003 Not enough system resources available Use the Device Manager to remove drivers you do not need Go to Start Settings System Settings System Device Manager DC30 series symbol...

Page 153: ...e miroVIDEO DC30 series board has been installed in your computer remove the board from its slot and reboot the system If this does not solve the problem another I22 based board is installed in your computer Insert the miroVIDEO DC30 series board in a PCI slot which is located in front of the other hardware DC30 series encoder init failed 0x0008 Encoder defective Consult your retailer or No miroVI...

Page 154: ...nstalled in your computer If the miroVIDEO DC30 series board has been installed in your computer remove the board from its slot and reboot the system If this does not solve the problem another I22 based board is installed in your computer Insert the miroVIDEO DC30 series board in a PCI slot located in front of the other hardware Z016 init failed 0x000B Z016 defective Consult your retailer or No mi...

Page 155: ...t Limit Data Rate Set the Limit Data Rate value to the same data rate of your captured clips for this project Or Open the project Choose Make menu and the Compression command then set the Quality slider to 100 When using miroINSTANT Video I get the error message miroINSTANT Video only supports M JPEG coded clips Please use the make make movie There are clips in the project that are not in the miro...

Page 156: ...hoosing the File menu and the Export command the miroINSTANT Video is grayed out The Construction or Project window is not active Solutions Make the Construction or Project window active by clicking on the window once with the left mouse button After moving clips all edited sections have to be recalculated Use the multitrack tool when moving the clips Select the multitrack button from the toolbar ...

Page 157: ...emory 64 MB recommended Minimum of 64 MB required for Windows NT Sufficient hard disk capacity Microsoft Windows 95 OSR2 Windows 98 or Windows NT 4 0 SP3 or higher PAL NTSC SECAM video input only PAL N PAL M Internal color representation always YUV 4 2 2 24 bit RGB Brightness contrast saturation sharpness Cropping Recording format Data rate Compression Board JPEG Processor Power supply System requ...

Page 158: ...Vpp 1 x Composite video output RCA 1 0 Vpp 1 x Composite video output RCA 1 0 Vpp 2 pin connector No Function 1 Composite 2 Ground You can select the inputs using the software The video is output on both outputs in parallel Audio inputs audio outputs Y adapter The Y adapter has an 8 pin Mini DIN connector and four RCA jacks RCA Audio Out Audio In Audio In 8 pin Mini DIN Audio Out Video inputs Slot...

Page 159: ...microphone sensitivity 0 1 Vrms voltage For Line sensitivity 1 Vrms 4 pin connector No Function 1 Left 2 Ground 3 Ground 4 Right Impedance 10 kOhm Input amplification 0 dB Max input Voltage 1 Vrms or 1 27 Vrms Impedance 600 Ohm Min load impedance 10 kOhm Max output voltage 0 707 Vrms 4 pin connector No Function 1 Left 2 Ground 3 Ground 4 Right Impedance 33 Ohm Min load impedance suitable for earph...

Page 160: ...nnect an S Video output to a S Video input or a composite output to a composite input DIGITIZING WITH THE miroVIDEO DC30 series To use the miroVIDEO DC30 series only for grabbing digitizing video sequences make the following connections VCR TV miroVIDEO DC30 series Graphics board VCR Monitor Monitor Computer monitor Inputs Camcorder VCR TV tuner VCR TV for image preview optional TV Audio output of...

Page 161: ...ty will be provided You can connect a suitable audio source to the combined audio input output using the Y adapter included in the package contents Also use the Y adapter to connect the audio output to a TV for example Function The miroVIDEO DC30 series digitizes and compresses the input signal video and audio and saves the signal to the hard disk The miroVIDEO DC30 series routes the output signal...

Page 162: ... of the video source microphone tape recorder CD player TV loudspeakers Audio input of the VCR Outputs VCR VCR VCR Connections The miroVIDEO DC30 series video input and the miroVIDEO DC30 series output connect to the same VCR or camcorder The second VCR output connects to a TV monitor If your video source has an S Video output use this connector instead of the composite output because higher quali...

Page 163: ...iroVIDEO DC30 series digitizes and compresses the input signal video and audio and saves the signal to the hard disk You can edit the video sequences on the computer using suitable software During editing the graphics board outputs a preview which the computer monitor and the TV monitor display The miroVIDEO DC30 series outputs the final video to the VCR which then records the video in VHS quality...

Page 164: ... or video monitor optional If your video source has an S Video output use this connector instead of the composite output because a higher quality will be provided You can connect a suitable audio source to the combined audio input output using the Y adapter included in the package contents Also use the Y adapter to connect the audio output to speakers Connect the internal miroVIDEO DC30 series aud...

Page 165: ...r When recording video the video is displayed on the TV monitor and the sound is output to the speakers connected to the sound board DIGITIZING AND RECORDING WITH THE miroVIDEO DC30 series AND A SOUND BOARD To record digitized and edited video sequences in VHS quality the miroVIDEO DC30 series output signal is also routed to the VCR this can be the same VCR VCR TV VCR VCR miroVIDEO DC30 series VCR...

Page 166: ... different place on the sound board than outlined in the diagram If your sound board has only one audio input for connecting the CD ROM drive you may connect the CD ROM drive to the miroVIDEO DC30 series audio input The cables required for this connection are not included in the miroVIDEO DC30 series package contents If you have not done so already connect loudspeakers to the audio output of the s...

Page 167: ... replaced with the averaged value The smallest element of a computer s memory Among other things bits are used to record the color values of pixels in an image The more bits used for each pixel the greater the number of available colors For example 1 bit each pixel is either black or white 4 bit each pixel can be any one of 16 colors or gray shades 8 bit each pixel can be any one of 256 colors or ...

Page 168: ...ue are cyan magenta and yellow respectively Composite video encodes all image information in one signal A method for making files smaller in size on disk There are two types of compression lossless and lossy Files compressed with a lossless scheme can be restored to their original state with no change to their original data Lossy schemes discard data during compression so the file when reopened is...

Page 169: ... print or display per inch Also called pixels per inch ppi An Edit Decision List is a listing of all clips effects and transitions in a video project This document identifies each clip s location the mark in and mark out times and how it relates to other clips in the project Its primary use is as a reference when using conventional video editing equipment for the final project The ways in which a ...

Page 170: ...of 312 lines each An arrangement of audio and video to promote smoother playback and synchronization or compression The standard AVI format equally spaces audio and video Irrelevant unimportant information can be eliminated during the image data compression since the human eye does not realize that this information is missing Abbreviation for Joint Photographic Experts Group Standard for the image...

Page 171: ...al Television System Committee Color TV standard spread in the USA using 525 lines and 60 image fields per second Abbreviation for Phase Alternation Line Color TV standard developed in Germany using 625 lines and 50 image fields per second Abbreviation for picture element Pixels are the smallest elements of a monitor image The colors that are the basis of the RGB color model red green and blue By ...

Page 172: ...HS quality is not achieved Method where cameras digitally store photographs on floppy disks or in the computer memory Improved standard for home VCRs using S Video signals to improve the color reproduction Y C With S Video signals the brightness luminance and the color information are transferred separately chrominance Y C The time code identifies the position of a frame in a video sequence with r...

Page 173: ... with which the video signal is scanned The higher the video scan rate the higher the image quality and the lesser the flicker A method of distortion based on a grid pattern By moving the control points that appear at each grid intersection you can control the distortion of the image Y C is a signal consisting of two components Y Brightness information C Color information Color model where Y deliv...

Page 174: ...____________ Fax ____________________________________________ Dear customer In case of technical problems please read the enclosed manual first or consult your retailer In case this is not sufficient please keep the following information ready System configuration 1 Which type of computer do you use Manufacturer _______________ model name ______________ Motherboard ___________________ chip set ___...

Page 175: ...____________ Video Hard Disk hard disk on which the video data is digitized and edited E IDE SCSI Wide SCSI Ultra Wide SCSI others _____ Manufacturer and type _______________________________________ 2 Which primary graphics board is installed in your computer Manufacturer and type ______________________________________ Graphics chip ______________________________________ Graphics chip ____________...

Page 176: ... CD version do you use see label on the installation CD 1 Version _________ date ________ for Pinnacle _________ 2 Version _________ date ________ for Pinnacle _________ 4 Which addresses does do the miroVIDEO board s use 1 Address _____________h Interrupt ______ 2 Address _____________h Interrupt ______ 5 Which video editing software do you use 1 Manufacturer ___________________ version _________...

Page 177: ...______ 2 Which input output of the miroVIDEO product do you use Input S VHS Composite Output S VHS Composite 3 Do you use a device control If yes which one Important Please explain the problem you have with the installation or the operation of your board in detail on a separate sheet of paper In addition to the questionnaire please fax us a printout of your computer configuration the printout of t...

Page 178: ...ption which can be determined by turning the equipment off and on the user is encouraged to try to correct the interference by one or more of the following measures Reorient or relocate the receiving antenna Increase the separation between the equipment and receiver Connect the equipment into an outlet on a circuit different from that to which the receiver is connected Consult the dealer or an exp...

Page 179: ...the approximation of the laws of the Member States relating to electromagnetic compatibility Zur vollständigen Einhaltung dieser Richtlinie n wurden folgende Normen herangezogen To fully comply with this these Directive s the following standards have been used EN 55022 Class B 1994 EN 50082 1 1992 ICE 801 2 4 ENV50140 ENV 50141 Dieser Erklärung liegt zugrunde Prüfbericht e des EMV Prüflabors This ...

Page 180: ...Black and white 161 Blur 113 Bold 103 107 108 Brightness 79 Bring Forward One Layer 105 Bring to Front 105 C Cables 7 Calibration 127 CD quality 132 CD ROM 161 CD ROM drive 127 Channel 161 Clear Selected Text 106 Clip 124 125 162 Clips 87 Clock 128 Cloning 162 Coarse 103 105 CODEC 162 Color 105 108 113 116 Color depth 128 162 Color display 48 Color model 162 Color palette 162 Complementary Color 1...

Page 181: ... format 163 File Type 103 124 125 film length 139 Filter 163 Find 105 Find Next 105 Fine 103 105 Font 113 Format 31 107 112 Frame 163 Frame content highly detailed 126 low level of detail 126 Frame rate 163 Frame size 131 134 163 Full 73 Full justification 109 Function fault 29 G Gradient background 116 Gradient colors 113 Graphics file 163 Grayscale 163 Grid 104 108 109 H Half 73 Halftoning 163 H...

Page 182: ...C30 Control 49 miroVIDEO Expert 30 miroVIDEO EXPERT 30 miroVIDEO EXPERT 2 127 138 miroVIDEO Expert 77 80 Mode 68 Monitor 6 Mono quality 132 Motion JPEG 138 Motion JPEG 165 Move 104 109 111 122 Move Resize 104 109 111 120 122 123 MPEG 165 N Network operation 129 New 103 Noise 126 Noisy image material 126 Non interlaced 165 NTSC 4 7 165 O Object 104 105 107 108 112 Online manual 28 36 Opacity 105 11...

Page 183: ...Rotate Skew 109 112 122 123 Run Length Encoding 166 S Saturation 79 Save 103 120 Save button 123 124 125 Scale 105 Scaling 111 166 Screen saver 129 Scrollable 117 124 125 SCSI 166 Search and replace 105 SECAM 7 166 Select 103 106 107 108 109 110 118 122 124 Select All 106 Selected 104 107 110 Selection box 106 107 109 111 112 122 125 Send Back One Layer 105 111 Send to Back 105 123 Settings 70 72 ...

Page 184: ...dards 151 Typeface 103 107 112 Typographical Characteristics 103 U Underline 103 108 Undo 104 Undo Redo 104 User interface 100 102 User type 68 V VCR 3 Vertical 104 108 109 VHS 166 VidCap32 140 Video 70 73 121 Video camera 3 Video channel 121 Video decoder 167 Video encoder 167 Video for Windows 129 167 Video format 61 Video inputs 152 Video output 7 Video outputs 152 Video quality 59 69 71 Video ...

Reviews: