HUNTER-PRO Series
35
Hunter-Pro Series & Captain 8 Installation Guide
3.12.3
Setting the channels
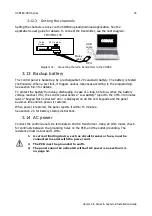
Setting the channels is done via the COMAX upload/download application. See the
application's user guide for details. To connect the transmitter, see the next diagram.
Diagram 32.
Connecting the radio transmitters to the COMAX
3.13
Backup battery
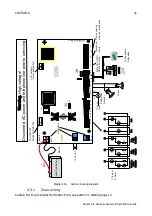
The control panel is backed up by a rechargeable 12V Lead-Acid battery. The battery is tested
continuously. When a test fails, it triggers various responses according to the programming.
See section 6.8.3 for details.
To protect the battery from deep discharging in case of a long AC failure, when the battery
voltage reaches 10.5v, the control panel sends a "Low battery" report to the CMS. 30 minutes
later a “Keypad Not Connected” error is displayed on all the LCD keypads and the panel
becomes idle until AC power is restored.
When power is restored, the panel reports it within 15 minutes.
See section 2.3 for battery startup instructions.
3.14
AC power
Connect the control panel's AC terminals to 16V AC transformer. Using an Ohm meter, check
for continuity between the grounding holes on the PCB, and the outlet grounding. The
resistance must not exceed 1 Ohm.
1.
A current limiting device, such as circuit breaker or fuse, must be
connected in serial with the power cord.
2.
The PCB must be grounded to earth.
3.
The panel cannot be activated without AC power; see section
on page 12.
TRV/TRU-100
To the
System
F2 Program
1
COMAX
DPU
USB
cable
Molex
cable
Summary of Contents for Hunter-Pro 8144
Page 111: ...Appendix D CAPTAIN 8 Factory Defaults 111 Hunter Pro Series Captain 8 Installation Guide...
Page 112: ...Appendix D CAPTAIN 8 Factory Defaults 112 Hunter Pro Series Captain 8 Installation Guide...
Page 113: ...Appendix D CAPTAIN 8 Factory Defaults 113 Hunter Pro Series Captain 8 Installation Guide...
Page 114: ...Appendix D CAPTAIN 8 Factory Defaults 114 Hunter Pro Series Captain 8 Installation Guide...
Page 115: ...Appendix D CAPTAIN 8 Factory Defaults 115 Hunter Pro Series Captain 8 Installation Guide...


