Chapter 3
Basic Procedures for Using the Mini Creative Cutter
Creative Cutter MINI
25
3
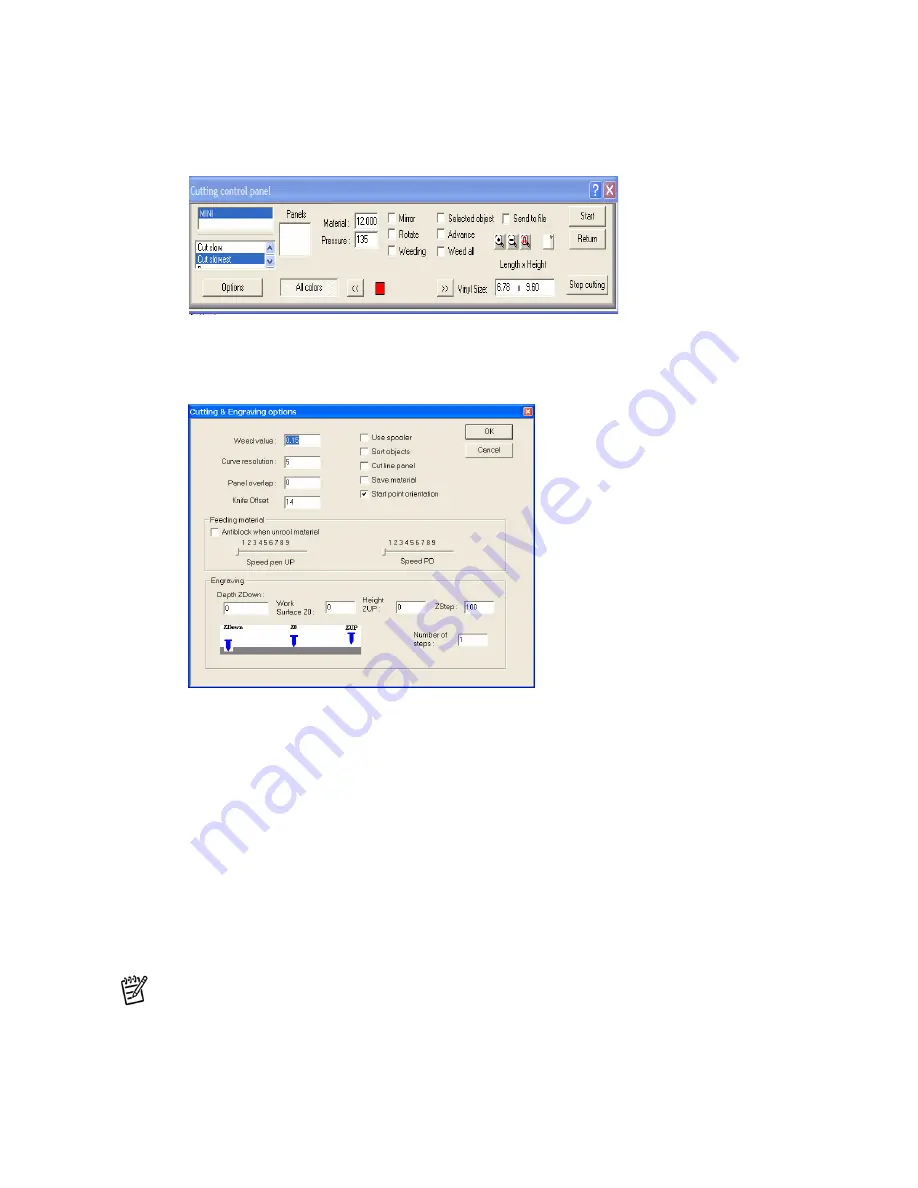
On the
Cutting Control Panel
window, clear the
Advance
box if it is checked. See
figure 27 .
Figure 27
4
On the
Cutting Control Panel
window, click the
Options
button to open the
Cutting
Options
window. See figure 28.
Figure 28
5
Set the Cutting Options to match those shown in figure 28.
6
Verify that the mat is positioned in the cutter properly, refer to “Working With the Cutting
Mat” on page 17.
7
Verify that the blade carriage is at the right side of the cutter and the green light is on.
8
Set the pressure to 145, and the cut speed to SLOW.
9
On the Cutting Control Panel, click
Start
to initiate the cut. If cutting does not start, see
“Select the Plotter” on page 13.
10
Examine results; continue to test various pressures until the cut is satisfactory. For more
information, see “Tips for Determining Proper Pressure to Assure Clean Cuts” on page 27.
NOTE:
If your cutter’s blade carriage goes to the left side of the cutter and just sits, your page
may be set wrong. Please see “Change the Page Size” on page 26.
Summary of Contents for Mini Creative Cutter
Page 1: ...Pazzles Creative Cutter Mini User Guide www pazzles com...
Page 24: ...Chapter 2 Installation and Setup 16 Creative Cutter MINI Blade Positioning Guide Figure 15...
Page 38: ...Chapter 3 Basic Procedures for Using the Mini Creative Cutter 30 Creative Cutter MINI...
Page 88: ...Chapter 4 Creative Cutter Tutorials 80 Creative Cutter MINI...
Page 111: ...Chapter 5 Manipulating Letters and Shapes Creative Cutter MINI 103 Figure 149...
Page 112: ...Chapter 5 Manipulating Letters and Shapes 104 Creative Cutter MINI...
Page 124: ...Chapter 6 Working With Graphics 116 Creative Cutter MINI...
Page 133: ...Chapter 7 Specialized Cutting and Finishing Techniques Creative Cutter MINI 125...
Page 134: ...Chapter 7 Specialized Cutting and Finishing Techniques 126 Creative Cutter MINI...
Page 140: ...Chapter 8 Troubleshooting Guide 132 Creative Cutter MINI...


