background image

SYSTEM INSTALLATION

 Acme Packet 4500 Hardware Installation and Maintenance Guide 

51

Your equipment rack location must have a local earth ground. This ground can be 
either an unpainted spot on the grounded equipment rack frame, or a grounded bus 
bar in the equipment room. 

Grounding Cable 
Installation

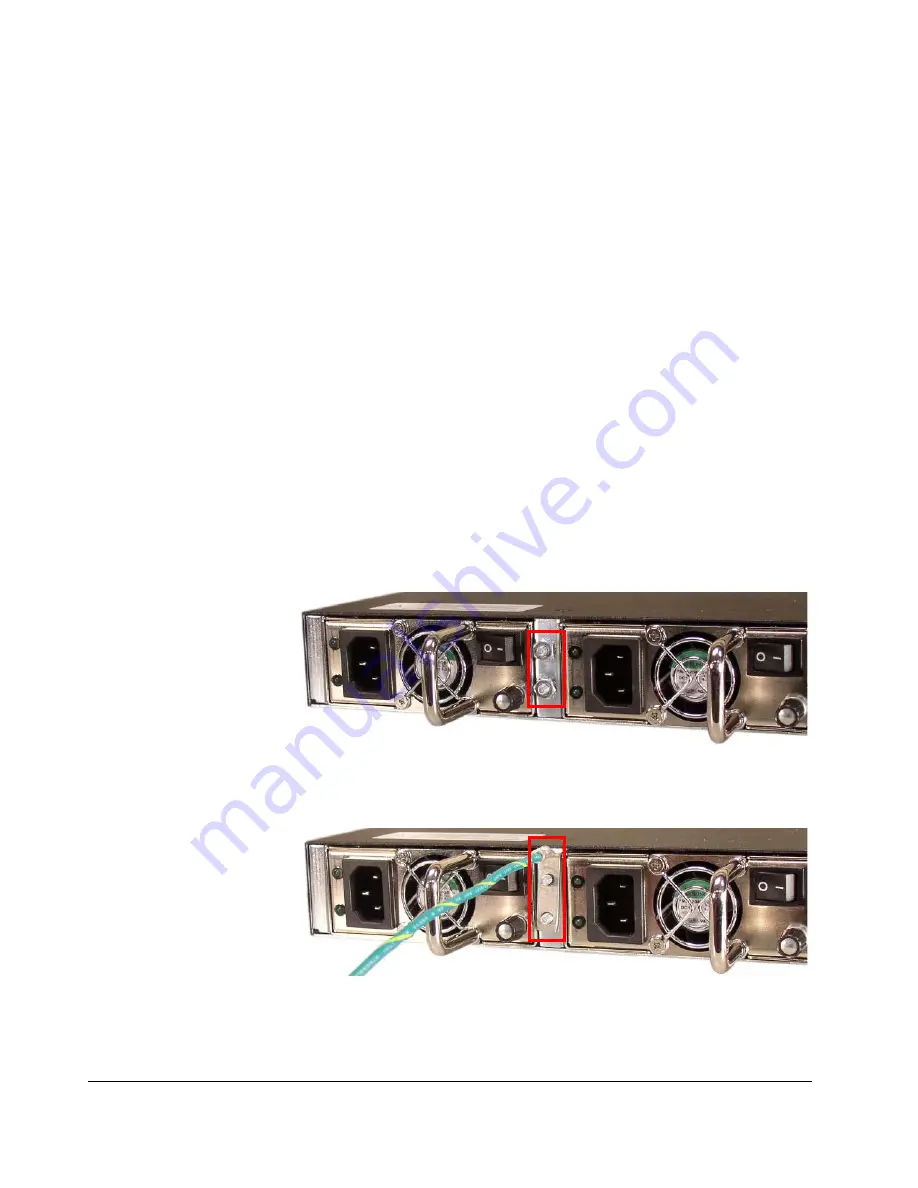
The ground terminals are located between the two power supplies on the rear of the 
chassis. The Acme Packet 4500 ships with two kep nuts screwed onto the ground 
terminals. Use an 11/32” nut driver to remove and install these kep nuts. 

This section shows you how to install the grounding cable on your Acme Packet 
4500.

Important: 

Acme Packet 4500 equipment is suitable for installation as part of a 

Common Bonding Network (CBN).

Note:  

The Common Bonding Network (CBN) is a term used for the 

connection of building steel, water pipes, cable racks, vertical and 
horizontal equalizer conductors, bonding conductors and electrical 
metallic raceways within a building, when they are bonded together by 
either deliberate or incidental connections. The CBN is also connected 
to the building’s grounding electrode system. Connections to the CBN 
are usually made from equipment frames to reduce voltage differences 
to acceptable levels when current flows through these frames, either 
during fault occurrences in the AC or DC power systems, or when 
lightning strikes.

To install the grounding cable on the Acme Packet 4500:

1.

Unscrew and remove the two kep nuts from the grounding posts located on the 
rear of the Acme Packet 4500. Place them aside.


Figure 4 - 66.  Kep Nuts on the Power Supply Ground Posts 

2.

Place the lug on the end of the grounding cable onto the grounding posts in the 
orientation shown in the following image.


Figure 4 - 67.  Aligning the Ground Cable on the Grounding Posts 

3.

Screw the two kep nuts onto the grounding post, securing the grounding lug in 
place. When attached correctly, the grounding lug fits snugly between the 

Summary of Contents for Acme Packet 4500

Page 1: ...Acme Packet 4500 Hardware Installation and Maintenance Guide Formerly Net Net 4500 April 2015...

Page 2: ...her rights are granted to the U S Government This software or hardware is developed for general use in a variety of information management applications It is not developed or intended for use in any i...

Page 3: ...cal Safety Precautions 6 Battery Warning 6 ESD Safety 7 Environmental Safety and Regulatory Certifications 7 2 Component Overview 9 Chassis 9 System Processor 13 System Control Panels 14 Network Inter...

Page 4: ...HA Deployments 63 5 Startup 65 Introduction 65 Creating a Console Connection 65 Powering On the Acme Packet 4500 66 Initial Log on 66 6 Maintenance 69 Introduction 69 System Shut Down 69 Rebooting Res...

Page 5: ...nance Guide v Physical Specifications 97 Electrical Specifications 98 Environmental Specifications 99 Connector Specifications 99 Optical Transceiver Interface Module Specification 100 100 8 Glossary...

Page 6: ...vi Acme Packet 4500 Hardware Installation and Maintenance Guide...

Page 7: ...cations Glossary Audience This guide is written for network administrators and telecommunications equipment installers and technicians It provides information related to the hardware components featur...

Page 8: ...ugust 10 2011 Revision 1 40 edited the Overview section to match up with the sections 1 8 add SFP section HW environment alarm severity February 14 2012 Revision 1 50 Added SFP section Corrected the T...

Page 9: ...hanged the term for 1 Gigabit ports from GigE the standard GbE to agree with other Oracle networking documentation Changed the copyright page to Oracle standards for 2015 Inserted a paragraph referrin...

Page 10: ...4 Acme Packet 4500 Hardware Installation and Maintenance Guide ABOUT THIS GUIDE...

Page 11: ...re general safety follow the safety precautions listed in this section Fan Module To avoid overheating the system do not block the air inlets or the fan module or otherwise obstruct airflow to the sys...

Page 12: ...electrical outlets Never use extension cords to power an Acme Packet 4500 Ensure that the installation facilities have proper grounding systems and include a grounded rack structure or local grounding...

Page 13: ...rounded rack check to see whether or not the rack is painted Paint can hinder proper grounding If your equipment rack is painted you should ground the system to some other reliable place or remove a s...

Page 14: ...8 Acme Packet 4500 Hardware Installation and Maintenance Guide SAFETY...

Page 15: ...ont and rear mounting flanges The cabinet slides are adjustable for equipment racks of various depths Slide extenders are also included with the Acme Packet 4500 for installations requiring up to an e...

Page 16: ...he Acme Packet 4500 These slides are reversible and can be used on either side of the system chassis The following image is a chassis section slide Figure 2 4 Chassis Section Slides The stationary sli...

Page 17: ...r 3820 shipped after September 2013 you will have the mounting hardware with the Locking Mechanism Equipment Rack Installation Hardware For equipment rack installations the system chassis is outfitted...

Page 18: ...r mounting point at left is mounted to the chassis The slide rail fits into the rack mounted slide rail Figure 2 10 Rack Mounted Slide Rail rear mounting point at left Once the slide rails are install...

Page 19: ...has been fully inserted into the rack turning the captive thumbscrews clockwise will lock the chassis into the rack Figure 2 14 Securing the Chassis to the Rack System Processor Processor Module CPU...

Page 20: ...hic Display USB Port Alarm Silence Button Figure 2 16 Acme Packet 4500 Front Control Panel Note The front control panel on the Acme Packet 4500 does not flip down Attempting to flip down the front con...

Page 21: ...real time status alarms and general system information Navigation Buttons You use the navigation buttons to navigate through the menus and information visible on the graphic display Console Port The c...

Page 22: ...Unit The Acme Packet 4500 s network interface unit NIU is located on the right side of the chassis s rear The single hot pluggable NIU contains all media and management interfaces Media interfaces ar...

Page 23: ...is useful for customers who want permanent console access the front console port provides easy access to the Acme Packet 4500 for a temporary connection Console port communication is used for administ...

Page 24: ...enerated the corresponding circuit for that level on the alarm port is closed Alarm Levels The following table lists the three alarm levels Table 2 2 Alarm Severity Levels Alarm Type Description Minor...

Page 25: ...ted directly above its associated port Figure 2 23 Ethernet LEDs LNK at left and ACT at right Link LED The link LED is located to the top left side of the Ethernet port This LED illuminates orange whe...

Page 26: ...standard IEEE 802 3 Signaling and Media Interfaces The signaling and media interfaces provide network connectivity for signaling and media traffic Each interface can connect to a network at GbE speeds...

Page 27: ...soon as possible If the Acme Packet 4500 starts up with only one power supply it will not generate an alarm AC Power The auto sensing AC power supply is rated at 110 240 VAC 50 60 Hz and comes with an...

Page 28: ...r attachment to your rack s circuit breaker or power supply The following table lists the DC power cord wire markings Table 2 4 DC Power Cord Wire Markings Wire Color Lead Designation style A DC Power...

Page 29: ...stem in any way The following figure shows the Acme Packet 4500 s fan module The fan module attaches to the chassis with two captive screws and is powered by a connector that joins to the motherboard...

Page 30: ...cs The signaling processor subsystem is comprised of the host subsystem and associated memory noted in red in the diagram The session control functions including the session signaling layer call routi...

Page 31: ...4500 Graphic Display Navigation Three navigation buttons are located to the right of the display These are used to scroll through display menus and select the information to view on the graphic displ...

Page 32: ...f what symptoms are currently causing alarms The number and type of alarms appear on the Acme Packet 4500 graphic display which indicates either a link alarm or a hardware alarm For example if there a...

Page 33: ...urns to the base display during normal operating conditions or to the alarm display during an alarm condition The following diagram shows the complete menu of options available from the graphic displa...

Page 34: ...button to return to the Top Menu BOOT PARAMS The BOOT PARAMS display allows you to view the same information configured in the bootparam ACLI configuration The BOOT PARAMS selection displays the IP i...

Page 35: ...roll to the SYSTEM selection 3 Press the Enter button The first screen in the SYSTEM menu is displayed 4 Press the Up or Down button to scroll through the three SYSTEM screens You can press the Enter...

Page 36: ...IRONMENT The ENVIRONMENT display allows you to view information about the hardware operational status The graphic display presents the following information in the order listed Screen 1 Hardware alarm...

Page 37: ...tput in the graphic display window of an Acme Packet 4500 in the initial state NET NET SESSION DIRECTOR I Out Of Service State Displays The following example shows the output in the graphic display wi...

Page 38: ...32 Acme Packet 4500 Hardware Installation and Maintenance Guide GRAPHIC DISPLAY...

Page 39: ...me Packet 4500 Shipping Container Contents Location Item Main Shipping Box Acme Packet chassis Accessory Kit Console adapter AC or DC power cords one per power supply Grounding cable with lug Document...

Page 40: ...tion should also be far from areas where heat electrical noise and electromagnetic fields are present Power Guidelines When preparing to install your Acme Packet 4500 Ensure that the installation loca...

Page 41: ...chapter of this guide before beginning installation Ensure that the equipment rack is securely bolted to the floor and that the equipment rack and components are properly grounded For AC power install...

Page 42: ...mponents listed in the shipping box contents tables are present and in good condition If you discover that any of the parts are missing or were damaged in shipment send an email to tac acmepacket com...

Page 43: ...e a chassis into place along the chassis slides Figure 4 34 Stationary Slide The chassis slide 2 x shipped is installed onto the side of the chassis and slides into the stationary slide to hold the ch...

Page 44: ...37 Nut Bar The mounting spacer 2 x shipped is for use in attaching the chassis slide rail to the equipment rack Figure 4 38 Mounting Spacer Assorted screws are for use in installing the chassis with t...

Page 45: ...nstalling the Stationary Slides In this first stage of system installation secure the stationary slide to the equipment rack The painted end of the stationary rail is attached to the front of the equi...

Page 46: ...enerously for a secure mounting Figure 4 42 Slide Extender Attached 4 Repeat steps 2 and 3 on the other stationary slide A completed slide should resemble the following image Figure 4 43 Completed Cha...

Page 47: ...igure 4 44 Aligning the Stationary Rail with the Equipment Rack Holes 3 Place 2 x 10 32 screws through the mounting spacer and through the stationary rail ear 4 Screw in and secure the stationary rail...

Page 48: ...igure 4 46 Stationary Rail Attached to Equipment Rack 6 Repeat this procedure for the other stationary slide Your rack should resemble the following image Figure 4 47 Rack with Stationary Rails Instal...

Page 49: ...e 4 48 Aligning the Stationary Rail with the Equipment Rack 3 Place one 10 32 screw through the stationary rail ear and screw it in place 4 Repeat Step 3 for the other mounting point Figure 4 49 Attac...

Page 50: ...ed nut bars but they must be mounted prior to this procedure To install the stationary rails on the front of a square hole equipment rack 1 Locate the following components 2 x stationary rail sections...

Page 51: ...t this point 6 Repeat Steps 3 5 for the other mounting point Figure 4 54 Stationary Slide Securely Attached to the Equipment Rack 7 Repeat this procedure for the other stationary slide To install the...

Page 52: ...d portion of system installation two chassis ears and two chassis slides are secured to the Acme Packet 4500 chassis To install the chassis rails on the Acme Packet 4500 chassis 1 Locate the following...

Page 53: ...re 4 59 Chassis Slide Installed on Chassis 6 Repeat this procedure for the other side of the Acme Packet 4500 chassis Installing the Chassis in the Rack You now lift the Acme Packet 4500 and install i...

Page 54: ...llation The following sections explain how to mount your Acme Packet 4500 in a center mount 2 post equipment rack The Acme Packet 4500 in a center mount installation is pictured below Figure 4 62 Cent...

Page 55: ...he Acme Packet 4500 chassis Installing the Chassis in the Rack Lift the Acme Packet 4500 and install it into the rack according to the following procedure To prevent personal injury or damage to the A...

Page 56: ...ce the fan module refer to the Fan Module and Filter Maintenance section in the Maintenance chapter of this guide Ground and Power Cable Installation The Acme Packet 4500 must be properly grounded to...

Page 57: ...al equalizer conductors bonding conductors and electrical metallic raceways within a building when they are bonded together by either deliberate or incidental connections The CBN is also connected to...

Page 58: ...Power Cord Installation This section shows you how to install an AC power cord Caution Use a 5 Amp fused circuit for each AC power supply Important This equipment is intended for installation in locat...

Page 59: ...VDC lead red return lead white frame ground lead All leads are tinned on both ends One end of each wire connects to the system DC power supply and the other end of each wire is secured to a DC fuse pa...

Page 60: ...s are on the left side of the terminal unit Release Slots Power Terminals Figure 4 71 Power Terminals and Release Slots Caution Use a 10 Amp fused circuit for each DC power supply To install the DC po...

Page 61: ...he Red Lead 4 Repeat Steps 2 and 3 with the white lead inserted into the middle terminal and the black lead inserted into the lower terminal Figure 4 74 Inserting the Red and White Leads Figure 4 75 R...

Page 62: ...GR 1089 CORE Issue 6 and requires isolation from the exposed OSP cabling The addition of primary protectors is not sufficient protection to connect these interfaces metallically to OSP wiring Note In...

Page 63: ...how to create a serial connection to the Acme Packet 4500 NIU console port Use the rear panel console port primarily for permanent connections to a terminal server or other serial device Refer to the...

Page 64: ...y from the rear panel toward a terminal server or other component where this serial connection terminates The following figure shows a Acme Packet 4500 with a console cable properly connected in addit...

Page 65: ...on the Acme Packet 4500 The alarm port contains leads for three circuits each of which closes to signify a corresponding alarm Refer to the Component Overview chapter in this document for a descripti...

Page 66: ...er run them in the same channel of a trunking system without segregation Cabling Procedure To connect Ethernet cables to the rear panel Ethernet ports 1 Locate the Ethernet cables you plan to connect...

Page 67: ...or your organization GbE Copper Cabling Procedure Shielded CAT5e or CAT6 or higher Ethernet cables with RJ45 jacks are used for connecting the Acme Packet 4500 GbE copper NIUs to your production netwo...

Page 68: ...able To prevent serious eye damage never look directly into a fiber optic cable connector or mating adapter Clean all fiber optics before installing them into your network according to prescribed proc...

Page 69: ...r shielded Ethernet cables are required for cabling two HA nodes together Rear Panel Cabling You can use one or two connections for HA redundancy support between the two members of an HA node Using tw...

Page 70: ...sert the other end of the cable into the Mgmt1 port on the rear panel of SBC2 The release tab on the RJ45 jack clicks into place when you insert it properly 3 Insert one end of a second Ethernet cable...

Page 71: ...the Acme Packet 4500 you need to configure the terminal hardware software appropriately The following table lists your terminal application serial configurations Table 5 7 Required Serial Configuratio...

Page 72: ...h redundant power supplies both power switches must be switched to the ON position either simultaneously or within a few seconds of each other If the second power supply is switched on long enough aft...

Page 73: ...e Acme Packet 4500 but you perform configuration tasks 2 Type enable and press return to enter superuser mode The prompt to enter the superuser password appears ACMEPACKET enable Password 3 Enter the...

Page 74: ...68 Acme Packet 4500 Hardware Installation and Maintenance Guide STARTUP...

Page 75: ...ed you can power off your Acme Packet 4500 Shutting down the system is appropriate when you are replacing a physical interface card power supply or are removing the Acme Packet 4500 from the equipment...

Page 76: ...The operating system gracefully shuts down as processes are terminated and the file system is stopped While the system and its processes are stopped all call processing is immediately halted You may t...

Page 77: ...the system shuts down abruptly You should only reset the Acme Packet 4500 when it becomes unstable and no other means of gaining administrative control is possible During a system reset certain files...

Page 78: ...n an HA pair 1 If you are in the same physical location as the Acme Packet 4500s you can view the graphic display on the front panel The display will indicate HA state as explained in the Graphic Disp...

Page 79: ...2 socket s SML STIC 45002 v3 Standby health 100 max silence 1050 last received from 169 254 1 2 on wancom1 0 Switchover log Jun 25 19 03 02 029 Active to BecomingStandby Jun 25 19 04 54 684 Standby t...

Page 80: ...current configuration version 4 Initiate a switchover on SBC1 by typing notify berpd force and pressing Enter at the ACLI prompt NETNETSBC1 notify berpd force 5 Wait for SBC2 to transition to the sta...

Page 81: ...et 4500 from an equipment rack 1 Turn the power supply switches to the OFF position 2 Remove all power cables from the Acme Packet 4500 3 Remove and label all attached network cables alarm cable and c...

Page 82: ...he malfunctioning power supply and replace it The power supply can be removed from the chassis while still installed in the rack and while the second power supply is providing system power this is cal...

Page 83: ...upply out of the power supply bay Figure 6 98 Removing the Power Supply 4 Continue to pull the power supply all the way out of the chassis until you have completely removed it Figure 6 99 Power Supply...

Page 84: ...d to the power source before the power supply is installed in the Acme Packet 4500 chassis Ground yourself with an ESD wrist strap before installing a power supply To install a power supply in the Acm...

Page 85: ...ssis Note Connect the power cord to the inserted power supply as described in the Ground and Power Cable Installation section of the System Installation chapter of this guide Fan Module and Filter Mai...

Page 86: ...dule 1 Press two fingers against the left end of the plastic fan bezel and pull directly toward you The fan bezel comes off of the chassis Set the fan bezel aside Figure 6 104 Removing the Front Bezel...

Page 87: ...be on the lower side of the module when inserted into the Acme Packet 4500 chassis Figure 6 108 Fan Module Power Connector 2 Note the chassis side power connector and threads where you will connect a...

Page 88: ...igure 6 113 Re Installing the Fan Bezel Maintaining the Cooling Components The Acme Packet 4500 air filter removes airborne particles before they are drawn into the Acme Packet 4500 chassis To prevent...

Page 89: ...lean out the perforated air inlets Note Only the removable fan bezel has vent holes that require cleaning Caution To prevent damage to the painted finish do not use any solvents or liquids to clean th...

Page 90: ...ed and will push forward but they will not fall out of the NIU Figure 6 114 Loosening Thumbscrews 3 Pivot the two ejection levers outward at the same time pulling the card out of its connection to the...

Page 91: ...e NIU 5 Place the NIU in an antistatic bag while it remains outside of the Acme Packet 4500 chassis NIU Replacement To install an NIU in the Acme Packet 4500 chassis 1 Locate the NIU 2 Ensure that the...

Page 92: ...serted into the Acme Packet 4500 chassis The guide rails guide the interface unit to engage the NIU bus connector squarely Figure 6 118 Guide Rails 5 Slide the card into the Acme Packet 4500 chassis T...

Page 93: ...jection levers will start to fold inward as the NIU is inserted into the chassis Figure 6 120 Installing the NIU 7 Fold both ejection levers inward toward the card to complete the connection to the mo...

Page 94: ...ay be replaced while the Acme Packet 4500 is powered on Leave the NIU in the Acme Packet 4500 as you extract the optical transceiver To obtain a replacement optical transceiver contact your Acme Packe...

Page 95: ...ght mode transceiver SFP Identification The following images show the multi mode and single mode SFP transceivers used in the Acme Packet 4500 NIU 4500 cards Black latch means the SFP is a multi mode...

Page 96: ...from Acme Packet if you order them Cable Information Three different fiber optic cables used on the Acme Packet 4500 media cards Multi mode transceivers take an orange fiber optic cable Single mode tr...

Page 97: ...optic cables from the optical transceiver to be replaced Figure 6 128 Bale Clasps in Rest Position 2 Pull the bale clasp latch out and down It will pivot downwards on its hinge Figure 6 129 Bale Clasp...

Page 98: ...larm Severity Description Minor Functionality is impaired to a small degree e g a single fan has failed Major Pending failures or unexpected events are imminent e g an LOS Critical Catastrophic condit...

Page 99: ...RITICAL any fan speed is 50 Or speed of two or more fans is 50 and 75 MINOR speed of one fan 75 and 90 the other two fans are at normal speed Fan failure Fan speed XXXX XXXX XXXX where xxxx xxxx xxxx...

Page 100: ...tage 2 5V CPU has emergency alarm the system should shutdown PLD VOLTAGE ALARM 3P3V 3 3 Volt Rail 65545 MINOR EMERGENCY Voltage 3 3V has minor alarm Voltage 3 3V has emergency alarm the system should...

Page 101: ...NK UP ALARM GIGPORT 131073 MINOR GbE S0P0 link up Slot 0 port 0 UP X LINK ALARMS where X is number of alarming links LINK UP ALARM GIGPORT 131074 MINOR GbE S1P0 link up Slot 1 port 0 UP X LINK ALARMS...

Page 102: ...NK ALARMS SFP Presence Alarms The following table lists the alarms that reflect when an SFP module is inserted or removed from an NIU Table 6 17 SFP Presence Alarms Alarm Name Alarm ID Alarm Severity...

Page 103: ...ons This table lists the physical dimensions and weight of the Acme Packet 4500 Table 7 18 Chassis Physical Dimensions and Weight Specification Description Height 1 72 4 37 cm 1U Width 17 10 43 43 cm...

Page 104: ...Facilities Fan Module Specifications This table lists the specifications for the Acme Packet 4500 fan module Table 7 21 Fan Module Specifications Specification Description Number of Fans 4 Total Maxim...

Page 105: ...storage Relative Humidity Operating conditions of 10 to 85 humidity under non condensing operating conditions Maximum Altitude The Acme Packet 4500 is required to operate below the maximum altitude o...

Page 106: ...ace Module Specifications Specification Multimode SX Fiber Module Singlemode LX Fiber Module Wavelength 850 nm 1330 nm Laser Type VCSEL FP Fiber type Transmission Distance 0 5 to 550m 50 m 0 5 to 550m...

Page 107: ...n their intended environment within designed efficiency levels without causing or receiving degradation due to unintentional electromagnetic interference ESD electrostatic discharge is the rapid disch...

Page 108: ...rnational Association is an organization consisting of approximately 500 companies that has developed a standard for small credit card sized devices PC cards This standard is designed for attaching in...

Page 109: ...saction oriented services Each UDP header carries both a source port identifier and a destination port identifier allowing high level protocols to target specific applications and services among hosts...

Page 110: ...104 Acme Packet 4500 Hardware Installation and Maintenance Guide GLOSSARY...

Page 111: ...ort uses 17 console session 65 control panel front 14 15 rear 16 cooling components 23 air inlets 23 maintenance 82 D default password 66 E equipment rack safety 35 ESD precautions 7 Ethernet cables 2...

Page 112: ...g in 66 M management interface See also Ethernet ports mounting hardware 9 chassis section slide 10 mounting slides as shipped 10 stationary section slide 10 N network interface unit slots 16 types 20...

Page 113: ...69 rejecting incoming calls 69 specifications AC power supply 97 alarm port 99 connectors 99 DC power cable 22 DC power supply 98 environmental 99 fan module 98 optical transceiver 100 physical 97 sta...

Page 114: ...108 Acme Packet 4500 Hardware Installation and Maintenance Guide I INDEX...

Reviews: