Océ|Two-Sided Printing and Double Print
D-2
3.
Allow machine to load normally.
4.
Using the "maintenance" menu, perform a
head purge.
5.
Allow the machine to complete its purge and
print the accompanying nozzle test - do not
advance the media.
6.
After the nozzle print is complete, open the lid
of the printer.
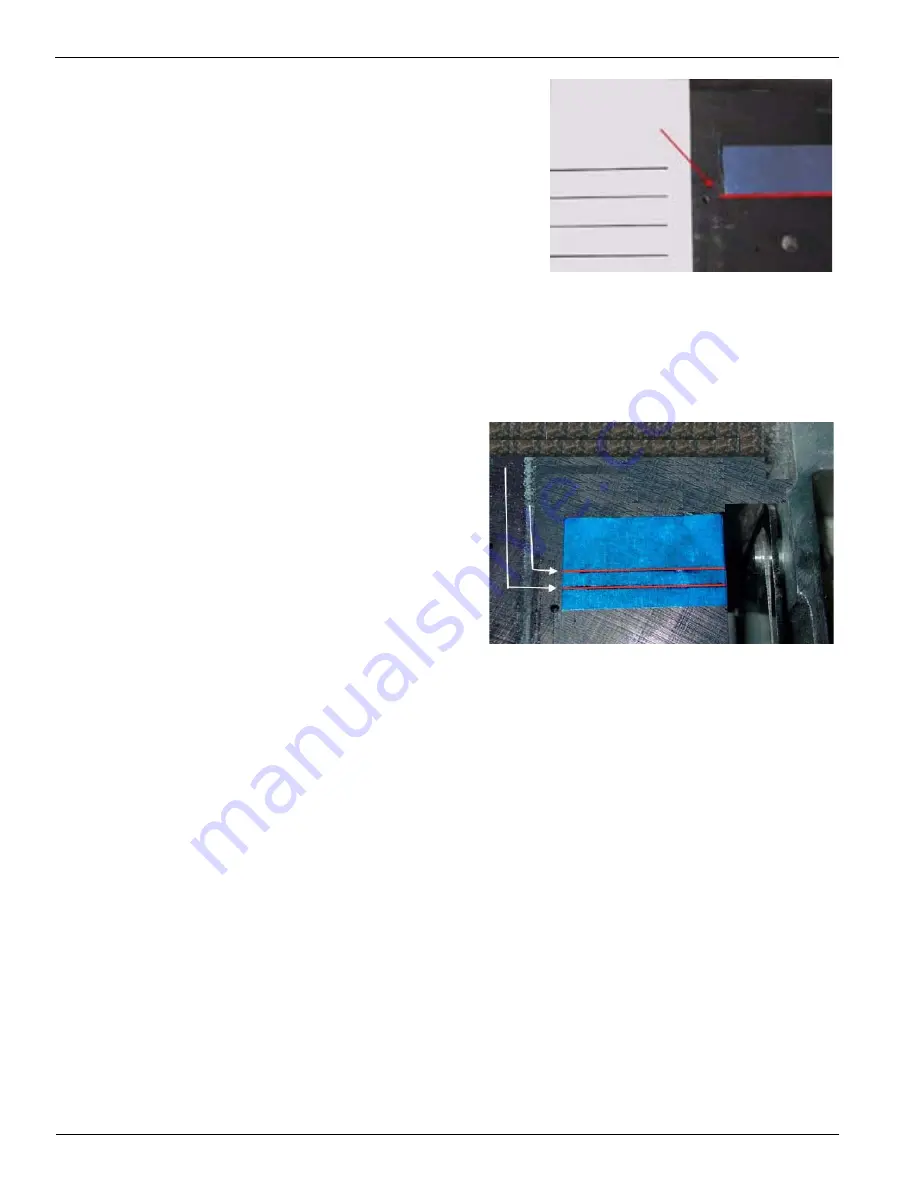
Figure A
7.
Observe the 4 marks made by the Cyan heads in the BACK right hand corner - see
Fig. A.
8.
Using the second Cyan mark from the
BACK
of the printer as a guide, using the
straight edge create a line continuing to
the right side of the platen - see Fig. A.
9.
Using the masking tape, affix a piece of
tape along this straight line - see Fig. A.
10.
Measure back 5 mm from the front
edge (See the red line in Fig. B) of the
tape for 8-pass printing and draw a
straight line to the edge of the platen.
Figure B
11.
These lines accurately reflect where printing begins in 8 and 4 pass and will be used
to line up the image on the reverse side, when you switch to the second side.
Double Sided Printing: Printing the First Side of the Graphic
1.
From the control panel, select "Menu", "Operator", "Print Parameters", "Statistics"
and turn "Statistics" off.
2.
In Onyx Rip Queue, highlight the Arizona 600 and select "Change".
3.
From the "Change Media and Placement" window select "Setup.
4.
From the "Placement Strategy" window, set the "Top" and "Left" offsets to 0.00 and
set "Justification" to "Right".
5.
Open the file to be printed in Pre-Flight.
6.
Under "Preview & Size" tab, ensure the X and Y origins are set for "0".
Mark the edge
of the tape
closest to you
with indelible marker.
Measure and mark 5mm from bottom edge of tape.
This is the starting point of 8-pass print on the 2nd side.
Measure and mark 10mm from bottom edge of
tape. This is the beginning of 4-pass print on the
2nd side.
Summary of Contents for Arizona 600
Page 2: ...Oc Display Graphics Systems 2004 All Rights Reserved...
Page 6: ...Oc Ordering Printer Supplies vi...
Page 34: ...Oc Media System 3 6 Figure 3 6 Secure the Mandrel Media Assembly...
Page 58: ...Oc Media System 3 30...
Page 110: ...Oc Printer Maintenance 5 20...
Page 118: ...Oc Error Messages and Troubleshooting 6 8...
Page 120: ...Oc Menus A 2 Figure A 1 Copies Reprints Menu...
Page 121: ...12 9 04 A 3 Figure A 2 Print Parameters Menu...
Page 122: ...Oc Menus A 4 Figure A 3 Test Prints Menu...
Page 123: ...12 9 04 A 5 Figure A 4 Maintenance Menu Part 1...
Page 124: ...Oc Menus A 6 Figure A 5 Maintenance Menu Part 2...
Page 126: ...Oc Menus A 8 Figure A 7 About Printer Menu...
Page 127: ...12 9 04 A 9 Figure A 8 Units Menu...
Page 128: ...Oc Menus A 10 Figure A 9 Set Clock Menu...
Page 129: ...12 9 04 A 11 Figure A 10 Ink Menu...
Page 130: ...Oc Menus A 12 Figure A 11 Configure I O Menu...
Page 137: ...12 9 04 B 7 Photo 2 Photo 3...
Page 138: ...Oc Printer Maintenance B 8 Photo 4...
Page 148: ...Oc Index Index 4...


