Chapter 9 - Creating Tracks
Page 9-8
961/962 Operations and Reference Manual, Rev. A
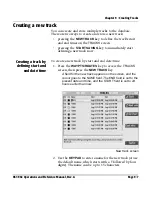
3. To adjust the start date and time, press the
CURSOR
PAD
right to highlight the
START
field, which defaults to the
date. To change the start date, which can’t be before your
system’s installation date, press the
LEFT ARROW
key to
select a desired date. To change the start hour, press the
DATE
key, then press the
ARROW
keys to select a desired
hour. To change the minute, press the hour key, then
press the arrow keys to select a desired minute. As you
press the
ARROW
keys to define the track, the system
updates the track’s number of positions and range of
minutes and seconds, or hours and days, and displays this
information near the bottom of the screen. Note that if
you press and hold the
ARROW
keys down, they’ll speed
up; therefore, when you’re close to the desired time,
release the
ARROW
key to avoid overshooting the date
and time.
4. To adjust the end date and time, press the
CURSOR
PAD
to highlight the
END
field, which defaults to the date. To
change the end date, which can’t be past the present,
press the
LEFT ARROW
key to select a desired date. To
change the end hour, press the
DATE
key, then press the
ARROW
keys to select a desired hour. To change the
minute, press the
HOUR
key, then press the
ARROW
keys
to select a desired minute. You can’t set the end time past
the present—the
RIGHT ARROW
key won’t take the end
date and time into the future).
5. To set the desired color, press the
NEXT COLOR
key to
cycle through a selection of eight different colors.
6. To enter a description, press the
CURSOR PAD
left or
right until the red cursor flashes in the
DESCRIPTION
field at the bottom of the screen, and use the
KEYPAD
to
enter a description.
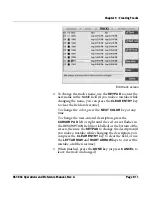
7. When finished defining the track, press the
DONE
key.
The finished start and end times may be slightly different if
track data wasn’t available for those exact start/end times
(the system uses the closest available times for which
there’s data). The final length of the track is displayed in
the current units at the bottom of the screen.
Summary of Contents for 961
Page 6: ...Page viii 961 962 Operations and Reference Manual Rev A ...
Page 8: ...Page x 961 962 Operations and Reference Manual Rev A ...
Page 14: ...Page xvi 961 962 Operations and Reference Manual Rev A ...
Page 92: ...Chapter 3 Using the Controls Page 3 34 961 962 Operations and Reference Manual Rev A ...
Page 160: ...Chapter 6 Creating Waypoints Page 6 18 961 962 Operations and Reference Manual Rev A ...
Page 176: ...Chapter 7 Creating Avoidance Points Page 7 16 961 962 Operations and Reference Manual Rev A ...
Page 202: ...Chapter 8 Creating Routes Page 8 26 961 962 Operations and Reference Manual Rev A ...
Page 380: ...Glossary Page G 8 961 962 Operations and Reference Manual Rev A ...

