


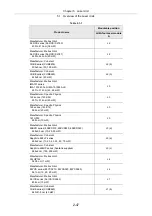


Chapter 4 Setting Up the Microscope
4.2 Setup Procedure
2-38
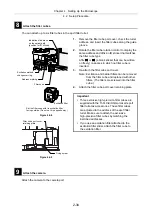
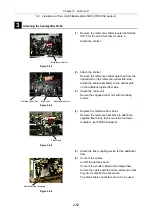
If the Perfect Focus System is not used
CAUTION – CLAS
S 3B
LASER RADIAT
ION WHEN OPE
N
AVOID EXPOSU
RE TO THE BEA
M
VORSICHT – LA
SERSTRAHLU
NG
KLASSE 3B,
WENN ABDEC
KUNG GEÖFFNE
T
NICHT DEM STR
AHL AUSSETZE
N
AVOID EXPOSU
RE
LASER LIGHT
IS EMITTED
FROM THIS A
PERTURE
N
AM
G
ET
N
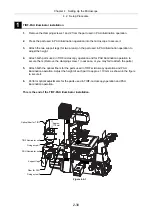
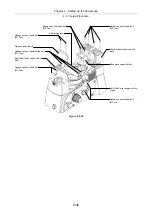
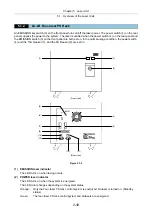
Figure 4.2-15
1) Remove the two M3 hexagon socket head
bolts secured on top of the epi-fl filter turret
(TI-FLC, TI-FLC-E, or TI-FLC-E/HQ), using
the 2-mm hexagonal screwdriver appended
to the Ti-E and Ti-E/B.
2) Attach the protection plate (for nosepiece)
appended to the Ti-E or Ti-E/B to the top
portion of the epi-fl filter turret and secure
the plate using the two M3 hexagon socket
head bolts removed in step 1).
3) Attach the nosepiece (TI-N6, TI-ND6, or
TI-ND6-E) to the Ti-E or Ti-E/B and secure
it using the 4-mm hexagonal screwdriver
appended to the Ti-E and Ti-E/B.
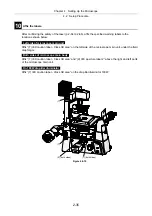
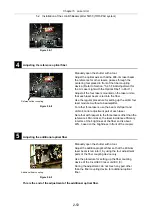
If the Perfect Focus System is used
CAUTION – CLA
SS 3B
LASER RADIAT
ION WHEN OPE
N
AVOID EXPOSU
RE TO THE BEA
M
VORSICHT – L
ASERSTRAHLU
NG
KLASSE 3B,
WENN AB
AVOID EXPOSURE
LASER LIGHT
IS EMITTED
FROM THIS AP
ERTURE
M
T
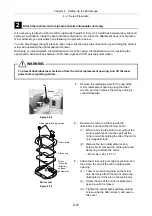
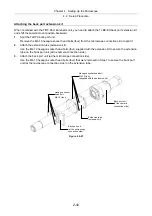
Figure 4.2-16
1) Remove the four M3 hexagon socket head
bolts secured on top of the epi-fl filter turret
(TI-FLC, TI-FLC-E, or TI-FLC-E/HQ), using
the 2-mm hexagonal screwdriver appended
to the Ti-E and Ti-E/B.
2) Attach the protection plate (for PFS6
nosepiece) appended to the PFS6
nosepiece to the top portion of the epi-fl
filter turret and secure the plate using the
four M3 hexagon socket head bolts
removed in step 1).
3) With the cable of the PFS6 nosepiece
being routed through the cable port of the
protection plate to the Ti-E or Ti-E/B, attach
the PFS6 nosepiece to the Ti-E or Ti-E/B
and secure it using the 4-mm hexagonal
screwdriver appended to the Ti-E and
Ti-E/B.
Figure 4.2-17
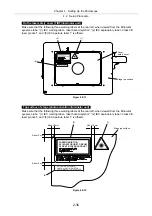
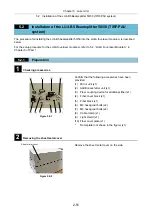
3.
Attach the filter cube port cover retaining plate.
3-1. After attaching the filter cube, re-attach the
filter cube port cover. (For how to attach
the filter cube, see the instruction manual
included with the microscope main body.)
3-2. Attach the filter cube port cover retaining
plate to the side surface of the epi-fl filter
turret’s lower plate using the screws
provided with the laser safety kit.
Filter cube port
cover retaining
plate
Fixing screw
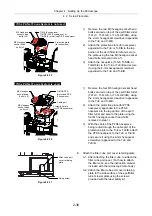
Protection plate
(for nosepiece)
TI-N6 (6 nosepiece),
TI-ND6 (DIC 6 nosepiece), or
TI-ND6-E (motorized DIC 6 nosepiece)
M5 Hexagon
socket head
bolts (x 2)
M3 Hexagon
socket head
bolts (x 2)
Protection plate
(for PFS6 nosepiece)
TI-ND6-PFS
(motorized PFS
6 nosepiece)
M5 Hexagon
socket head
bolts (x 2)
M3 Hexagon
socket head
bolts (x 4)
Cable port
Summary of Contents for Eclipse Ti Series
Page 2: ......
Page 14: ......
Page 256: ......
Page 258: ......
Page 260: ...Contents 2 2 8 2 Environmental Conditions 2 70 8 3 Safety Standards Compliance 2 71 ...


