SECTION 2
INSTALLING THE PRINTER
43
8.
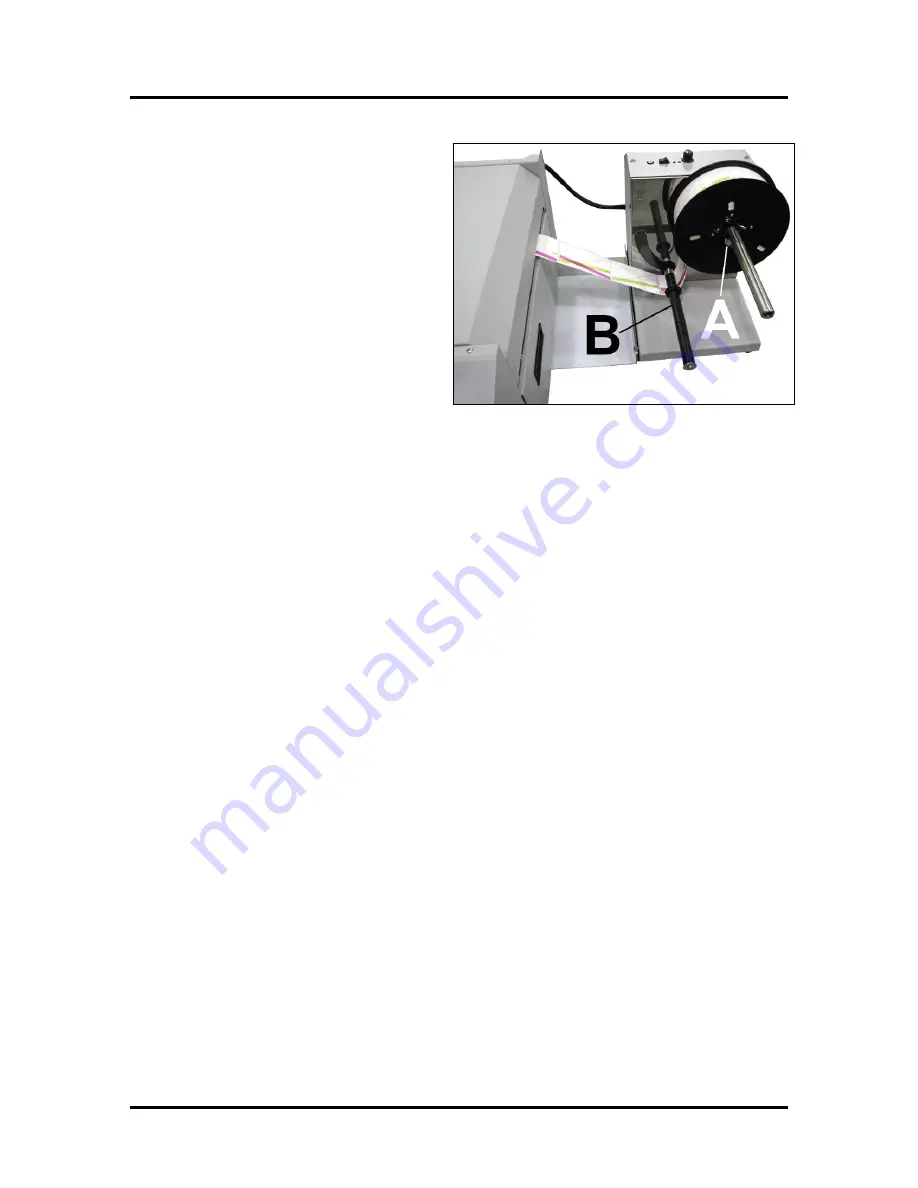
Load an empty 3" core onto the Winder
Spindle.
9.
Slide the Spindle Lock/Guide
[A]
onto
the shaft until the 4 pins fit into the roll
core.
Tip:
Do not push the Spindle
Lock/Guide up against the side of the
media. Leave a small amount of space to
allow the media to wind freely onto the
core.
10.
Take the leader end of the media and pull
it under the Label Tension Arm
[B]
on
the Winder.
11.
Tape or glue the roll end (
label side up
)
to the top side of the empty core.
NOTE:
Make sure the edge is secured
straight on the core for proper winding.
12.
Slide Adjustable Media Ring Guide, on the Label Tension Arm [B] shaft to the edge of the media.
13.
Turn the Winder’s Mode Switch ON
.
14.
Adjust Speed of Unwinder/Winder and Adjust the Winder’s Tension Control Selector.
See section titled “Unwinder/Winder Controls & Function”.
NOTE
: In "Roll to Roll" mode: "Mid Job Servicing" is disabled. Therefore printing will not be interrupted
to perform head maintenance; unless the job has been paused for more than 5 minutes. If you see image
degradation during the run; you can manually PAUSE the job (press PAUSE/RESUME button). Then from
the Toolbox press “Cut Media” then press “Retract Media”. With the media retracted, you can now press
“Normal Clean Printhead”. Once head maintenance is completed you can continue printing using the
PAUSE/RESUME button. Once you have printed about 20 inches of media; PAUSE the job again, splice
the stock onto the Winder, and press PAUSE/RESUME to continue.
Roll to Cut Setup
IMPORTANT!
Winder must be turned OFF or disconnected from the Printer and moved out of the way.
This will ensure that the automatic cut function of the Cutter is enabled and the Winder doesn’t interfere
with media output.
Be sure to power-off the printer before connecting/disconnecting Winder.
1.
Make sure Winder is OFF
, or disconnected from the Printer and moved out of the way.
CAUTION!
Power-off printer before connecting/disconnecting Winder.
2.
Load the Label/Media Roll onto the Unwinder and into the Printer.
Complete Steps 1-4 in section titled “Roll to Roll Setup”. Then return here.
3.
Adjust Speed of Unwinder.
See section titled “Unwinder/Winder Controls & Function”.
Fanfold Setup
IMPORTANT!
Make sure both the Unwinder and Winder are disconnected from the Printer and moved
out of the way. This will ensure that the automatic cut function of the Cutter is enabled and the
Unwinder/Winder doesn’t interfere with label input/output.
Be sure to power-off the printer before connecting/disconnecting Unwinder/Winder.
Loading Fanfold Labels:
1.
Make sure Unwinder and Winder are disconnected from the Printer and moved out of the
way. CAUTION!
Power-off printer before connecting/disconnecting Unwinder/Winder.
Summary of Contents for MACH X
Page 124: ......
Page 125: ...Copyright 2015 NEOPOST USA...


