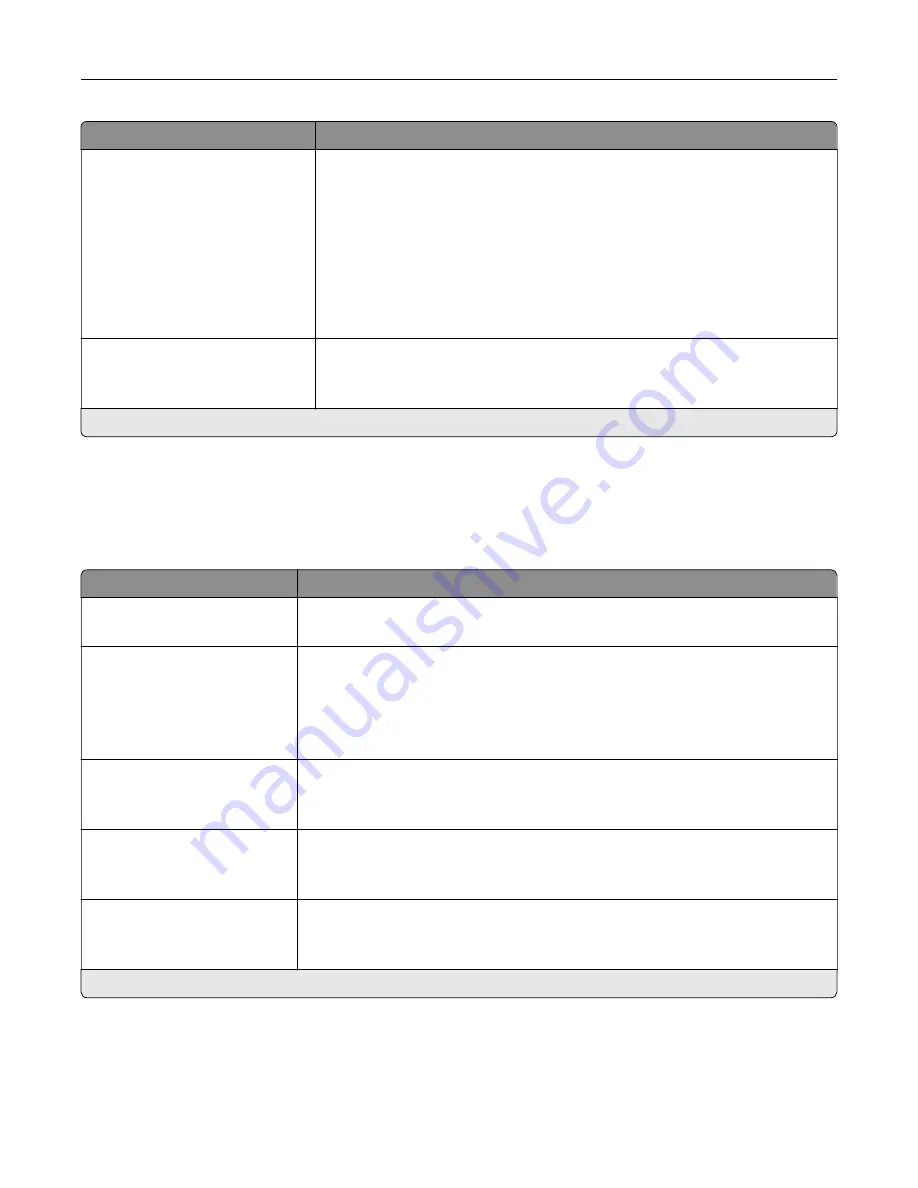
Menu item
Description
Configure Bins
Mailbox*
Link
Link Optional
Type Assignment
Configure the mode of operation for the output bins.
Notes:
•
Mailbox allows the standard bin and any optional bin to be selected
individually.
•
Link allows all output bins to be linked together as though they were one
large bin.
•
Link Optional treats all optional bins as one large output bin.
•
Type Assignment assigns each paper type a bin or a linked bin set.
Custom Bin Names
Standard Bin
Bin [x]
Assign a name for the bin.
Note:
An asterisk (*) next to a value indicates the factory default setting.
USB Drive
Flash Drive Print
Menu item
Description
Number of Copies
1–9999 (1*)
Set the number of copies.
Paper Source
Tray [x] (1*)
Multipurpose Feeder
Manual Paper
Manual Envelope
Set the paper source for the print job.
Color
Off
On*
Print a flash drive file in color.
Collate
(1,1,1) (2,2,2)
(1,2,3) (1,2,3)*
Keep the pages of a print job stacked in sequence, particularly when printing
multiple copies of the job.
Sides
1
‑
Sided*
2
‑
Sided
Specify whether to print on one side or both sides of the paper.
Note:
An asterisk (*) next to a value indicates the factory default setting.
Understanding the printer menus
70
Summary of Contents for C9235
Page 1: ...C9235 Printer User s Guide May 2020 www lexmark com Machine type s 5059 Model s 190...
Page 108: ...9 Insert the waste toner bottle and then close the door Maintaining the printer 108...
Page 112: ...8 Insert the waste toner bottle and then close the door Maintaining the printer 112...
Page 135: ...Below the fuser area Duplex area Clearing jams 135...
Page 140: ...2 Open door J 3 Open door H Clearing jams 140...
Page 188: ...6 Remove the controller board shield Upgrading and migrating 188...
Page 197: ...4 Remove the controller board shield Upgrading and migrating 197...
Page 203: ...7 Connect the tray connector to the printer 8 Open trays 2 and 3 Upgrading and migrating 203...
Page 208: ...9 Remove the stabilizing feet from the tray Upgrading and migrating 208...
Page 212: ...17 Secure the tray cable with the clamp Upgrading and migrating 212...
Page 219: ...7 Remove the paper guides 8 Attach the sensor cover Upgrading and migrating 219...
Page 225: ...8 Attach the nisher to the printer Upgrading and migrating 225...


