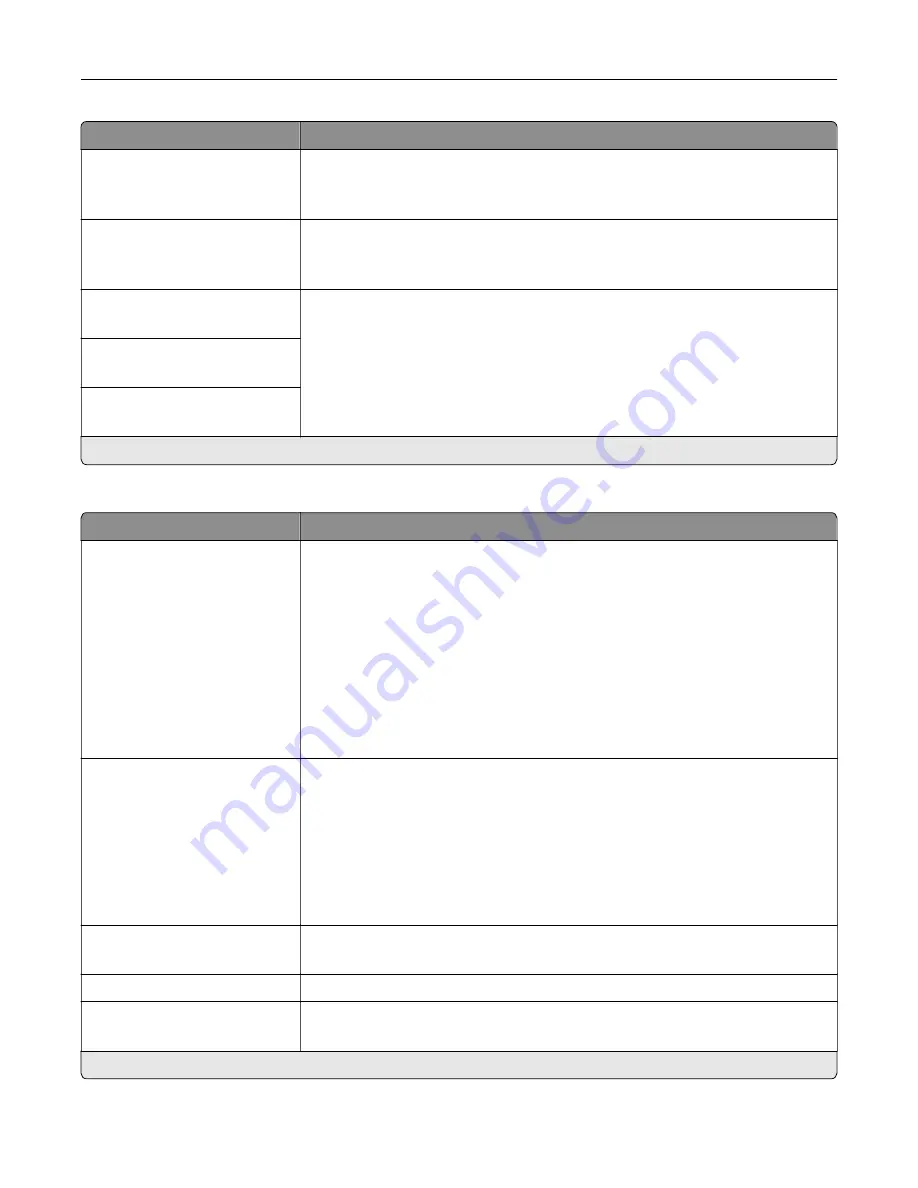
Menu item
Description
Halftone
Normal*
Detail
Enhance the printed output to have smoother lines with sharper edges.
Color Saver
Off*
On
Reduce the amount of toner used to print graphics and images.
Note:
When set to On, this setting overrides the value of the Toner Darkness
setting.
RGB Brightness
‑
6 to 6 (0*)
Adjust the brightness, contrast, and saturation for color output.
Note:
This setting does not affect files where CMYK color specifications are
used.
RGB Contrast
0 to 5 (0*)
RGB Saturation
0 to 5 (0*)
Note:
An asterisk (*) next to a value indicates the factory default setting.
Advanced Imaging
Menu item
Description
Color Balance
Cyan
‑
5 to 5 (0*)
Magenta
‑
5 to 5 (0*)
Yellow
‑
5 to 5 (0*)
Black
‑
5 to 5 (0*)
Reset Defaults
Adjust the amount of toner that is used for each color.
Color Correction
Off
Auto*
Manual
Modify the color settings used to print documents.
Notes:
•
Off sets the printer to receive the color correction from the software.
•
Auto sets the printer to apply different color profiles to each object on the
printed page.
•
Manual allows the customization of the RGB or CMYK color conversions
applied to each object on the printed page.
Color Samples
Print Color Samples
Print sample pages for each of the RGB and CMYK color conversion tables used
in the printer.
Color Adjust
Calibrate the printer to adjust color variations in the printed output.
Spot Color Replacement
Set Custom CMYK
Assign specific CMYK values to twenty named spot colors.
Note:
An asterisk (*) next to a value indicates the factory default setting.
Understanding the printer menus
62
Summary of Contents for C9235
Page 1: ...C9235 Printer User s Guide May 2020 www lexmark com Machine type s 5059 Model s 190...
Page 108: ...9 Insert the waste toner bottle and then close the door Maintaining the printer 108...
Page 112: ...8 Insert the waste toner bottle and then close the door Maintaining the printer 112...
Page 135: ...Below the fuser area Duplex area Clearing jams 135...
Page 140: ...2 Open door J 3 Open door H Clearing jams 140...
Page 188: ...6 Remove the controller board shield Upgrading and migrating 188...
Page 197: ...4 Remove the controller board shield Upgrading and migrating 197...
Page 203: ...7 Connect the tray connector to the printer 8 Open trays 2 and 3 Upgrading and migrating 203...
Page 208: ...9 Remove the stabilizing feet from the tray Upgrading and migrating 208...
Page 212: ...17 Secure the tray cable with the clamp Upgrading and migrating 212...
Page 219: ...7 Remove the paper guides 8 Attach the sensor cover Upgrading and migrating 219...
Page 225: ...8 Attach the nisher to the printer Upgrading and migrating 225...


