background image

190

Re

movi

ng opti

o

ns

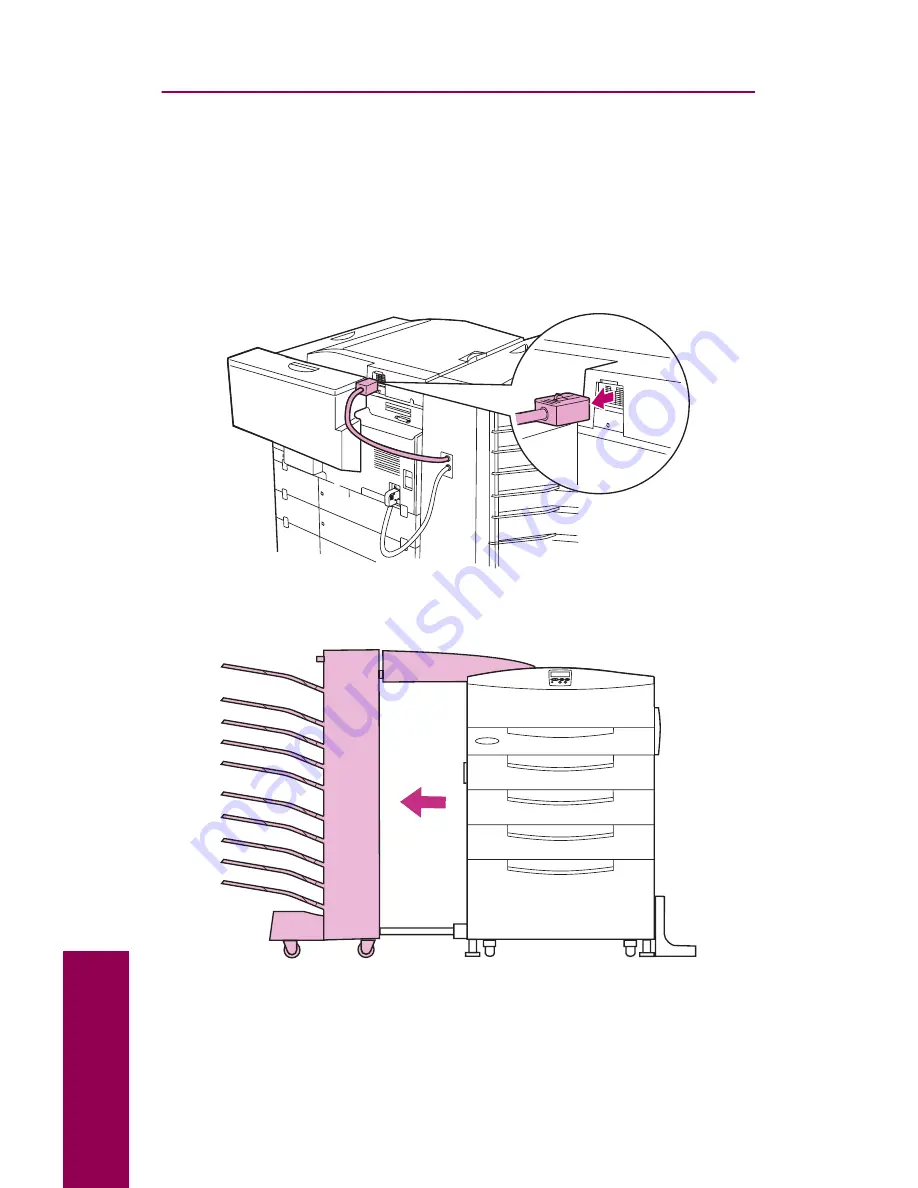
Removing the transport unit

You must remove the transport unit from the top of the printer before you 
can fully detach a finisher or mailbox, or access the printer system board.

1

Turn the printer off and unplug the power cord.

2

Unplug the cable from the back of the transport unit.

3

Pull the mailbox or finisher away from the printer.

Summary of Contents for 12L0103

Page 1: ...OptraTM W810 User s Reference...

Page 2: ...o this product by calling 1 800 553 9727 In the United Kingdom and Eire call 0628 481500 In other countries contact your point of purchase References in this publication to products programs or servic...

Page 3: ...CD xii Lexmark Web site xiii Complete Printer Reference xiii Chapter 1 Understanding printer messages 1 Chapter 2 Troubleshooting 19 Print quality problems 20 Paper feed problems 28 Other printing pr...

Page 4: ...udible alarms 109 Storing supplies 109 Recycling used supplies 110 Installing a toner cartridge 111 Installing the photoconductor kit 116 Replacing the photoconductor cartridge 117 Replacing the paper...

Page 5: ...inisher 193 Removing memory and option cards 196 Accessing the system board 196 Removing a memory card 198 Removing an option card 199 Removing a hard disk 201 Removing the duplex option 203 Detaching...

Page 6: ...vi Table of contents...

Page 7: ...our printer it may look more like one of the fully configured models shown on page viii The illustrations in this book reflect the standard model unless it s necessary to show another configuration Tr...

Page 8: ...handling options including a finisher You may have attached a 10 bin mailbox instead of a finisher Finisher Stapler cover Cover L Transport unit Cover H Duplex unit Door G Manual feed unit Tray 4 2500...

Page 9: ...l from the printer driver See Using the print and hold function on page 215 for more information Operator panel buttons Button Press this button to Go Make the printer ready to receive print jobs Clea...

Page 10: ...nter settings You can however use your Lexmark printer driver to override printer defaults and select set tings for individual print jobs See page 221 for a brief overview of the printer menus availab...

Page 11: ...ou need more detailed information about your printer Printer pocket We recommend that you keep the User s Reference in the handy printer pocket which should be attached to the printer or optional fini...

Page 12: ...arm Other sources of information For more information about the Optra W810 printer refer to the other doc uments that shipped with your printer or to the Lexmark Web site Setup Guide The Setup Guide p...

Page 13: ...rma tion about configuring MarkNet internal print servers Lexmark Web site Access our site on the World Wide Web for updated printer drivers and utilities and documentation including the Complete Prin...

Page 14: ...xiv Preface...

Page 15: ...www lexmark com Printer messages Message Action Activating Menu Changes The printer is activating changes made to the printer settings Bin x Full The specified bin is full Remove the stack of paper f...

Page 16: ...ncel Job appears on the second line of the operator panel display Press Select Check Finisher Installation Check Mailbox Installation The specified option is detached from the printer To clear this me...

Page 17: ...in the optional finisher is full To clear the message you must empty the hole punch box and reset the hole punch counter See Emptying the hole punch box on page 163 for detailed instructions Enabling...

Page 18: ...r the message For installation instructions see step 12 on page 153 Press Go to ignore the message If you choose to ignore the message the printer handles the job as if the stapler were installed but...

Page 19: ...or Go to ignore the manual feed request and print on media already installed in one of the paper sources If the printer finds a tray that has media of the correct type and size it feeds media from th...

Page 20: ...nter menus are disabled You cannot change the printer default settings from the operator panel Network Card Busy An internal print server is being reset Network x An optional network interface is the...

Page 21: ...y specified in the Staple Prime Source menu If you are printing a job press Return or Stop to continue the print job without priming the stapler See Priming the stapler on page 162 for more informatio...

Page 22: ...r is deleting one or more held jobs and sending one or more jobs held in the print queue to print For more information on held jobs see Using the print and hold function on page 215 Queuing Jobs The p...

Page 23: ...eplacing the photoconductor cartridge Note If you do not replace the photoconductor cartridge now the printer will soon display the Replace PC Kit To Continue message and stop operating You will not b...

Page 24: ...not be able to print until you replace the toner and photoconductor cartridges Replace Transfer Kit Replace the items included in the transfer kit to ensure proper printer operation To clear the mess...

Page 25: ...er to clear the message For more information see Loading paper on page 79 Tray x Missing Insert the specified tray completely into the printer Note If you cannot clear this message and the specified t...

Page 26: ...sher Clear Staple Job from Finisher or Clear Job from Finisher may alternate with the 2xx Paper Jam message 34 Wrong Paper Size in Tray x 34 Wrong Paper Size Manual Feed The printer was expecting to p...

Page 27: ...ter memory or optional disk if installed does not have the space necessary to collate the print job Press Go to print the portion of the job already stored and begin collating the rest of the job Canc...

Page 28: ...orrectly Cancel the current job Press Menu or Menu The Job Menu is displayed Press Menu or Menu until Cancel Job appears on the second line of the operator panel display Press Select 38 Memory Full Th...

Page 29: ...message and continue printing You must install a different flash memory option before you can download any resources to flash 52 Flash Full There is not enough free space in the flash memory option t...

Page 30: ...f the Fax Port menu item in the Fax Menu is not set to Disabled the printer automatically assumes a modem is connected for fax processing If the printer does not detect a modem connected to the serial...

Page 31: ...ter Remove one of the disk options from the printer See page 196 for information on removing disks 61 Defective Disk The printer detects a defective disk option Press Go to clear the message and conti...

Page 32: ...nformation Click View Documentation and then click MarkNet Print Servers 900 999 Service When a service message occurs turn the printer off and check all cable connections Turn the printer back on If...

Page 33: ...hese possibilities turn the printer off and back on This often fixes the problem If a message appears on the operator panel display see page 1 for more information If the message indicates the printer...

Page 34: ...ected Print quality problems Symptom Cause Solution Blank pages The photoconductor cartridge is defective Replace the photoconductor cartridge See Replacing the photocon ductor cartridge on page 117 T...

Page 35: ...nishes Make sure the paper you load in the trays is not damp The toner cartridge is empty Replace the toner cartridge See Installing a toner cartridge on page 111 The printer is shifting toner from th...

Page 36: ...eplacing the photocon ductor cartridge on page 117 Blurred background The toner cartridge is defective Replace the toner cartridge See Installing a toner cartridge on page 111 Uneven print density The...

Page 37: ...ete Printer Reference on Lexmark s Web site for detailed specifications Avoid textured paper with rough finishes The transfer roller is worn or defective Replace the transfer roller See Replacing the...

Page 38: ...oller is worn or defective Replace the transfer roller See Replacing the transfer roller on page 131 The fuser is worn or defective Replace the fuser See Installing the fuser on page 140 The paper dus...

Page 39: ...properly positioned under the corner bucklers If you re feeding from a 500 sheet paper tray tray 2 or tray 3 or an optional tray 4 make sure the stack of paper fits under the corner bucklers before p...

Page 40: ...size from the printer operator panel 1 From the Paper Menu select Paper Size 2 Select Tray 1 Size 3 Select the correct paper size from the list of avail able values For information on using the opera...

Page 41: ...orrect position for the size paper in the tray See page 88 for information on loading paper You did not set the correct paper size for tray 1 After loading paper in tray 1 set the default paper size f...

Page 42: ...xmark s Web site for detailed specifications You have loaded too much paper in the tray Make sure the stack of paper you load in the tray does not exceed the maximum stack height indicated at the back...

Page 43: ...he long edge of the paper first For A3 B4 legal and 11x17 size paper feed the short edge of the paper first The Paper Jam message remains after you remove the jammed paper You have not cleared the ent...

Page 44: ...nel display before sending a job to print Press Go to return the printer to the ready state One of the printer supplies has reached the end of life If Replace Toner to Continue or Replace PC Kit to Co...

Page 45: ...recom mended printer cable Refer to the Setup Guide for cable specifications It takes longer than expected to print a job The job is too complex Reduce the complexity of your print job by eliminating...

Page 46: ...or all linked trays Tray 1 Verify the Tray 1 Size set ting in the Paper Menu is correct Trays 2 and 3 Verify the left paper guide inside the tray is installed in the correct position This procedure al...

Page 47: ...dge See Installing a toner cartridge on page 111 If no message is displayed and you just inserted a new toner cartridge the printer may be transporting toner into the photoconductor cartridge The moto...

Page 48: ...earby artificial lights may interfere with communication You cannot print using the LocalTalk port The LocalTalk port is not set up correctly Make sure neither LocalTalk Port nor LocalTalk Buffer is s...

Page 49: ...ears must be completely engaged for paper to travel successfully from the printer to the finisher Refer to the Setup Guide for detailed installation instructions You are trying to staple hole punch or...

Page 50: ...o many sheets The finisher can staple up to 50 sheets of 20 lb paper If you attempt to staple a larger stack of paper the finisher ejects the stack without stapling it Reduce the number of pages in th...

Page 51: ...ffset jobs in bin 2 If bin 1 and bin 2 are linked and bin 2 is full the printer reports that bin 1 is full also To clear the message remove the stack of paper from bin 2 The printer can then receive a...

Page 52: ...stalled the transport unit on top of the printer The gears must be completely engaged for paper to travel successfully from the printer to the mailbox Refer to the Setup Guide for detailed installatio...

Page 53: ...know your printer model type and serial number Refer to the label on the back of the printer under the toner box for this informa tion The serial number is also listed on the menu settings page you ca...

Page 54: ...40 Troubleshooting...

Page 55: ...jam occurs the printer displays a two line 2xx Paper Jam message and stops operating Although the location of the paper jam appears on the second line of the display you must clear all paper from the...

Page 56: ...u are not sure which source the printer is using start with tray 4 if installed or tray 3 Refer to the following illustration for a better understanding of the path the paper travels through the print...

Page 57: ...pen when clearing the paper path Mailbox lower access door Door J Mailbox upper access door Door I Output bins Jam access doors Doors D E and F Duplex door Door G Manual feed tray Transport unit cover...

Page 58: ...sheet drawer If the printer is feeding paper from an optional 2500 sheet drawer follow the instructions beginning in this section to clear the paper jam Skip to page 48 if the printer is feeding from...

Page 59: ...45 Clearing jams 1 Open the jam access door on the right side of the printer Door F 2 If you cannot grasp the edge of the paper rotate the paper release wheel to roll the paper out of the printer...

Page 60: ...46 Clearing jams 3 Pull the jammed paper straight out 4 Close the jam access door...

Page 61: ...the jam access door open tray 4 and remove the jammed paper WARNING If the paper has lodged behind the paper tray where you cannot reach it discontinue using tray 4 and call for service 6 Close tray...

Page 62: ...ctions beginning in this section to clear the paper jam 1 Open the jam access doors on the right side of the printer Doors D and E NOTE Do not open the paper trays until you clear all paper from the j...

Page 63: ...per is tightly bound inside the printer pull out the upper edge of the jammed paper and then pull the paper straight out c If the paper is jammed as shown release the upper edge of the paper and then...

Page 64: ...paper from the jam access door pull open the paper tray and remove the jammed paper 5 Press down on the pressure plate inside the tray until it clicks into place Make sure the adjustable guides are sn...

Page 65: ...r has lodged behind the paper tray completely remove the tray to retrieve the paper a Release the tabs on either side of the tray as shown and pull the tray straight out of the printer b Remove any pa...

Page 66: ...fits under the corner bucklers b Align the paper tray with the opening and insert the tray completely into the printer If the tray is not pushed completely into the printer text and images may print...

Page 67: ...s feeding paper from tray 1 follow the instructions in this section to clear jammed paper from the drawer 1 Pull open tray 1 2 Press down on the pressure plate until it clicks into place 3 Remove the...

Page 68: ...ieve the paper a Use a pencil or similar object to press the tab on the right side of the tray as shown b Pivot the tray to the left and then firmly move the tray back and forth to work the tray out o...

Page 69: ...lign the left side of the tray with the guides inside the opening c Insert the rails on the right side of the tray into the metal bracket that extends from inside the printer as shown NOTE If the meta...

Page 70: ...ductor area on page 58 Manual feed unit NOTE The manual feed tray is available only if the duplex unit is attached to your printer Follow these instructions if you are feeding a single sheet of media...

Page 71: ...ng the print job Skip to Photo conductor area on page 58 if a duplex unit is not installed or you are not duplexing the print job 1 Open the duplex door Door G 2 Depending on the location of the jamme...

Page 72: ...the jammed paper straight up and out of the duplex unit 3 Close the duplex door 4 Go to Photoconductor area to continue clearing the paper path Photoconductor area 1 Lift the side door latch and lowe...

Page 73: ...t a Pull the jammed paper out from under the photoconductor cartridge as shown b Pull the jammed paper straight out from under the transfer roller as shown WARNING Do not touch the transfer roller Tou...

Page 74: ...tion on page 62 or Clearing jams from the finisher option on page 69 Otherwise continue with Fuser area Fuser area CAUTION The fuser area becomes very hot during printer operation Avoid touching parts...

Page 75: ...move the jammed paper as shown 4 Close the fuser cover 5 Close the side door 6 Press Go on the operator panel to continue printing The printer clears the 2xx Paper Jam message and continues printing I...

Page 76: ...he mailbox begin on page 63 Refer to the following illustration for a better understanding of the path the paper travels through the transport unit to the mailbox option NOTE If paper jams in the mail...

Page 77: ...63 Clearing jams 1 Pull the mailbox away from the printer 2 Lift the side door latch and lower the side door Door C...

Page 78: ...Cover B CAUTION The fuser area becomes very hot during printer operation Avoid touching parts in this area of the printer until they have cooled 4 If paper is jammed in the fuser pull the paper relea...

Page 79: ...65 Clearing jams 5 Remove the jammed paper as shown 6 Close the fuser cover 7 Close the side door 8 Raise the transport unit cover Cover H...

Page 80: ...traight out of the mailbox 10 Close the transport unit cover If the 280 Paper Jam Open Cover H message frequently recurs make sure you have properly installed the transport unit Refer to the Setup Gui...

Page 81: ...pper access door on the mailbox Door I 12 Pull the jammed paper straight down and out of the mailbox 13 Close the upper access door 14 Open the lower access door Door J 15 Pull the jammed paper straig...

Page 82: ...8 Pull any jammed paper straight out of the bins 19 Press Go on the operator panel to continue printing The printer clears the 2xx Paper Jam message and continues printing If the message does not clea...

Page 83: ...Refer to the following illustration for a better understanding of the path the paper travels through the transport unit to the finisher option NOTE If paper jams in the finisher option recur make sure...

Page 84: ...70 Clearing jams 1 Pull the finisher away from the printer 2 Lift the side door latch and lower the side door Door C...

Page 85: ...Cover B CAUTION The fuser area becomes very hot during printer operation Avoid touching parts in this area of the printer until they have cooled 4 If paper is jammed in the fuser pull the paper relea...

Page 86: ...72 Clearing jams 5 Remove the jammed paper as shown 6 Close the side door 7 Close the fuser cover 8 Raise the transport unit cover Cover H...

Page 87: ...traight out of the finisher 10 Close the transport unit cover If the 280 Paper Jam Open Cover H message frequently recurs make sure you have properly installed the transport unit Refer to the Setup Gu...

Page 88: ...74 Clearing jams 11 Open the finisher top cover Cover M...

Page 89: ...punching holes when the paper jammed rotate the green paper release wheel 10 times to remove the jammed paper Check the hole punch box for any paper that might have rolled into it For instructions on...

Page 90: ...76 Clearing jams 13 Lift the green paper release handle to remove the jammed paper 14 Close the finisher top cover...

Page 91: ...The message Leave Staple Job in Finisher Clear Staple Job from Finisher or Clear Job from Finisher may alternate with the Paper Jam message If you see Leave Staple Job in Finisher do not remove the st...

Page 92: ...le jam on page 156 18 Push the finisher against the printer 19 Press Go on the operator panel to continue printing The printer clears the 2xx Paper Jam message and continues printing If the message do...

Page 93: ...in your printer and hints on how to avoid paper jams For details about the types of media your printer supports refer to the Complete Printer Reference on Lexmark s Web site www lexmark com Loading th...

Page 94: ...r attached to your printer note that you cannot staple hole punch or offset any media other than paper Do not load 100 cotton paper in tray 1 NOTE If you load any media other than letter or A4 size pa...

Page 95: ...81 Loading paper 2 Press down on the pressure plate until it clicks into place 3 Squeeze the left paper guide and slide it all the way to the left...

Page 96: ...ing paper 4 Press the green tab and slide the adjustable guides all the way open 5 Before loading paper flex the sheets back and forth to loosen them and then fan them Straighten the edges on a level...

Page 97: ...in the illustrations on pages 84 and 85 Do not exceed the maximum stack height indicated on the adjust able guide If you are loading media other than paper do not load more than 50 sheets Use the max...

Page 98: ...on the size paper you re loading For A4 A5 B5 executive and letter size paper place the long edge of the paper to the right of the tray If you re loading preprinted letterhead place the top of the pag...

Page 99: ...A3 B4 legal and 11x17 size paper place the short edge of the paper to the right of the tray If you re loading preprinted letterhead place the top of the page at the left side of the tray A3 B4 legal...

Page 100: ...queeze the left paper guide and slide it toward the paper until the guide fits snugly against the stack 8 Press the green tab and slide the adjustable guides toward the paper until the guides fit snug...

Page 101: ...open the tray make sure the pressure plate is snapped down before pushing the tray back into the printer 10 Push the tray firmly into the printer If the tray is not pushed completely into the printer...

Page 102: ...h hold 500 sheets of A3 A4 B4 11x17 letter or legal size paper Load only paper in trays 2 and 3 NOTE If you installed an optional 500 sheet drawer the instructions are the same for loading paper in th...

Page 103: ...89 Loading paper 2 Press down on the pressure plate until it clicks into place...

Page 104: ...for tray 2 and tray 3 from the operator panel If the left paper guide is in the wrong position you may experi ence paper feeding problems clipped images or inappropriate tray linking If the paper gui...

Page 105: ...he pressure plate in the bottom of the tray must be pressed down before you can remove the left paper guide If there is paper in the tray remove the paper before trying to adjust the guide a Release t...

Page 106: ...92 Loading paper b Lift the paper guide up and out of the tray...

Page 107: ...t in the back of the tray b Slide the paper guide into the corresponding slot at the front of the tray c Release the guide so the spring mechanism forces the guide fully into the slot at the front of...

Page 108: ...4 Loading paper 6 Press the green tab and slide the adjustable guides open 7 Before loading paper flex the sheets back and forth to loosen them and then fan them Straighten the edges on a level surfac...

Page 109: ...g paper 8 Load the paper with the recommended print side face up as shown in the illustrations on pages 96 and 97 Do not exceed the maximum stack height indicated on the adjust able guide Maximum stac...

Page 110: ...he tray depends on the size paper you re loading For A4 and letter size paper place the long edge of the paper to the right of the tray If you re loading preprinted letterhead place the top of the pag...

Page 111: ...A3 B4 legal and 11x17 size paper place the short edge of the paper to the right of the tray If you re loading preprinted letterhead place the top of the page at the left side of the tray A3 B4 legal...

Page 112: ...98 Loading paper 9 Press the green tab and slide the adjustable guides toward the paper until the guides fit snugly against the stack...

Page 113: ...g paper 10 Make sure the paper fits under the two corner bucklers on the right side of the tray The edge of the paper stack must be tucked completely under the corner bucklers or you may experience pa...

Page 114: ...ull open the tray make sure the pressure plate is snapped down before pushing the tray back into the printer 12 Push the tray firmly into the printer If the tray is not pushed completely into the prin...

Page 115: ...drawer attached to your printer you can load up to 2500 sheets of either A4 or letter size paper in tray 4 depending on how the tray was configured at the factory for your geo graphic region 1 Pull t...

Page 116: ...102 Loading paper 2 Before loading paper flex the sheets back and forth to loosen them and then fan them Straighten the edges on a level surface...

Page 117: ...print side face up as shown Always load the same type of paper in both sides of the tray Do not exceed the maximum stack height indicated on the back of the tray If you re loading preprinted letterhea...

Page 118: ...print quality Follow the guidelines below For best results store media in an environment where the tem perature is approximately 21 C 70 F and the relative humidity is 40 Store cartons of paper on a p...

Page 119: ...Make sure the paper stack does not exceed the maximum height indicated by the labels in the trays Push all paper trays firmly into the printer after loading them Make sure the paper guides in the tra...

Page 120: ...secure the drawers to the printer are properly attached Refer to the Setup Guide for details about attaching the locking clips Tray 1 does not have size sensing When you load paper set the default pap...

Page 121: ...re also shipped in the box with each consumable Printer supplies and maintenance items Item Average yield 1 Order number In the U S call 2 For details see page Toner cartridge 20 000 pages at approxi...

Page 122: ...om the Utilities Menu Press Menu until you see Utilities Menu Press Select Press Menu until you see Print Menus Press Select to print the page Look for Consum able Status on the printed page You will...

Page 123: ...t Refer to the Complete Printer Reference on Lexmark s Web site www lexmark com for more information about changing the alarm set tings from the Setup Menu NOTE If Replace Toner To Continue or Replace...

Page 124: ...ructions on the outside of the box to send the used supply back to Lexmark If a prepaid shipping label is not available for your country contact the place where you bought your printer for additional...

Page 125: ...d continue printing for a short while However we strongly recommend that you change the toner cartridge immediately If you do not the printer will stop operating when Replace Toner To Continue appears...

Page 126: ...112 Replacing supplies To install a new toner cartridge 1 Open the toner box cover Cover A...

Page 127: ...page 110 for information on recycling the empty toner cartridge NOTE Lexmark does not recommend refilling used toner cartridges or purchasing refilled cartridges from a third party Print quality and...

Page 128: ...lacing supplies 3 Remove the new toner cartridge from its packing materials 4 Turn the toner cartridge over so the handle is on top 5 Vigorously shake the cartridge in all directions to distribute the...

Page 129: ...to be installed correctly The clip ensures that the slot remains correctly oriented until you are ready to install the cartridge After you pull out the clip keep it in a convenient place in case you e...

Page 130: ...from the display rein stall the toner cartridge Installing the photoconductor kit The Replace PC Kit message indicates that it is time to replace the items in the photoconductor kit The photoconducto...

Page 131: ...e the printer Instructions for replacing the items in the photoconductor kit follow Replacing the photoconductor cartridge WARNING After you install a photoconductor cartridge in the printer do not re...

Page 132: ...n grips to pull the old photoconductor cartridge partially out of the printer 3 Use the handle to lift the cartridge out of the printer See Recycling used supplies on page 110 for information on recyc...

Page 133: ...hold the cartridge by the handle Touching the cartridge s protective shutter could affect the quality of your printed documents Never touch the photoconductor drum WARNING If you cannot install the p...

Page 134: ...5 Place the photoconductor cartridge on a stable surface 6 Hold the cartridge firmly in place and peel the protective foam off the side of the photoconductor cartridge 7 Remove the tape and plastic t...

Page 135: ...121 Replacing supplies 8 Carefully peel off the two labels removing the magnets as shown Discard the labels and magnets 9 Gently shake the new cartridge Magnets...

Page 136: ...orange foam plug from the back of the cartridge as shown Discard the tape and foam plug 11 Turn the photoconductor cartridge around so the green grips are facing you 12 Align the cartridge with the s...

Page 137: ...123 Replacing supplies 13 Push the cartridge into the printer as far as it will go...

Page 138: ...124 Replacing supplies Replacing the paper dust remover CAUTION Areas inside the printer may be hot Avoid touching parts inside the printer until they have cooled 1 Locate the old paper dust remover...

Page 139: ...125 Replacing supplies 2 Press the green tab on the left end of the paper dust remover and lift the end up...

Page 140: ...126 Replacing supplies 3 Slide the paper dust remover to the left and lift it out of the printer Discard the old paper dust remover...

Page 141: ...127 Replacing supplies 4 Remove the new paper dust remover from its packing materials 5 Insert the posts on the right end of the paper dust remover into the holes on the printer...

Page 142: ...128 Replacing supplies 6 Press the green tab and push the paper dust remover into place...

Page 143: ...the tape and foam plug as directed in step 10 on page 122 Reinstall the photoconductor cartridge firmly pushing the green grips on the cartridge into the printer as far as they will go 8 Make sure all...

Page 144: ...that can accumulate during the printing process Replace both items to ensure proper printer operation Instructions for replacing them begin on page 131 After you ve replaced the transfer roller and th...

Page 145: ...N Areas inside the printer may be hot Avoid touching parts inside the printer until they have cooled 1 Lift the side door latch and lower the side door Door C 2 Release the old transfer roller by rota...

Page 146: ...and discard the old transfer roller 4 Remove the new transfer roller from its packing materials Hold the transfer roller by each end as shown WARNING Do not touch the roller Touching the roller can r...

Page 147: ...133 Replacing supplies 5 Push the ends of the new transfer roller into the brackets on the printer 6 Rotate the two green finger grips back toward the printer until they click into place...

Page 148: ...pplies 7 Close the side door Make sure the side door latch snaps into place 8 Remember to reset the printer s internal counter after you replace the transfer roller and the ozone filter See page 139 f...

Page 149: ...135 Replacing supplies Replacing the ozone filter 1 Move to the back of the printer and locate the ozone filter cover 2 Pull the latch to release the ozone filter cover...

Page 150: ...136 Replacing supplies 3 Remove the cover 4 Pull the old ozone filter down and out of the printer Discard the filter...

Page 151: ...lacing supplies 5 Remove the new ozone filter from its packing materials 6 Insert the new ozone filter as shown 7 Reinstall the ozone filter cover a Insert the tabs on the cover into the slots on the...

Page 152: ...138 Replacing supplies b Swing the cover up toward the printer until it snaps into place...

Page 153: ...mory Open the Job Menu to review the held jobs before continuing 1 Turn the printer off 2 Press and hold the Select and Return buttons on the operator panel while you turn the printer on When CONFIG M...

Page 154: ...ou agree to return your old fuser to Lexmark within 30 days The representative can give you details on this return program After you ve replaced the fuser follow the instructions beginning on page 147...

Page 155: ...the fuser 1 Turn the printer off and disconnect the power cord CAUTION Areas inside the printer may be hot Allow the printer to cool for 20 minutes before replacing the fuser 2 Lift the side door lat...

Page 156: ...142 Replacing supplies 3 Loosen the two fuser retaining screws...

Page 157: ...ith both hands and pull it straight out of the printer If you agreed to return your old fuser to Lexmark in order to pay a reduced price for the new one place the old fuser in the new fuser box and ma...

Page 158: ...Remove the new fuser from its packing materials Carefully remove any tape 6 Align the top left edge of the new fuser with the rail on the printer 7 Hold the fuser level and push it into the printer u...

Page 159: ...145 Replacing supplies 8 Tighten the two fuser retaining screws...

Page 160: ...duplex unit attached to your printer remove the gear cover on the fuser The gear on the duplex unit meshes with the gear on the fuser when you close the side door 10 Close the side door Make sure the...

Page 161: ...eturn buttons on the operator panel while you turn the printer on When CONFIG MENU appears on the first line of the display release the buttons MAINT COUNTERS appears on the second line 3 Press Select...

Page 162: ...t ordering staple cartridges see page 107 NOTE If Staple Alarm in the Setup Menu is set to either Single or Continuous the printer stops printing and displays the Load Staples message Install a new st...

Page 163: ...149 Replacing supplies 2 Turn the knob on the stapler cover to the unlocked position and open the cover 3 Remove the stapler as shown...

Page 164: ...150 Replacing supplies 4 Set the stapler on a stable surface 5 Push down on the green lever to release the staple cartridge holder 6 Pull the staple cartridge holder out of the stapler...

Page 165: ...Replacing supplies 7 Turn the cartridge holder around to orient it as shown in the illustration in step 8 8 Remove and discard the empty staple cartridge 9 Insert the new staple cartridge into the sta...

Page 166: ...eplacing supplies 10 Peel off the protective tape from the staple cartridge 11 Turn the cartridge holder around and firmly push it into the stapler as shown Make sure the green lever clicks back into...

Page 167: ...e finisher as shown and insert the stapler into the finisher 13 Close the stapler cover and turn the knob to the locked position Priming Stapler appears on the display as the printer tests the sta ple...

Page 168: ...154 Replacing supplies...

Page 169: ...e For information about See page Troubleshooting 35 Ordering and loading staples 148 Clearing a staple jam 156 Priming the stapler 162 Emptying the hole punch box 163 Aligning the finisher with the pr...

Page 170: ...taple jam If the finisher is not stapling print jobs satisfactorily you may need to clear a staple jam 1 Open the finisher bin cover Cover N 2 Remove the stack of paper the finisher was trying to stap...

Page 171: ...157 Finisher 3 Close the finisher bin cover 4 Turn the knob on the stapler cover to the unlocked position and open the cover 5 Remove the stapler as shown...

Page 172: ...158 Finisher 6 Set the stapler on a stable surface 7 Push down on the green lever to release the staple cartridge holder 8 Pull the staple cartridge holder out of the stapler...

Page 173: ...round to orient it as shown in the illustration in step 10 10 Use the metal tab to lift the staple guard and pull out the sheet of staples Discard the entire sheet 11 Press down on the staple guard un...

Page 174: ...he cartridge holder around and firmly push it into the stapler as shown Make sure the green lever clicks back into place 13 Align the arrows on the stapler and the finisher as shown and insert the sta...

Page 175: ...161 Finisher 14 Close the stapler cover and turn the knob to the locked position 15 Complete the steps in Priming the stapler on page 162...

Page 176: ...the display The printer pulls a sheet of paper from the tray specified in the Staple Prime Source menu feeds it into the finisher and attempts to staple it You may hear the stapler punch several times...

Page 177: ...he hole punch box is nearly full after approxi mately 50 000 punched pages Empty Box K appears on the operator panel display to alert you it s time to empty the box Each time you empty the box make su...

Page 178: ...box straight up and slide it to the left The bottom of the box is attached to the printer with hook and loop fasteners It may require some force to lift the box 3 Swing the bottom of the box out then...

Page 179: ...165 Finisher 4 Discard the contents of the hole punch box Do not discard the box 5 Angle the box into the finisher so that the white hole punch dispensers are inserted inside the box Dispensers...

Page 180: ...6 Finisher 6 While still covering the dispensers swing the bottom of the box into the finisher and slide the box to the right 7 Lower the box until it fits between the braces in the finisher Brace Bra...

Page 181: ...nst the printer 9 Continue with Resetting the printer s internal counter on page 168 This clears the Empty Box K message from the operator panel display and ensures the printer alerts you when it is a...

Page 182: ...bs before continuing 1 Turn the printer off 2 Press and hold the Select and Return buttons on the operator panel while you turn the printer on When CONFIG MENU appears on the first line of the display...

Page 183: ...h the printer Complete the instructions in the following sections to adjust the alignment of the finisher with the printer Adjusting the finisher s standing position Look at the finisher and the print...

Page 184: ...nd the printer are not parallel as shown in the following illustration use the steps in this section to correct the finisher s standing position To adjust the finisher s standing position 1 Pull the c...

Page 185: ...171 Finisher 2 Loosen the two wing bolts on each of the finisher s legs 3 Turn the knobs on the legs counterclockwise to adjust the finisher s standing position as shown...

Page 186: ...on is adjusted in the direction shown in the fol lowing illustration 4 When the finisher s standing position is correct tighten the wing bolts you loosened in step 2 on page 171 5 Push the two covers...

Page 187: ...and look at the position of the transport unit to determine if the fin isher is at the correct height If the transport unit appears level as shown in the following figure the fin isher and printer ar...

Page 188: ...der the finisher s base ledge on the side that faces the printer 2 Turn the wing bolts counterclockwise to loosen them 3 Turn the knobs on the base ledge to adjust the finisher s height Turn the knobs...

Page 189: ...175 Finisher 4 When the transport unit is level tighten the wing bolts you loosened in step 2 on page 174 5 Push the finisher against the printer...

Page 190: ...176 Finisher...

Page 191: ...e mailbox and the printer are not properly aligned Use the procedures in this chapter to help ensure proper alignment For information about clearing paper jams in the mailbox see page 62 If you need t...

Page 192: ...the mailbox s standing position Look at the mailbox and the printer carefully from the front If the mailbox and printer are parallel as shown in the following illustration skip to Adjusting the mailbo...

Page 193: ...x and the printer are not parallel as shown in the following figure use the steps in this section to correct the mailbox s standing posi tion To adjust the mailbox s standing position 1 Pull the cover...

Page 194: ...180 Mailbox 2 Loosen the two wing bolts on each of the mailbox s legs 3 Turn the knobs on the legs counterclockwise to adjust the mailbox s standing position...

Page 195: ...Mailbox The mailbox s position is adjusted in the direction shown in the following illustration 4 When the mailbox s standing position is correct tighten the wing bolts you loosened in step 2 on page...

Page 196: ...182 Mailbox 5 Push the two covers onto the mailbox s legs as shown...

Page 197: ...and look at the position of the transport unit to determine if the mailbox is at the correct height If the transport unit appears level as shown in the following figure the mailbox and printer are co...

Page 198: ...184 Mailbox To adjust the mailbox s height 1 Remove the two screws from the mailbox s bottom plate...

Page 199: ...185 Mailbox 2 Open the lower door 3 Remove the bottom plate 4 Remove the four screws from the backs of the legs as shown...

Page 200: ...above the wheels to adjust the mailbox s height Turn the screws clockwise to raise the mailbox Turn the screws counterclockwise to lower it 6 When the transport unit is level replace the four screws...

Page 201: ...187 Mailbox 7 Replace the bottom plate...

Page 202: ...188 Mailbox 8 Close the lower door 9 Secure the bottom plate with the two screws you removed in step 1 on page 184 10 Push the mailbox against the printer...

Page 203: ...of the printer usually hidden by an option Refer to the Setup Guide for complete installation instructions for all the options Find the option you want to remove in the following table then go to the...

Page 204: ...t unit from the top of the printer before you can fully detach a finisher or mailbox or access the printer system board 1 Turn the printer off and unplug the power cord 2 Unplug the cable from the bac...

Page 205: ...191 Removing options 4 Open the cover on the transport unit 5 Loosen the thumbscrew at the front left of the transport unit...

Page 206: ...192 Removing options 6 Lift the transport unit off the printer WARNING Be sure to use both hands to hold the transport unit 7 Remove the support shelf that was underneath the transport unit...

Page 207: ...the instructions apply to either option 1 Turn the printer off and unplug the power cord 2 Remove the transport unit from the top of the printer See page 190 for detailed instructions 3 Unplug the op...

Page 208: ...194 Removing options 6 Pull the option away from the printer until the guide rail falls free 7 Slide the guide rail all the way under the printer and out the other side...

Page 209: ...195 Removing options 8 If you need to detach the bins from the mailbox a Release the tab on the left side of a bin b Pull the bin away from the mailbox c Repeat for the remaining bins...

Page 210: ...m board 1 Turn the printer off and unplug the power cord 2 Disconnect all cables from the back of the printer 3 If you have a finisher or mailbox option attached to your printer remove the transport u...

Page 211: ...lay it aside 7 Find the option you want to remove in the following table Then go to the page listed for removal instructions Where do I go from here To remove Go to page Memory card 198 Option card p...

Page 212: ...easily damaged by static electricity Touch something metal on the printer before you touch the memory card 1 Locate the memory card you want to remove 2 Push the latches on both ends of the connector...

Page 213: ...print servers and interface cards are easily damaged by static electricity Touch something metal on the printer before you touch the option card 1 Locate the option card you want to remove 2 Remove t...

Page 214: ...ns 3 Pull the option card out of the connector on the system board 4 If you saved the metal plate that covers the connector slot and you do not plan to insert another card attach the plate with the tw...

Page 215: ...static electricity Touch something metal on the printer before you touch the disk 1 Locate the metal bracket that houses the disk 2 Carefully pull the ribbon cable out of the system board connector 3...

Page 216: ...202 Removing options 4 Slide the hard disk out of the bracket...

Page 217: ...e removed during initial installation of the duplex option If possible locate these covers and screws before continuing If you purchased the Optra W810dn model with the duplex hardware already install...

Page 218: ...204 Removing options 3 Unplug the cable connectors from the sockets on the printer 4 Use a long Phillips screwdriver to loosen the recessed screws that secure the duplex unit to the printer...

Page 219: ...205 Removing options 5 Remove the duplex unit from the printer 6 If available attach the small cover to the gear opening above the side door...

Page 220: ...206 Removing options 7 Attach the two screws that secure the side door NOTE Be sure to complete the steps in Adjusting the side door tension on page 210 after you ve removed the duplex option...

Page 221: ...207 Removing options Removing the manual feed unit 1 Make sure the printer is turned off and the power cord is unplugged 2 Remove the three screws that secure the manual feed unit to the printer...

Page 222: ...208 Removing options 3 Remove the manual feed unit from the printer 4 If available attach the printer s side panel...

Page 223: ...9 Removing options 5 Attach the connector cover you removed in step 2 on page 203 NOTE Be sure to complete the steps in Adjusting the side door tension on page 210 after you ve removed the duplex opti...

Page 224: ...ire that supports the side door Removing the duplex unit reduces the weight of the door therefore changing the tension required to support the door as it is opened If you have a mailbox or a finisher...

Page 225: ...211 Removing options 2 Push down on the green tension adjuster and slide it toward the toner box until it stops 3 Replace the cover on the top of the printer Toner box...

Page 226: ...ction show removing a 2500 sheet drawer The procedure is the same if you are removing an optional 500 sheet drawer 1 Turn off the printer and unplug the power cord 2 If you have attached a finisher op...

Page 227: ...213 Removing options 6 Move to the back of the printer 7 Remove the two locking clips between trays 3 and 4 on the back of the printer as shown Rear view...

Page 228: ...rawers Two people are required to lift it safely 8 Have someone help you lift the printer off the drawer Do not hold the printer under the paper trays Use the handholds at the front and back of the pr...

Page 229: ...ch of the four types of held jobs go to the page indicated in the following table For details about memory requirements for held jobs hardware recom mendations and setting up system defaults for these...

Page 230: ...enu If the printer is Ready press Menu until JOB MENU appears on the second line of the display Press Select 2 Press Menu or Menu until either Held Jobs or Confidential Job appears on the display depe...

Page 231: ...data that might cause the printer to flush the job When a symbol appears next to a held job you can Print the job Be aware however that only part of the job may print Delete the job You may want to f...

Page 232: ...e the first copy to see if it is satisfactory before print ing the remaining copies See Printing and deleting held jobs on page 215 if you need help print ing the additional copies stored in memory NO...

Page 233: ...confidentiality If you enter an invalid PIN the message No Jobs Found Retry appears Press Go to reenter the PIN or press Stop to exit the Confidential Job menu Once you enter a valid PIN you can choos...

Page 234: ...220 Print and hold...

Page 235: ...nformation on using the operator panel buttons see page ix For information on MarkVision refer to the Drivers MarkVision and Utilities CD The following table provides an overview of the menus availabl...

Page 236: ...Bin ASSIGN TYPE BIN Substitute Size PAPER LOADING FINISHING MENU Duplex Duplex Bind Copies Blank Pages Collation Separator Sheets Separator Source Multipage Print Multipage Order Multipage View Multi...

Page 237: ...lash Format Disk Job Acct Stat Hex Trace JOB MENU Cancel Job CONFIDENTIAL JOB HELD JOBS Reset Printer Print Butter Reset Active Bin Prime Stapler Cancel Fax Note Print Buffer is only available when th...

Page 238: ...rotect Display Language Alarm Control Toner Alarm Staple Alarm Job Buffer Size Job Accounting Job Acct Limit PCL EMUL MENU Font Source Font Name Point Size Pitch Symbol Set Orientation Lines per Page...

Page 239: ...or PARALLEL OPT x PCL SmartSwitch PS SmartSwitch NPA Mode Parallel Buffer Job Buffering Advanced Status Protocol Honor Init Parallel Mode 1 Parallel Mode 2 SERIAL MENU Note To access these menu items...

Page 240: ...martSwitch NPA Mode Infrared Buffer Job Buffering Window Size Transmit Delay Max Baud Rate LOCALTALK MENU LocalTalk Port PCL SmartSwitch PS SmartSwitch NPA Mode LocalTalk Buffer Job Buffering NPA Host...

Page 241: ...Fax Paper Size Fax Paper Type Fax Output Bin FAX SETUP FAX LOGS FAX SEND FAX RECEIVE CONFIGURATION MENU MAINT COUNTERS REGISTRATION Prt Quality Pgs Panel Menus PPDS Emulation Buffered Jobs Download Em...

Page 242: ...228 Menus...

Page 243: ...57 finisher option 68 fuser area 60 mailbox option 62 manual feed unit 56 message maps 43 staple 156 tray 1 53 tray 2 and tray 3 48 tray 4 44 clipped images 27 90 Complete Printer Reference xiii confi...

Page 244: ...labels 79 80 Lexmark Web site xiii lifting the printer 214 loading card stock 80 labels 80 letterhead 83 95 103 paper 79 transparencies 80 tray 1 80 tray 2 and tray 3 88 tray 4 2500 sheet optional dra...

Page 245: ...oving 197 motherboard see system board multipurpose tray see tray 1 O Operation ReSource 110 operator panel buttons ix menus disabled x messages 1 option cards removing 196 199 optional drawers removi...

Page 246: ...Port x Disabled 17 56 Std Parallel Port Disabled 17 58 Too Many Disks Installed 17 61 Defective Disk 17 62 Disk Full 17 63 Unformatted Disk 17 70 79 messages 18 900 999 messages 18 Activating Menu Cha...

Page 247: ...207 memory cards 196 198 metal shield 197 option cards 196 199 optional drawers 212 options 189 parallel USB interface card 199 print servers 199 transport unit 190 tri port interface card 199 Repeat...

Page 248: ...ss doors 48 loading 88 maximum stack height 95 media supported 79 paper orientation 96 paper sizes supported 79 recommended print side 95 removing 51 tray 4 2500 sheet optional drawer clearing jams 41...

Reviews: