


751/601
7-56
Application functions
7
–
The setting for "Page Number" can be set to a number between –99999 and 99999, and the setting
for "Chapter" can be set to a number between –100 and 100.
–
When specifying a setting for "Starting Page Number", switch the number between positive and
negative by pressing the [
] key.
–
If a negative value is specified, the numbers are not printed until the numbering reaches 1. For
example, if "–1" was specified, the numbers are printed starting with "1" on the third copied page.
–
To print multiple chapters, specify the first page of each chapter using the "Chapters" function. For
details, refer to
"Specifying pages to be printed on the front side ("Chapters" function)" on
page 7-15
.
–
To cancel the "Page Number" function, touch [No].
5
Select a setting under "Page Number Type".
6
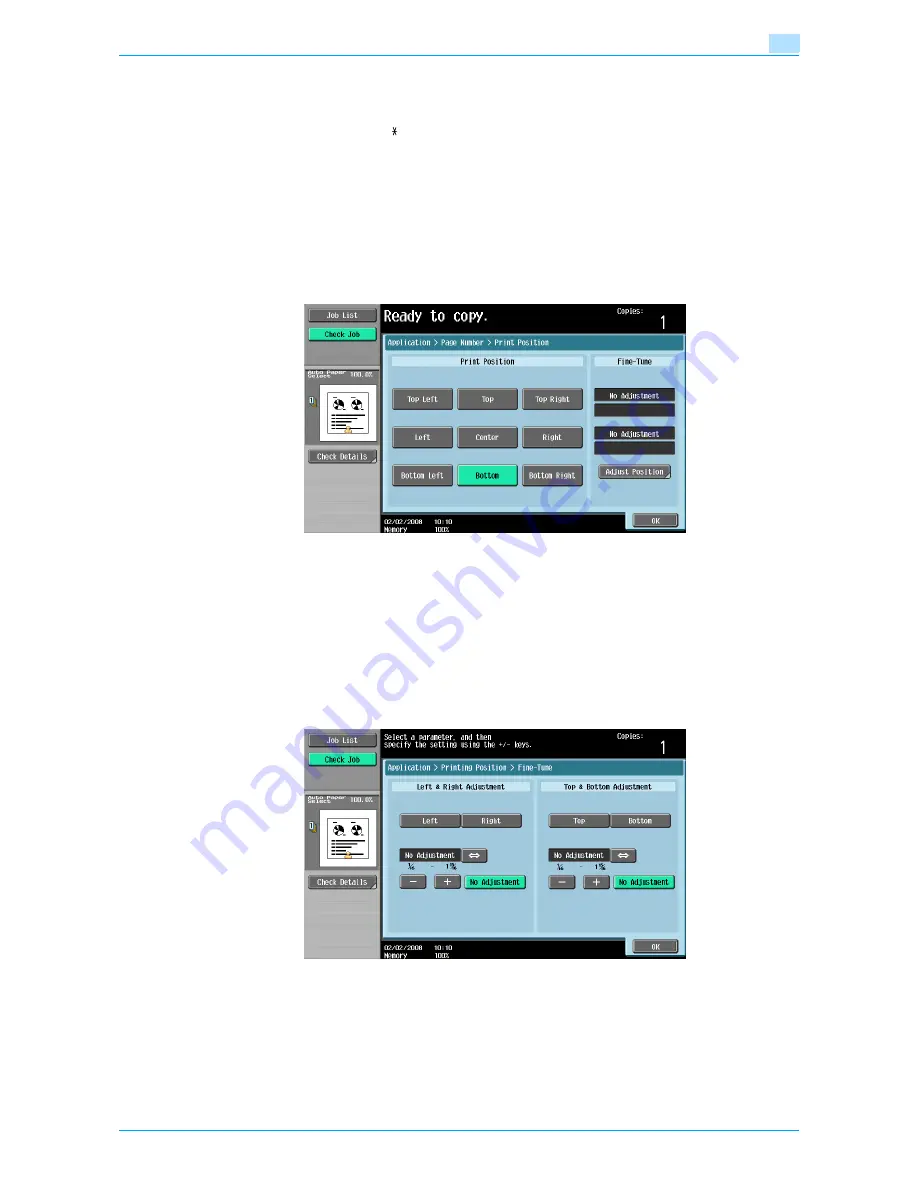
Touch [Print Position], and then select the printing position.
–
To make fine adjustments to the printing position, touch [Adjust Position]. Select the desired
direction under "Left & Right Adjustment" or "Top & Bottom Adjustment", touch [´] to switch
between the integer and the fraction, touch [–] and [+] to specify the adjustment amount, and then
touch [OK].
–
If a decimal value is displayed in the screen, press the [C] (clear) key, and then use the keypad to
type in the adjustment amount. For details on switching between decimal and fraction values, refer
to
"System Settings" on page 11-15
.
–
If a decimal value is displayed in the screen and the specified value is outside the allowable range,
the message "Input Error" appears.
Type a value within the allowable range. If the value was incorrectly entered, press the [C] (clear) key
to erase the value, and then specify the correct value.
?
What are the limits on the adjustment amount?
%
The print position can be finely adjusted in 1/16 inch increments.
?
Can no adjustment be made?
%
To make no left/right or up/down adjustments, touch [No Adjustment].
7
If necessary, specify the other settings.
Summary of Contents for bizhub 601
Page 1: ...User s Guide Copy Operations...
Page 16: ...751 601 x 15 Explanation of manual conventions...
Page 17: ...751 601 x 16...
Page 20: ...1 Before Making Copies...
Page 78: ...2 Basic copy operations...
Page 105: ...751 601 2 28 Basic copy operations 2 Binding Position screen Zoom screen Frame Erase screen...
Page 149: ...751 601 2 72 Basic copy operations 2 4 Touch OK and then touch OK again...
Page 157: ...3 Additional copy operations...
Page 187: ...4 Troubleshooting...
Page 235: ...5 Specifications...
Page 246: ...6 Copy paper originals...
Page 276: ...7 Application functions...
Page 298: ...751 601 7 23 Application functions 7 6 Press the Start key...
Page 316: ...751 601 7 41 Application functions 7 7 Press the Start key...
Page 355: ...8 Replacing toner cartridges and staple cartridges and emptying hole punch scrap box...
Page 376: ...9 Care of the machine...
Page 383: ...10 Managing jobs...
Page 397: ...11 Utility mode...
Page 476: ...12 Authentication Unit Biometric Type AU 101...
Page 501: ...13 Authentication Unit IC Card Type AU 201...
Page 527: ...14 Appendix...
Page 534: ...15 Index...
Page 538: ...http konicaminolta com Copyright 2008 2008 8 A0PN9551 CO 00...


