102
ORTHOPANTOMOGAPH
OP
2D
7. Replacing parts
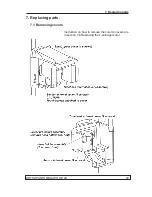
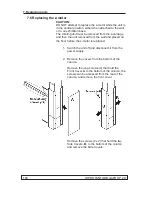
Loosen the 4 nuts that hold the rotating unit
to the upper shelf and then slide the rotating
unit off of the upper shelf and place it on the
ground.
5.
CAUTION:
HEAVY OBJECT; THE FOLLOW-
ING TASK REQUIRES TWO PEOPLE.
Remove the unit from the wall or exhibition
stand and lay it on the
fl
oor.
For information on how to do this refer to the
installation instructions and follow, in reverse
order, the instructions on how to attach the unit
to the wall or exhibition stand.
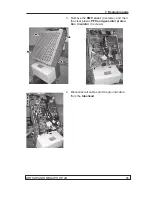
6. Loosen the nuts (4) that hold the column upper
front plate in position. There are two at the top
of the front plate and two at the bottom.
Summary of Contents for ORTHOPANTOMOGAPH OP 2D
Page 2: ......
Page 4: ...IV ORTHOPANTOMOGAPH OP 2D Contents...
Page 24: ...14 ORTHOPANTOMOGAPH OP 2D 2 Unit Description 2 3 Unit dimensions...
Page 32: ...22 ORTHOPANTOMOGAPH OP 2D 2 Unit Description...
Page 33: ...2 Unit Description ORTHOPANTOMOGAPH OP 2D 23 2 6 Block diagram...
Page 34: ...24 ORTHOPANTOMOGAPH OP 2D 2 Unit Description 2 7 Fuse diagram...
Page 38: ...28 ORTHOPANTOMOGAPH OP 2D 2 Unit Description...
Page 43: ...3 Circuit Boards L1200 ORTHOPANTOMOGAPH OP 2D 33 L1200 Block Diagram...
Page 46: ...36 ORTHOPANTOMOGAPH OP 2D 3 Circuit Boards L1500 L1500 Block diagram...
Page 50: ...40 ORTHOPANTOMOGAPH OP 2D 3 Circuit Board L1600 L1600 Block diagram...
Page 54: ...44 ORTHOPANTOMOGAPH OP 2D 3 Circuit Boards L1700 L1700 Block Diagram...
Page 57: ...3 Circuit Boards L1800 ORTHOPANTOMOGAPH OP 2D 47 L1800 Block diagram...
Page 61: ...3 Circuit Boards P1910 ORTHOPANTOMOGAPH OP 2D 51 P1910 Block diagram...


